Introduction
SAMi Subscriber User Guide provides the information necessary for developers, product managers and administrators to follow the user instructions provided herein and perform specific operations. The authorized users are allowed to access the SAMi product effectively and perform different user-based operations with respect to API marketplace subscription. The user guide also helps the marketplace subscribers in-turn to easily build their apps using these APIs in collaboration with our developers.
Overview
SAMi helps technology consumers to leverage the benefits of our most popular Smart API product available in the Marketplace that can be utilized to build apps in collaboration with our developers and consumer development teams and assist in smoothly integrating with different domain applications. Our consumers and developer communities from our consumers can visit the API Marketplace, and subscribe to these API products, and try them out to make sure they work perfectly to perform specific functions when integrated with their customized applications.
These are the key features of SAMi, but is not limited to, the following:
- SAMi Marketplace and Configuration – A unique API marketplace product that can be easily configured with an intelligent rate card system
- SAMi Product Management – A Unified Product Catalog Management of multiple Product categories. Set Recommendation of Products for user consumption.
- Subscription Management – A Centralized Subscription Management for all category API-products. Active & Inactive subscription listings with individual Active durations & Subscription Approval Management. Profile Management of individual developers, Product Managers, and Administrators. Product Unsubscribe and App disablement options are available
- Monetisation – Helps Monetize assets faster. Create Multiple rate plans for users. A user-specific product rate-plan capability. Billing Reports with earnings per product and rate plans based. PayPal integration for monetization. Recurring payments for API subscriptions
- Asset Management – Manage all assets like SDKs, API specifications, Product Features & FAQs from a single pane. Reuse Assets for Products resulting in efficient portfolio consolidation. Create & manage Product SKUs with versioning & permissions for users. Quick search capabilities and display customizations for individual assets’ documentation
- Apps & Teams – Define Apps & create teams to collaborate on the development Invite developers/subscribers for Apps. Built-in approvals workflow capability. Unsubscribe users and apps
- API Consumer Management – A Unified catalog for all API gateways. Guest user onboarding & unified catalog. API Product Subscription Management System, Application Alerts, Notifications & Announcements broadcast. Built-in Sandbox capabilities. A Real-time Theming & UX capabilities
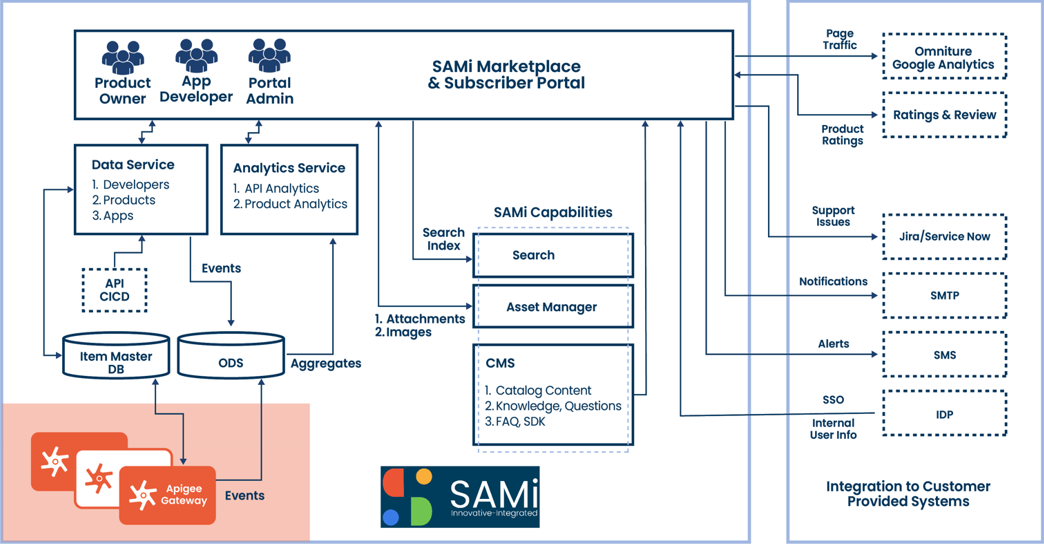
- SAMI Architecture – a SaaS based platform product and its technology stack
- System environment or special conditions, if any
Getting Started
The user registration page will provide you with the necessary instructions for registering as a subscriber to the SAMi portal and performing particular actions on the Portal.
User Registration
The user registration page will allow you to register as a user to SAMi portal.
- Type the SAMi Portal URL in the Internet Browser address bar, and Press Enter.
The SAMi page is displayed.

- Click on Sign In
The Log In Page is displayed.

- In the Sign In page, click Sign Up
The Registration page is displayed.
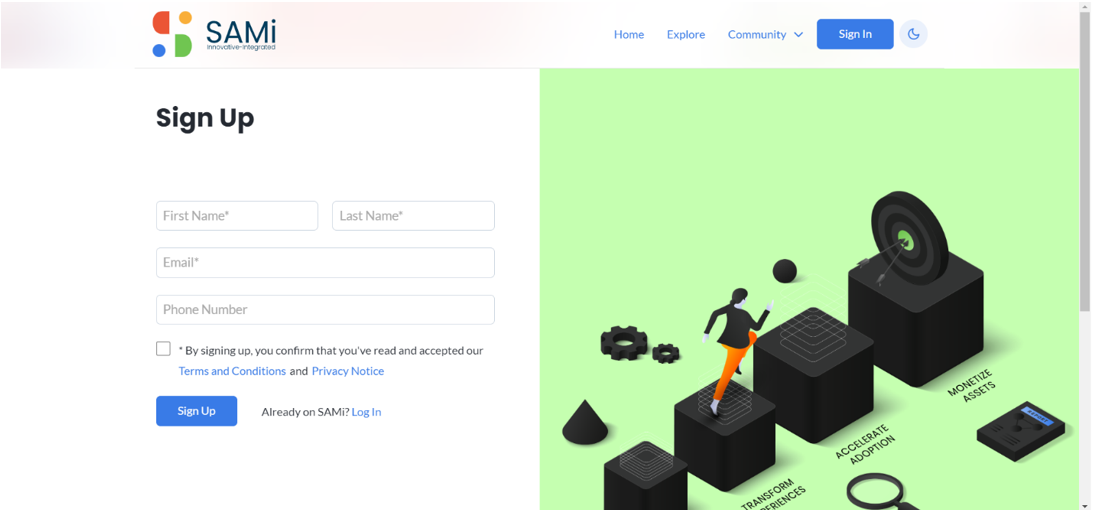
- In the Registration page, do the following:
- Enter the First Name and Last Name in the respective textboxes.
- Enter the Email address in the respective textbox.
- Enter the Phone Number in the respective textbox.
- Click to check the “By signing up you confirm that you’ve read and accepted our Terms and Conditions and Privacy Notice”
- Click Sign Up.
- An email is sent to the approver (Administrator), the Admin will review and approve it. And after approval, grant the requested role-based access.
Forgot Password
The forgot password feature allows you to change your existing password if you’ve forgotten it or wanted to change it for security reasons.
To change the password, do the following:
- In Sign In page, click Forgot your Password?

The New Password creation page is displayed.
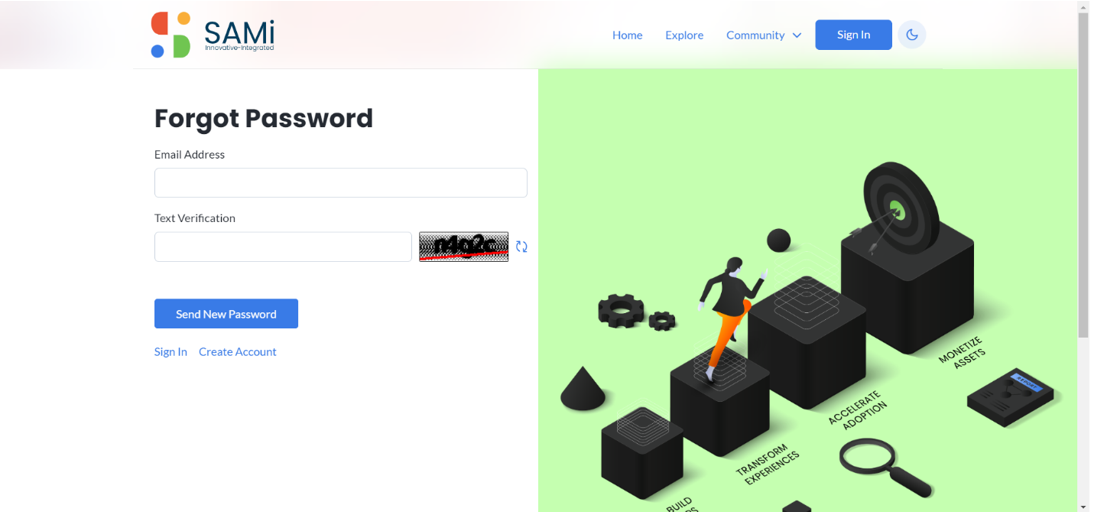
- In New Password creation page, enter your Email Address in the textbox.
- Enter the Text Verification, by viewing the captcha, if it’s not clear click on refresh icon to see a new captcha and enter it.
- Click Send New Password in the textbox.
Sign In to SAMi
The Sign In page will allow you to login to the SAMi Portal with the help of your valid email and password in the Registration page.
To Sign In to SAMi portal, do the following:
- Type the SAMi Portal URL in the Internet Browser address bar, and Press Enter.
The SAMi Sign In page is displayed.
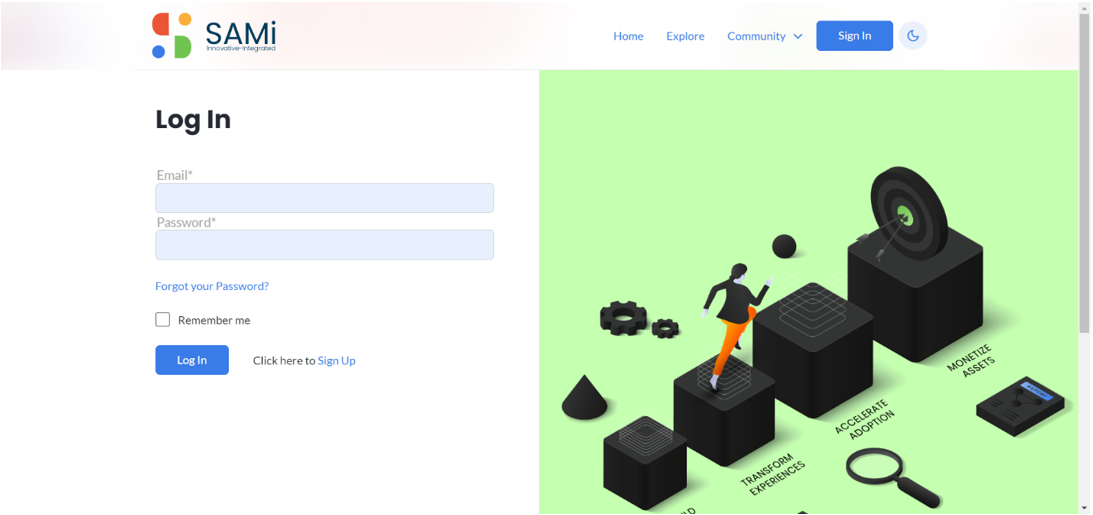
- In the Sign In page, enter the Email Address, and Password in respective textboxes.
- Click to check the Remember Me checkbox, only if you wish to save your credential in the browser, and next time when you try to login, the credentials auto-populate in the textboxes.
- Click Sign In.
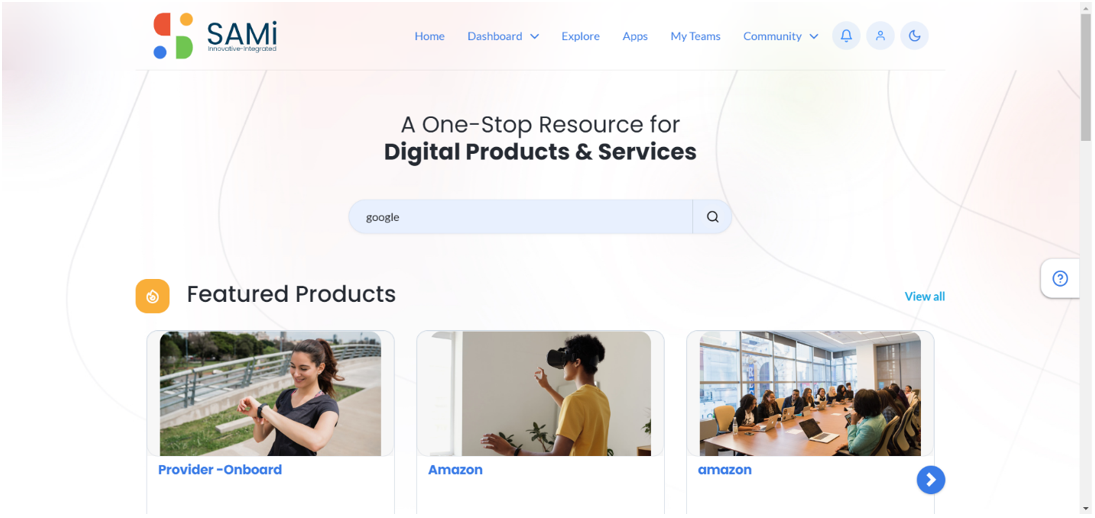
You will Sign In to the SAMi Portal successfully, and the SAMi Home page is displayed.
User Access Considerations
SAMi as a product has different user personas. There are specific users who can access SAMi – an API marketplace provided with different user roles. The table given below describes different roles and their access permissions to the product.
The following roles are most common, who are authorized to access the application most.
- A Developer
- Product Owner
- System Administrator
- ONEAPI Team
| Developer | Product Owner | System Administrator | ONEAPI Team |
|
|
|
|
Developer Persona
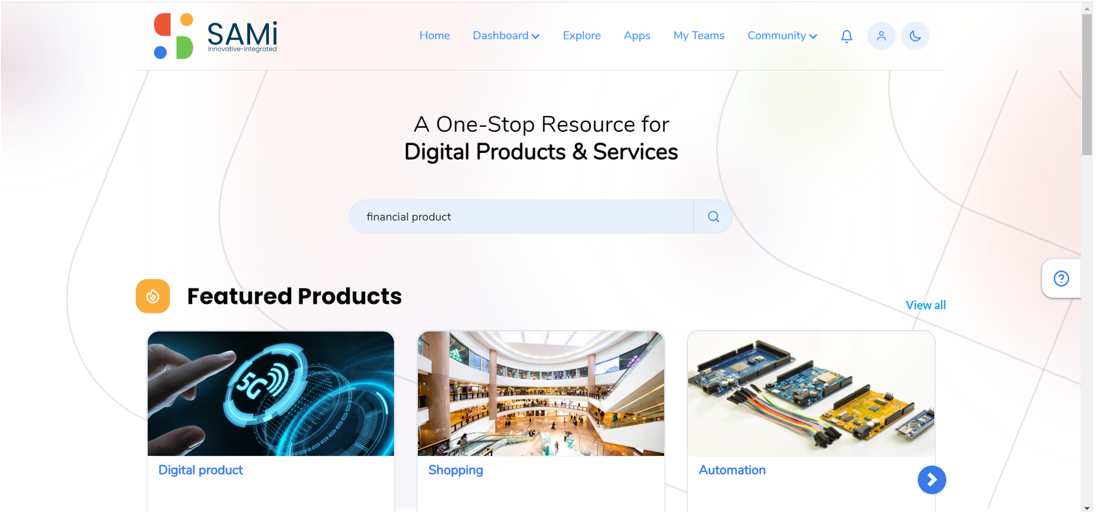
Scenario-1: Searching a Product by a Developer from Home page
To search for a product at SAMi Portal, you need to login as a Developer. Once you login to the SAMi Portal, you will view the Homepage. At SAMi Homepage perform the following:
Login as a Developer by providing the user credentials:
- Enter the Email address in the textbox.
- Enter the Password in the textbox.
- Click Sign In.
The Homepage is displayed.

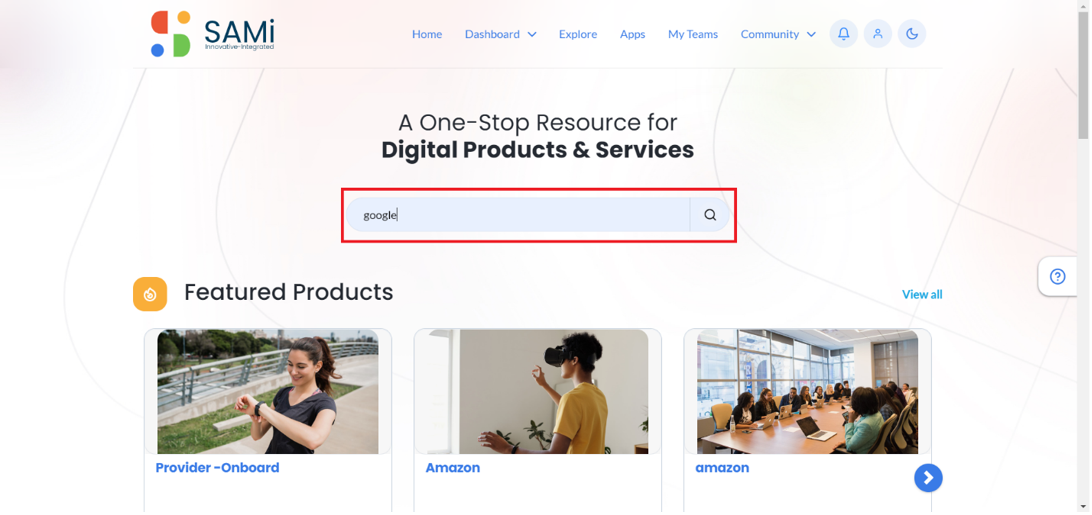
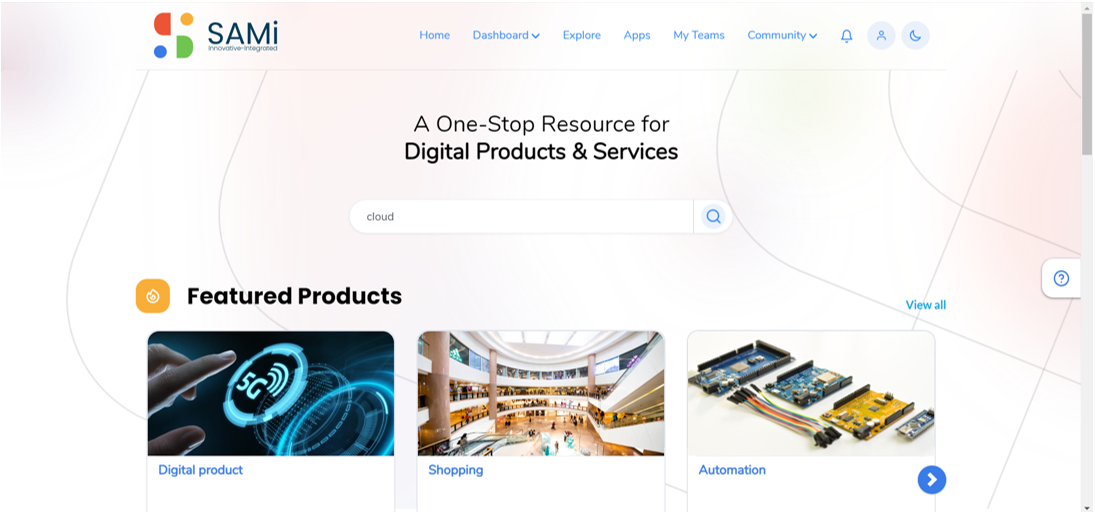
- In the Homepage, Search the product by entering the Product name/ Keyword in the search field.
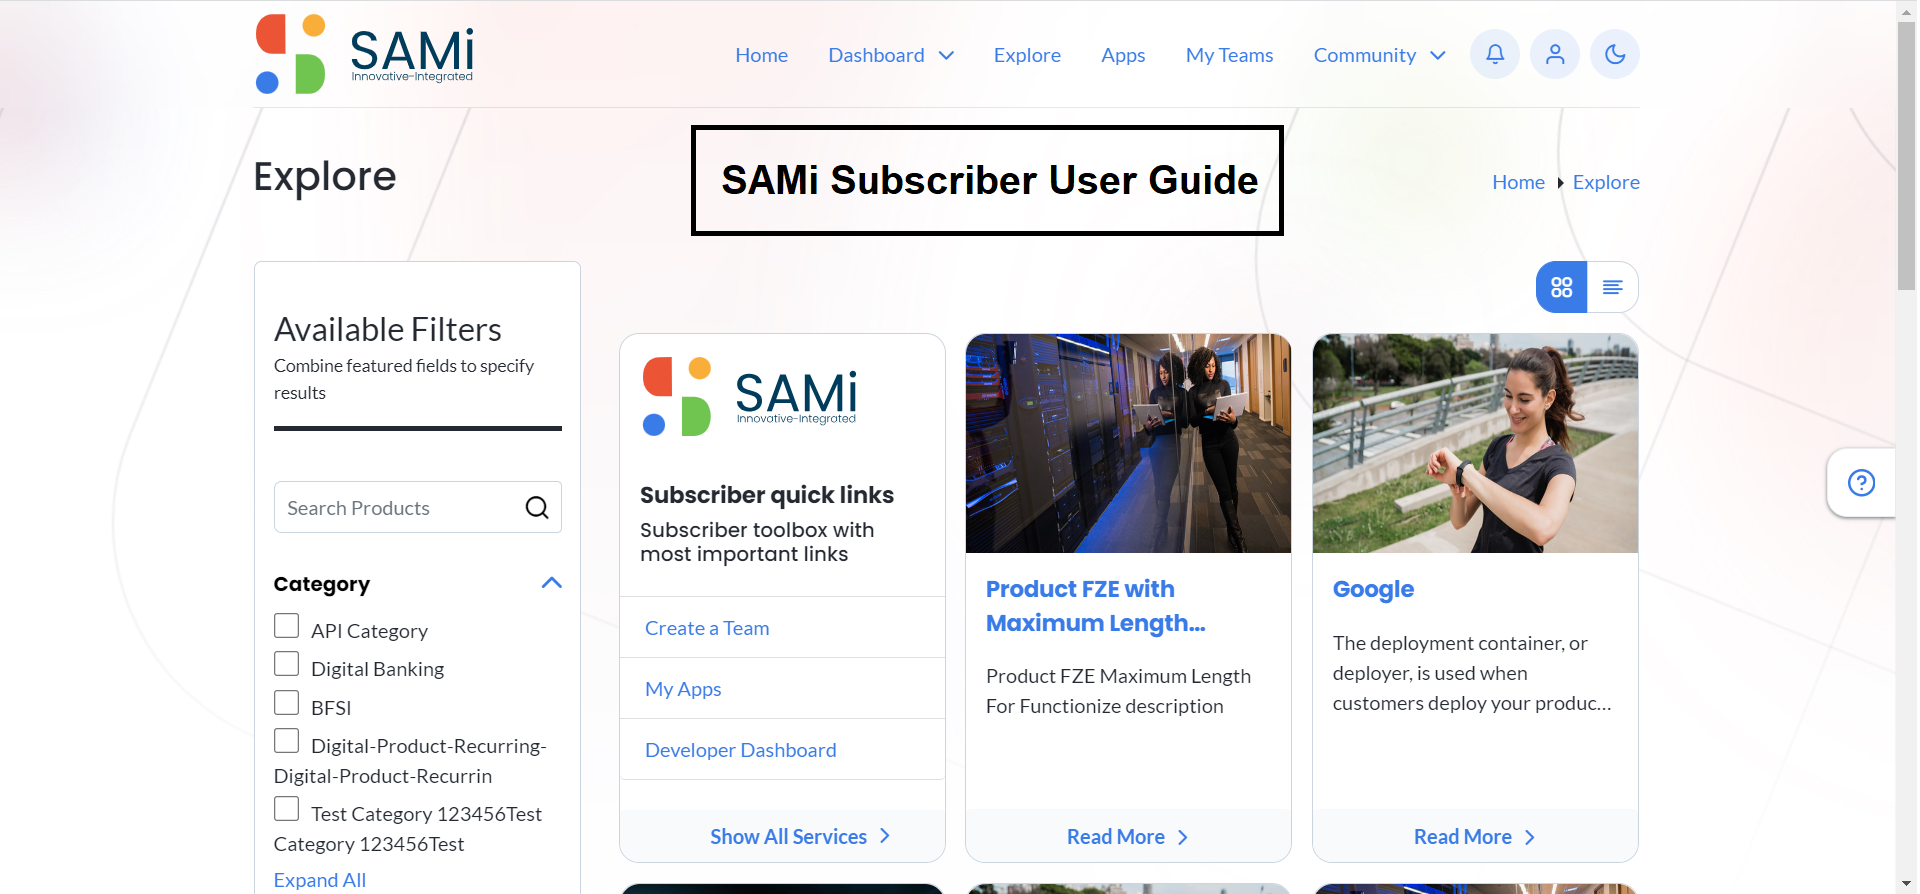
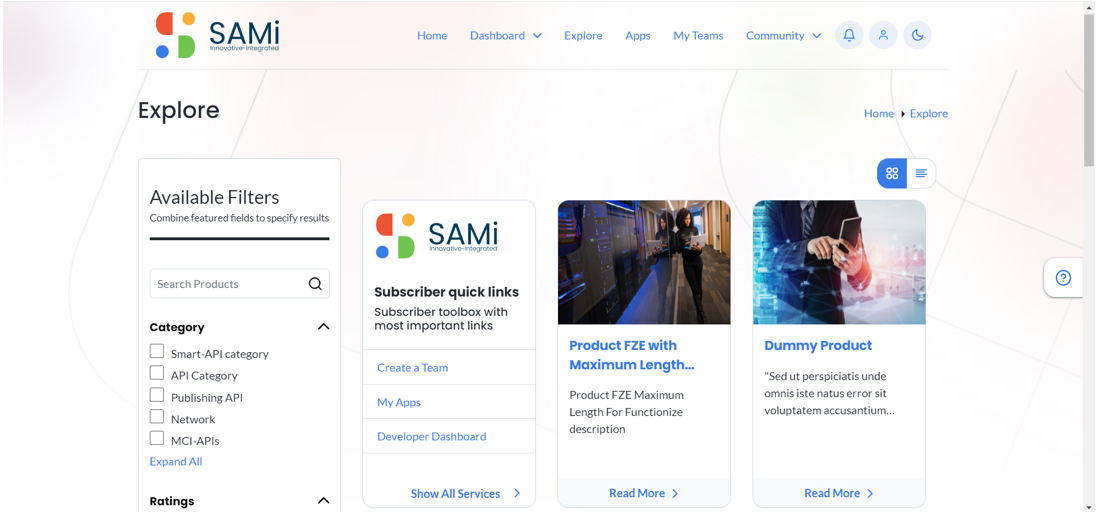
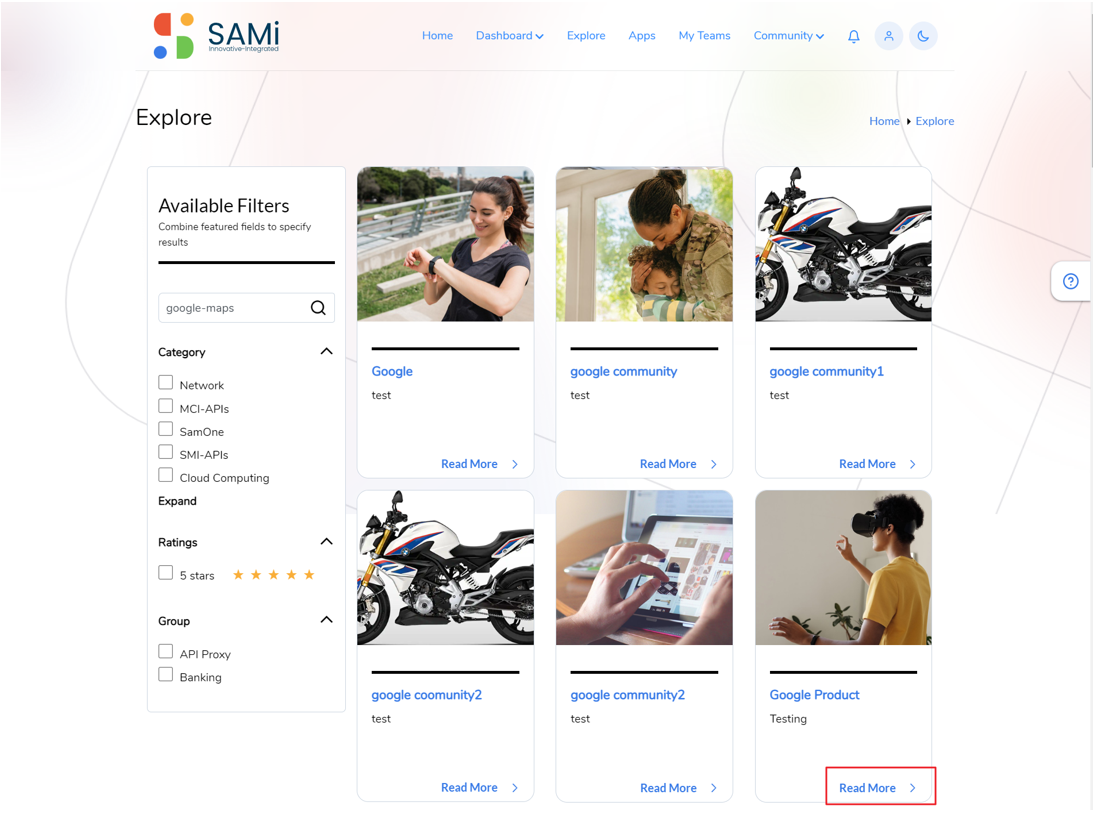
The Featured Products page (Explore Page) is displayed with the Product Searched.

- In the Explore page you have the option to view the product in Card View or List View. Click on the List icon to view the products in list view. Similarly, click on Card icon to return to card view.
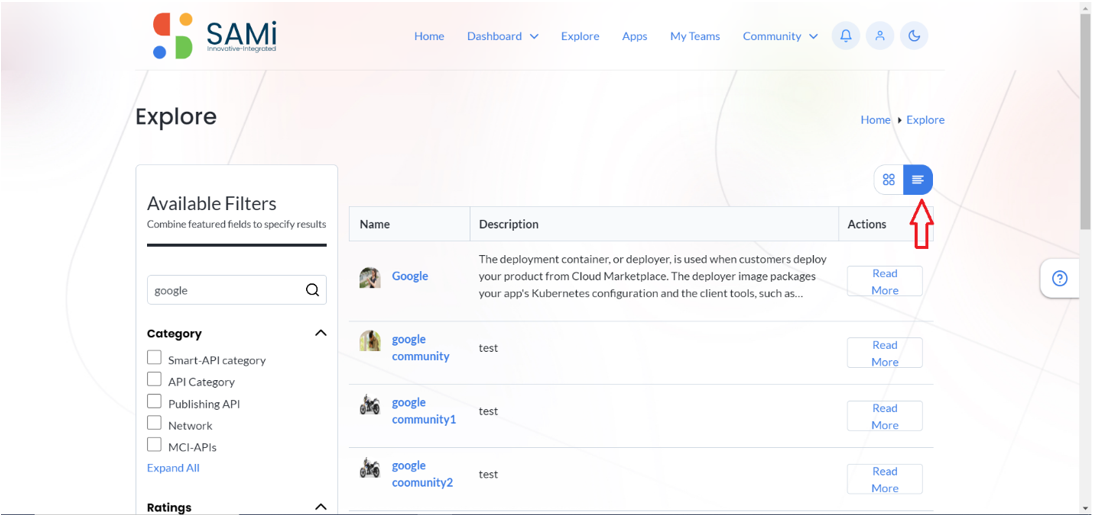
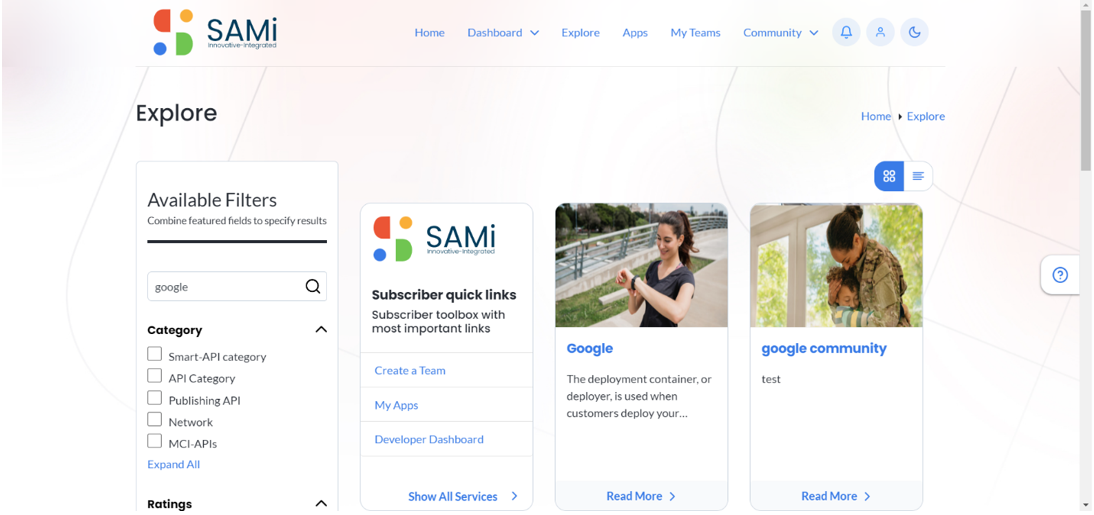
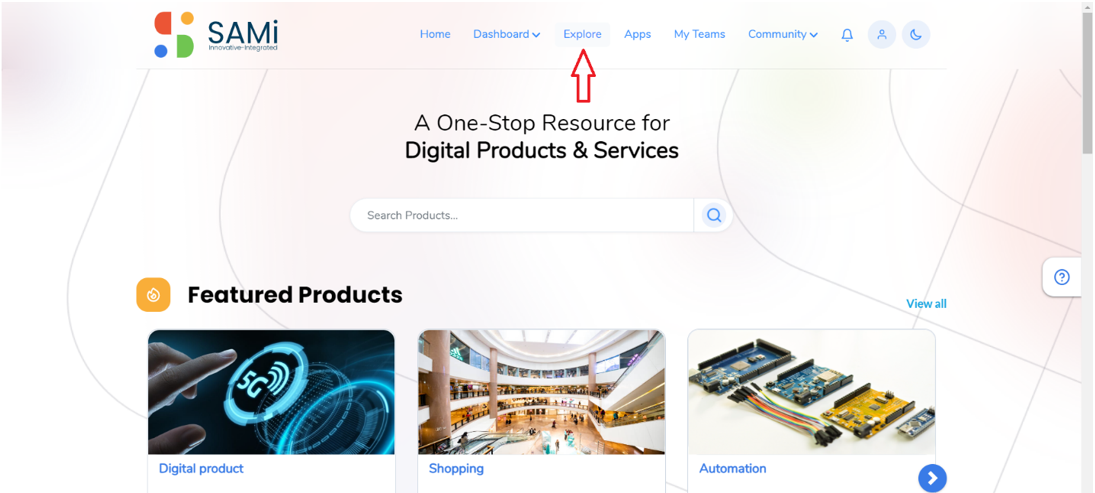
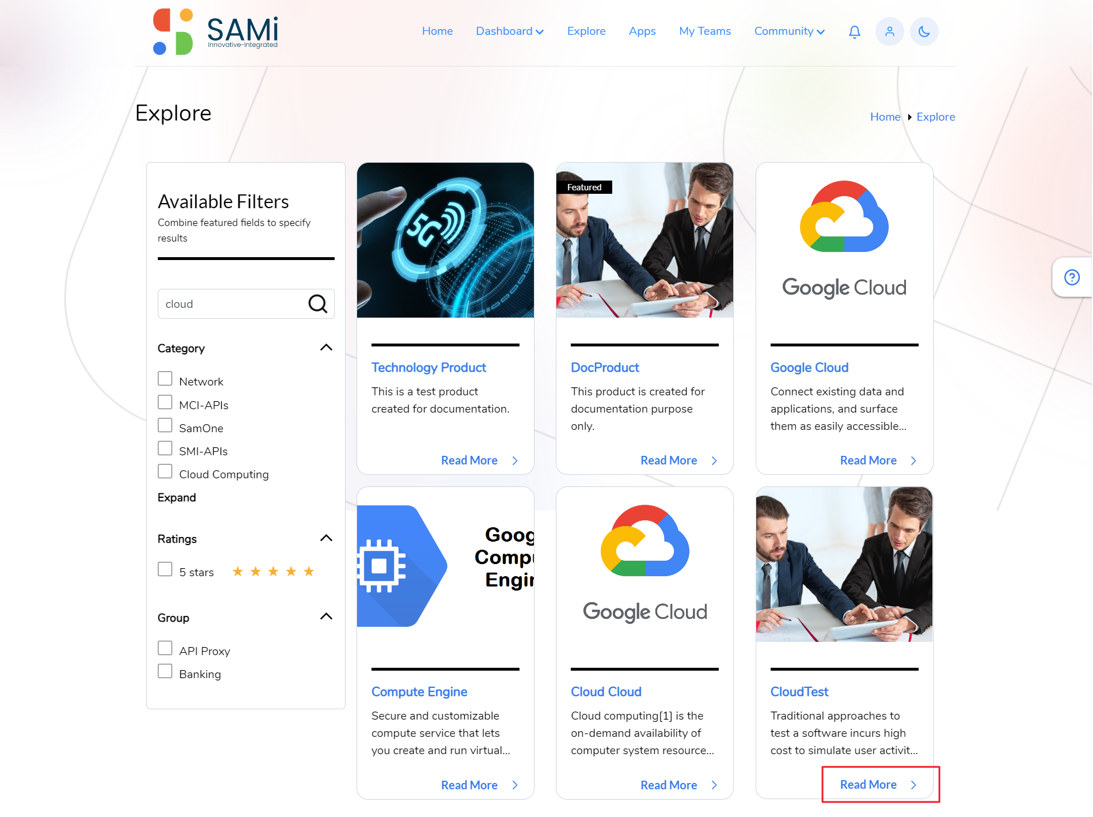
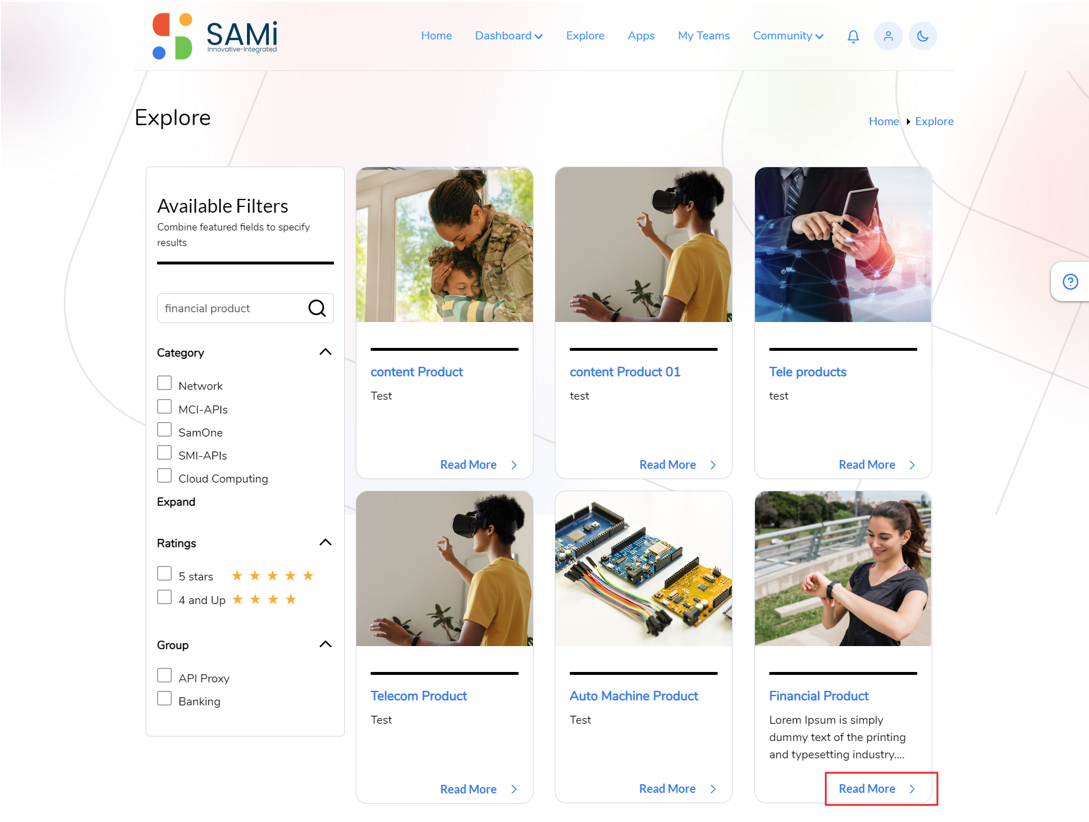
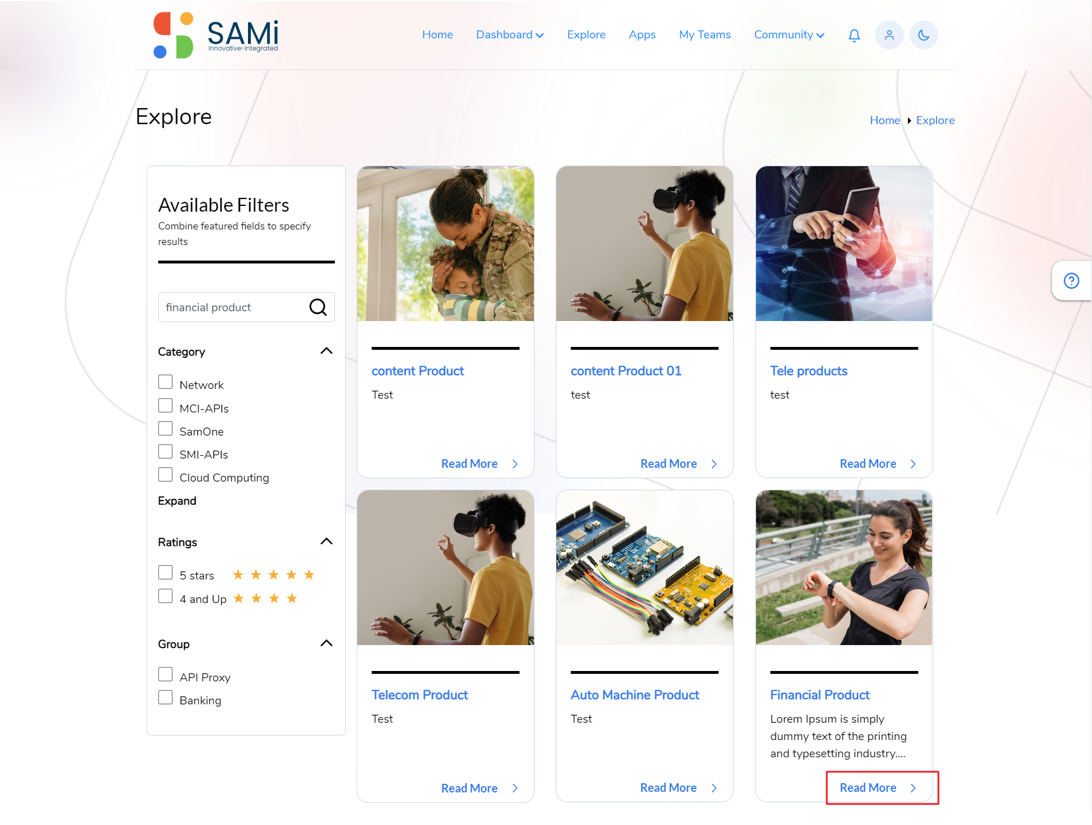
Scenario 2: Search Product from Explore Page.
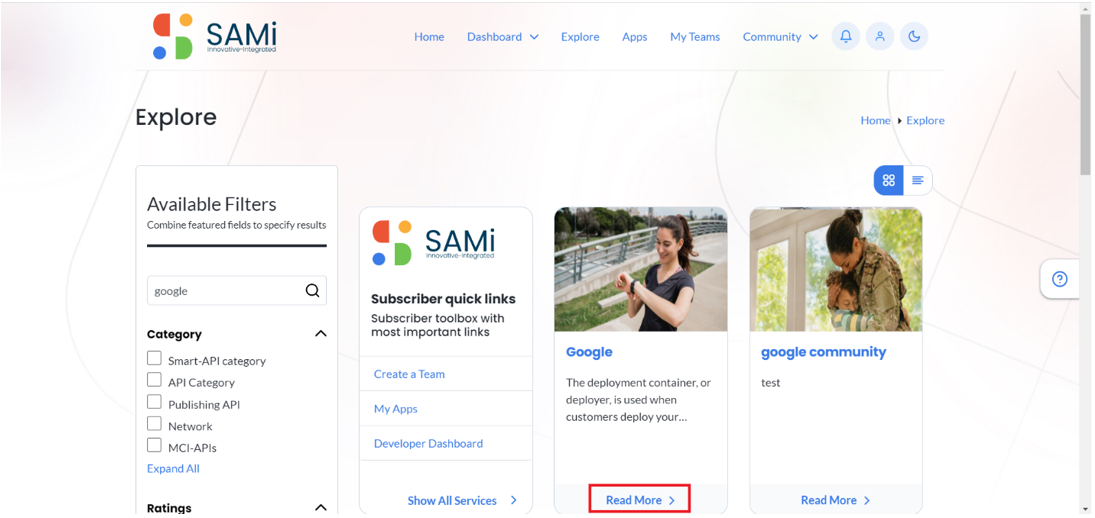
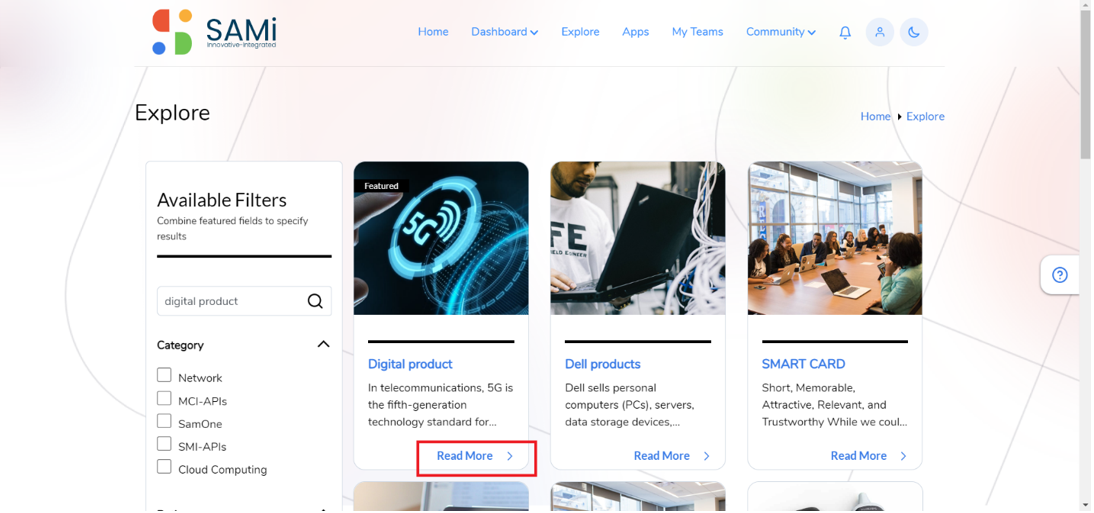
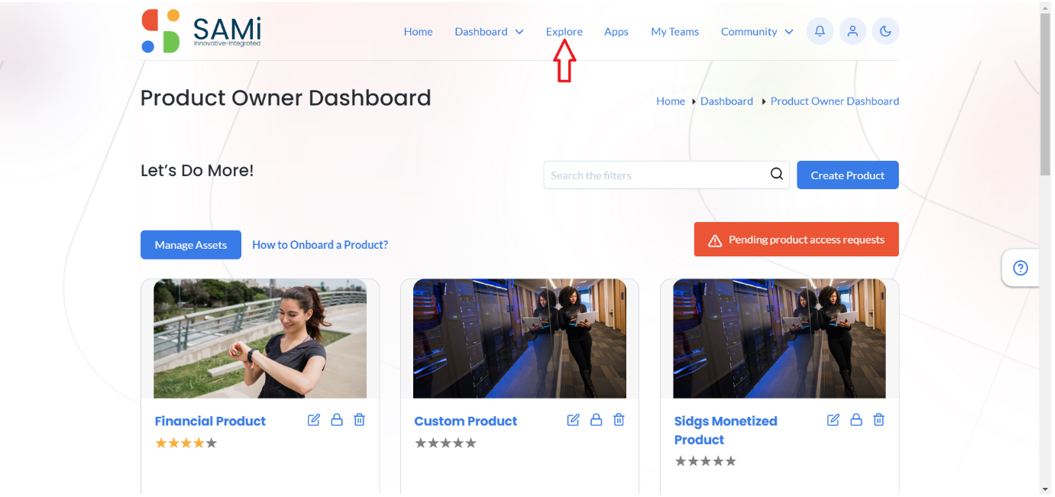
In Home page, click on Explore page from the main menu.

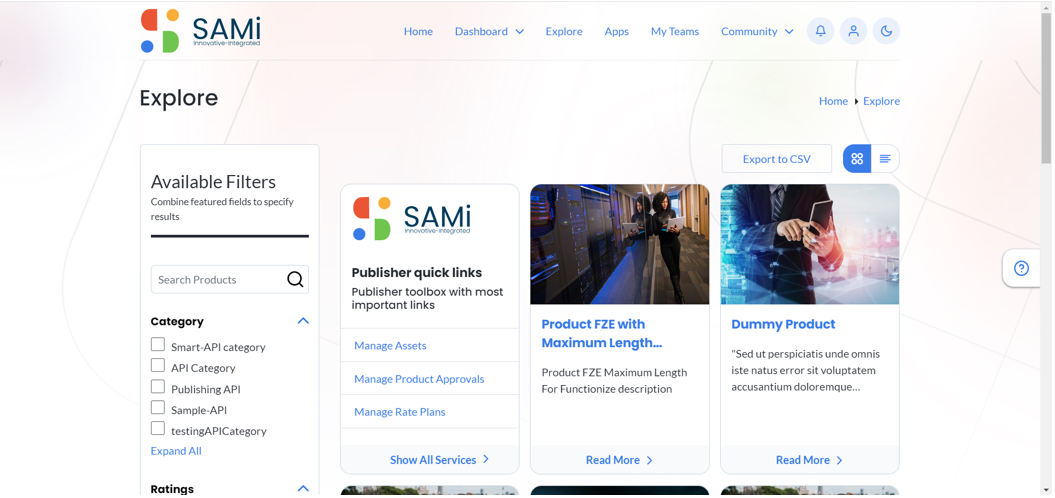
The Explore page appears.
- In Explore page, enter the Product name in the Search field or select the Category using the checkboxes to view relevant products.
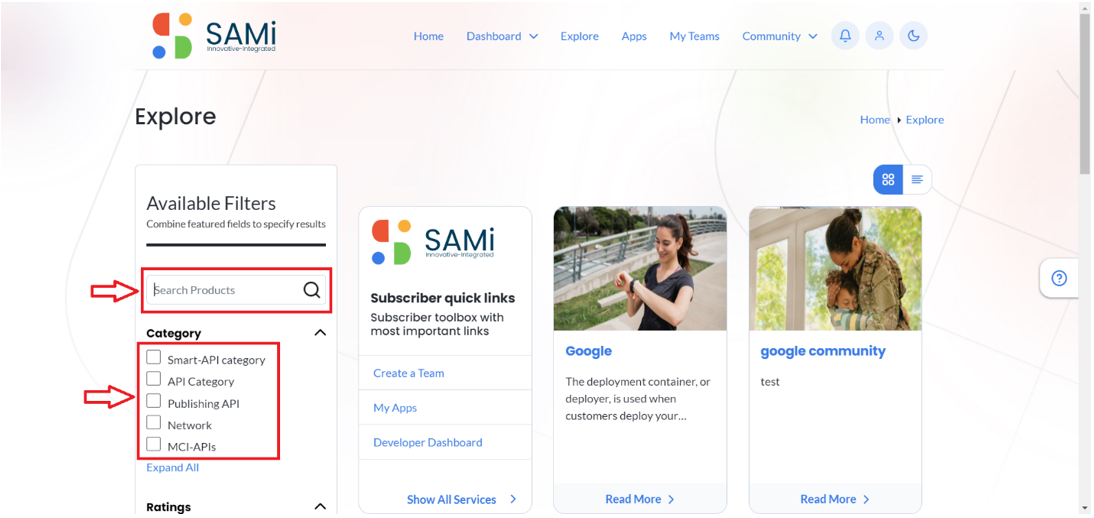
The relevant searched products are displayed.
Scenario-3: Search a Product using Featured Products
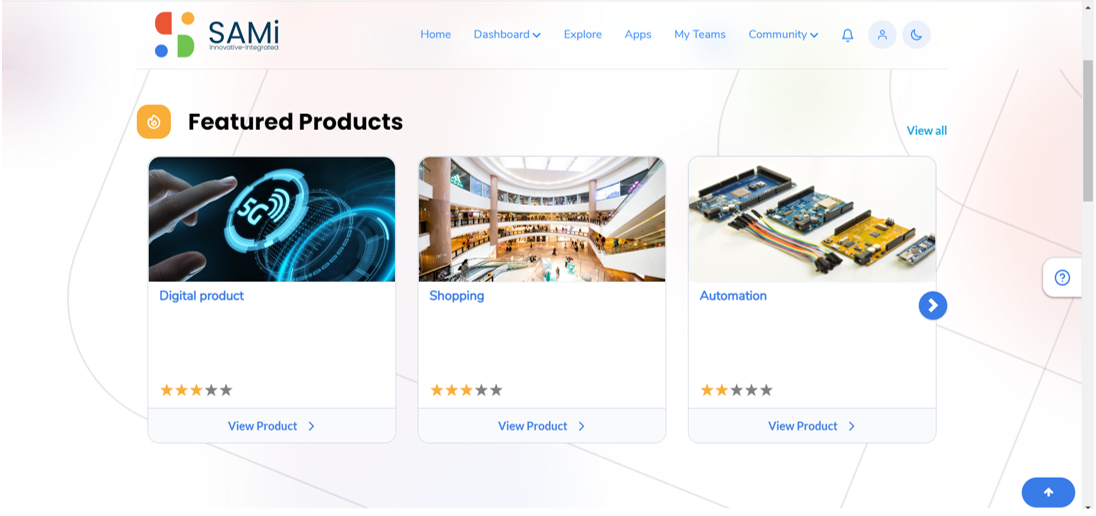
To search for a SAMi product, you can Click on Featured Products “View All” Option in the Home Page. The Explore page appears listing all the products, in a page-wise view. To view Product details from Homepage, do the following:
Login as a Developer by providing the user credentials:
- Enter the Email address in the textbox.
- Enter the Password in the textbox.
- Click Sign In.
The Homepage is displayed.

- In the Homepage, Click on “View All” option in the Featured Products.
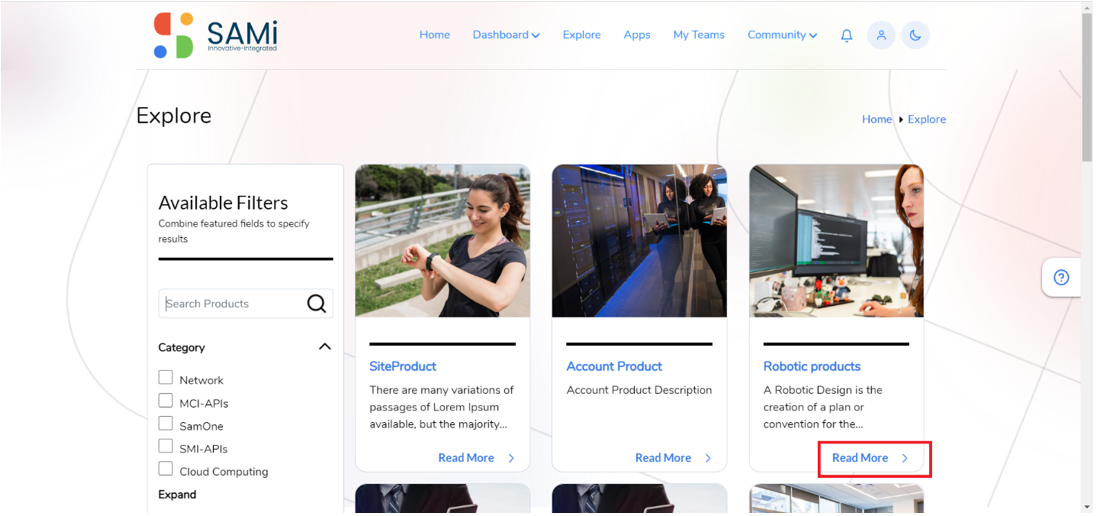
- The Explore page is displayed to view products, select a Product to Explore. Click on Read More to view product details.
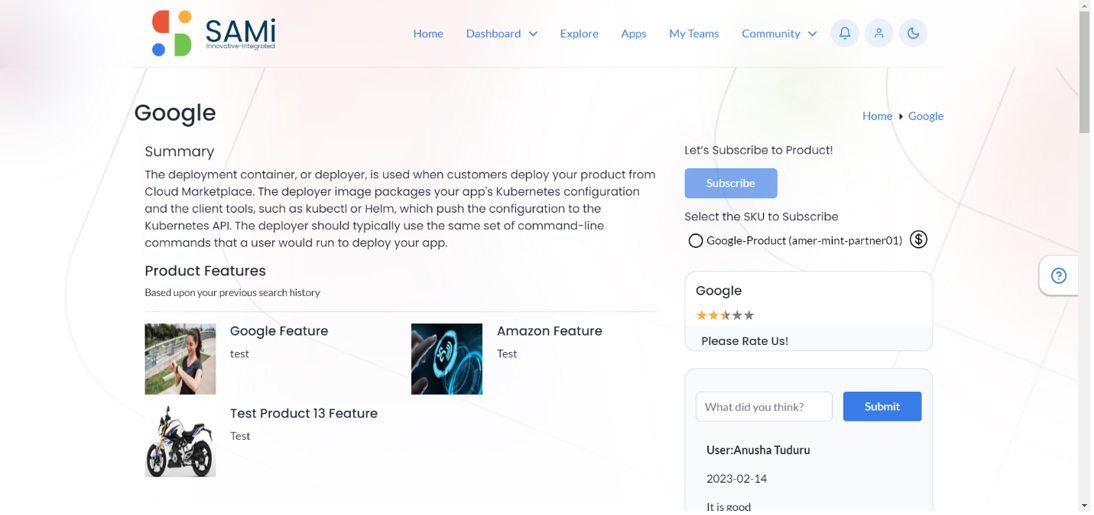
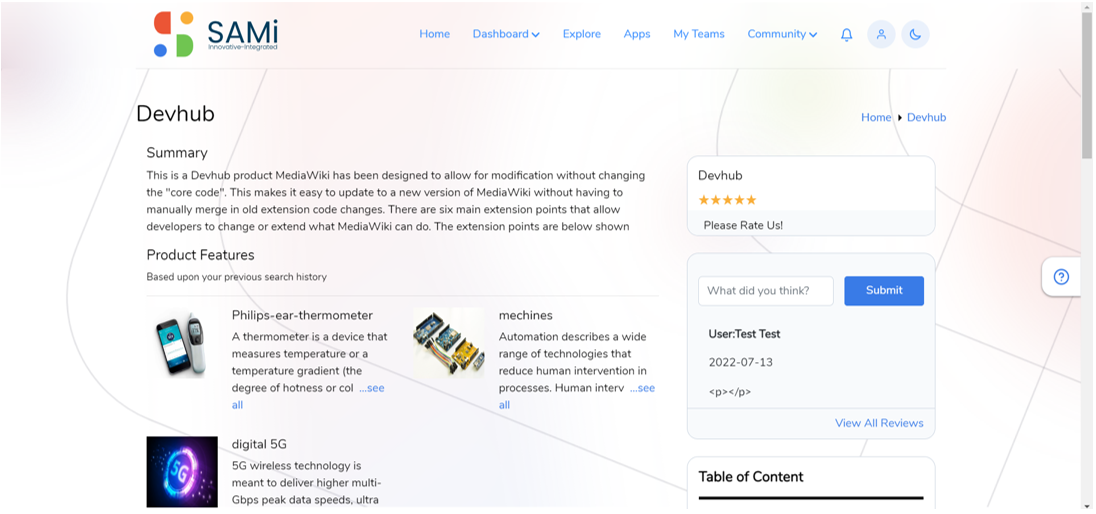
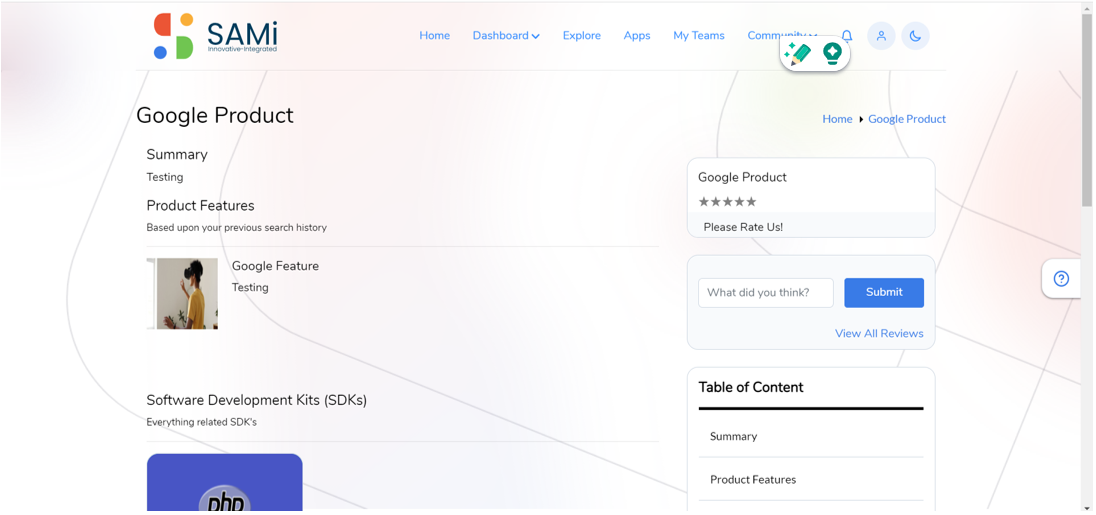
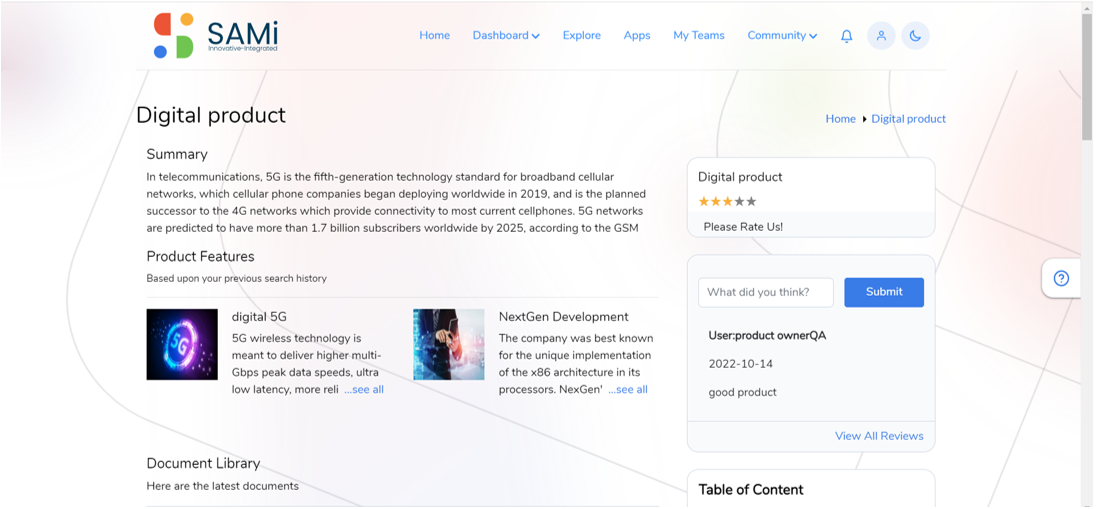
- Click on any product, it will take you to the Product detail page. Can be able to see the Product Summary, Product Features, Product Specs, Product FAQ’s, Document Library, To Rate the Product, write a Review Where you will be able to subscribe the product.
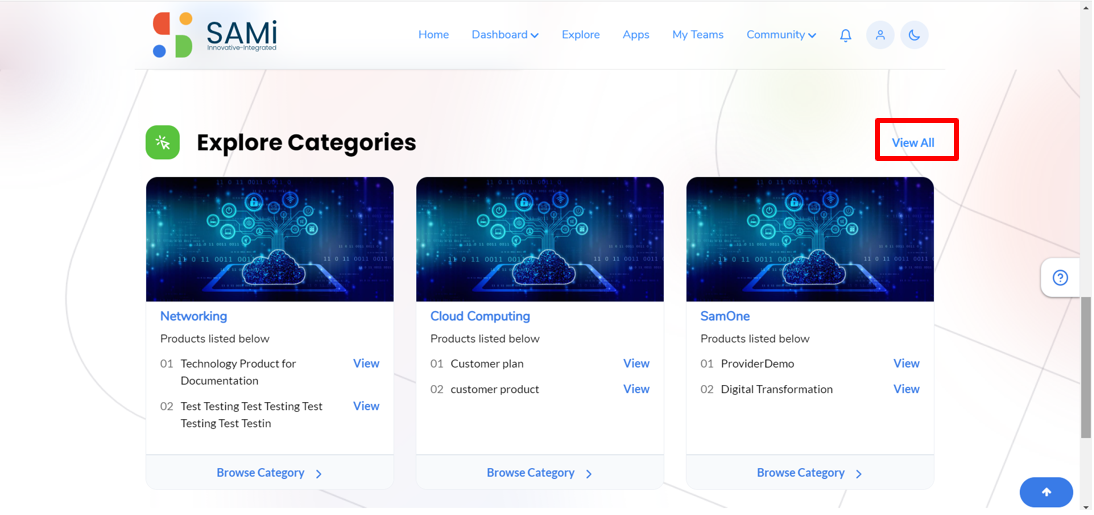
Workflow 2: Browse Explore Categories
Scenario 1: Browse Explore Categories from the Home Page
The developer will be able to browse different categories from the SAMi Portal Home page. As a developer, you will be able to browse the Explore Categories from the Home page.
Login as a Developer by providing the user credentials:
- Enter the Email address in the textbox.
- Enter the Password in the textbox.
- Click Sign In.
The Homepage is displayed.

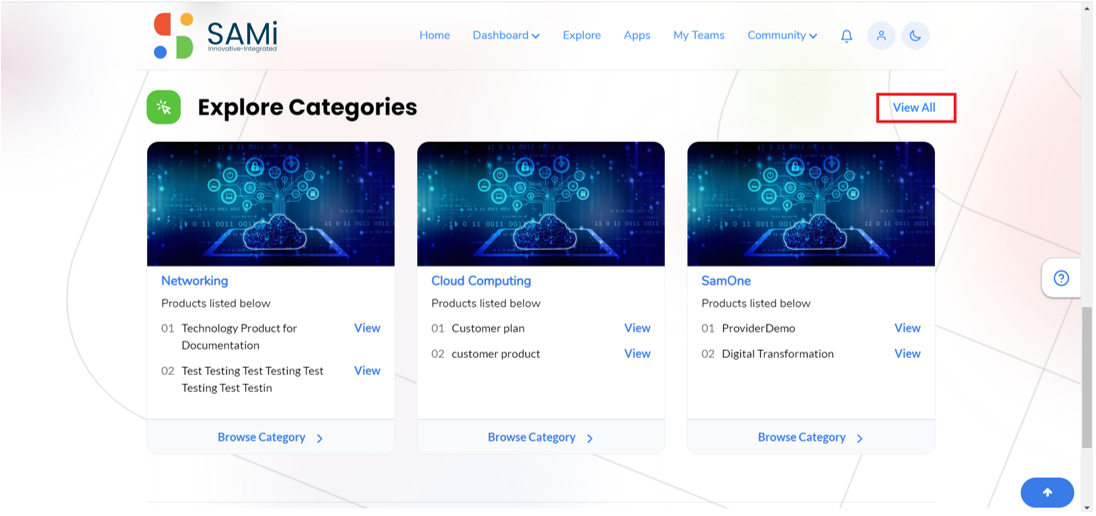
- Scroll down the Home page to view Explore Categories.

- Click on View All link to view all the product categories.
- To open a product, select a Product click on Read More on any product card.
The product summary page appears for you to view all Product details or subscribe.
Scenario 2: Browse Explore Categories from the Explore Page
You will be able to browse the Explore Categories from Explore page.
Login as a Developer by providing the user credentials:
- Enter the Email address in the textbox.
- Enter the Password in the textbox.
- Click Sign In.
The Homepage is displayed.

- In Home page, click on Explore option from main menu.

The Explore page appears.
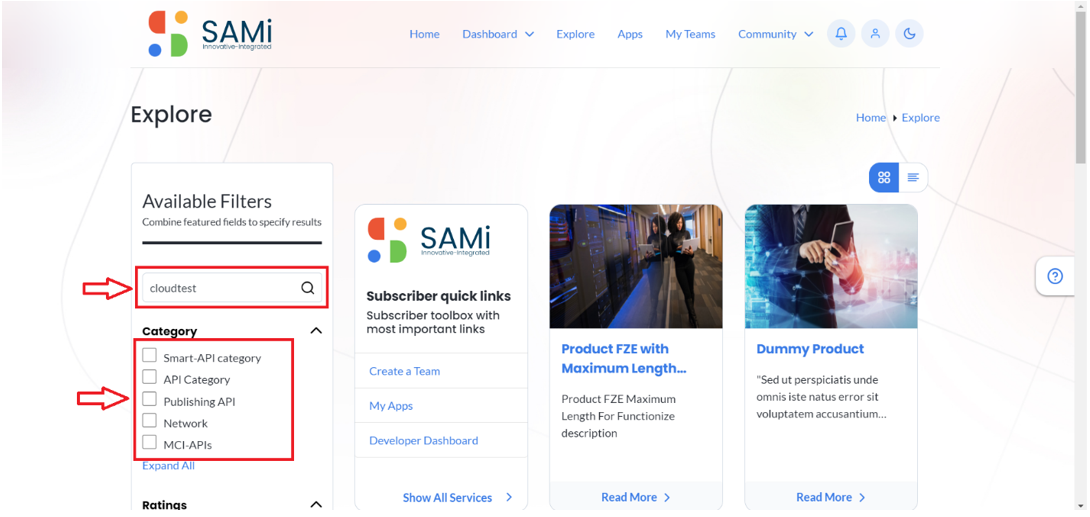
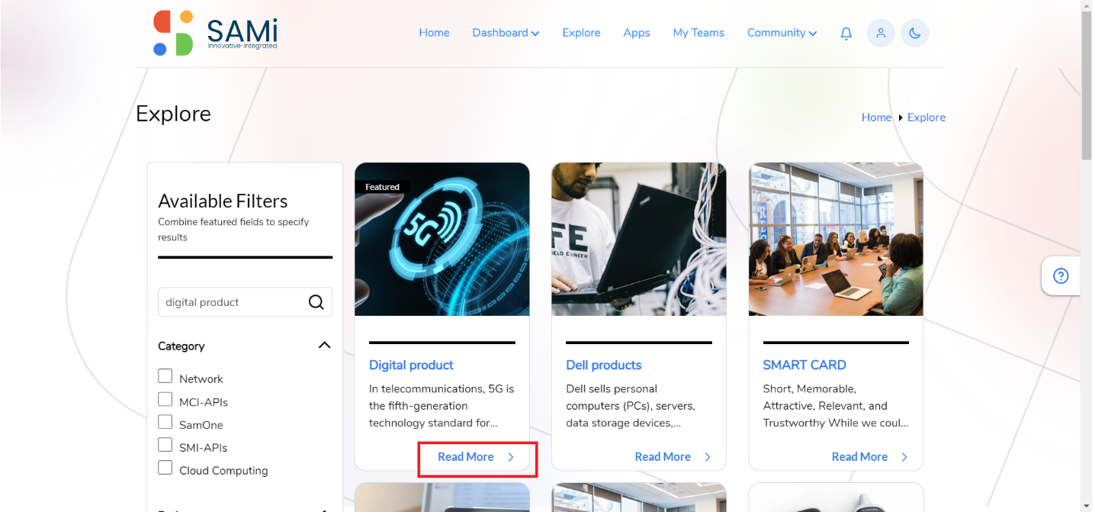
- Enter the product name in the Search field and press Enter or check at the relevant product Category to filter and search the product.

The product search results appear. - Click on Read More link to view the product summary page.
 On the Summary page, you will be able to see all the Product details and subscribe to the product.

Workflow 3: View Product Details Page
Scenario 1: View Product Detail Page from the Home Page (Featured Product)
From the Home Page, the user may access the Product Details page. As a subscriber, you may search for a product or visit the Home page to view the Featured Products in order to access the Product Detailed Page.
To View Product details from Homepage, do the following:
- Go to Homepage and view the Featured Products.

- Swipe on the right arrow to navigate and view more featured products.
- Click on View all link to view all the Featured products in the Explore
- In the Explore page, select any Product and click on Read More of any of the product cards.
You will be navigated to the product summary page. 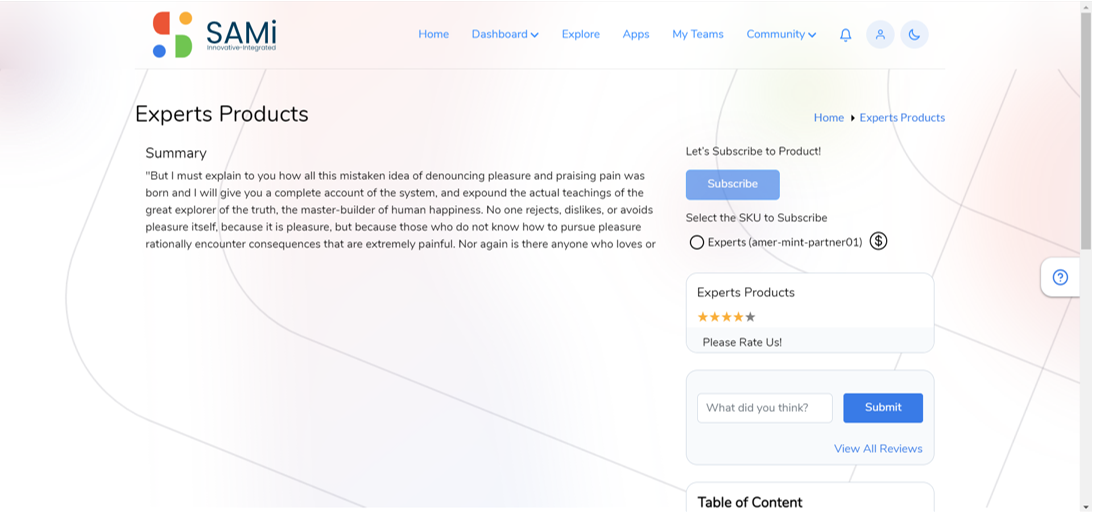
Scenario 2: View Product Detail Page from the Home Page (Explore Categories)
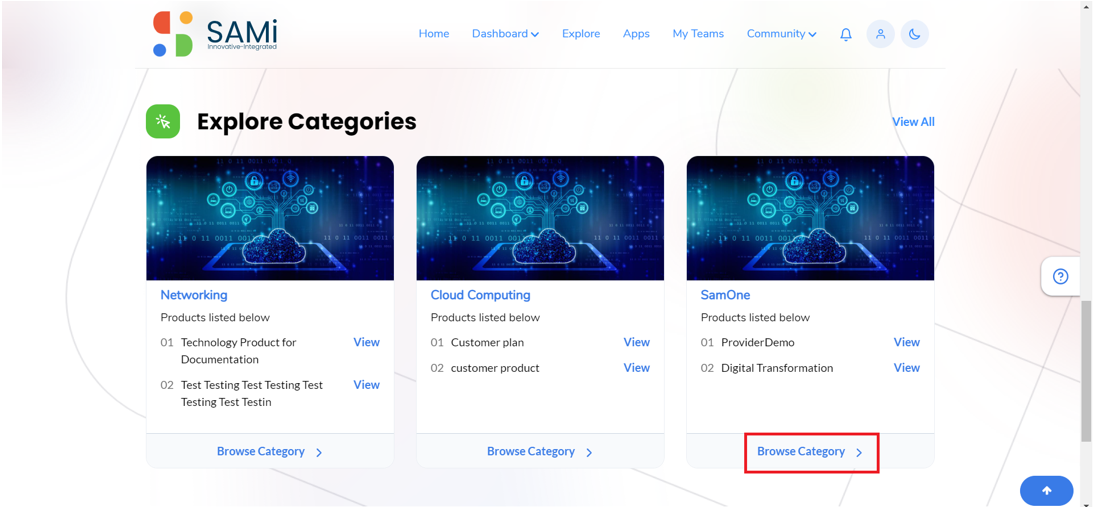
You will be able to view the product details page, by navigating to the Home page and then clicking on Explore Categories.
To View Product details from Homepage, do the following:
- Go to Homepage and scroll down to view the Explore Categories.
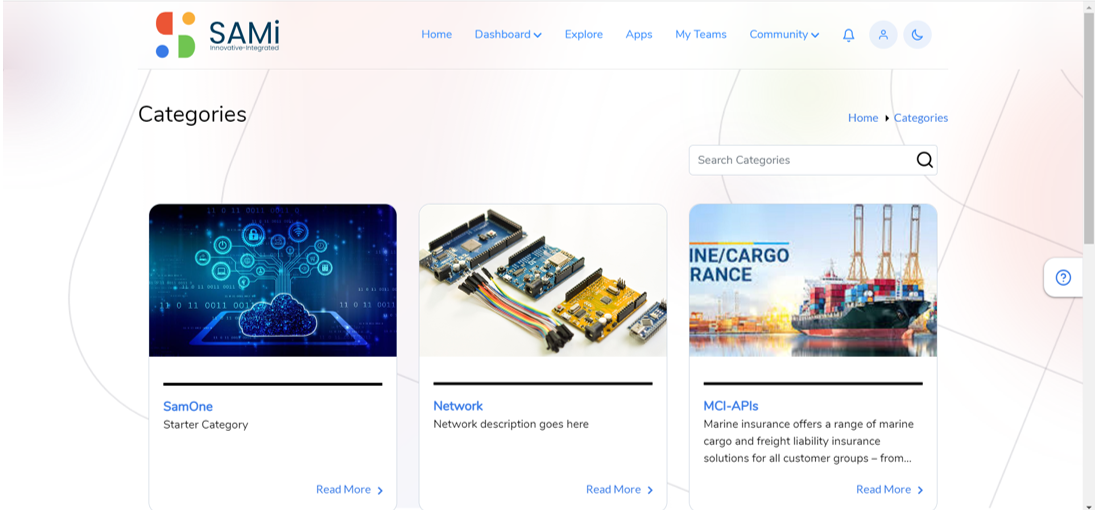
- In Explore Categories, click on View All link.
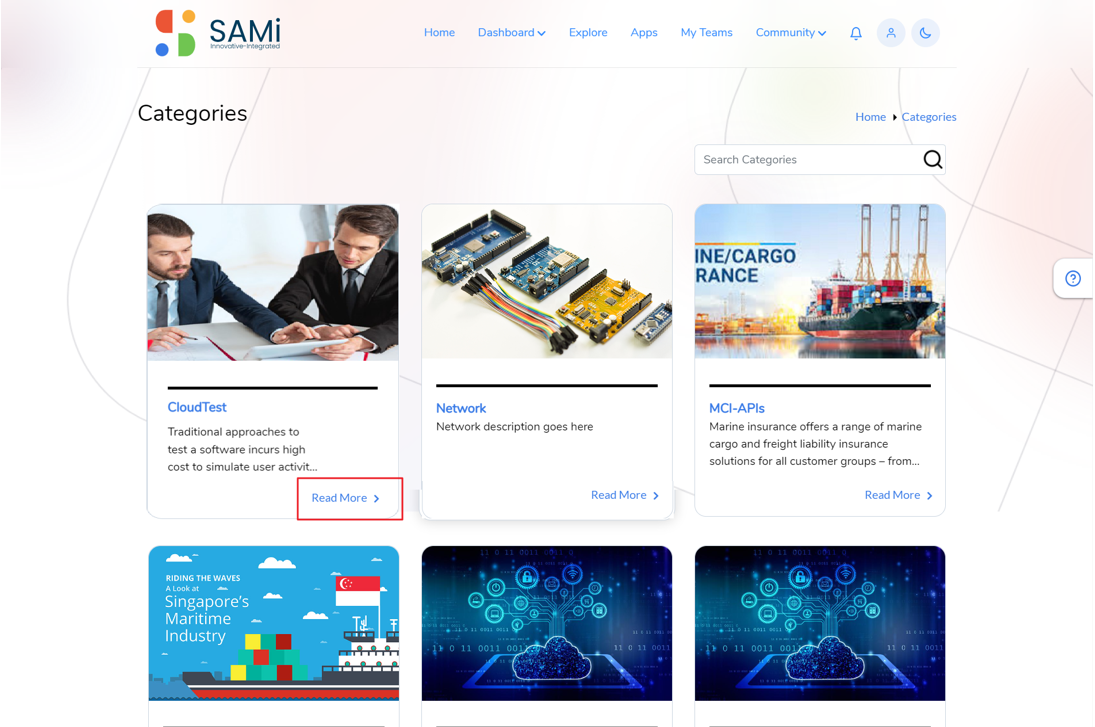
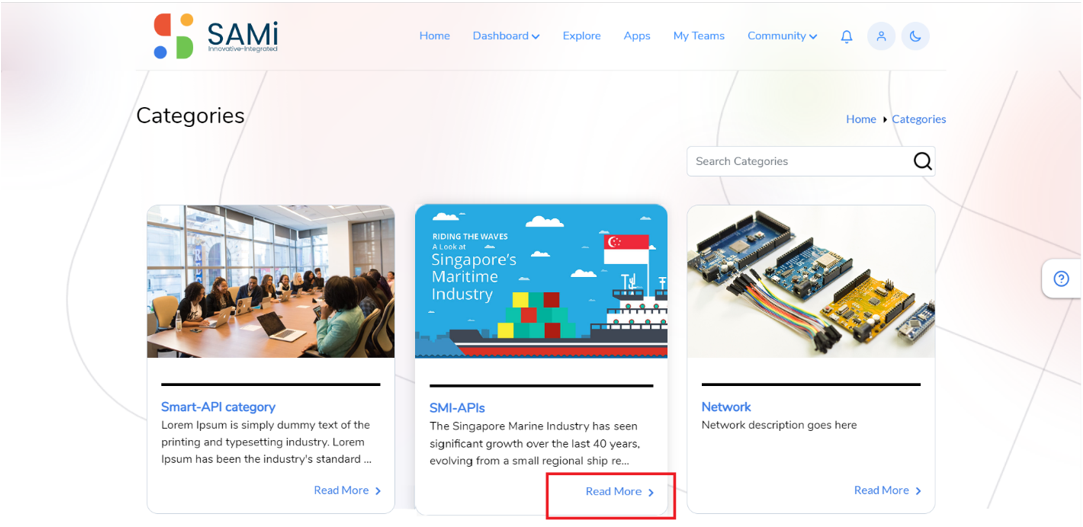
The Categories page appears with different product categories appear as cards.
- Select a Category card and click on Read More.
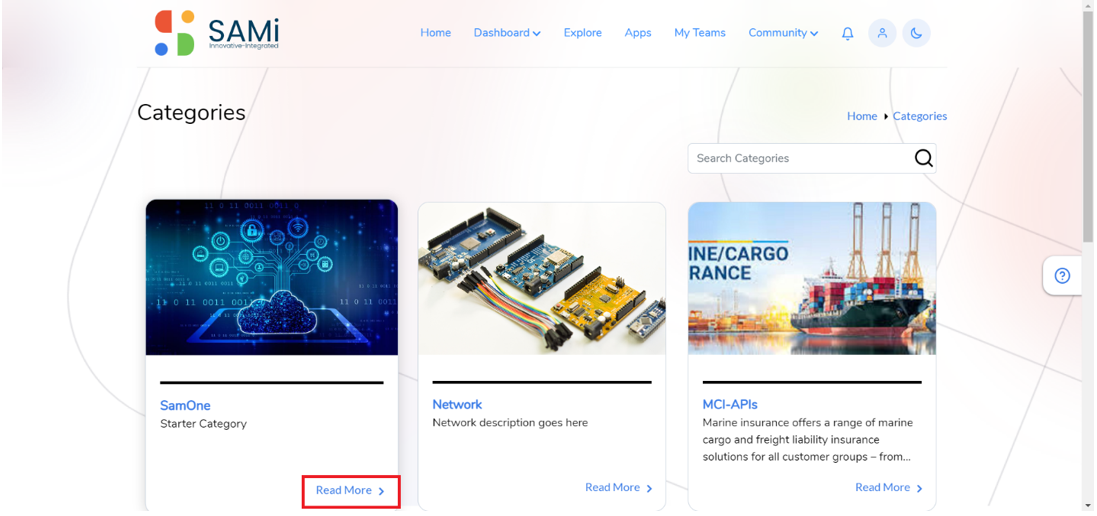
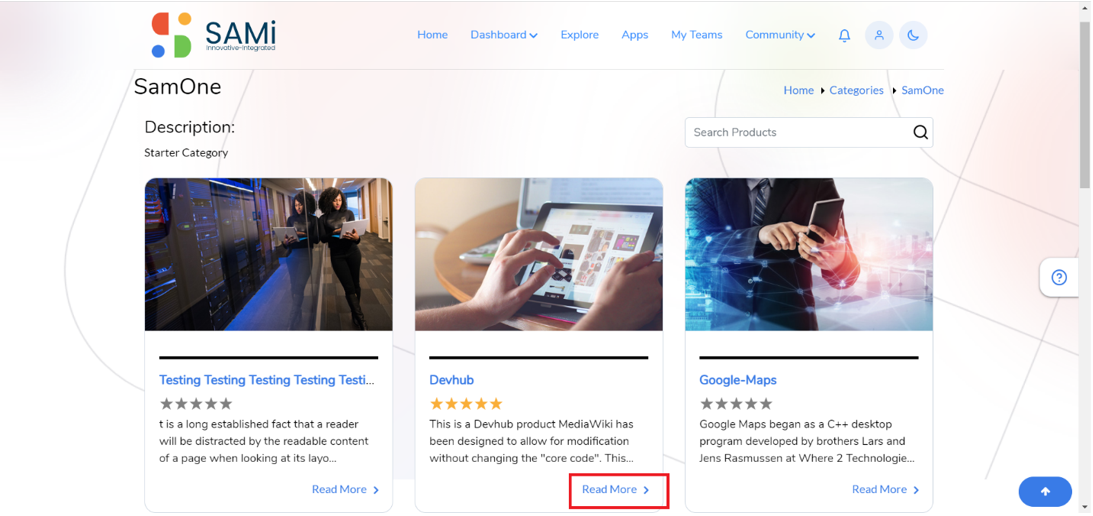
Under SamOne, these are the product categories displayed.
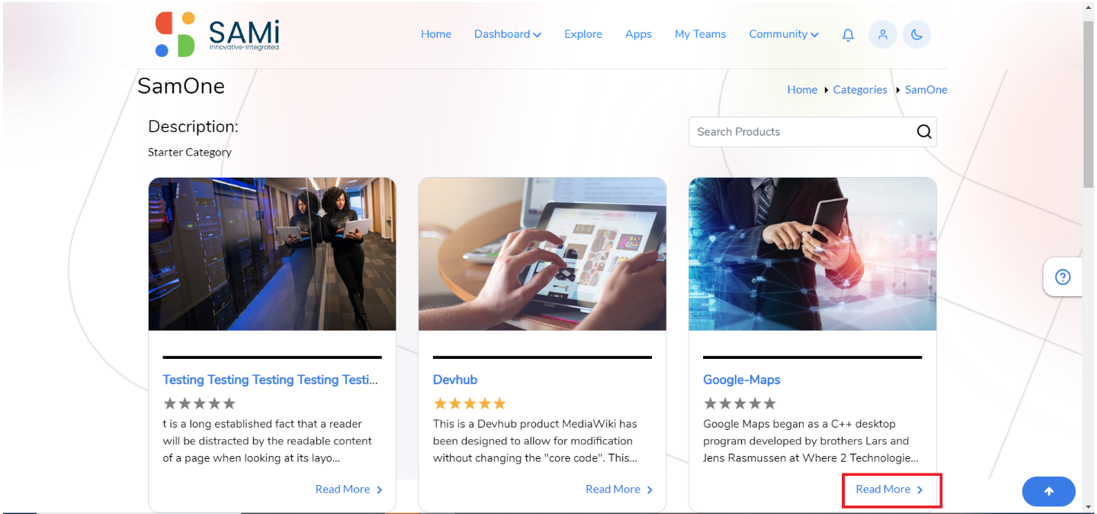
- Choose a product, click on Read More to open and view the product details.
Scenario 3: View Product Detail Page from the Explore Page
You will be able to browse the Explore Categories from Explore page.
- Login as a Developer by providing your Email address and Password in the respective textboxes.
- Click Sign In.
The SAMi Home page is displayed.
- In Home page, click on Explore option from main menu.
The Explore page appears.
- Enter the product name in the Search field and press Enter or check at the relevant product Category to filter and search the product.
The product search results appear.
- Click on Read More link to view the product summary page.
On the Summary page, you will be able to subscribe the product.

Workflow 4: “Try It Out” Feature to try and experience
Scenario 1: “Try it out” feature for selected products from the Home Page (Featured Products)
The “Try It Out” feature helps you try the APIs in Swagger and Redocs and experience it before subscribing to the product. To navigate to “Try it out” feature from the Home page, you need to do the following:
- Login as a Developer by providing your Email address and Password in the respective textboxes.
- Click Sign In.
The Homepage is displayed.
- Search a Product by using the Search Option on Home Page or Scroll down and click on View Product link of any selected Featured Product.
The Summary page is displayed. - In Summary Page, scroll down to view product details.

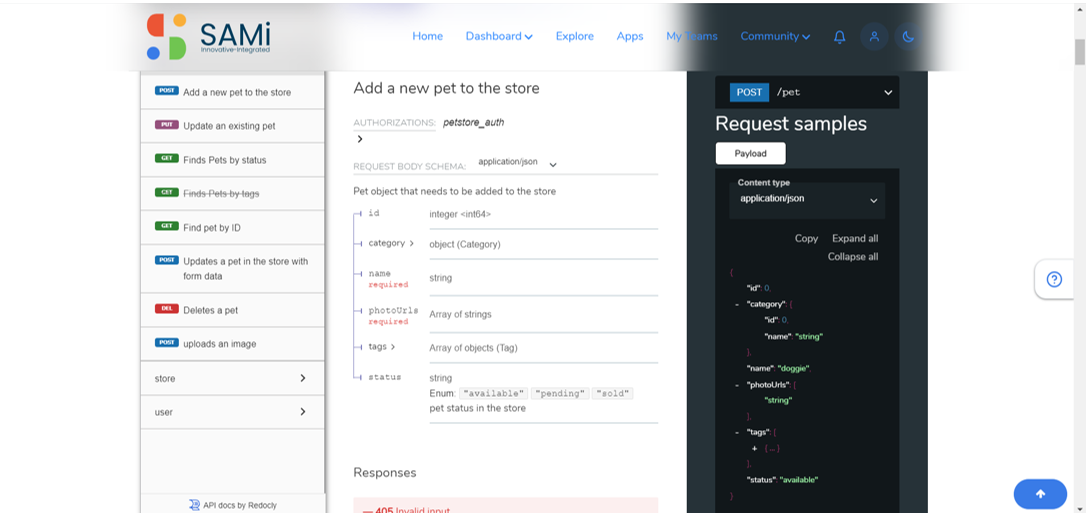
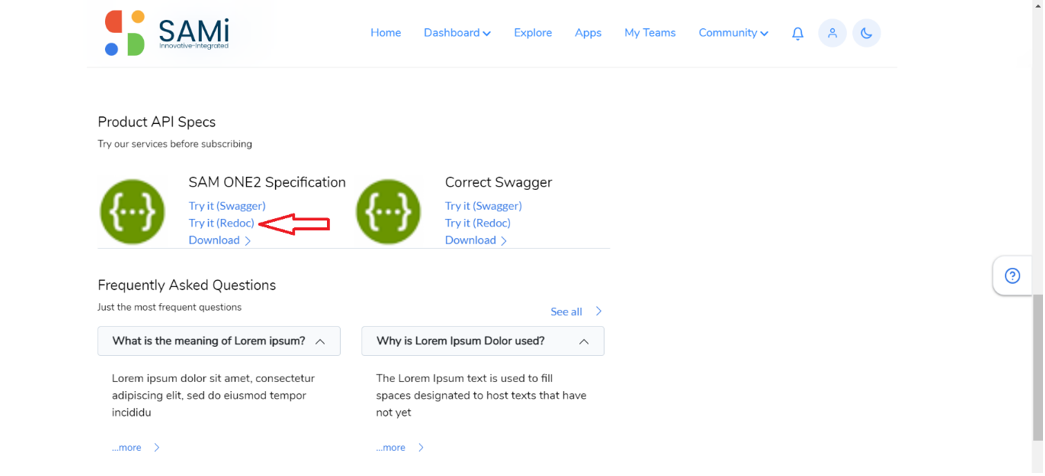
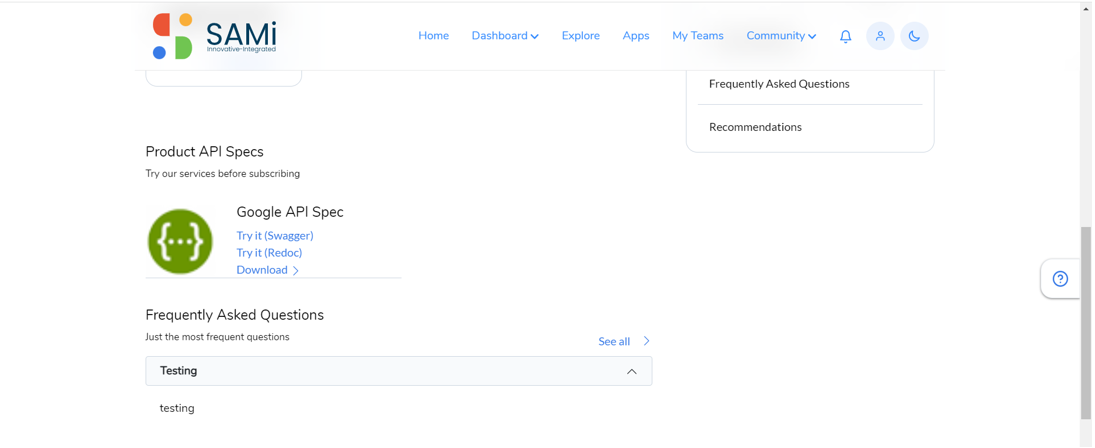
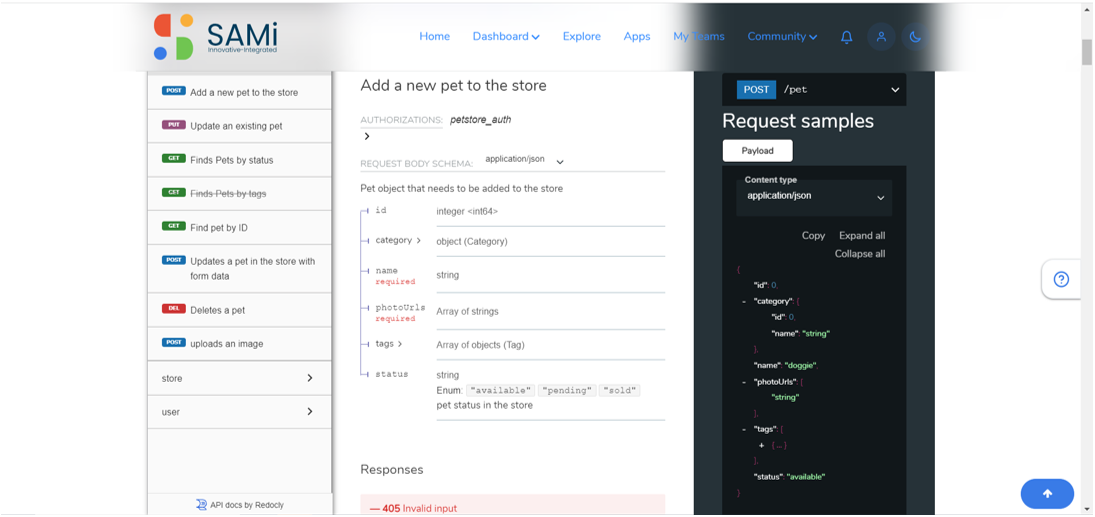
- In the Product Summary page, scroll down to API Specs and click on “Try it” link.
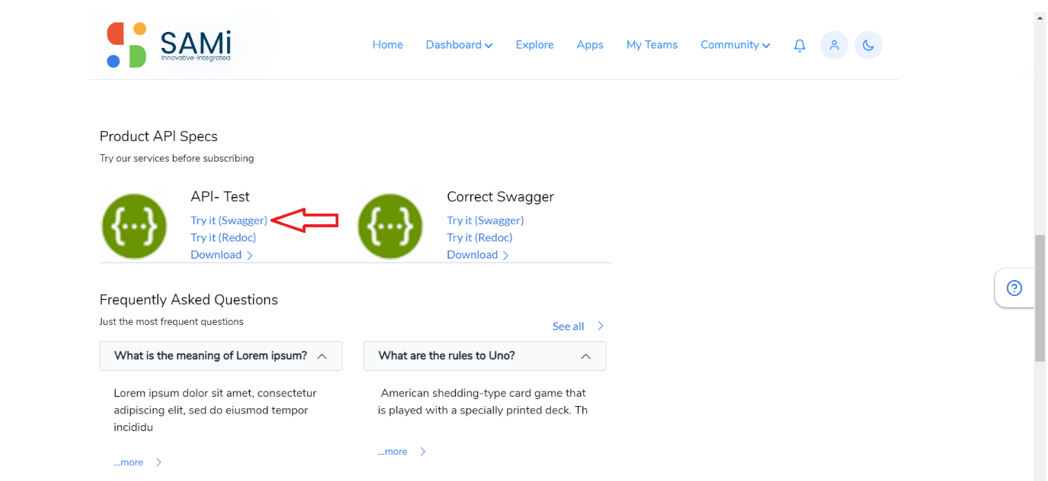
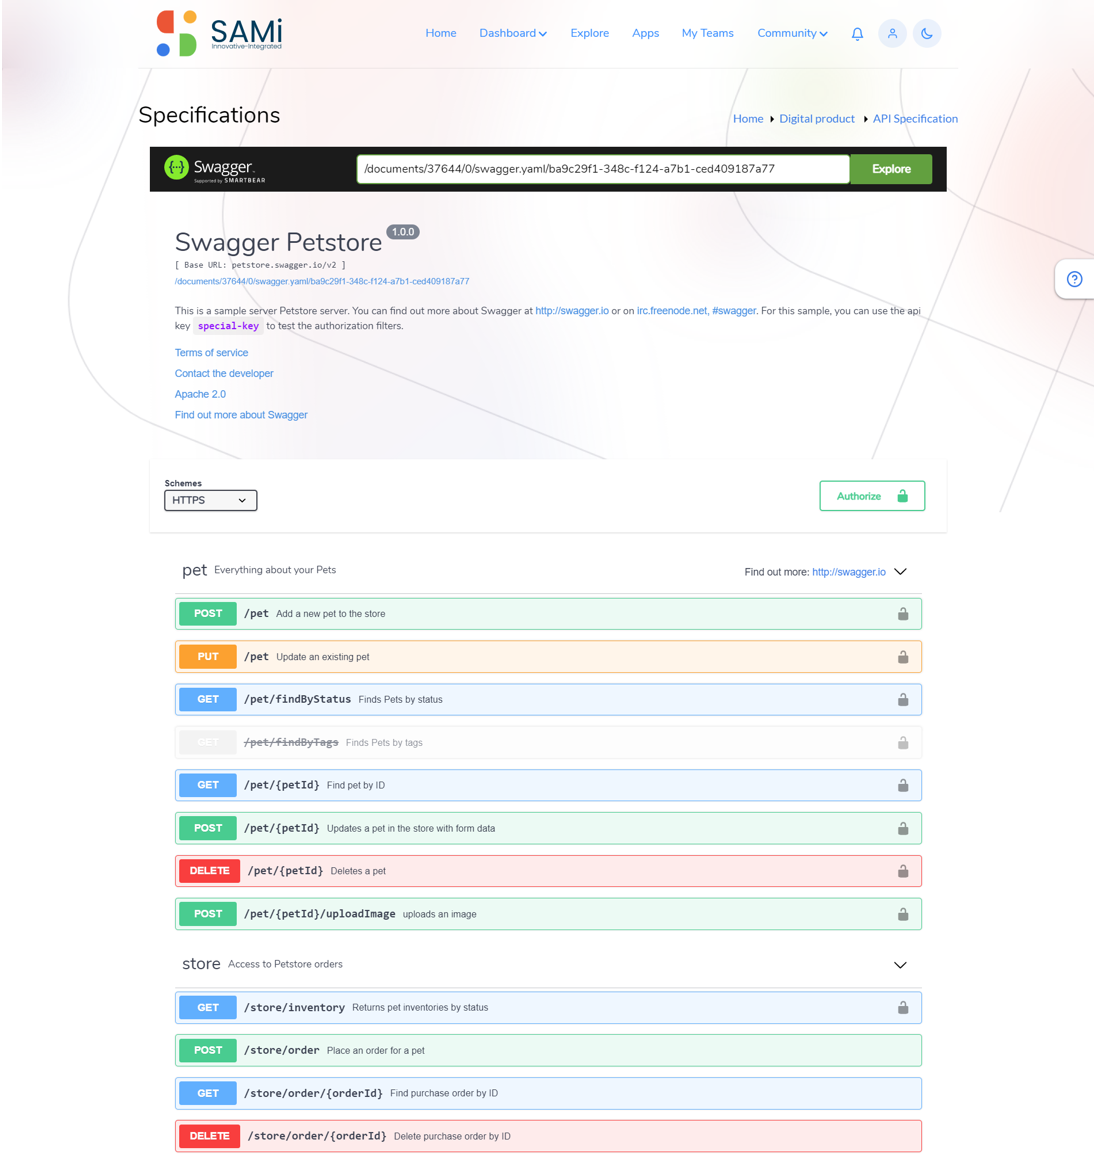
- You will view the “Swagger” or “Redoc page”, and you can try and test run an API to see the results. Click on Try it (Swagger)
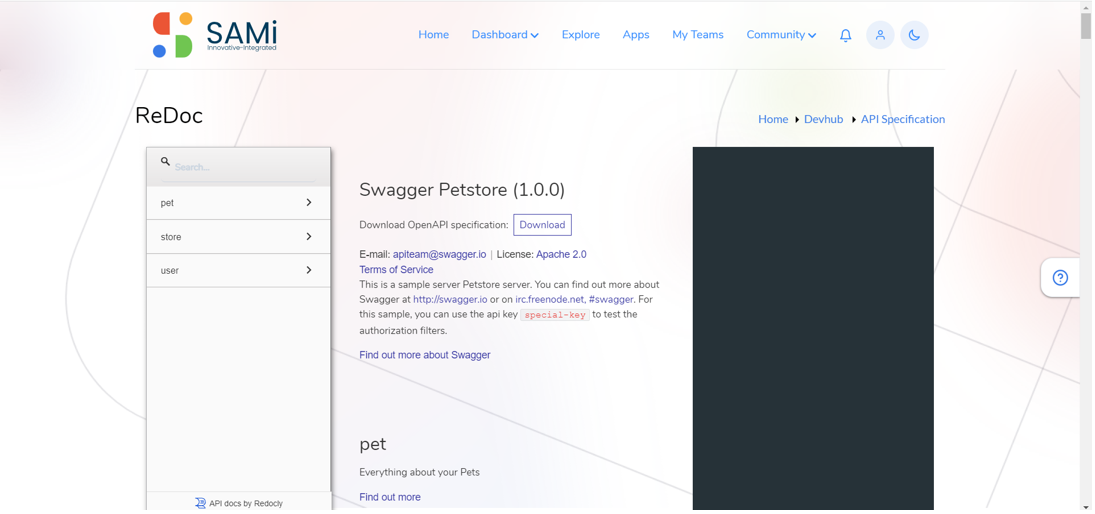
- Click on Try it (Redoc)
The Redoc specifications page appears.
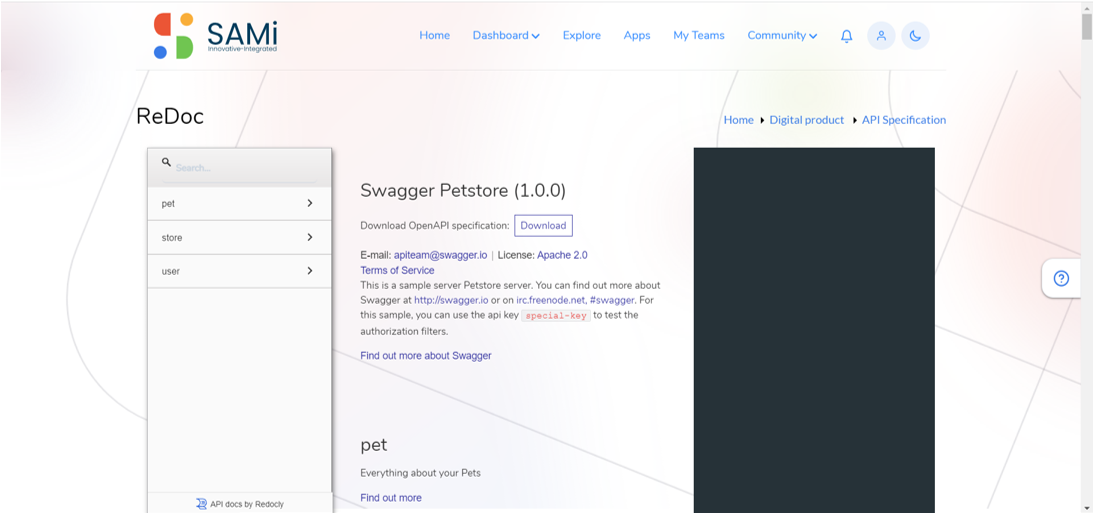 The Redoc page with the API specification is displayed.
Scenario 2: “Try it out” feature for selected products from the Home Page (Explore Categories)
To experience “Try it out” feature from Search on the Homepage (Explore Categories), you need to login as a developer and navigate to explore categories.
- Login as a Developer by providing your Email address and Password in the respective textboxes.
- Click Sign In.
The Homepage is displayed.

- In Home page, scroll down to Explore Categories. Click on Browse Categories.
The Product Description page appears with all product cards.
- Click on Read More.
The product Summary page appears.
- In Summary page, scroll down to the API Specs section.
- Click on Try it (Swagger)

The API Specifications is displayed.

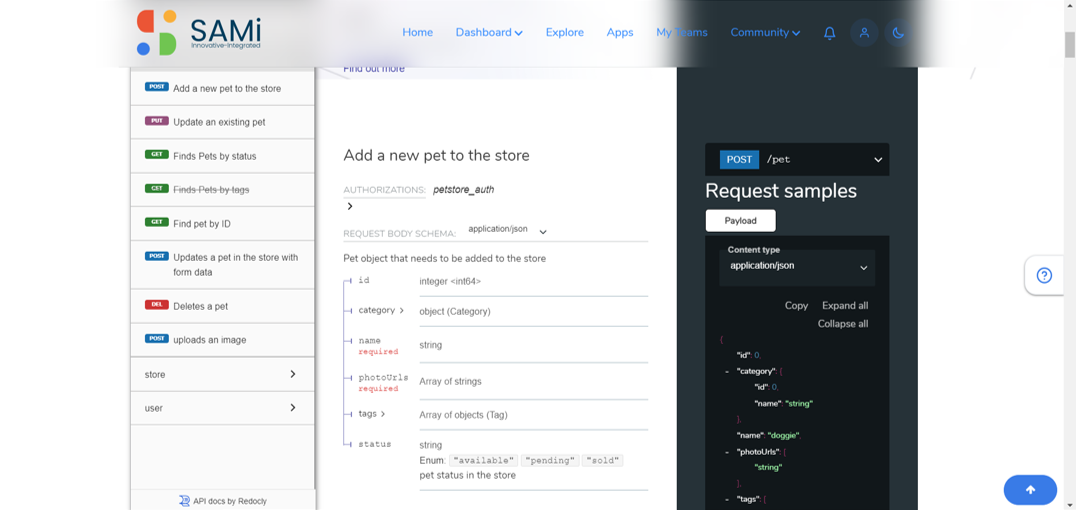
- Scroll down to view the Swagger methods and endpoints to try.

- Similarly, from the API Specifications page, click on Try it (Redoc) link.
The API Redoc Specification page is displayed.
- Scroll down to view the methods and endpoints to try.
Scenario 3: “Try it out” feature for selected products from the Explore Page
- Go to Homepage, click on Explore option on main menu.

The Explore page is displayed.
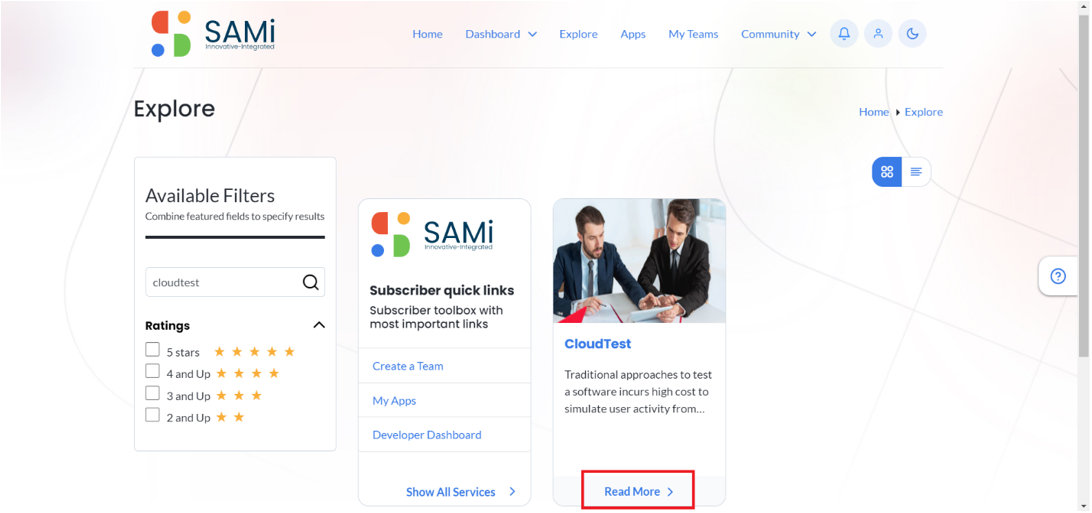
- Search using the Available Filters by providing the product name and clicking on Search icon.
- Click on Read More on the selected product card.
- In the Product detail page, scroll down to API Specs click on “Try it out”.
- Here, you will view the “Try it (Swagger)” link to try and test an API in Swagger or Try it (Redoc) link to try it in Redoc.
- Click Try It (Swagger) link, to open Swagger API specs.
The Swagger page is opened with the API specs. Here you can click on any of the listed methods to view the endpoints.

- At the same time, if you wish to open the Redoc API Specs page, click Try It (Redoc).
The Redoc API Specifications page is displayed.

- Scroll down to view the API methods and endpoints to try.
Subscriber Workflow 05: Subscribe for Non-Monetized Product
The developer will be able to easily subscribe to a product (APIs) from the SAMi APi Marketplace Home page. In SAMi portal, the subscription products are categorized into:
- Non-Monetized Products
- Monetized Products
Non-Monetized products can be easily identified as their name is not followed by a dollar symbol. Similarly, all monetized products names are followed by a dollar symbol in the SKU name.
Scenario-1: Subscribe Non-Monetized products from Home page (Search Option)
To subscribe a product from the Homepage, do the following:
- Login as a Developer by providing your Email address and Password in the respective textboxes.
- Click Sign In.
The Homepage is displayed.

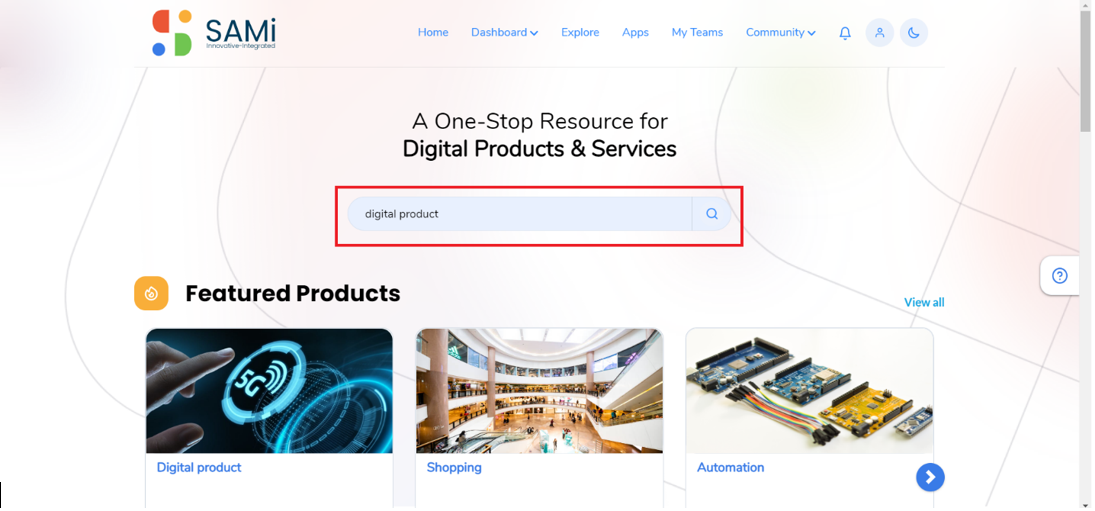
- In the Homepage, search the product by entering with Product name/ Keyword and press Enter.
- You will view the products on the Explore.
- Select a Product of your choice, click on Read More.
Here, you will view the Product Summary page.

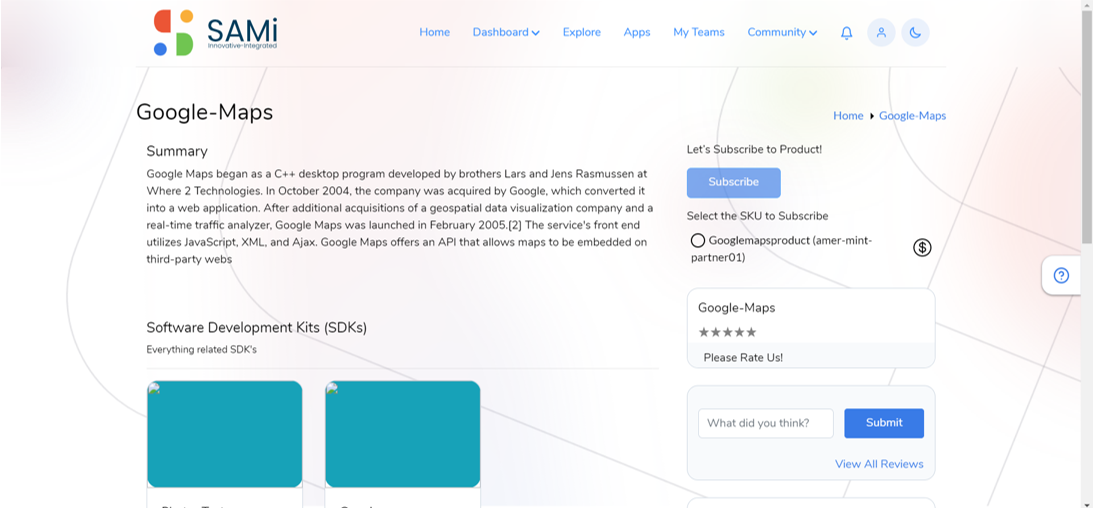
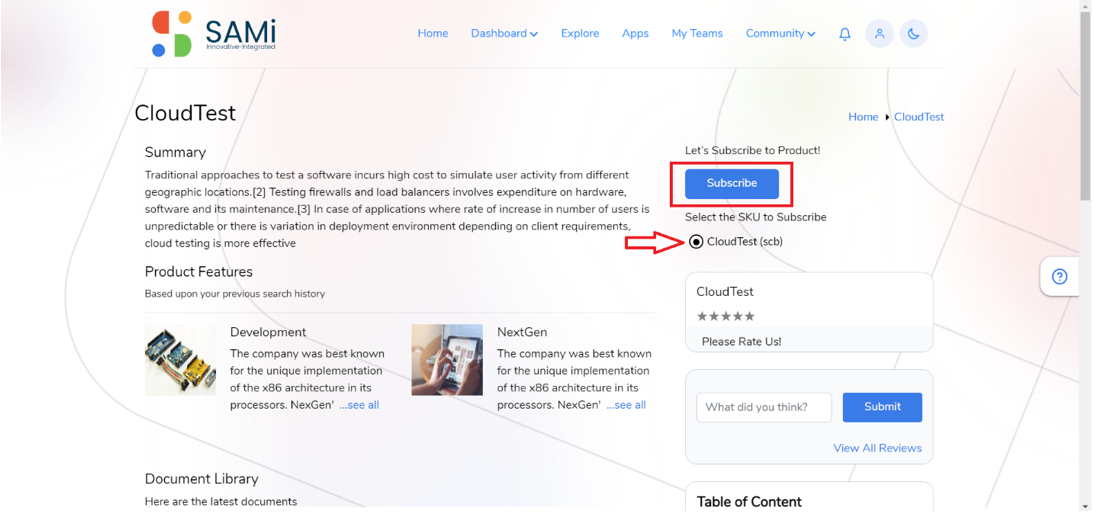
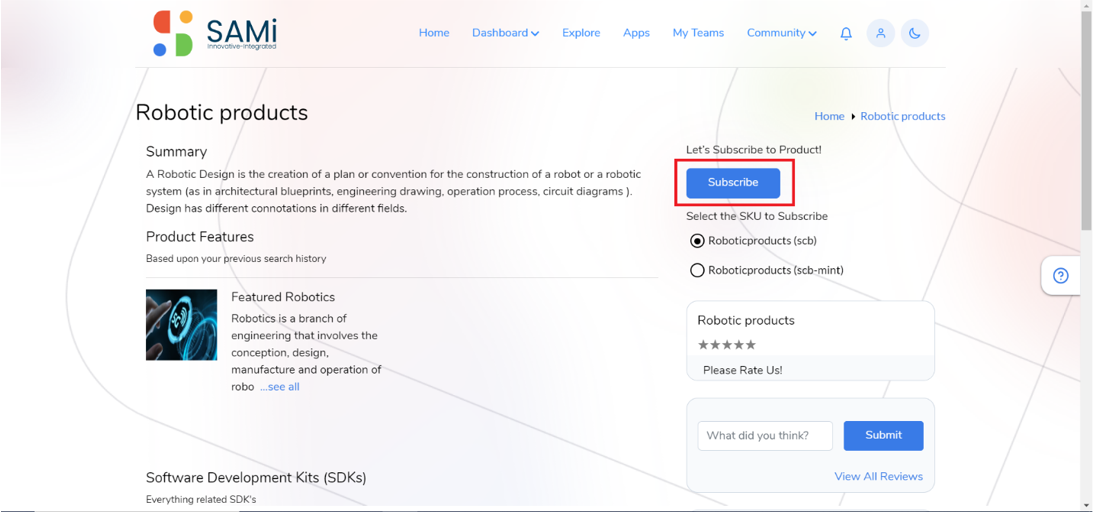
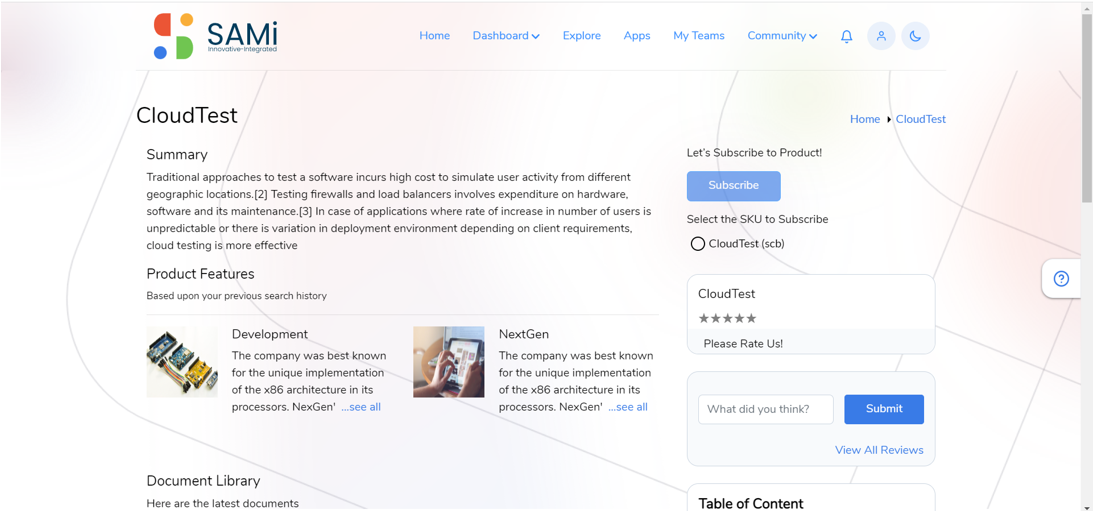
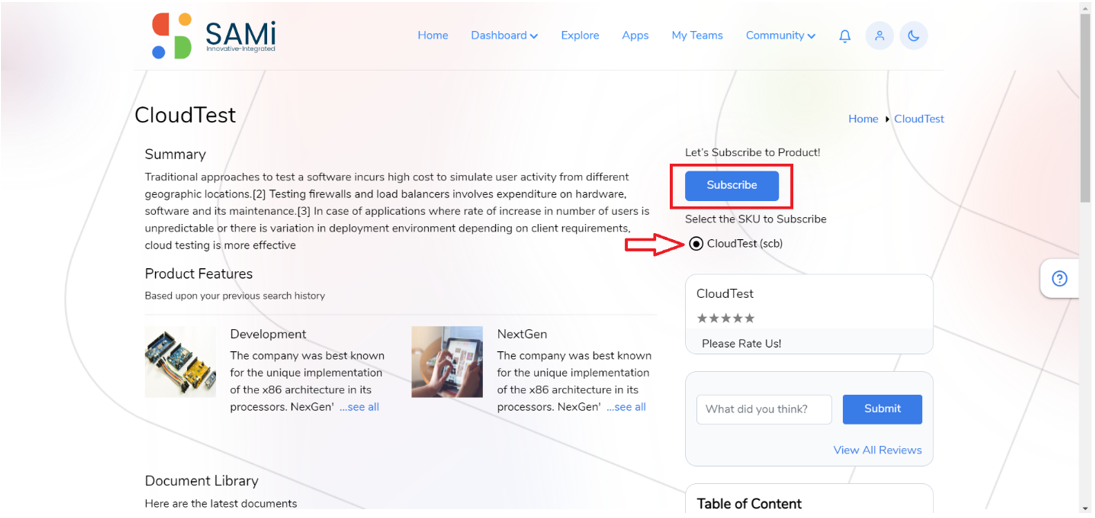
- In Summary page, click on Subscribe button to subscribe a product.
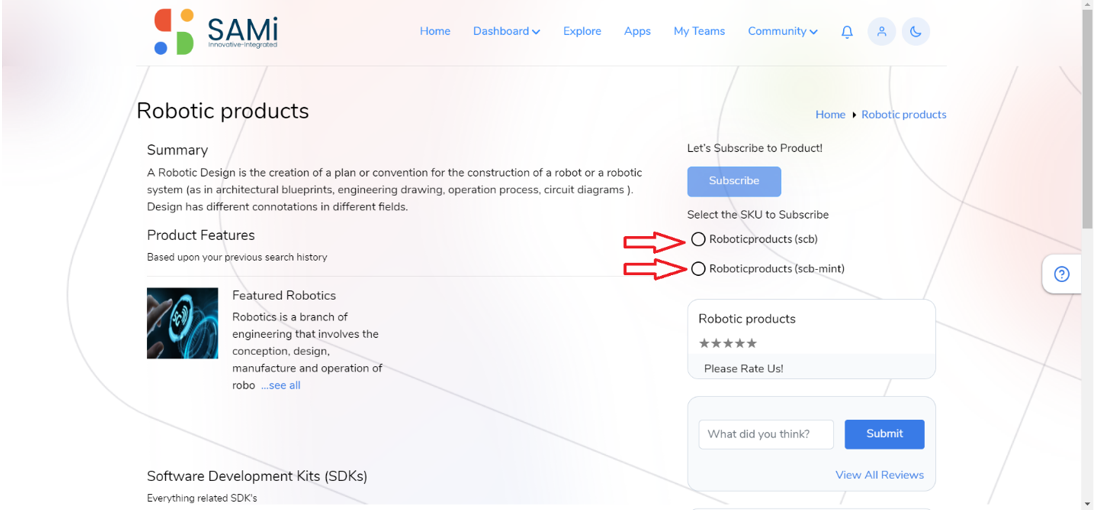
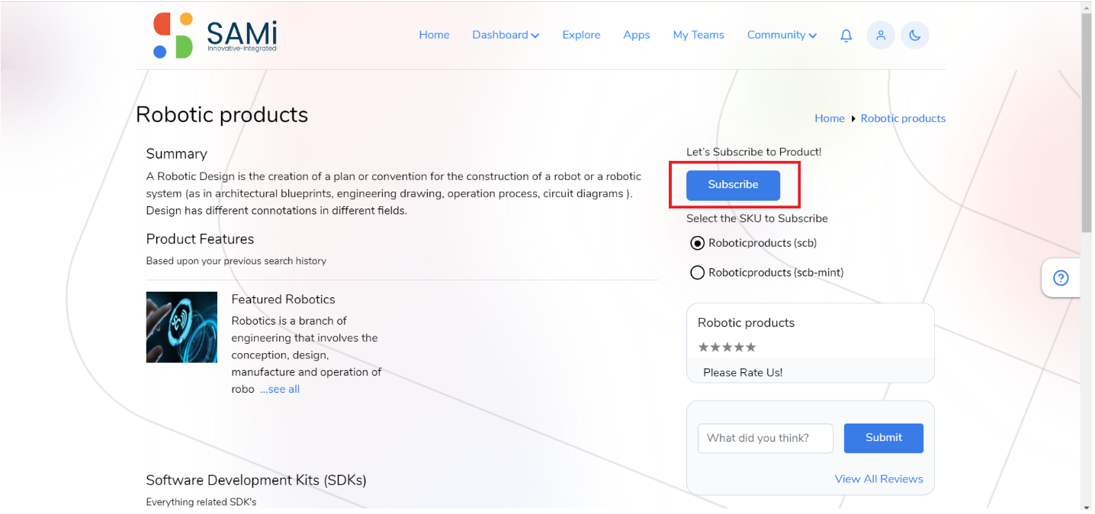
Note: Initially, the Subscribe button will not be enabled, you need to choose any one of the SKU to subscribe.
- In Summary page, select the SKU to Subscribe radio button to subscribe to the product. Now, the button is enabled.
- Click Subscribe.
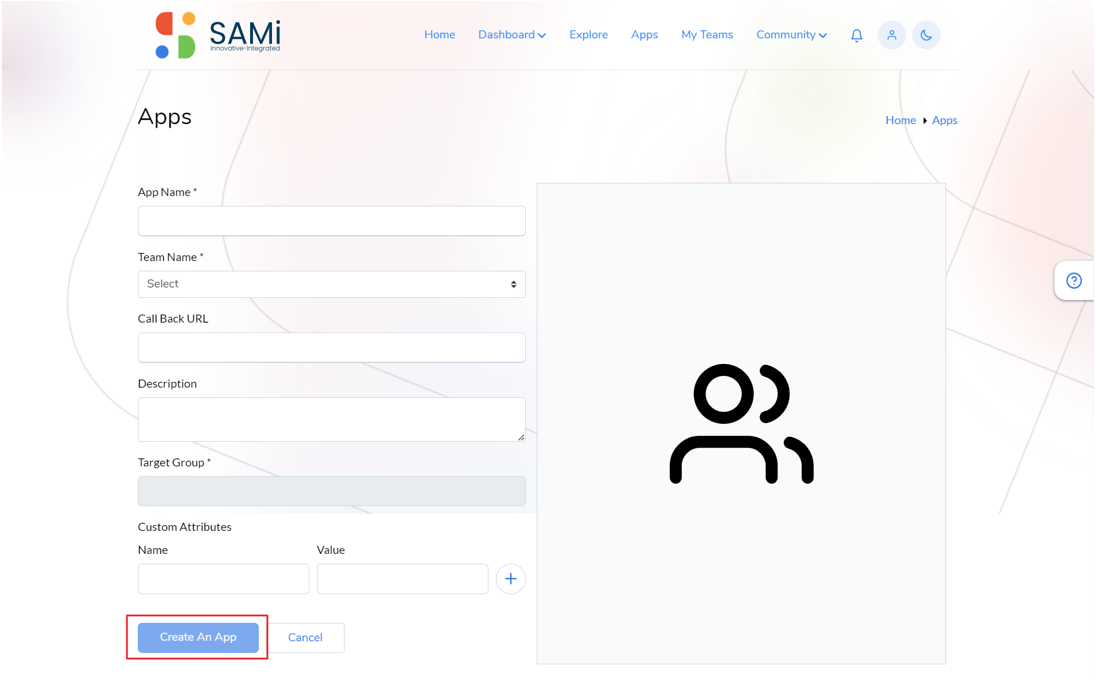
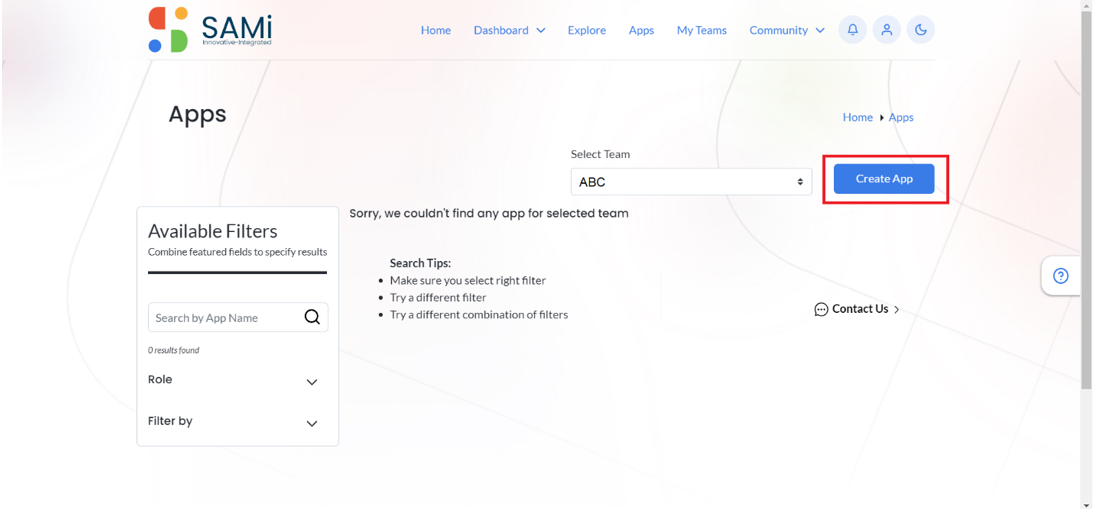
It will redirect to App’s Page to Create an App for Non-Monetization Subscription.
You will be able to create an App by clicking Create App button on the right corner of the App’s Page.

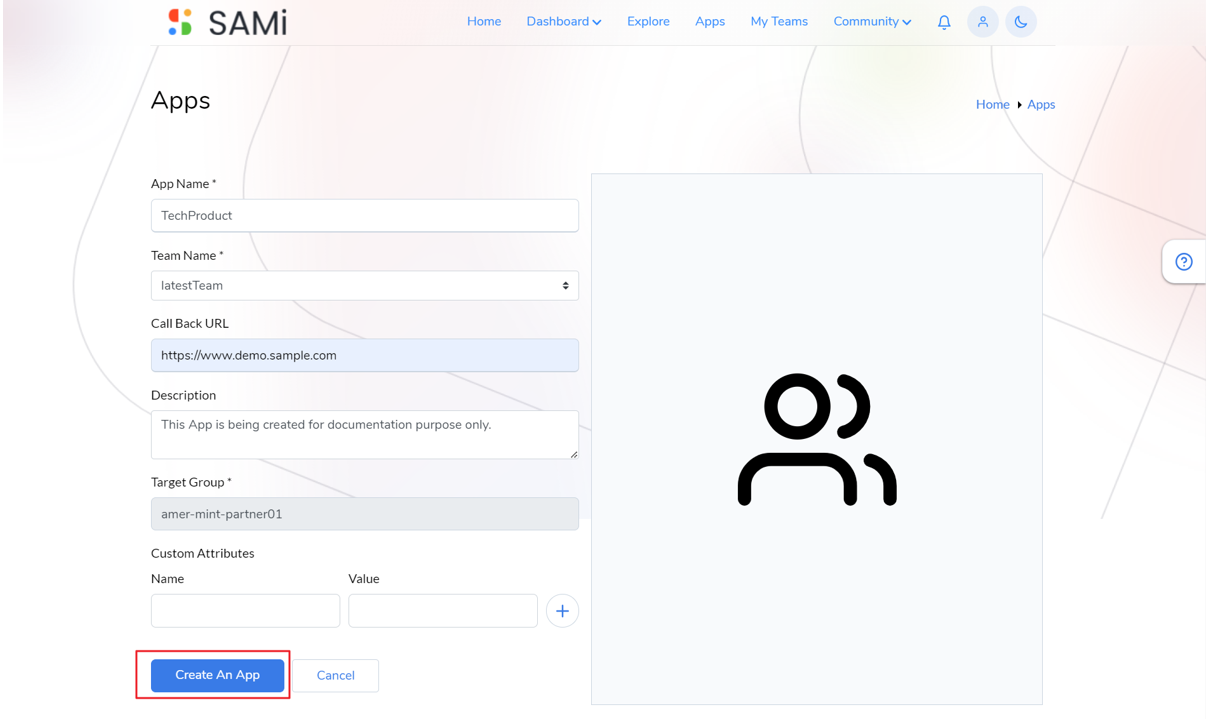
It redirects to App’s Creation Form.
- Fill all the Details displayed in App’s Details page and Click on Create an App.
Note: Can Create a New Team or can select from the Existing Team to create App in it.
- Or Select the Team from the App page, the non- monetized subscribed product will appear.
Note: You need to wait for 3-4 minutes before the product is subscribed.
The subscribed App will be displayed in the Apps page only after 3-4 minutes.
- Click on My Subscriptions tab, the Product will be displayed in Pending.
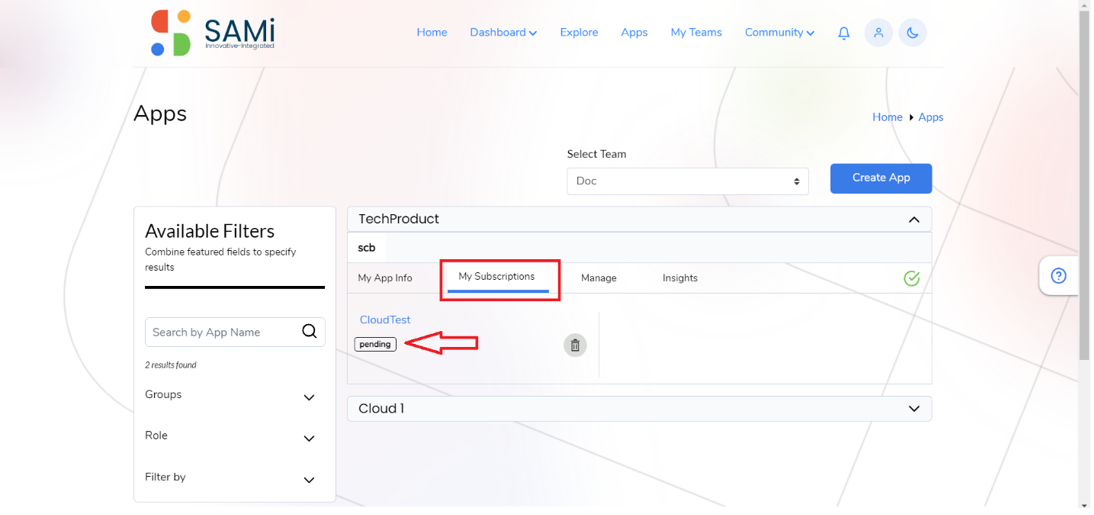
*Note: When the product is in Pending State, the PO or admin needs to approve it. When the PO or admin approves it, the status changes to Approve.
An Email notification is sent to the SAMi Admin to review and approval the App.
When the App is approved by the SAMi Admin it will be displayed in the Apps page with the status as, ‘Active’.
Scenario-2: Subscribe for Non-Monetized products from Home Page (Featured Products)
To subscribe to a non-monetized product, you need to choose a product from the featured products.
- Go to Homepage click on Explore.
The Featured Products page is displayed. - Click View All

You will view the Explore page to view all the products.
- Click on Read More on any of the selected product card.
- On product details page, Select the SKU to Subscribe using the radio button to enable the Subscribe button for subscribing a non-monetized product.
- On the Subscription page, click the Subscribe button.
- Select the Team from the Apps page, the non- monetized subscribed product will appear.

The product details are displayed in My App Info tab.
- Click on Subscribe button, the Product will be displayed in Pending Status if the Product is Manually Approved Product. The Product is approved automatically if the product is Auto Approval Product.

*Note: You need to wait for 3-4 minutes before the product is displayed in the Apps page. When the product is in Pending State, the PO or admin needs to approve it. An email is sent to the PO that a product awaits your approval. When the PO or admin approves it, the status changes to Approve.
Since you have subscribed to a non-Monetized product, it does not require payment and the subscription happens without directing you to the payment page.
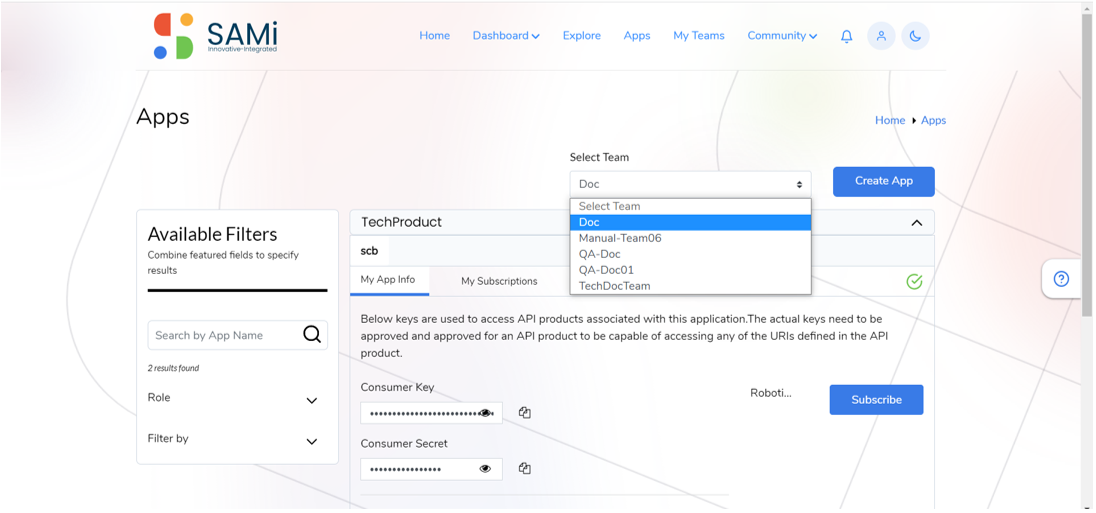
Scenario 3: Subscribe for Non-Monetized products from Home Page (Explore Categories)
To subscribe a product from the Homepage, do the following:
- Login as a Developer by providing your Email address and Password in the respective textboxes.
- Click Sign In.
The Homepage is displayed.
- Scroll down to the Explore Categories, click the View All link.
The Explore Categories appears with all the product categories.
The Categories page appears.
- Select a Category of product from any of the cards and click on Read More.
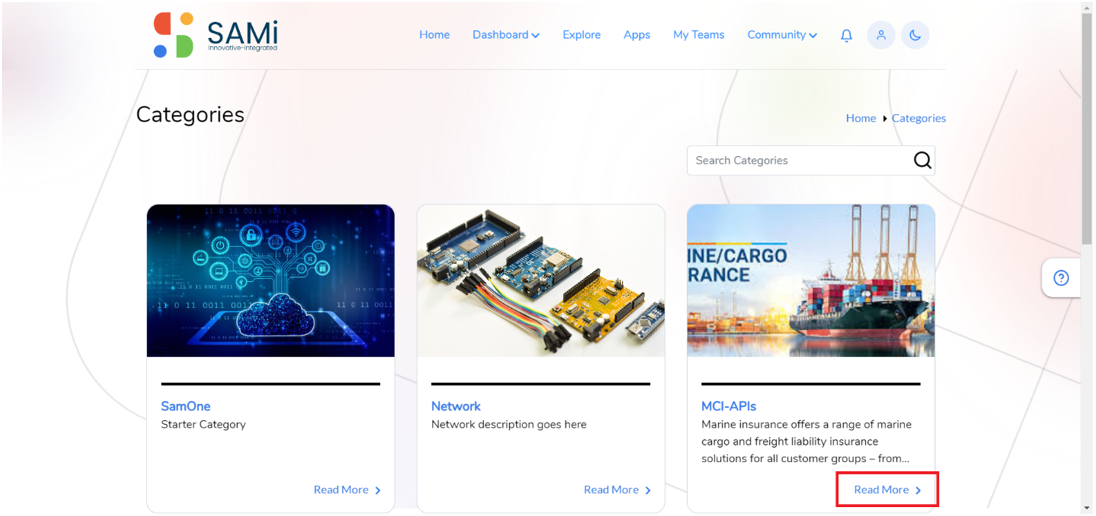
In this Category we have chosen MCI-APIs as the subcategory.
- In MCI-APIs we have selected Robotic Products, click on Read More Link of Robotic Products card.
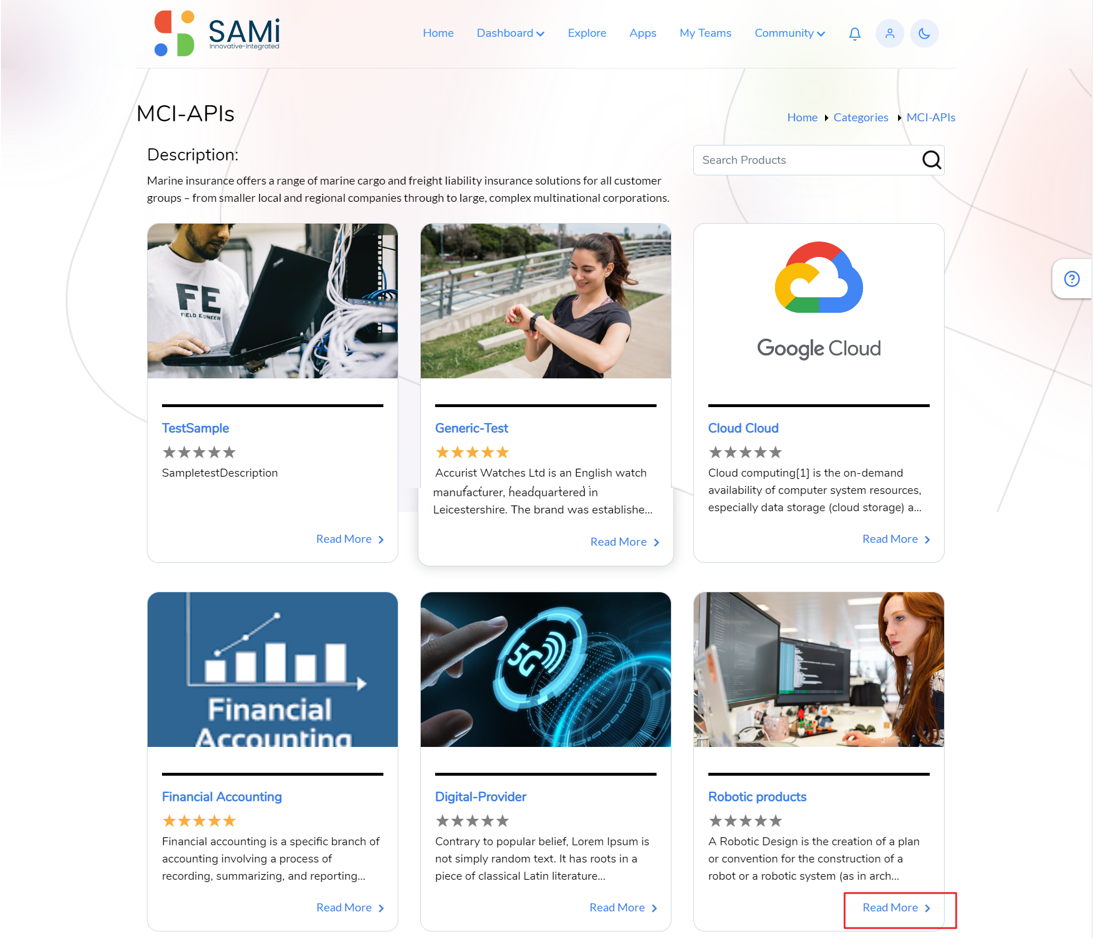
The Robotic Products – Summary page appears.
- On product details page, Select the SKU to Subscribe using the radio button to enable the Subscribe button for subscribing a non-monetized product.
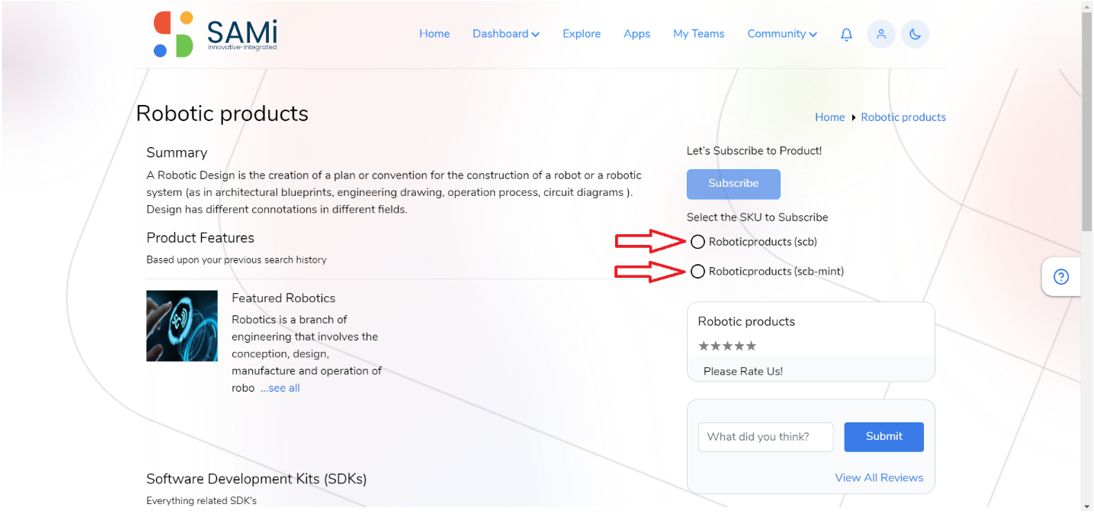
- Click on the Subscribe button to subscribe to the product.
- Select the Team from the Apps page, the non- monetized subscribed product will appear or can create New Team and New App by clicking Create App button.

The product details are displayed in My App Info tab.
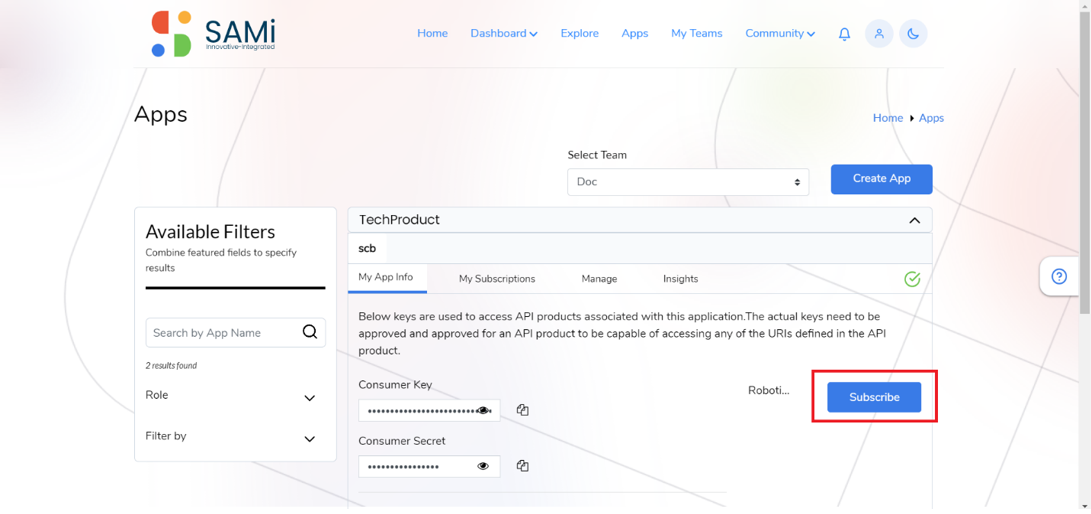
- Click on Subscribe button, the Product will be displayed in Pending Status if the Product is Manual Approval.
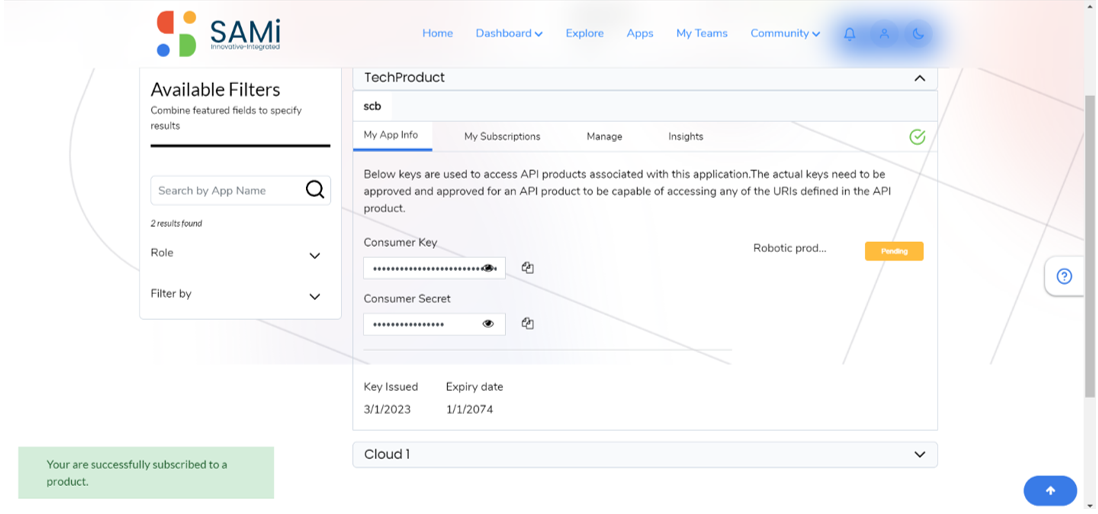
*Note: You need to wait for 3-4 minutes before the product is displayed in the Apps page. When the product is in Pending State, the PO or admin needs to approve it. An email is sent to the PO that a product awaits your approval. When the PO or admin approves it, the status changes to Approve.
Since you have subscribed to a non-Monetized product, it does not require payment and the subscription happens without directing you to the payment page.
Scenario 4: Subscribe for Non-Monetized products from Explore Page
To subscribe a product from the Homepage, do the following:
- Login as a Developer by providing your Email address and Password in the respective textboxes.
- Click Sign In.
The Homepage is displayed.
- Click on the Explore option on the main menu.

- You will view the products on the Explore page.

- Select a Product of your choice, click on Read More.
Here, you will view the Product Summary page.
- In Summary page, click on Subscribe button to subscribe a product.
Note: Initially, the Subscribe button will not be enabled, you need to choose any one of the SKU to subscribe.
- In the Summary page, select the SKU to Subscribe radio button to subscribe to the product. Now, the Subscribe button is enabled.
- Click Subscribe.
It will redirect you to the App’s page to Create an App for Non-Monetization Subscription. - You will be able to create an App by clicking Create App button on the left corner of the App’s Page.
It redirects you to App’s Creation Form. - Fill all the Details displayed in App’s Detailed Page and Click on Create an App button.
Note: Can Create a New Team or can select from the Existing Team to create App.
Note: You need to wait for 3-4 minutes before the product is subscribed. - Select the Team from the App page, the non- monetized subscribed product will appear.
The subscribed App will be displayed in the Apps page only after 3-4 minutes.
- Click on My Subscriptions tab, the Product will be displayed in Pending Status if the Product is Manual Approval.

*Note: When the product is in Pending State, the PO or admin needs to approve it. When the PO or admin approves it, the status changes to Approve.
Workflow-6: Subscribe for Monetized products.
Scenario 1: Subscribe for Monetized products from Home Page (Search Option)
The developer can easily subscribe to a monetized product (API) from the SAMi API Marketplace Portal Home Page. You can subscribe to the Monetized product in Developer Apps.
To subscribe to a monetized product, do the following:
- Login as a Developer in the Sign In
- In the Login page, enter the Email address, and Password in the respective textboxes.
The Homepage is displayed.
- Enter the product keywords/name in the search field and click on Search.
The searched results appear on the Explore page.
- In the Explore page, click on Read More to view all the product details.
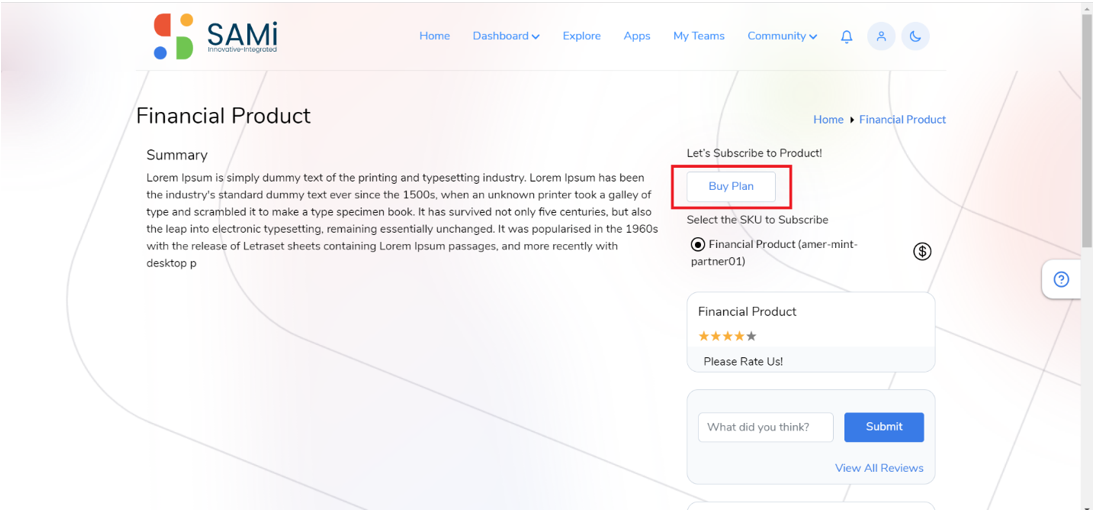
The Financial Product Summary page is displayed.
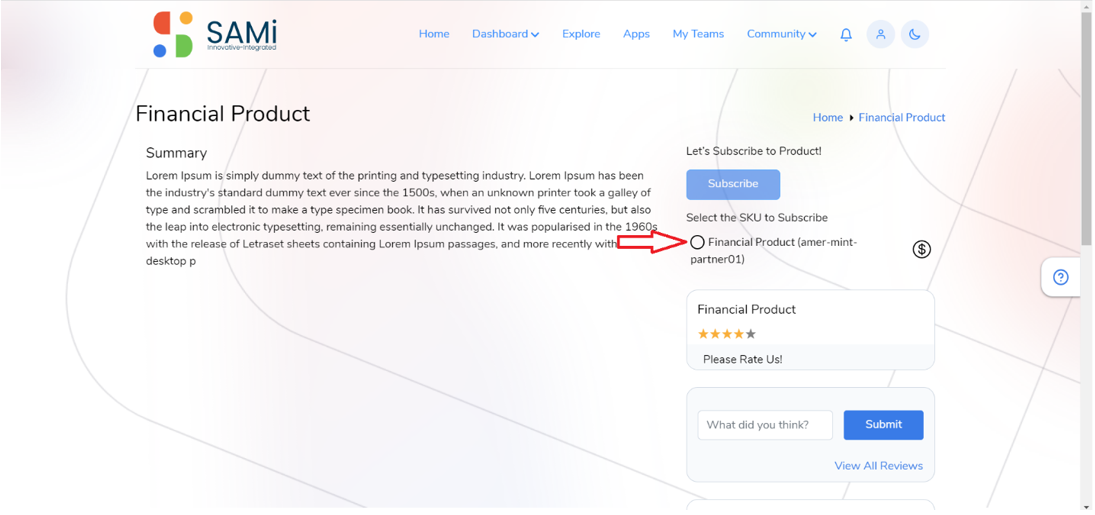
- Select any of the monetized product to subscribe it.
Note: When you check Select the SKU to Subscribe option, only then the Subscribe button changes to Buy Plan.

- Select Financial Product (amer-mint-partner01) radio button, to monetize the selected product.
- The Subscribe button is converted to Buy Plan
- Click Buy Plan.
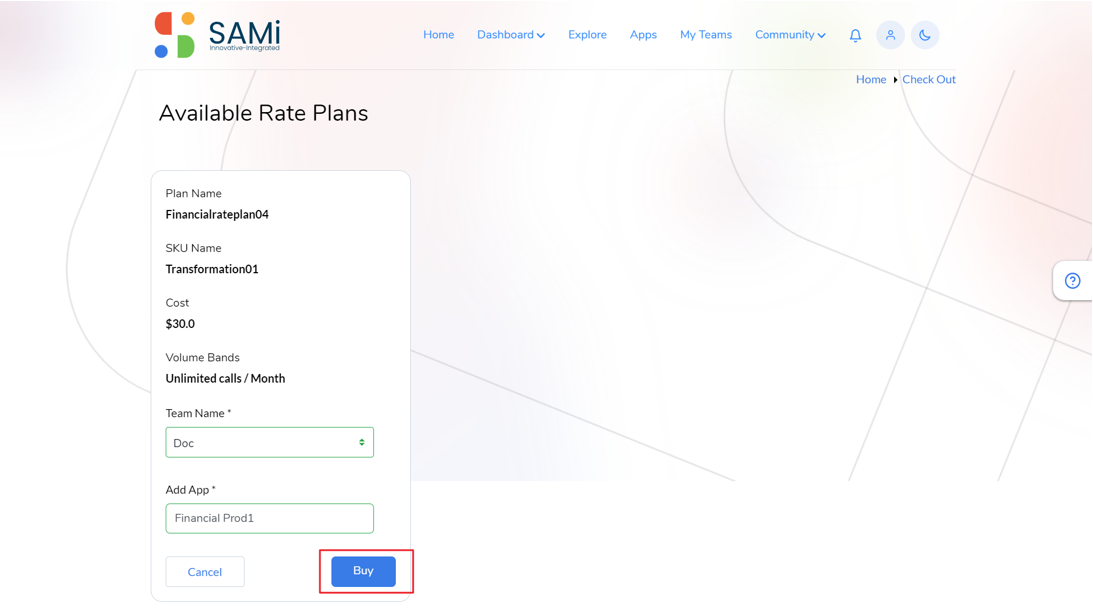
The Available Rate Plan page is displayed.

- In the Available Rate Plan page, Plan Name, SKU Name, Cost, and Volume Bands is pre-populated.
- Select the Team Name from the available dropdown list.
- The Create New Team text box appear, enter the new team name.
- Enter the App name in the Add App
- Click Buy.
The payment page appears.

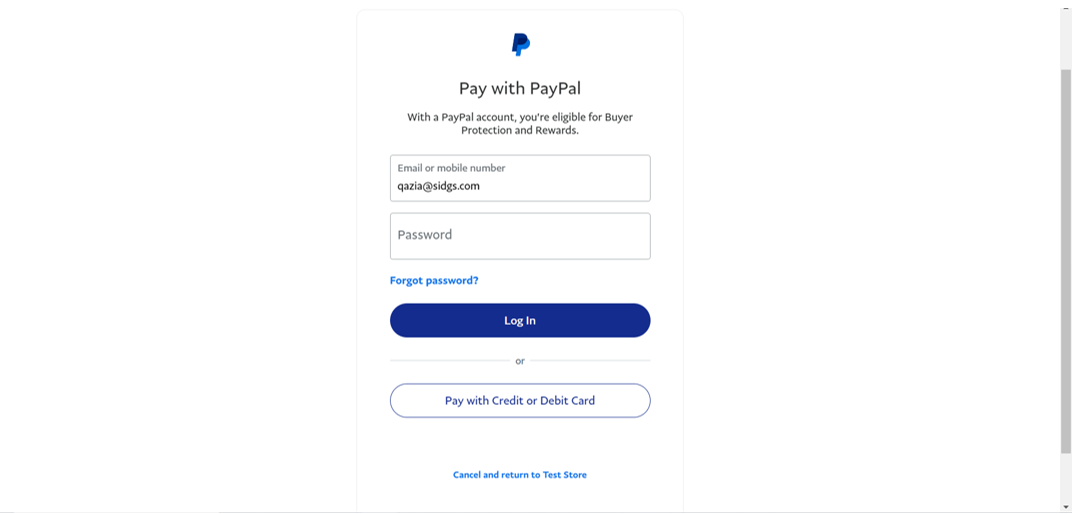
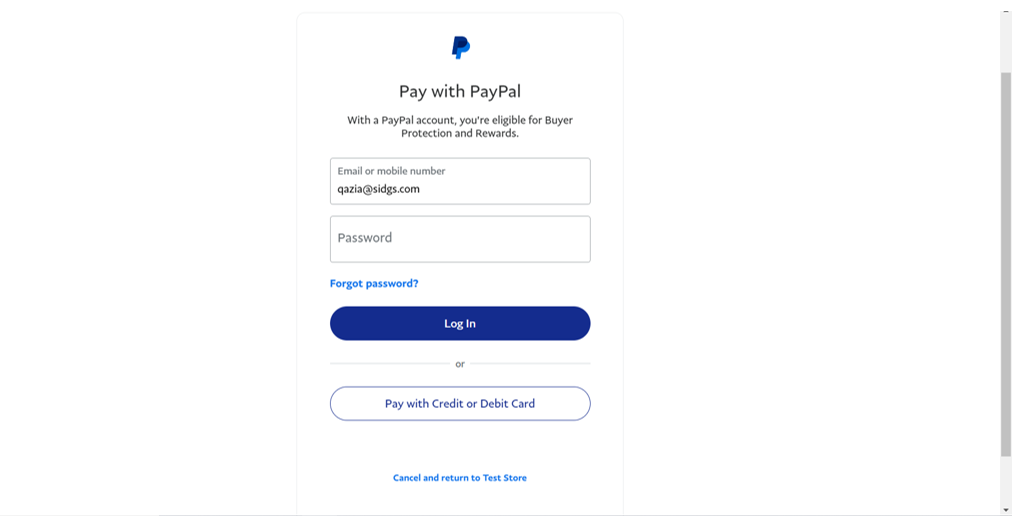
- Click on the Pay with Credit or Debit Card.
A Credit and Debit Card Payment page appears.

- Here, you need to toggle left to Save info & create your PayPal account. If you do not wish to create a PayPal account.
- Click Continue as Guest.
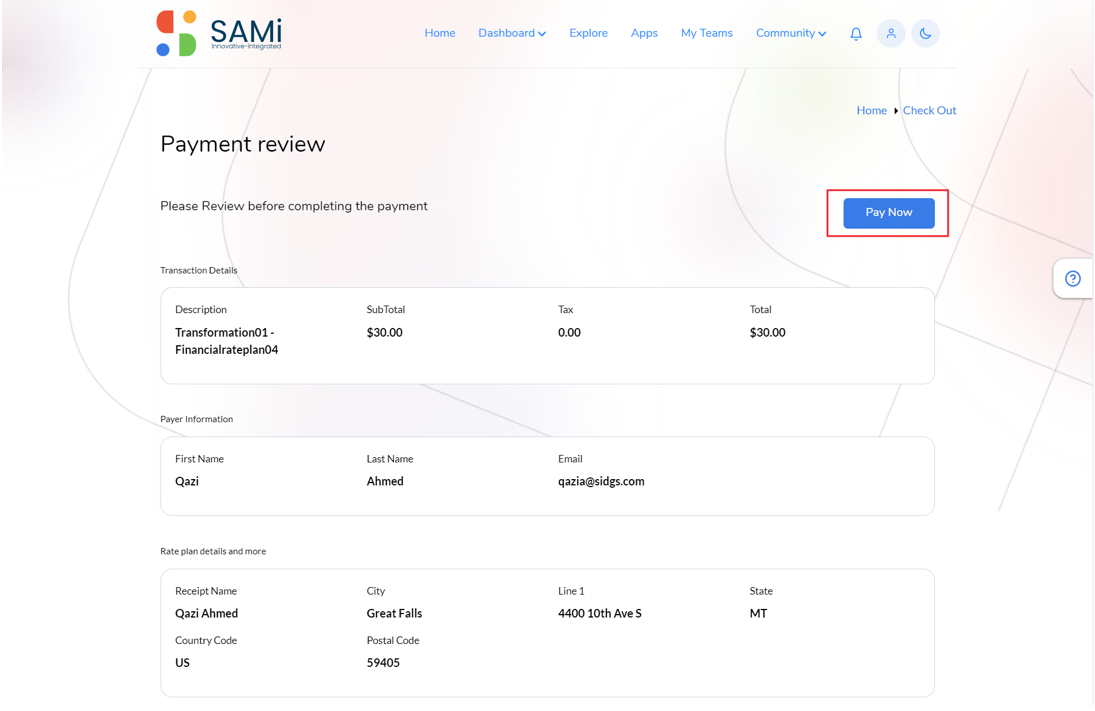
The Payment review page appears. The Developer to review the payment information before making the payment. - Click on Pay Now.

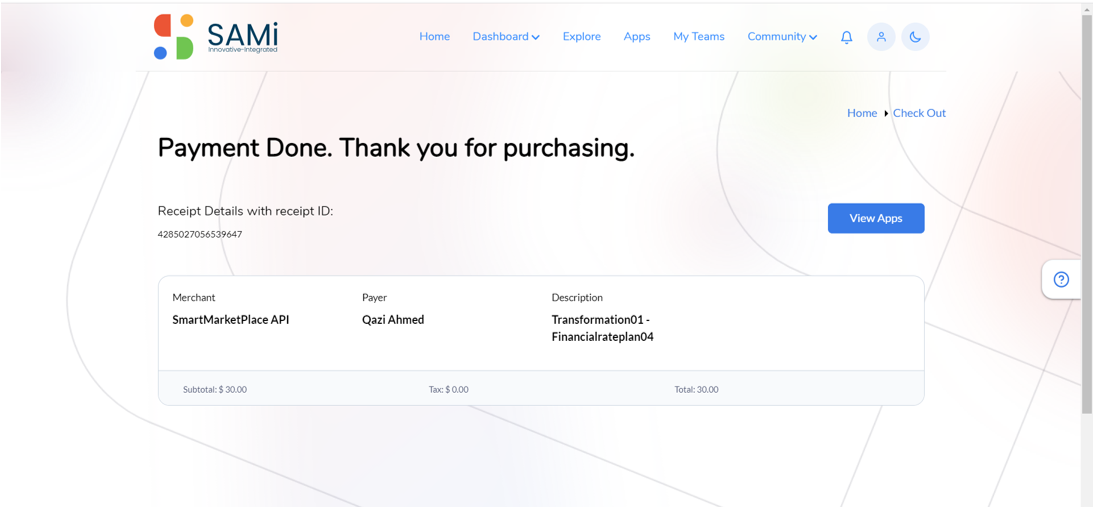
The Selected monetized product is successfully subscribed. A success message appears.
- A Payment Done page appears. Click on View Apps to view the subscribed app.

Note: Also, to view the monetized product, go to Developer Dashboard and search it.
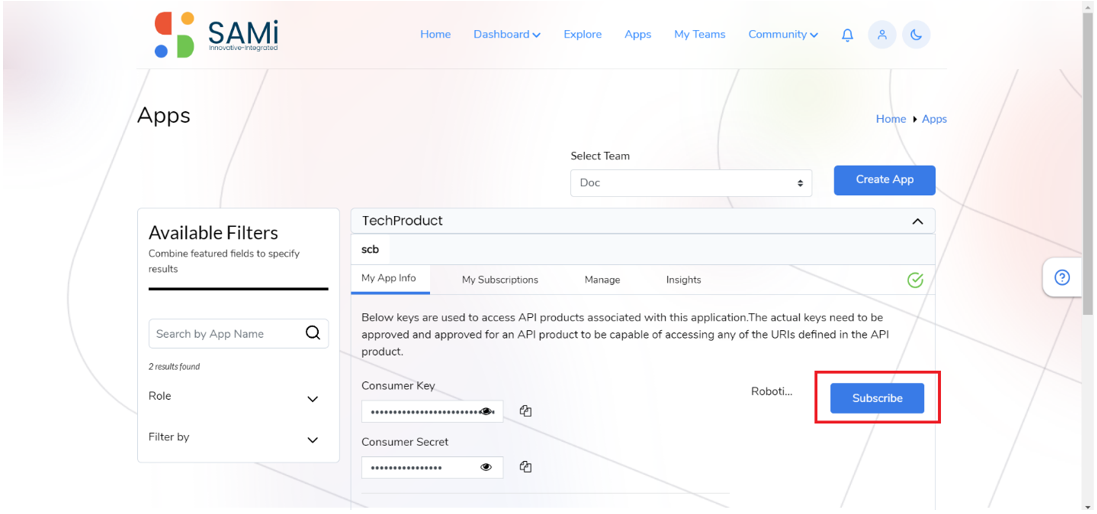
Product Onboarding
To view the subscribed product and onboard the App, do the following:
- Click on Apps
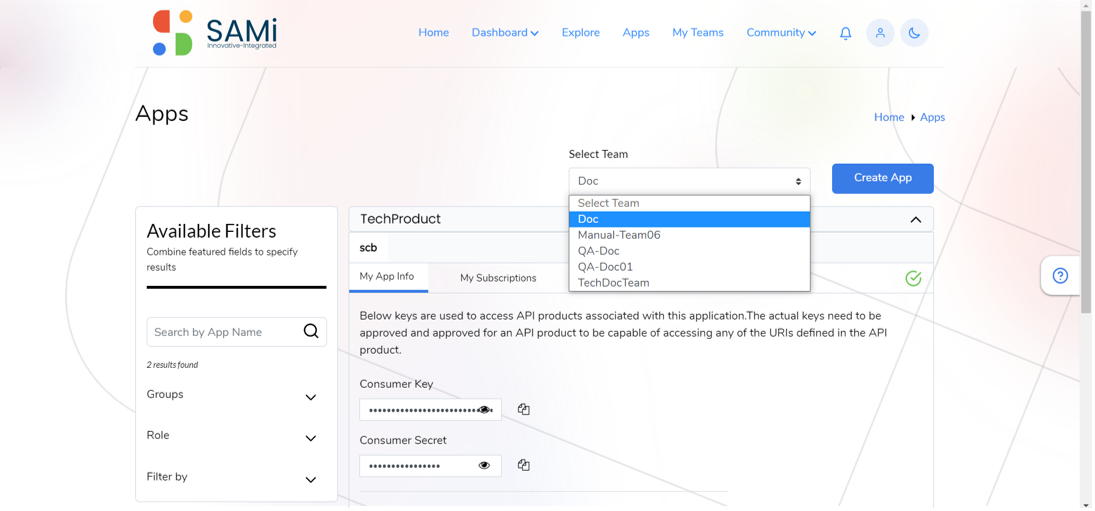
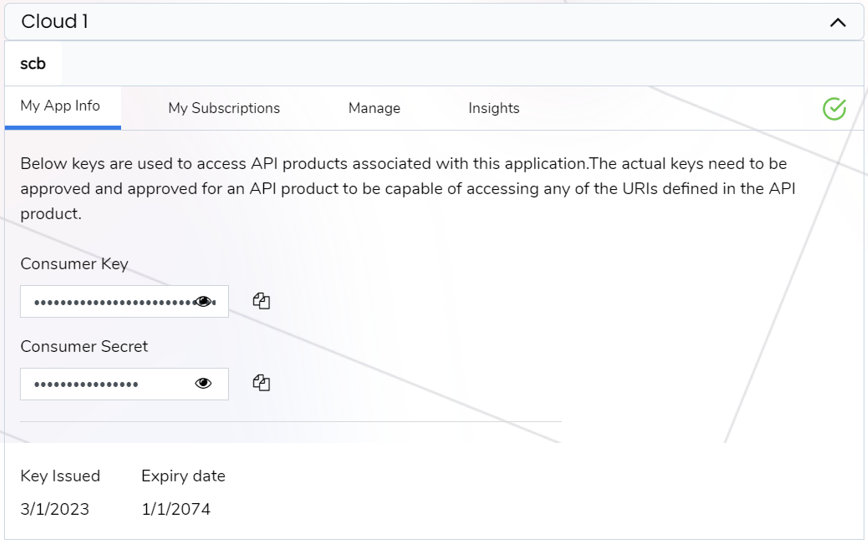
The Onboarding page appears. In this page, you will view these 3 tabs:
- My App Info
- My Subscriptions
- Manage
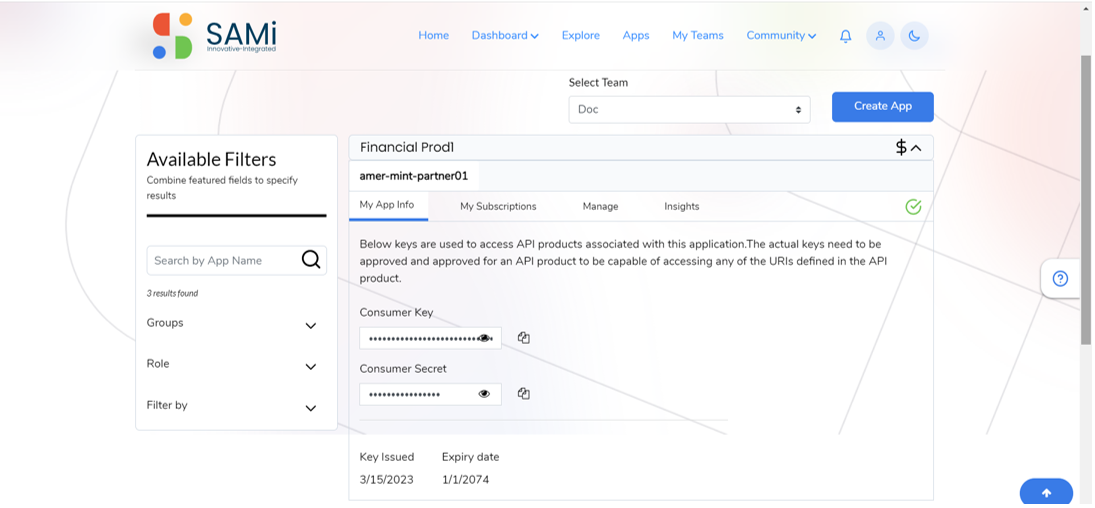
My App Info – This tab is opened by default, it will display the Consumer Key and Consumer Secret to further access the app. These keys can be copied by clicking on the copy icon besides the Consumer Key and Consumer Secret.
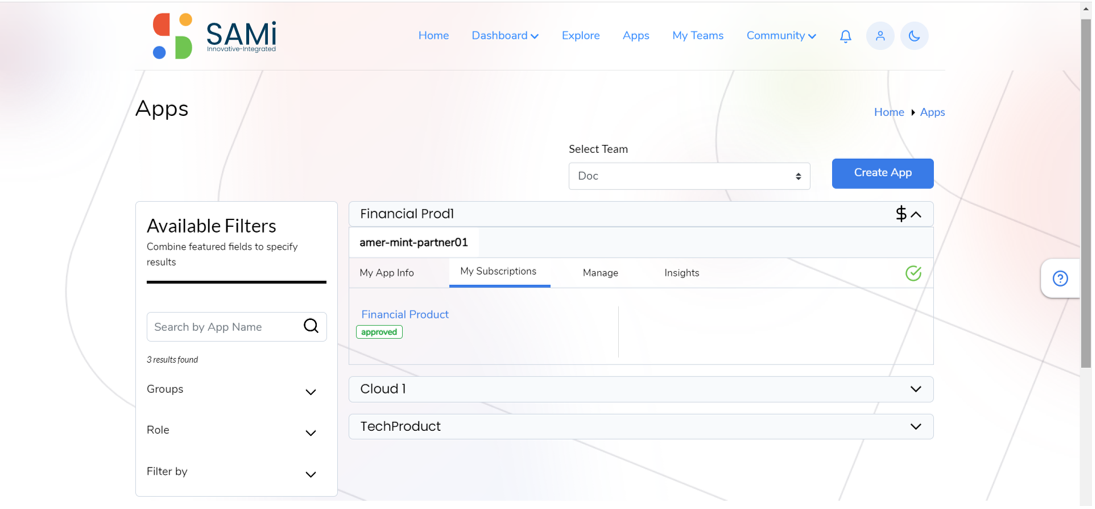
My Subscriptions – This tab when clicked, it will display the status of the product as approved. Also, if you wish to delete the subscribed product, you can delete it by clicking on the Delete icon.
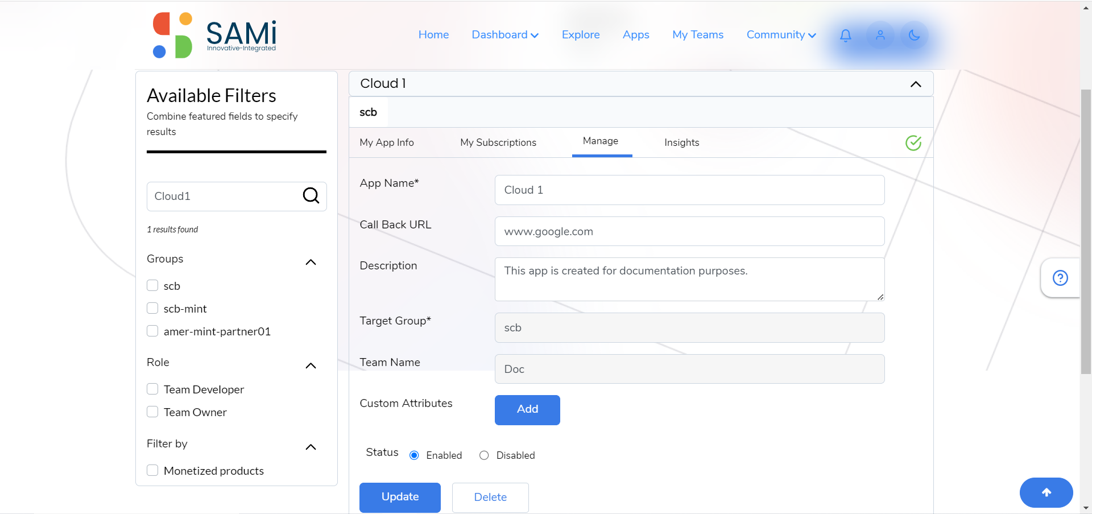
Manage – This tab when clicked, it will allow you to manage the app information by making changes to some of the information like, Call Back URL, Description. Also, you are allowed to change the Status from Enabled to Disabled. When you are done with the changes to the app information, click Update.
Note: When you change the Status from Enabled to Disabled, and click Update, you will no longer be able to access the app again, as it gets disabled. Furthermore, if you wish you can enable it again to use it by selecting the radio button to Enabled and clicking Update.
View Subscribed Products in Dashboard
To search monetized and non-monetized products after subscription, do the following:
- Go to Dashboard > click Developer Dashboard.
The Developer Dashboard is displayed.
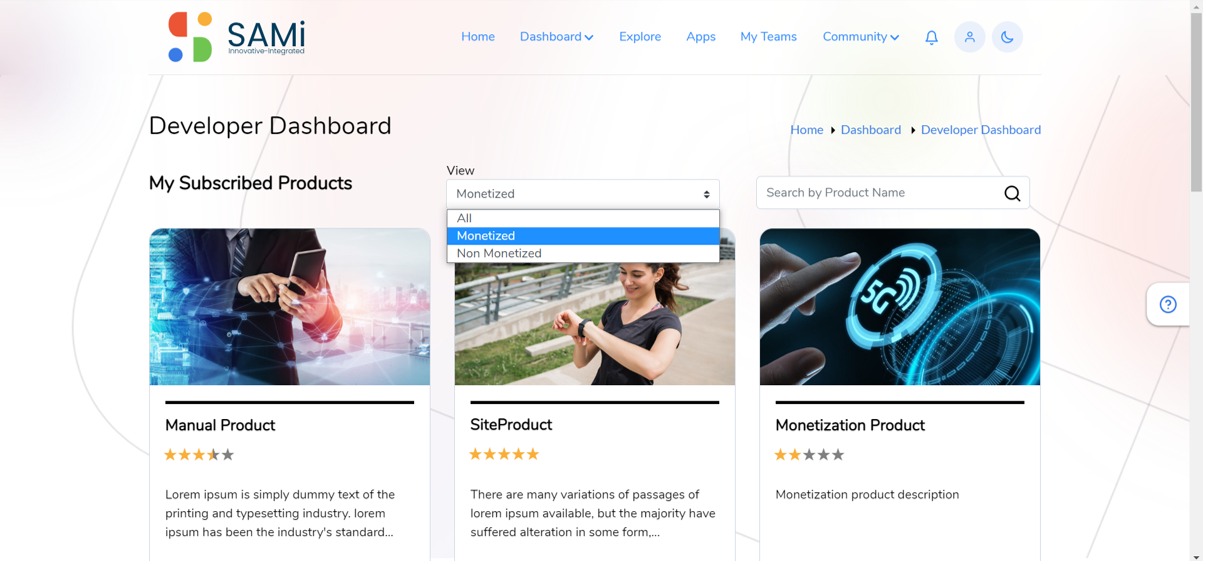
- In the Developer Dashboard, click to select the View
- Click Monetized.
- Enter the product name in the “Search by Product Name” search box.
- Click on Search.
The Monetized products are displayed.
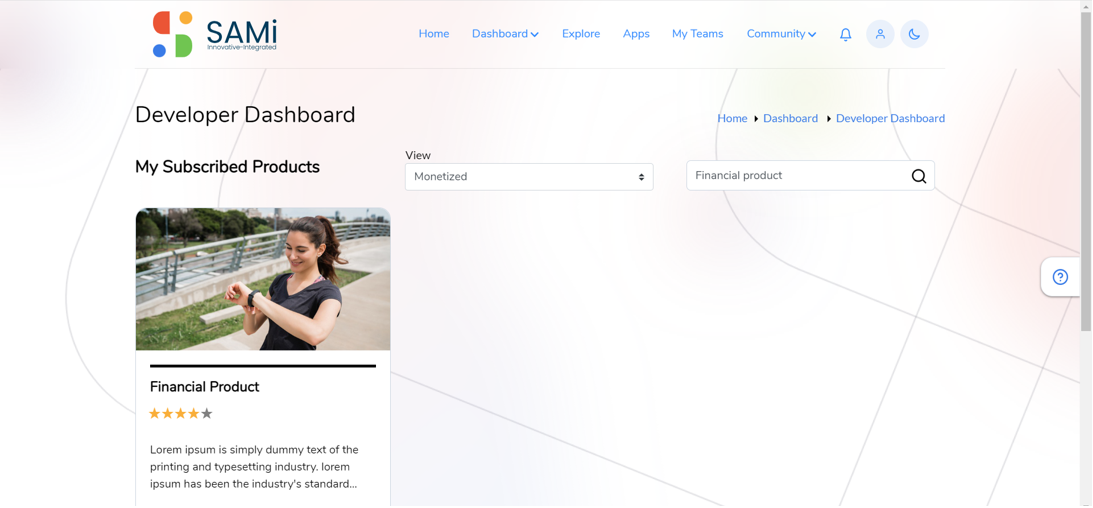
Note: If you select All in the View dropdown, it displays all the products subscribed by the Developer. When Monetized, is selected it displays only the monetized products subscribed by the developer. Similarly, when you select Non-Monetized products, it displays Non-Monetized products based on the selection.
Scenario 2: Subscribe for Monetized products from Home Page (Featured Products)
You can subscribe to the Monetized product in Developer Apps.
To subscribe to a monetized product, do the following:
- Login as a Developer in the Sign In
- In the Login page, Enter the Email address, and Password in the respective textboxes.
The Homepage is displayed.

- Search a product in the Featured Products page by using the right arrow or clicking View All.
The Explore page appears. - Enter the product keywords/name in the search field and click on Search.

The searched results appear in the Explore page.
- In the Explore page, select the product card, click on Read More to view all the product details.
The Financial Product Summary page is displayed.
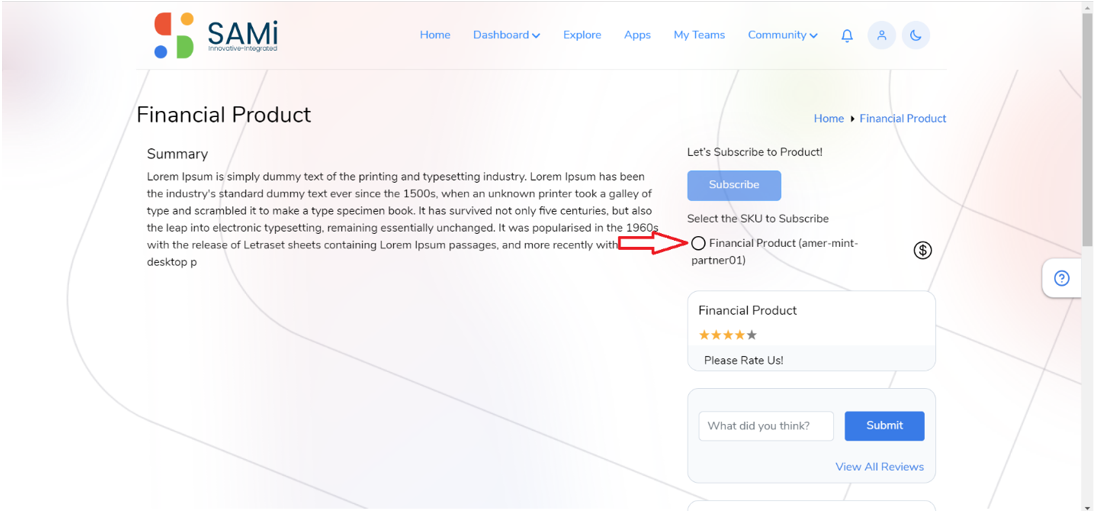
- Select any of the monetized product to subscribe it.
Note: When you check Select the SKU to Subscribe option, only then the Subscribe button changes to Buy Plan.
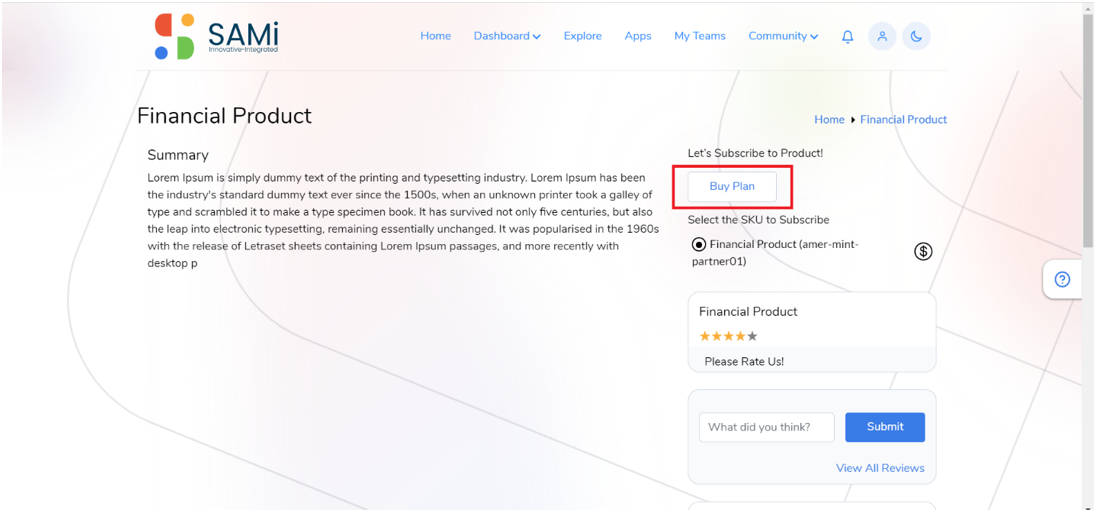
- Select Financial Product (amer-mint-partner01) radio button, to monetize the selected product.
- The Subscribe button is converted to Buy Plan
- Click Buy Plan.
The Available Rate Plan page is displayed.
In the Available Rate Plan page, Plan Name, SKU Name, Cost, and Volume Bands is pre-populated.
- Select the Team Name from the available dropdown list.
- The Create New Team text box appear, enter the new team name.
- Enter the App name in the Add App
- Click Buy.
The payment page appears.
- Click on the Pay with Credit or Debit Card.

A Credit and Debit CardPayment page appears.
Here, you need to toggle left to Save info & create your PayPal account. If you do not wish to create a PayPal account. - Click Continue as Guest.
The Payment review page appears. The Developer to review the payment information before making the payment.
- Click on Pay Now.
The Selected monetized product is successfully subscribed. A success message appears.
An email is triggered to the subscriber, you have successfully subscribed to a product and the URL is shared with the next steps. - A Payment Done page appears. Click on View Apps to view the subscribed app.

Note: Also, to view the monetized product, go to Developer Dashboard and search it.
Product Onboarding
To view the subscribed product and onboard the App, do the following:
- Click on Apps
The Onboarding page appears. In this page, you will view these 3 tabs:
-
- My App Info
- My Subscriptions
- Manage
My App Info – This tab is opened by default, it will display the Consumer Key and Consumer Secret to further access the app. These keys can be copied by clicking on the copy icon besides the Consumer Key and Consumer Secret.
My Subscriptions – This tab when clicked, it will display the status of the product as approved. Also, if you wish to delete the subscribed product, you can delete it by clicking on the Delete icon.
Manage – This tab when clicked, it will allow you to manage the app information by making changes to some of the information like, Call Back URL, Description. Also, you are allowed to change the Status from Enabled to Disabled. When you are done with the changes to the app information, click Update.
Note: When you change the Status from Enabled to Disabled, and click Update, you will no longer be able to access the app again, as it gets disabled. Furthermore, if you wish you can enable it again to use it by selecting the radio button to Enabled and clicking Update.
View Subscribed Products in Dashboard
To search monetized and non-monetized products after subscription, do the following:
- Go to Dashboard > click Developer Dashboard.
The Developer Dashboard is displayed.
- In the Developer Dashboard, click to select the View
- Click Monetized.
- Enter the product name in the “Search by Product Name” search box.
- Click on Search.
The Monetized products are displayed.
Note: If you select All in the View dropdown, it displays all the products subscribed by the Developer. When Monetized, is selected it displays only the monetized products subscribed by the developer. Similarly, when you select Non-Monetized products, it displays Non-Monetized products based on the selection.
Scenario 3: Subscribe for Monetized products from Home Page (Explore Categories)
You can subscribe to the Monetized product in Developer Apps.
To subscribe to a monetized product, do the following:
- Login as a Developer in the Sign In
- In the Login page, Enter the Email address, and Password in the respective textboxes.
The Homepage is displayed.
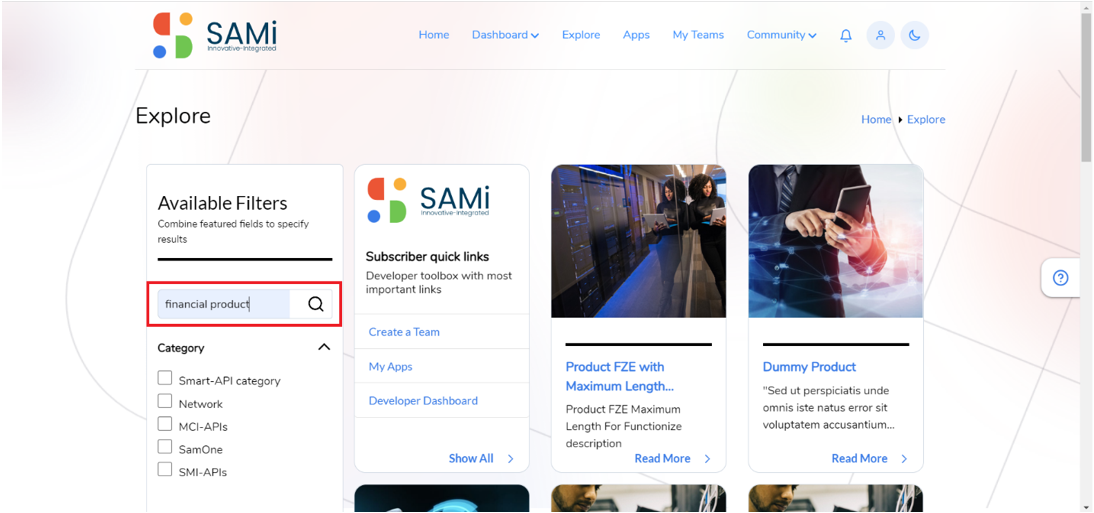
- Search for a product in the Featured Products list by scrolling down to the Explore Categories.
The Explore Categories appears. - In Explore Categories, click on View All link.

The Categories page appears with all the categories.
- Click Read More on the SMI-APIs category card.
- On the SMI-APIs page, select the product card, click on Read More to view all the product details.
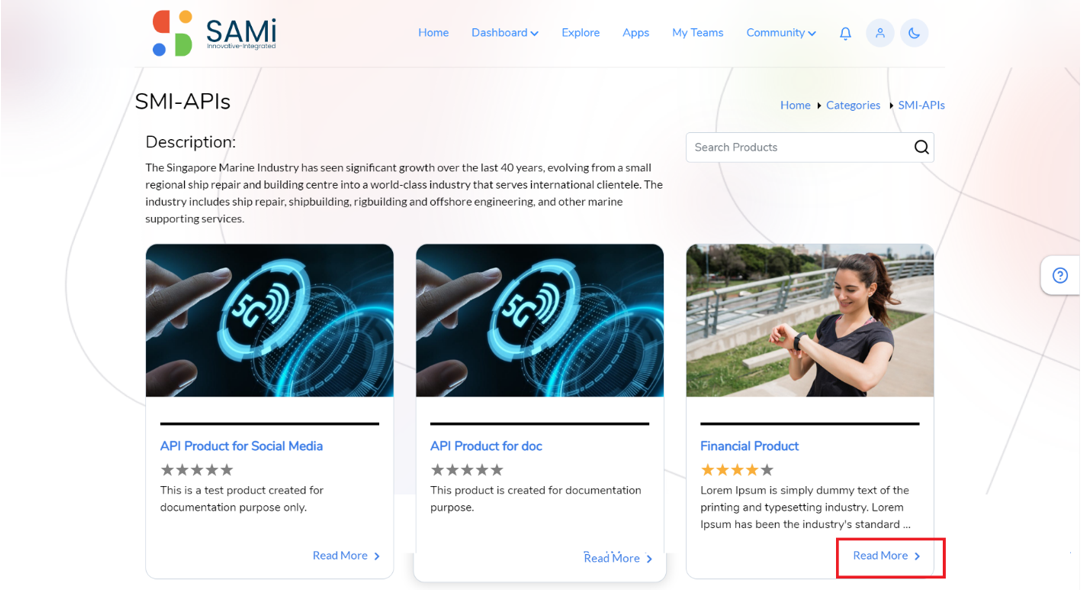
The Financial Product Summary page is displayed. - Select any of the monetized products to subscribe to it.
Note: When you check Select the SKU to Subscribe option, only then the Subscribe button changes to Buy Plan.

- Select Financial Product (amer-mint-partner01) radio button, to monetize the selected product.
- The Subscribe button is converted to Buy Plan
- Click Buy Plan.
The Available Rate Plan page is displayed.

In the Available Rate Plan page, Plan Name, SKU Name, Cost, and Volume Bands is pre-populated.
- Select the Team Name from the available dropdown list.
- The Create New Team text box appears, enter the new team’s name.
- Enter the App name in the Add App
- Click Buy.
The payment page appears.
- Click on Pay with Credit or Debit Card.
A Credit and Debit CardPayment page appears.

Here, you need to toggle left to Save info & create your PayPal account. If you do not wish to create a PayPal account.
- Click Continue as Guest.
The Payment review page appears. The Developer reviewed the payment information before making the payment.

- Click on Pay Now.
The Selected monetized product is successfully subscribed. A success message appears.
An email is triggered to the subscriber, you have successfully subscribed to a product and the URL is shared with the next steps. - A Payment Done page appears. Click on View Apps to view the subscribed app.
Note: Also, to view the monetized product, go to Developer Dashboard and search it.
Product Onboarding
To view the subscribed product and onboard the App, do the following:
- Click on Apps
The Onboarding page appears. In this page, you will view these 3 tabs:
-
- My App Info
- My Subscriptions
- Manage
My App Info – This tab is opened by default, it will display the Consumer Key and Consumer Secret to further access the app. These keys can be copied by clicking on the copy icon besides the Consumer Key and Consumer Secret.
My Subscriptions – This tab when clicked, it will display the status of the product as approved. Also, if you wish to delete the subscribed product, you can delete it by clicking on the Delete icon.
Manage – This tab when clicked, it will allow you to manage the app information by making changes to some of the information like, Call Back URL, Description. Also, you are allowed to change the Status from Enabled to Disabled. When you are done with the changes to the app information, click Update.
Note: When you change the Status from Enabled to Disabled, and click Update, you will no longer be able to access the app again, as it gets disabled. Furthermore, if you wish you can enable it again to use it by selecting the radio button to Enabled and clicking Update.
View Subscribed Products in Dashboard
To search monetized and non-monetized products after subscription, do the following:
- Go to Dashboard > click Developer Dashboard.
The Developer Dashboard is displayed.
- In the Developer Dashboard, click to select the View
- Click Monetized.
- Enter the product name in the “Search by Product Name” search box.
- Click on Search.
The Monetized products are displayed.
Note: If you select All in the View dropdown, it displays all the products subscribed by the Developer. When Monetized, is selected it displays only the monetized products subscribed by the developer. Similarly, when you select Non-Monetized products, it displays Non-Monetized products based on the selection.
Scenario 4: Subscribe for Monetized products from Explore Page
You can subscribe to the Monetized product in Developer Apps.
To subscribe to a monetized product, do the following:
- Login as a Developer on the Sign In
- In the Login page, Enter the Email address, and Password in the respective textboxes.
The Homepage is displayed. - In the Home page, click on Explore option on the main menu.
The Explore page appears.
- Enter the product keywords/name in the search field and click on Search icon.
The search results appear on the Explore page.
- In the Explore page, select the product card, click on Read More to view all the product details.

The Financial Product Summary page is displayed.

- Select any of the monetized products to subscribe to it.
Note: When you check Select the SKU to Subscribe option, only then the Subscribe button changes to Buy Plan.
- Select Financial Product (amer-mint-partner01) radio button, to monetize the selected product.
- The Subscribe button is converted to Buy Plan
- Click Buy Plan.
The Available Rate Plan page is displayed.

In the Available Rate Plan page, Plan Name, SKU Name, Cost, and Volume Bands is pre-populated.
- Select the Team Name from the available dropdown list.
- The Create New Team text box appears, enter the new team’s name.
- Enter the App name in the Add App
- Click Buy.
The payment page appears.

- Click on Pay with Credit or Debit Card.
A Credit and Debit Card Payment page appears.

Here, you need to toggle left to Save info & create your PayPal account, if you do not wish to create a PayPal account.
- Click Continue as Guest.
The Payment review page appears. The Developer reviewed the payment information before making the payment.
- Click on Pay Now.
The Selected monetized product is successfully subscribed. A success message appears.
An email is triggered to the subscriber, you have successfully subscribed to a product and the URL is shared with the next steps. - A Payment Done page appears. Click on View Apps to view the subscribed app.
Note: Also, to view the monetized product, go to Developer Dashboard and search it.
Product Onboarding
To view the subscribed product and onboard the App, do the following:
- Click on Apps
The Onboarding page appears. In this page, you will view these 3 tabs:
-
- My App Info
- My Subscriptions
- Manage
My App Info – This tab is opened by default, it will display the Consumer Key and Consumer Secret to further access the app. These keys can be copied by clicking on the copy icon besides the Consumer Key and Consumer Secret.
My Subscriptions – This tab when clicked, it will display the status of the product as approved. Also, if you wish to delete the subscribed product, you can delete it by clicking on the Delete icon.
Manage – This tab when clicked, it will allow you to manage the app information by making changes to some of the information like, Call Back URL, Description. Also, you are allowed to change the Status from Enabled to Disabled. When you are done with the changes to the app information, click Update.
Note: When you change the Status from Enabled to Disabled, and click Update, you will no longer be able to access the app again, as it gets disabled. Furthermore, if you wish you can enable it again to use it by selecting the radio button to Enabled and clicking Update.
View Subscribed Products in Dashboard
To search monetized and non-monetized products after subscription, do the following:
- Go to Dashboard > click Developer Dashboard.
The Developer Dashboard is displayed.
- In the Developer Dashboard, click to select the View
- Click Monetized.
- Enter the product name in the “Search by Product Name” search box.
- Click on Search.
The Monetized products are displayed.
Note: If you select All in the View dropdown, it displays all the products subscribed by the Developer. When Monetized, is selected it displays only the monetized products subscribed by the developer. Similarly, when you select Non-Monetized products, it displays Non-Monetized products based on the selection.
Workflow 07 – Provide Product Reviews and Ratings
Scenario 1: Provide Product Reviews and Ratings from Home Page (Search Option)
The product review and ratings feature will help the developer to add product reviews and submit ratings on individual products.
To add a product review or rating from Home page, do the following:
- In Home page, search a product by providing the keywords/product name in the search field and press Enter.

The Explore page appears with relevant search results.
- In Explore page, click on Read More of the selected product card.
The product Summary page appears.
- In the Product Summary page, hover over the mouse on the 5 stars (choose from 1 to 5 stars) to provide your ratings to that product. When you submit the rating a ‘done’ message appears.
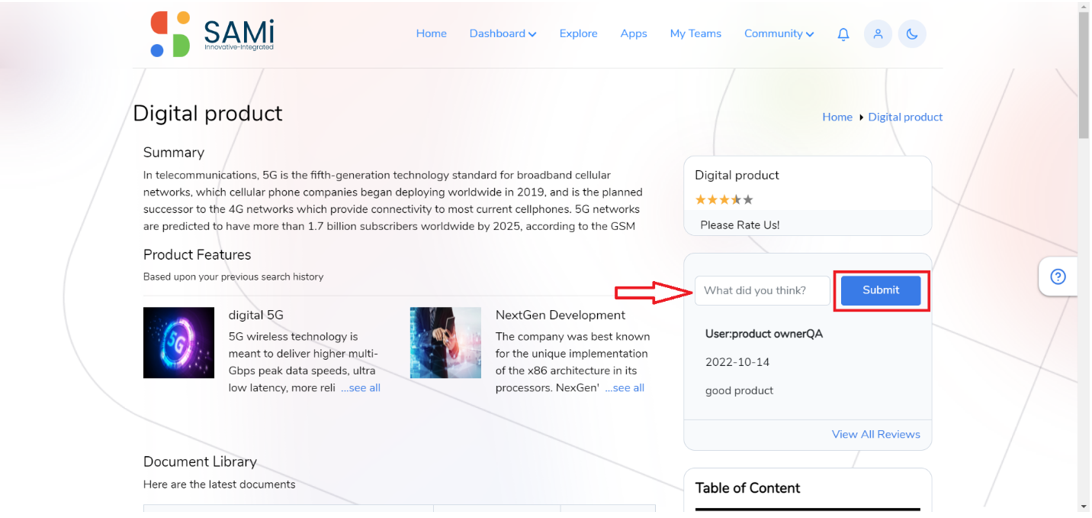
- Similarly, to add review comments, type-in your comments in the textbox provided and click on Submit.

The Review submitted appears below in the same section. - To view all review, click on View All Reviews
The ‘Reviews most recent on top’ popup appears displaying with the most recent reviews.
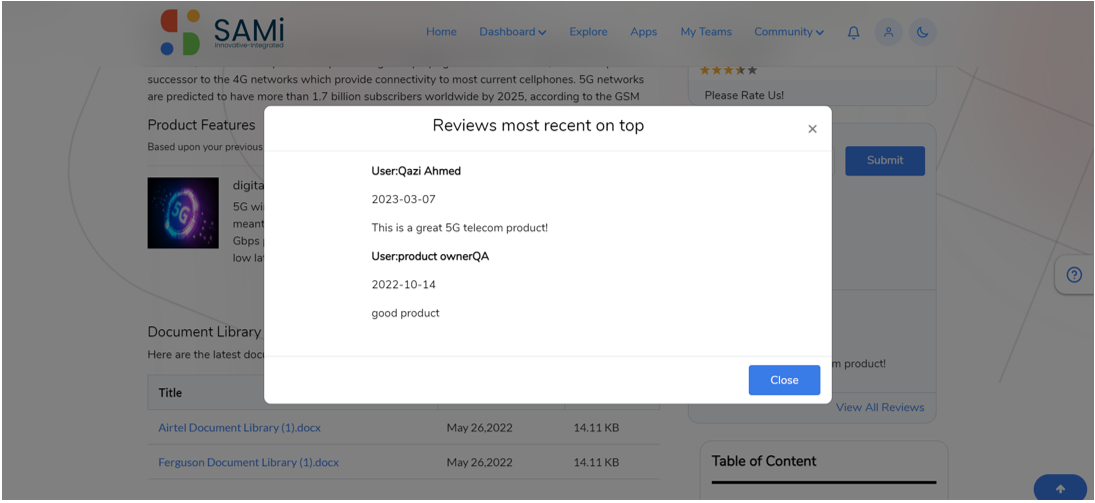
- Click Close, to close the review popup after viewing it.
Scenario 2: Provide Product Reviews and Ratings from Home Page (Featured Products)
The product review and ratings feature will help the developer to add product review and submit ratings on individual products.
To add a product review or rating from Home page, do the following:
- In Home page, search a product by scrolling down to Featured Products.

The Featured products appears displaying all products. You can navigate and search products by using the right arrow. - In Featured Products, click on View Product of the selected product card.
The product Summary page appears.
- In the Product Summary page, hover over the mouse on the 5 stars (choose from 1 to 5 stars) to provide your ratings to that product. When you submit the rating a ‘done’ message appears.
- Similarly, to add review comments, type-in your comments in the textbox provided and click on Submit.
The Review submitted appears below in the same section. - To view all review, click on View All Reviews
The ‘Reviews most recent on top’ popup appears displaying with the most recent reviews.
- Click Close, to close the review popup after viewing it.
Scenario 3: Provide Product Reviews and Ratings from Home Page (Explore Categories)
The product review and ratings feature will help the developer to add product review and submit ratings on individual products.
To add a product review or rating from Home page (Explore Categories), do the following:
- In Home page, search a product by scrolling down to Explore Categories.
The Explore Categories page appears by displaying all the product categories.
- In Explore Categories, click on View link of the selected product category card.
The product Summary page appears.

- In the Product Summary page, hover over the mouse on the 5 stars (choose from 1 to 5 stars) to provide your ratings to that product. When you submit the rating a ‘done’ message appears.
- Similarly, to add review comments, type-in your comments in the textbox provided and click on Submit.
The Review submitted appears below in the same section. - To view all review, click on View All Reviews
The ‘Reviews most recent on top’ popup appears displaying with the most recent reviews.
- Click Close, to close the review popup after viewing it.
Scenario 4: Provide Product Reviews and Ratings from Explore Page
The product review and ratings feature will help the developer to add product review and submit ratings on individual products.
To add a product review or rating from Explore page, do the following:
- From Home page, navigate by clicking on Explore option on the main menu.
The Explore page appears.
- In the Explore page, search the product by providing keywords/product name in the search field and press Enter.
The search results appear.
- In Explore page, click on Read More of the selected product card.
The product Summary page appears.

- In the Product Summary page, hover over the mouse on the 5 stars (choose from 1 to 5 stars) to provide your ratings to that product. When you submit the rating a ‘done’ message appears.
- Similarly, to add review comments, type-in your comments in the textbox provided and click on Submit.

The Review submitted appears below in the same section. - To view all review, click on View All Reviews
The ‘Reviews most recent on top’ popup appears displaying with the most recent reviews.
- Click Close, to close the review popup after viewing it.
Workflow 08 – Manage Subscriber Apps from Apps Page
The developer can easily manage the subscribed apps in the SAMi API Marketplace. The developer when navigates to the Apps page, will be able to perform certain functions related to subscribed apps for instance:
- Search a Subscribed App
- My Apps Info
- My Subscriptions Information
- Manage App
- Insights
- Filter by Groups, Roles and Filter By options
- Edit an App
- Delete An App
Search a Subscribed App
- To search a subscribed app, from Home page navigate to the Apps page by clicking on Apps option on the main menu.

The Apps page appears with the latest subscribed app details.

To search for a subscribed app, enter the App Name in the search field on the left navigation pane and click Enter. Also, you will be able to filter the apps using the Groups, Role, Monetized products filter options by enabling or disabling the checkboxes.
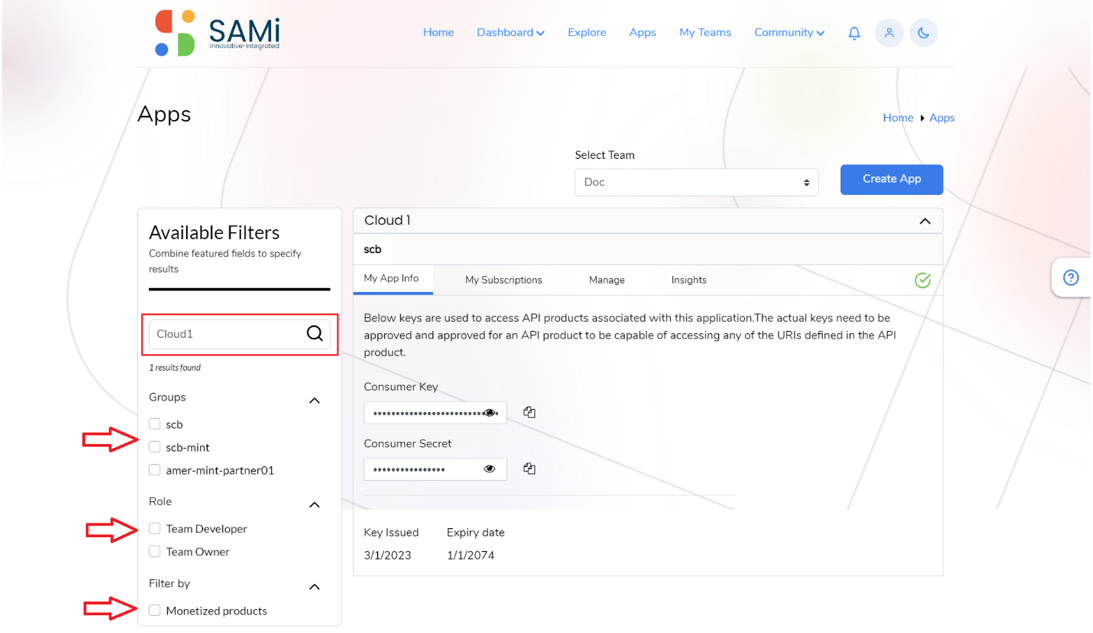
The search result of the subscribed app is displayed.
My App Info tab
By default, the My App Info tab is enabled and displays the app subscription details along with the Consumer Key and Consumer Secret to access the app the first time. Also provided the date of key issued and expiry date of the app.
My Subscriptions tab
To navigate to my subscriptions, click on My Subscriptions tab to open and display the app subscription information.
The My Subscriptions section displays the information related to app subscription, its status as approved, or pending. Here the app is approved by the PO it shows an Approved status.
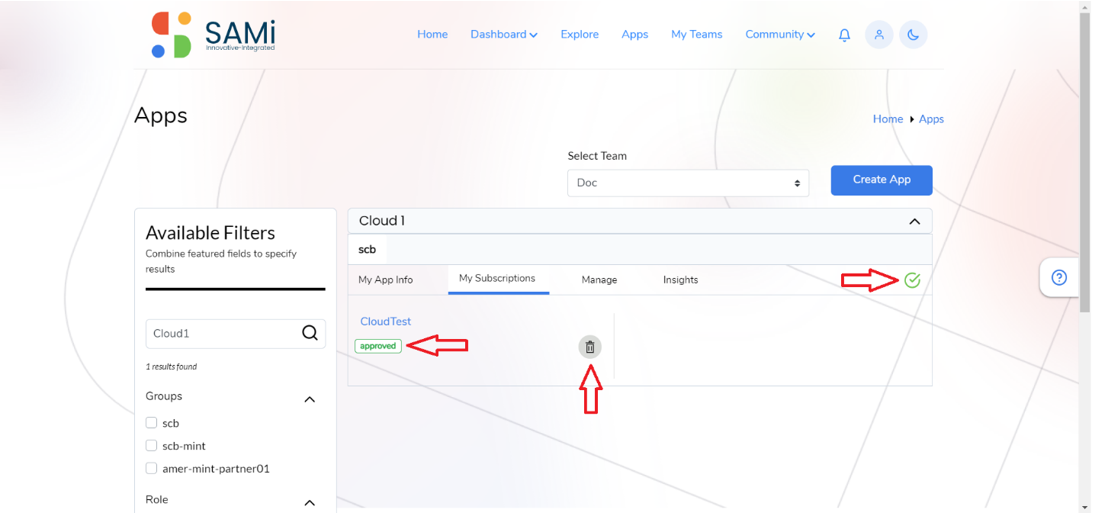
The right icon in green also denotes that the app is approved otherwise, if the app is unapproved or pending it shows an (x) symbol.
Delete App – The delete icon can be used to delete the subscribed app by searching an app and clicking on Delete icon.
Manage tab
In Apps page, the Manage tab when selected, it displays the app information and will enable you to update the app information for instance:
- Call Back URL
- Description
- Add Attributes
- Disable the App
- Click on Manage tab.
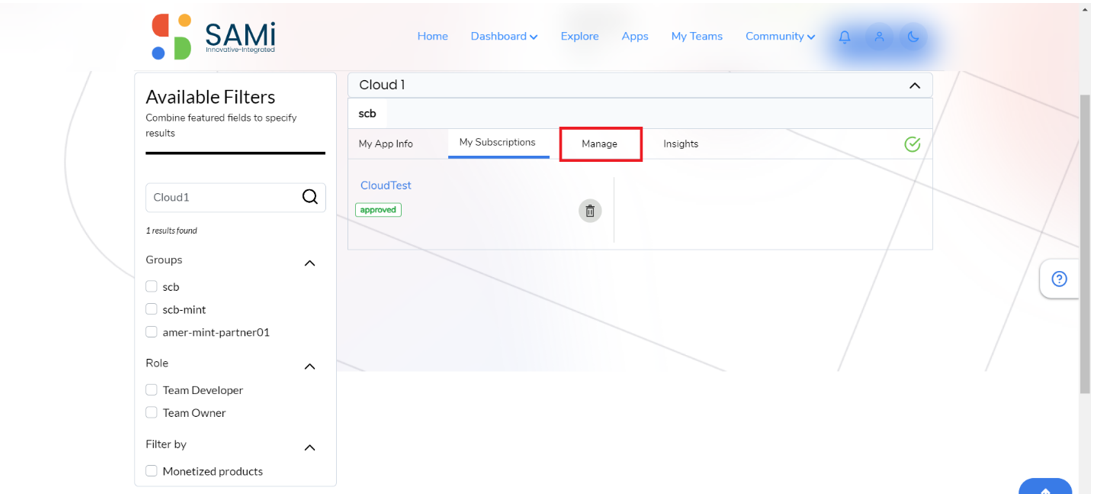
The Manage tab opens and displays the app information.
- Make necessary updates to the app information. When all the updates are done, click on Update.
A success message appears, the App is updated.
- Delete the App – You are able to delete a subscribed app by clicking on the Delete button.
Insights tab
- When the Insights tab is selected, it opens the app insights.
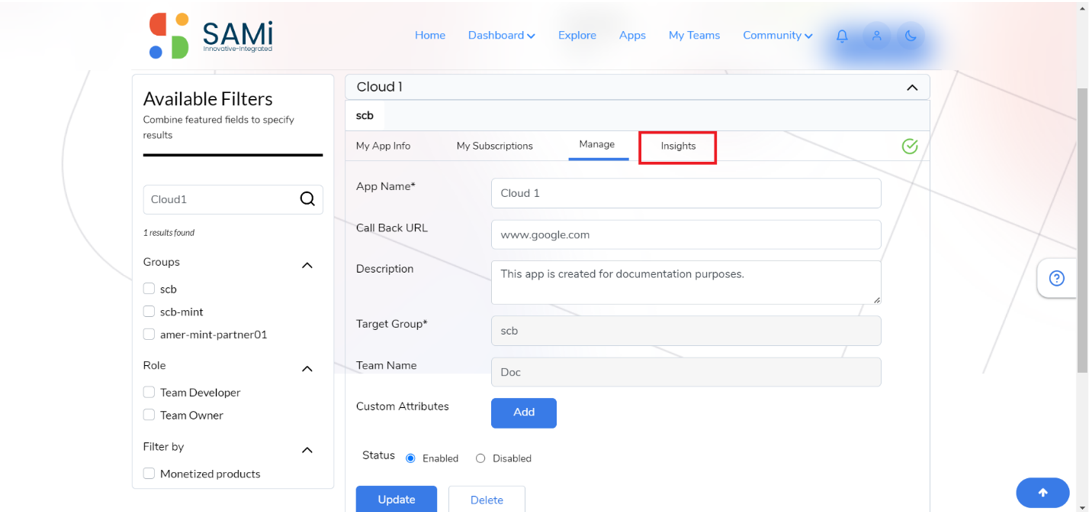
- The Insights section is displayed. Based on the selection of the Performance Type, Frequency, API Type and Response Code insights are provided.
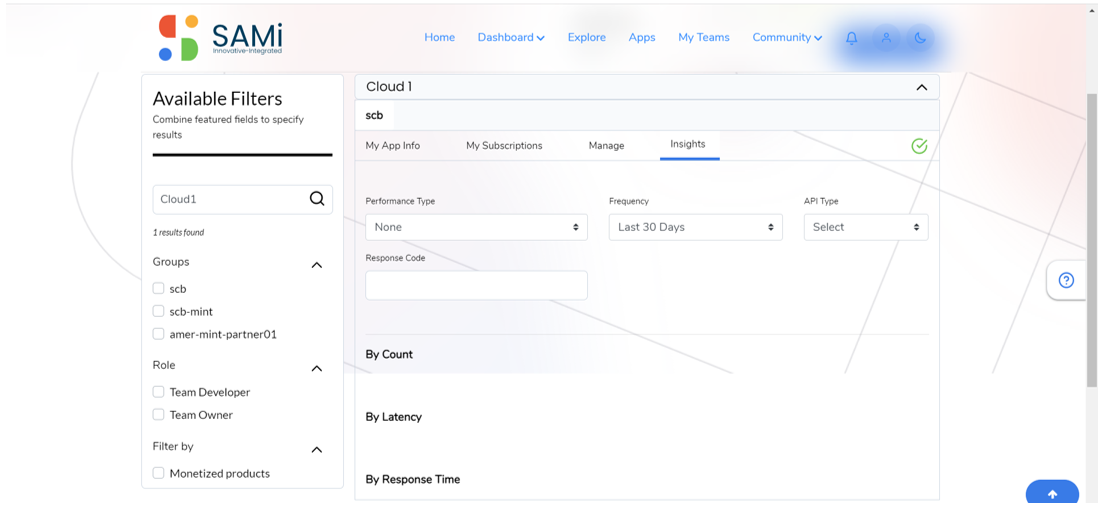
Note: There is no data, hence it is not showcasing any insights.
Workflow 09 – Manage Teams from Main Menu
Manage Teams from the Main menu
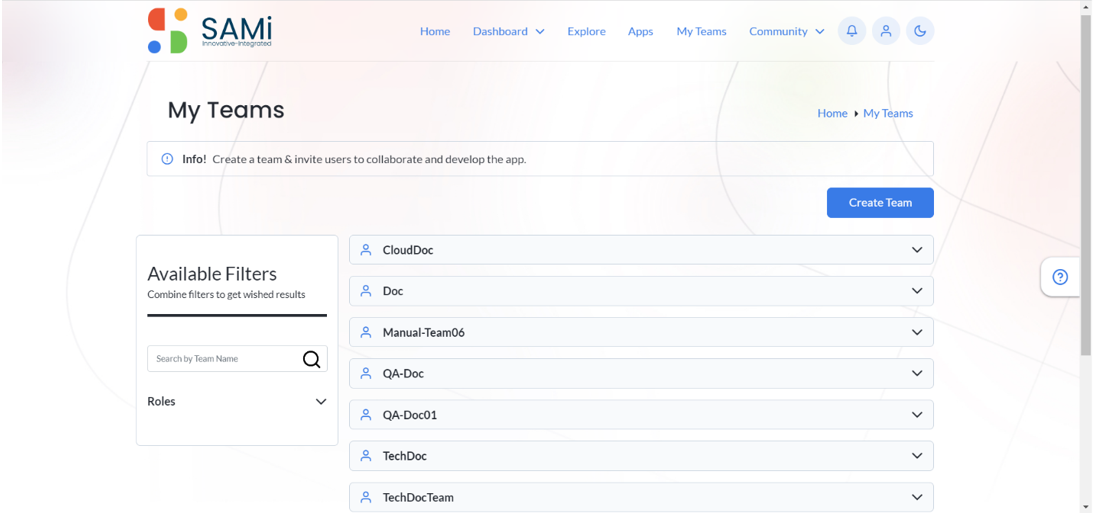
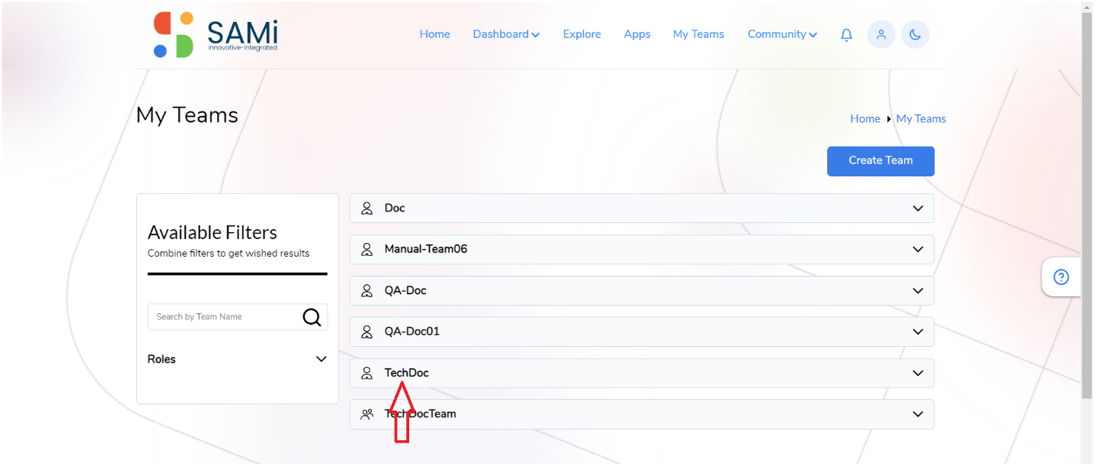
My Teams
The My Teams page helps you to create your teams and collaborate with other subscribers and create apps, helps view the teams and also members associated to the respective teams. Using My Teams feature you can also invite a New/Existing team Owner/Member by providing their email address and selecting the role.
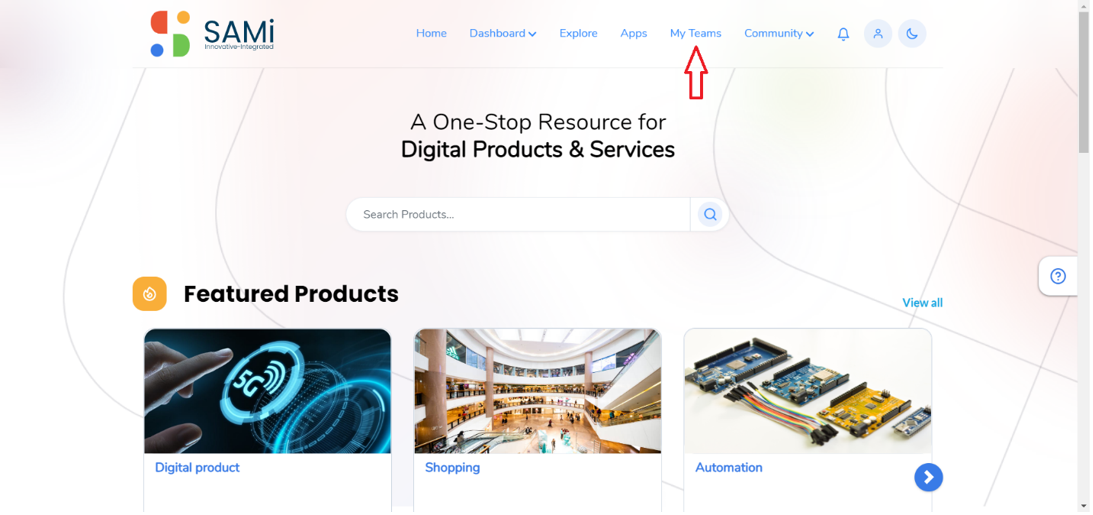
- To navigate to My Teams page from Home page, click on My Teams option on the main menu.
The My Teams page appears. My Teams page displays all the Teams listed.
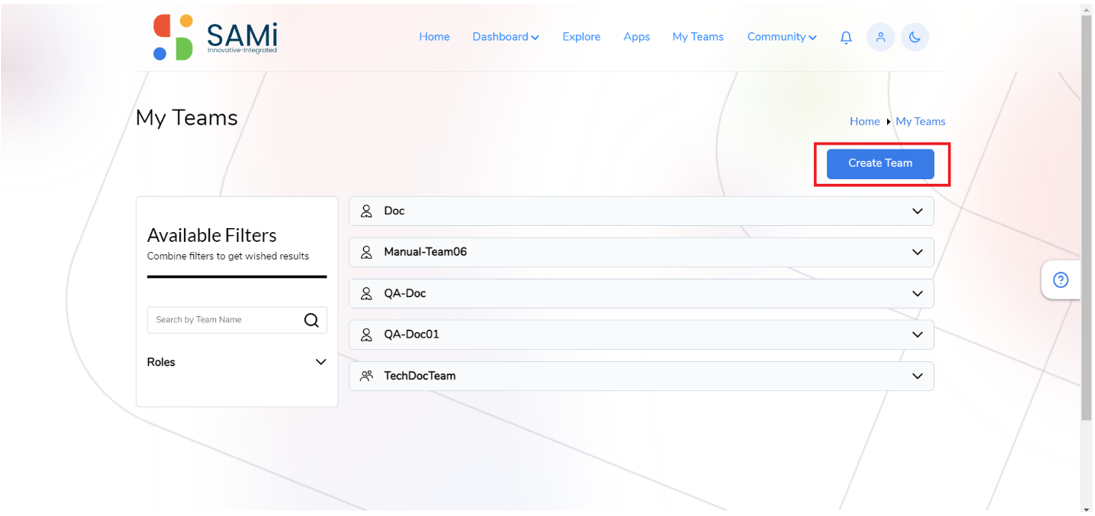
Create a Team
To create a team in My Teams page, do the following:
- In Teams page, click on the Create Team.
The Create Team page appears.
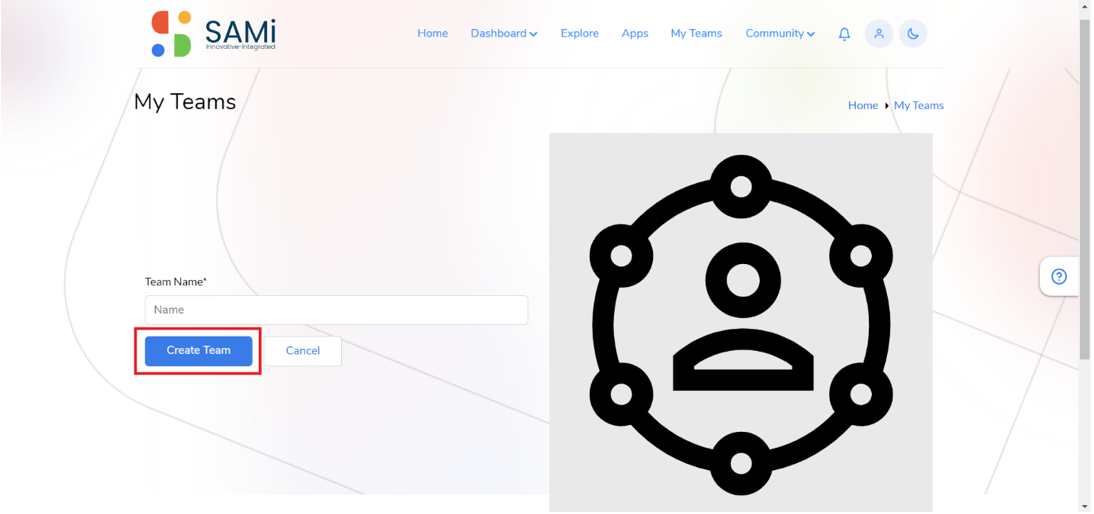
- Enter the Team Name in the textbox provided.
- Click Create Team.
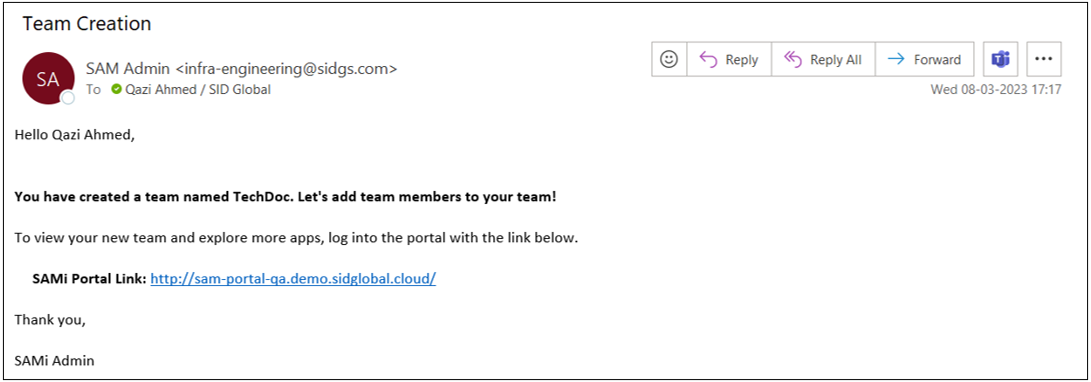
A success message appears. A new Team with the name as, TechDoc is created successfully.
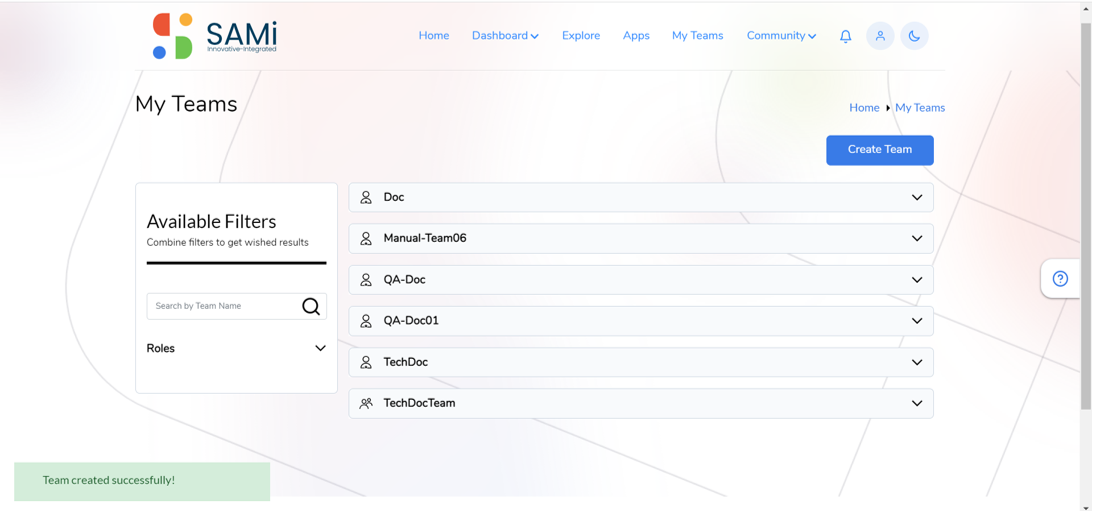
The new team created is displayed.
A success message is received in the email inbox of the creator who created the team.
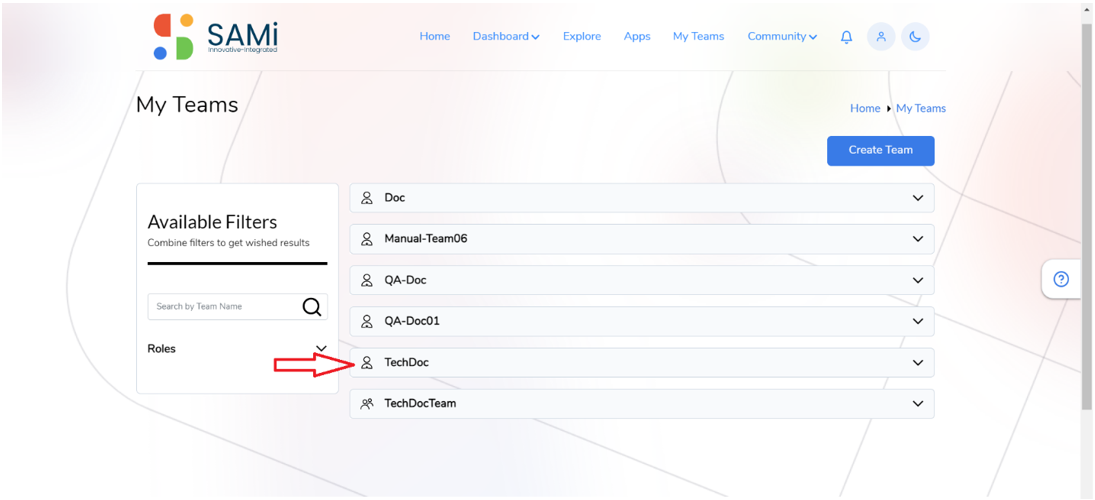
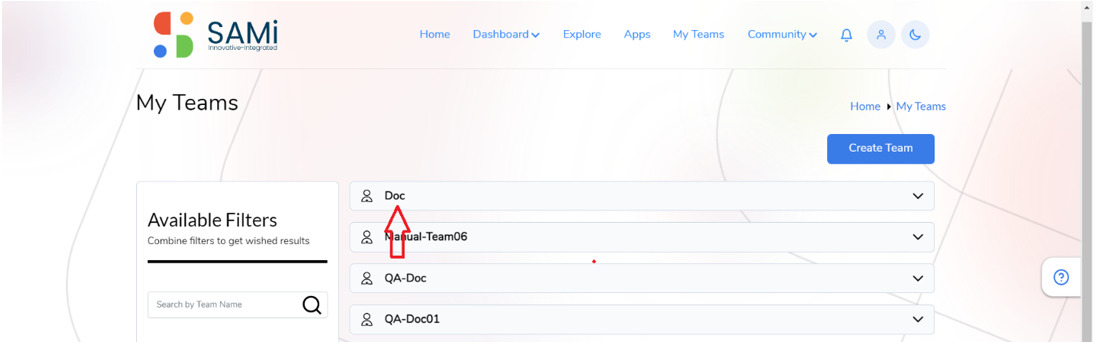
- Click to select and expand any of the Team from the available list of teams.
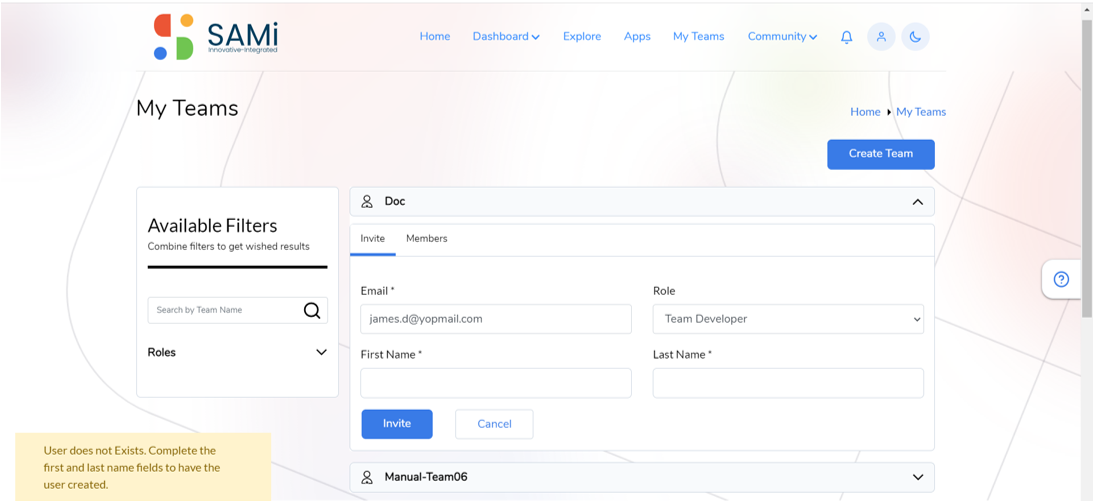
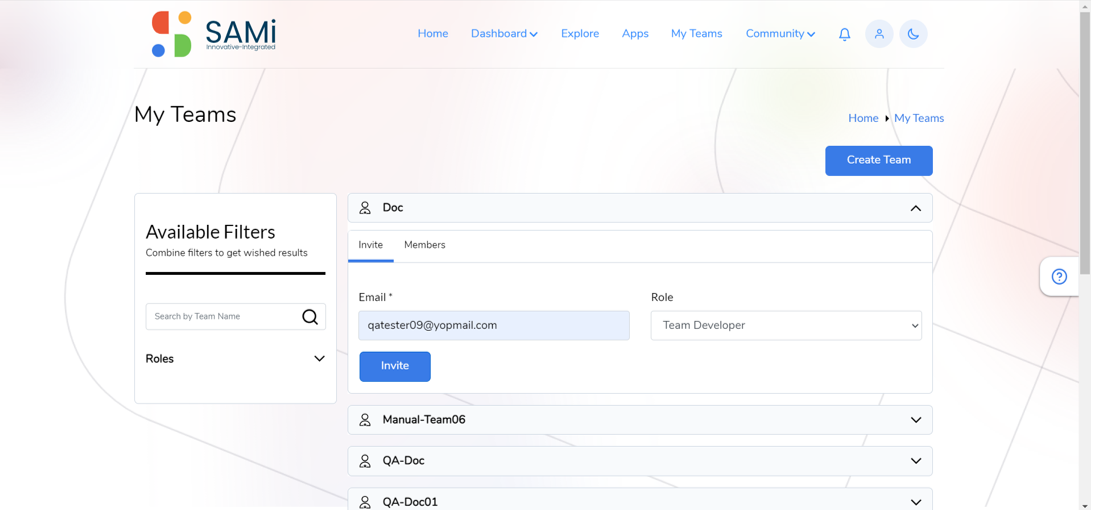
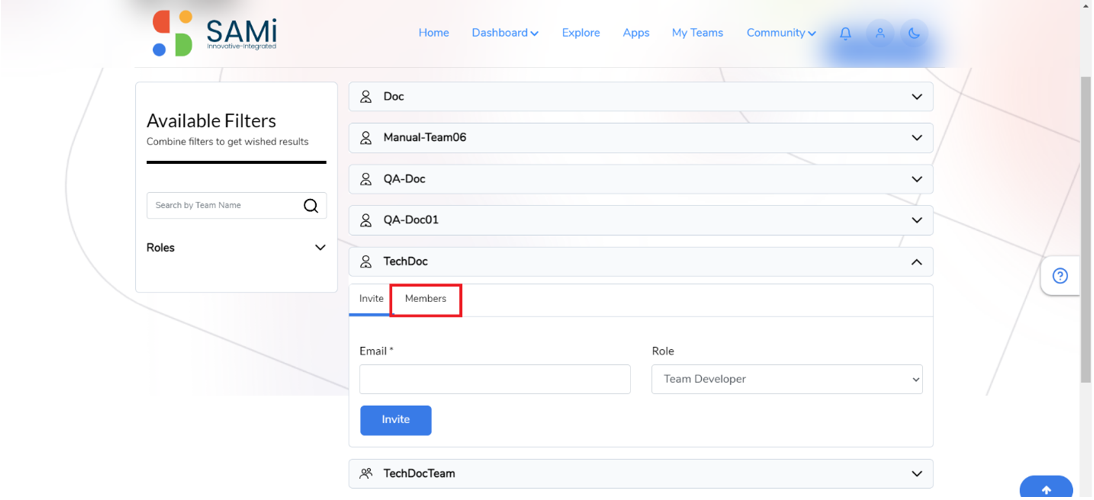
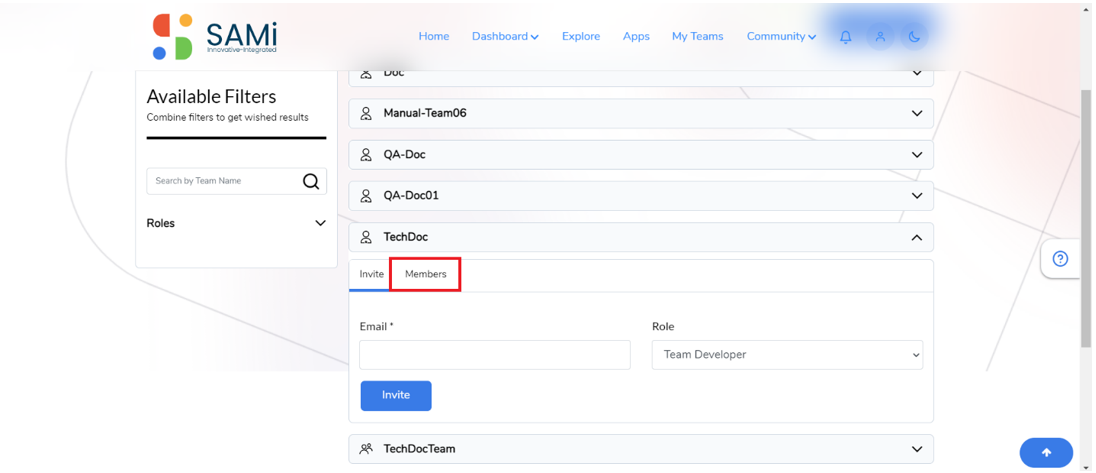
Scenario 1: Invite New Team Member (New Developer)
As a subscriber, you will be able to invite New Team Members (Developers) to the Team. The My Teams page, is categorized into 2 tabs:
- Invite tab
- Members tab
To invite a new team member to work on the subscribed app, do the following:
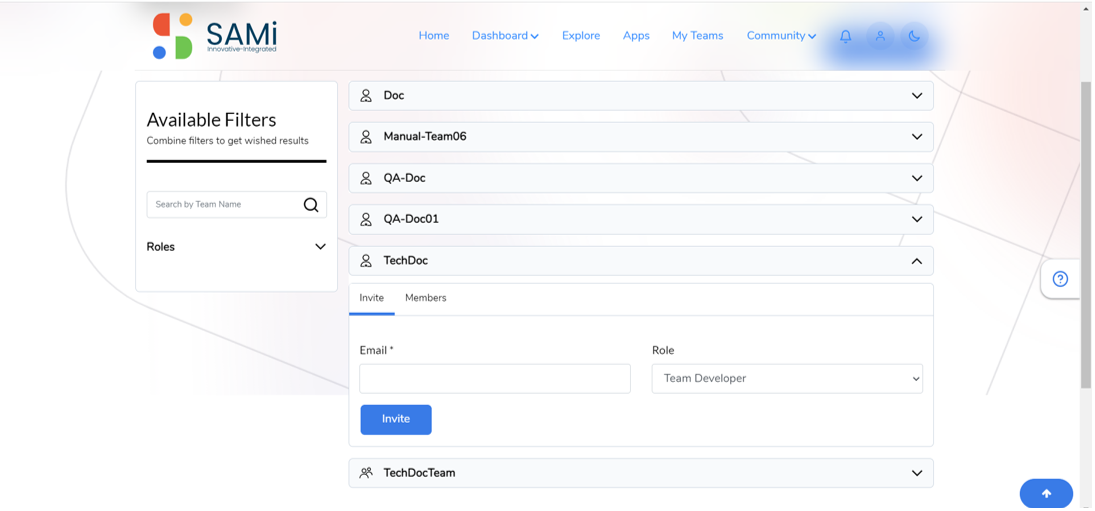
- Go to My Teams, click on Doc Team to expand.
The Doc team section expands and displays input fields to invite a member.
- In Invite tab, enter the Email Address of the team member in the text box provided.
- Select the Role as Team Developer. By default, it will be set to Team Developer only.
- Click Invite

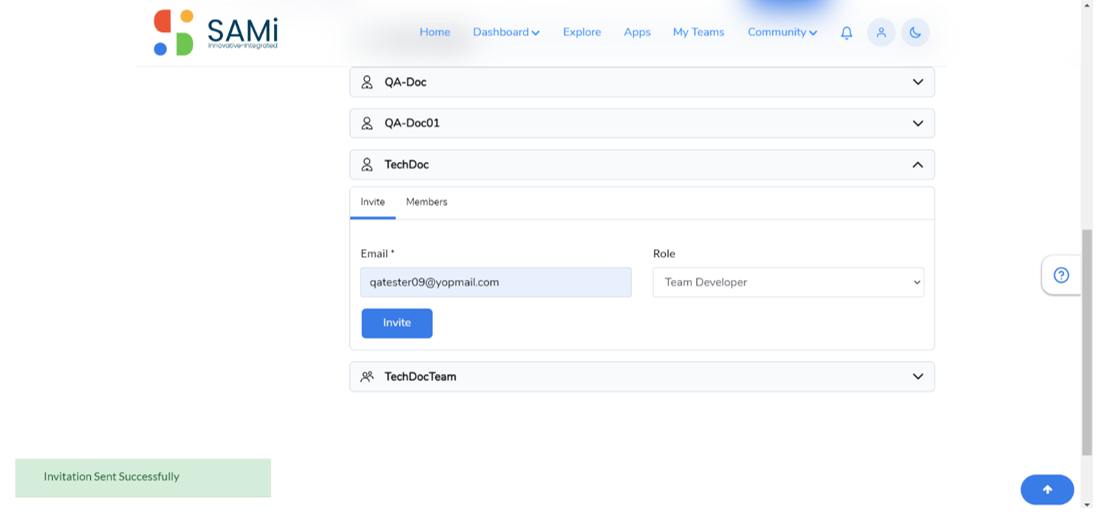
Upon clicking Invite button, a message pops up stating, “User does not Exists. Complete the First Name and Last Name fields to have the user created”. - Enter the First Name and Last Name in the respective textboxes.
- Click Invite.
A success message appears, “Invitation sent successfully”.
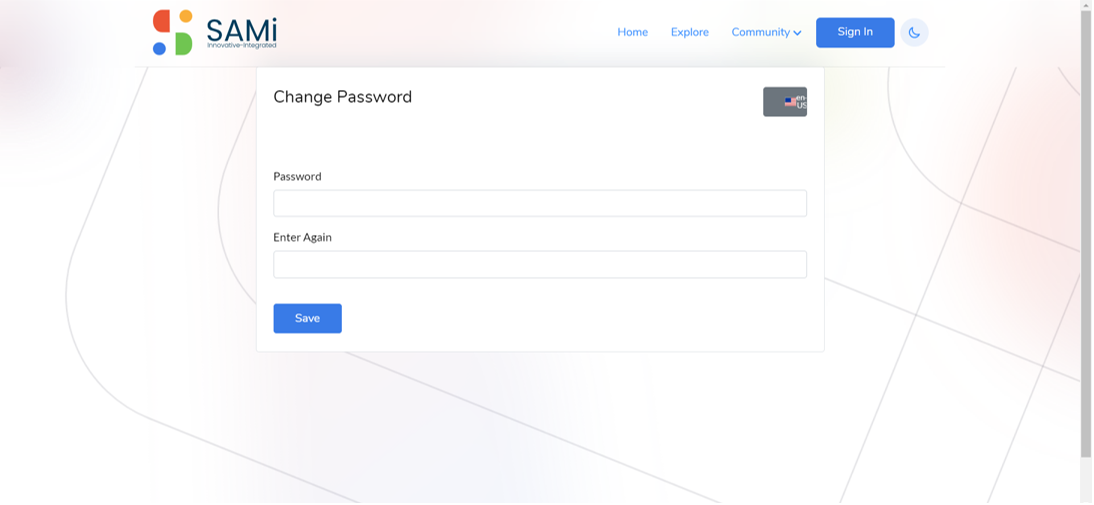
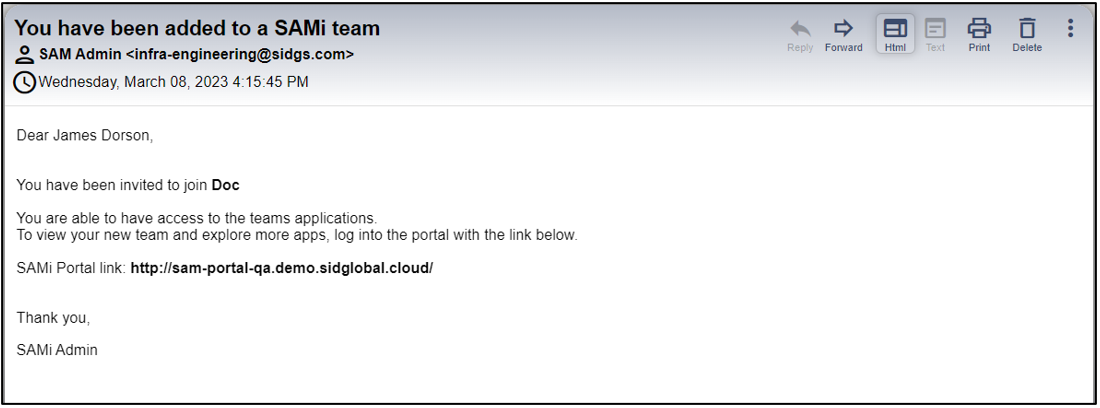
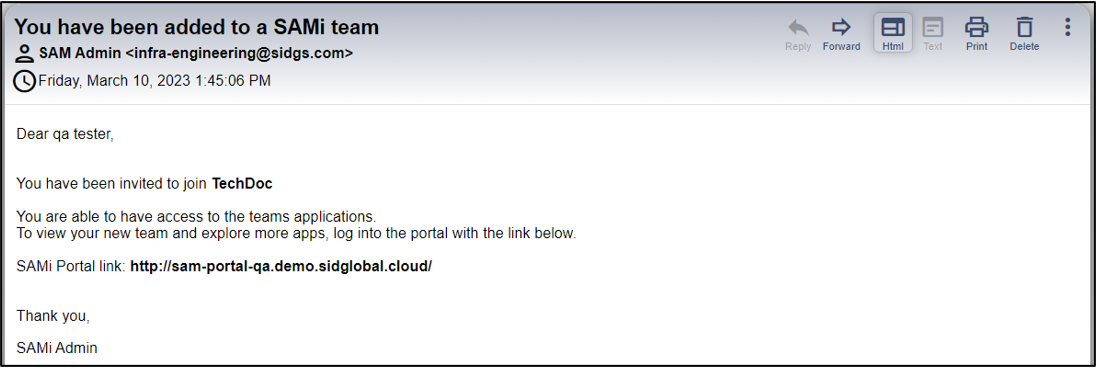
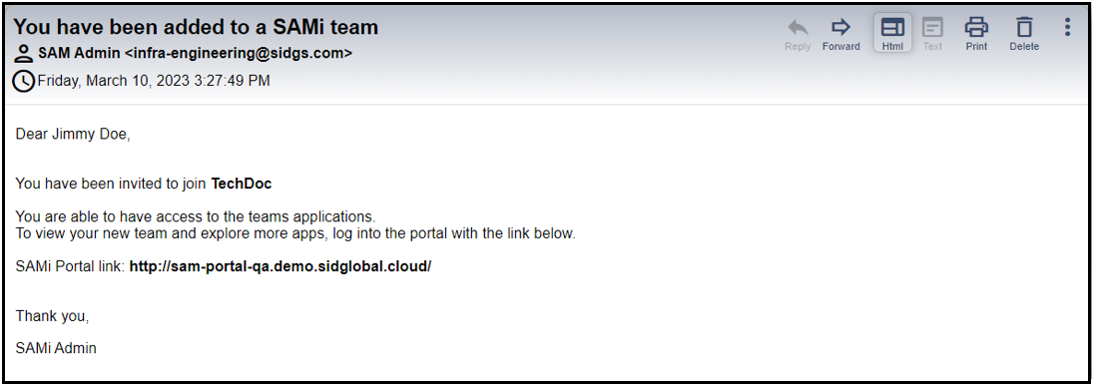
An email message with the invitation is sent to the invited team member with a link to reset the password. - The invited team member opens the email from the Inbox and clicks on the password reset link.
The SAMi portal opens in the browser with the option to enter New Password and Confirm Password in the respective textboxes. - The member enters the Password and Confirm Password in respective textboxes.
- Clicks Save.
An email message is sent to the team member mentioning, “You have been invited to join the team”.
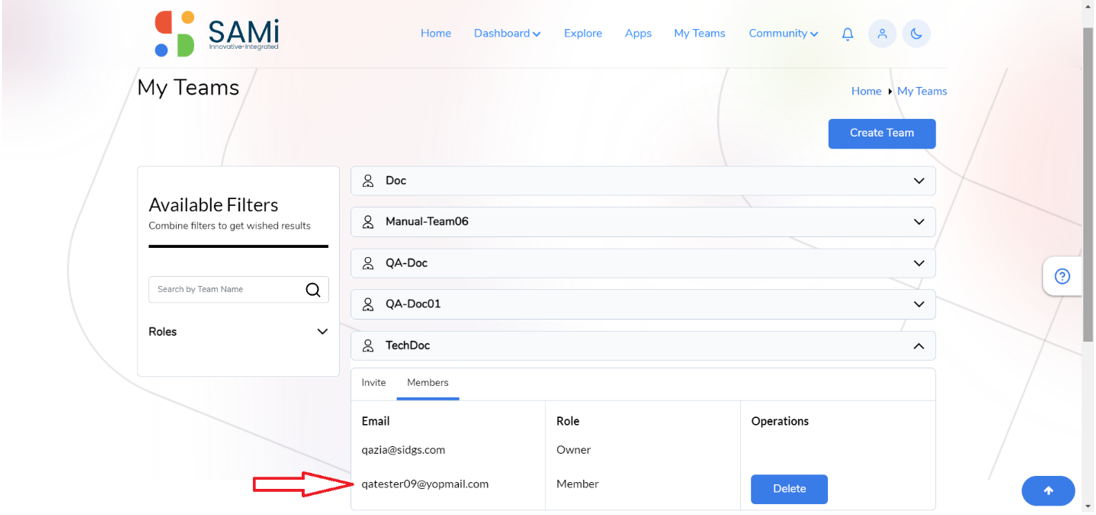
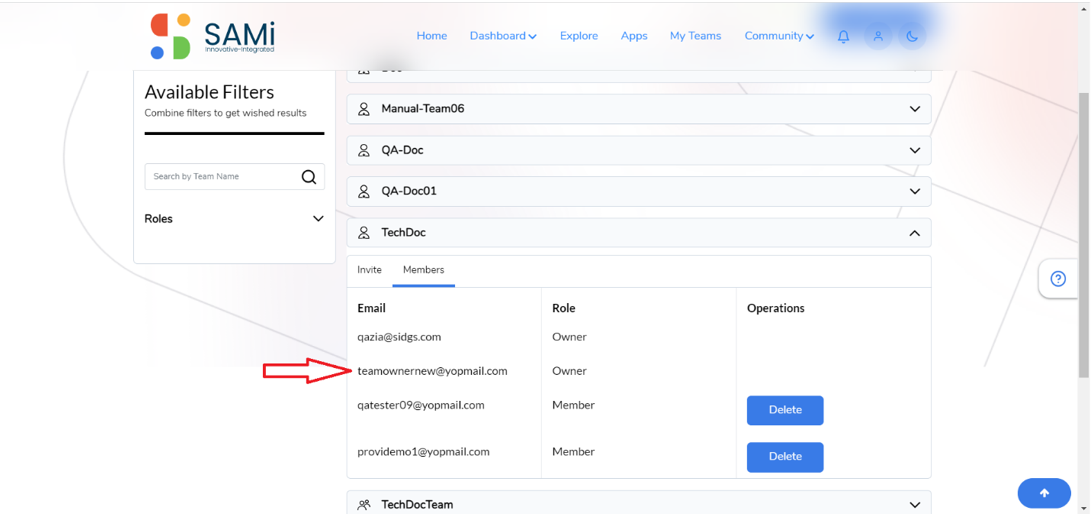
- Click on Members tab to view the added Team members.
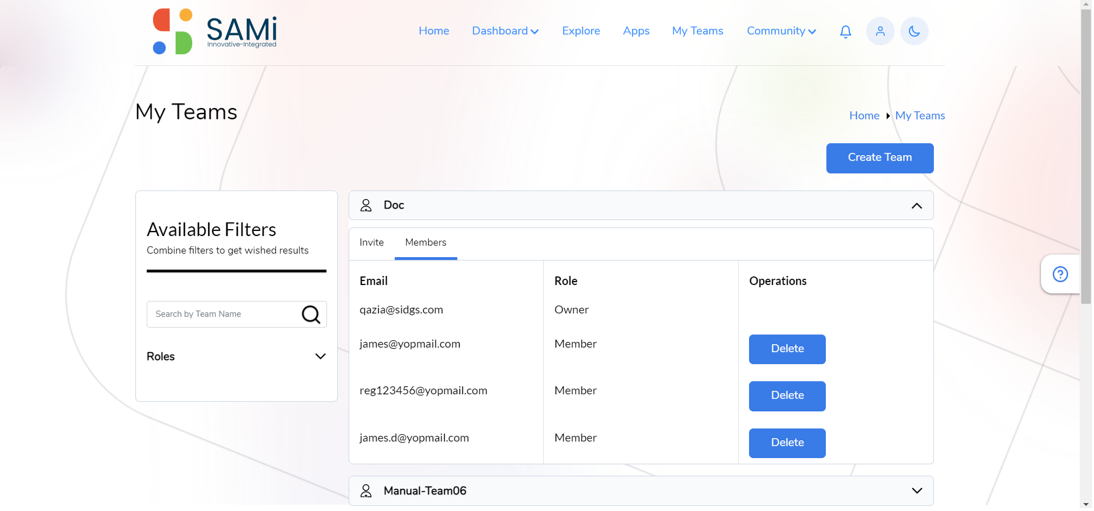
Delete Team member – In My Teams page, click on Members tab, click on Delete button to delete any existing team member.
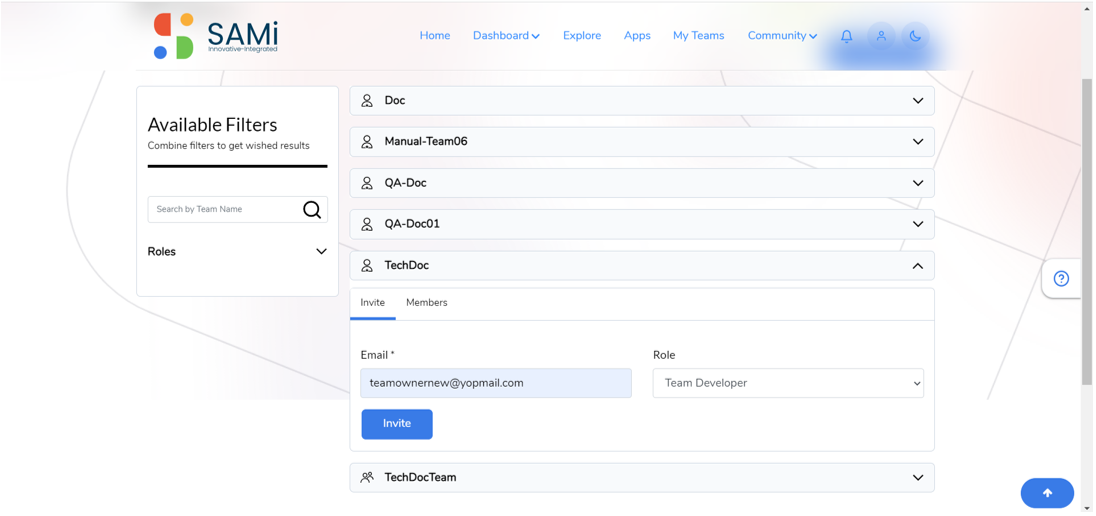
Scenario 2: Inviting Existing Team Member
To invite an existing team member to work on the subscribed app, do the following:
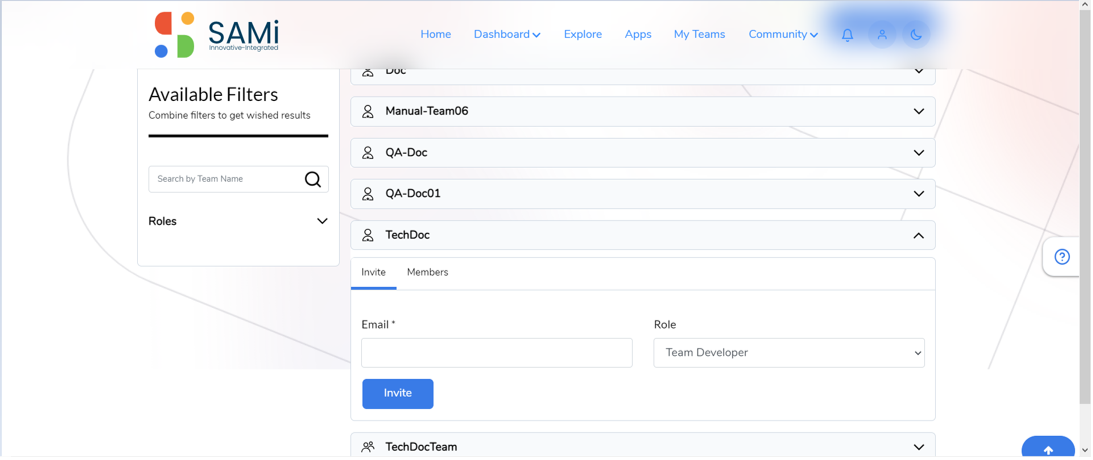
- Go to My Teams, click on TechDoc Team to expand.
- In the Invite tab, enter the Email Address of an existing team member in the text box provided.
- Click the Invite
The team members are invited, and a message of success is received.
 And also, an email message is sent to the team member mentioning you have been invited to join the team.
You will be able to view the team members by clicking the Members tab.
The Members tab displays information related to all the members in that particular team.
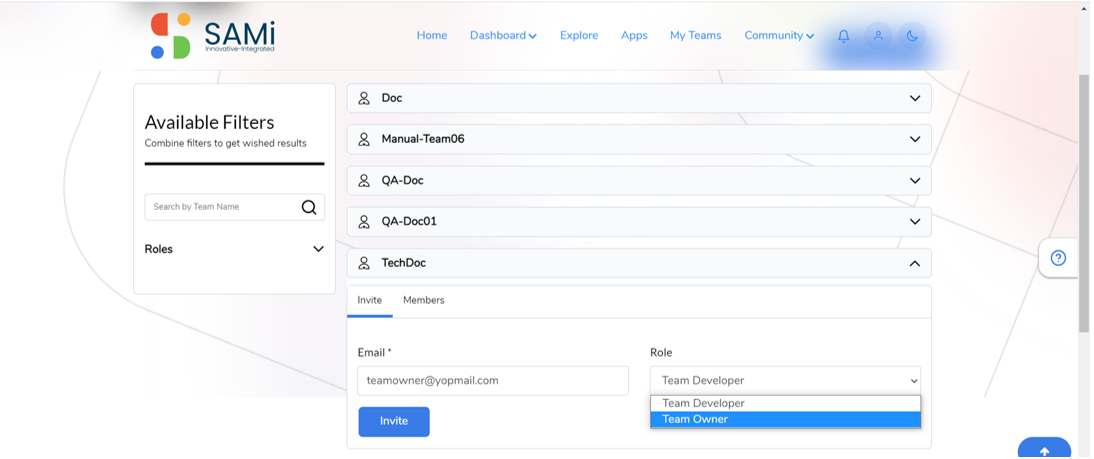
Scenario 3: Inviting New Team Owner
To invite a new Team Owner to work on the subscribed app, do the following:
- Go to My Teams, click on TechDoc Team to expand.
- In the Invite tab, enter the Email Address of a new team owner in the text box provided.
- Select the Team Owner using the Role dropdown list.
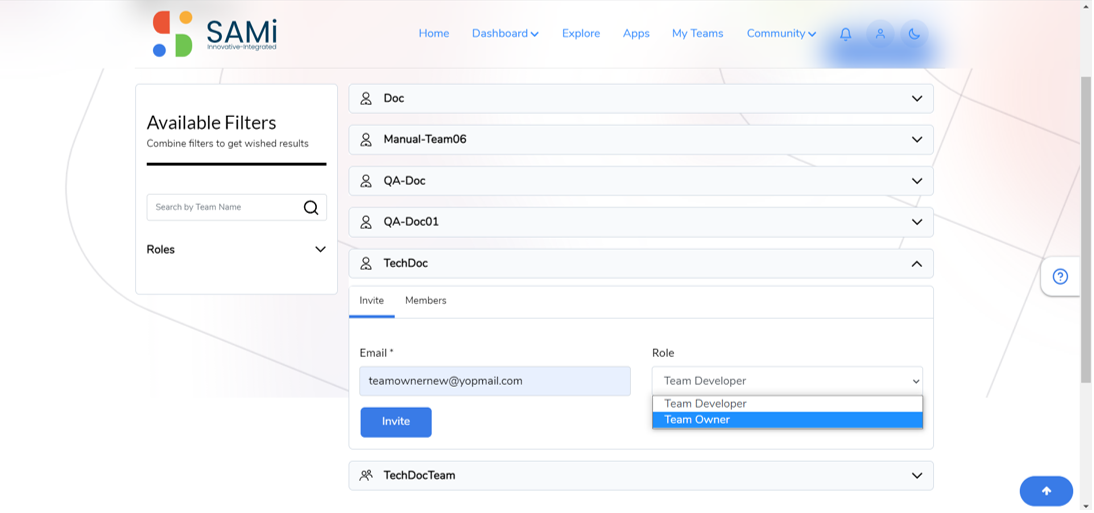
- Click the Invite button.
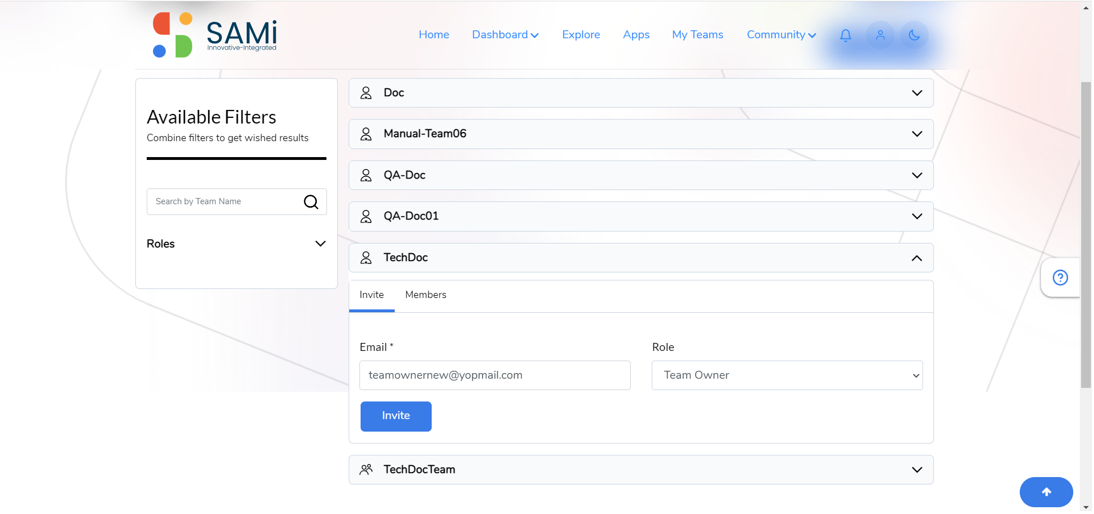
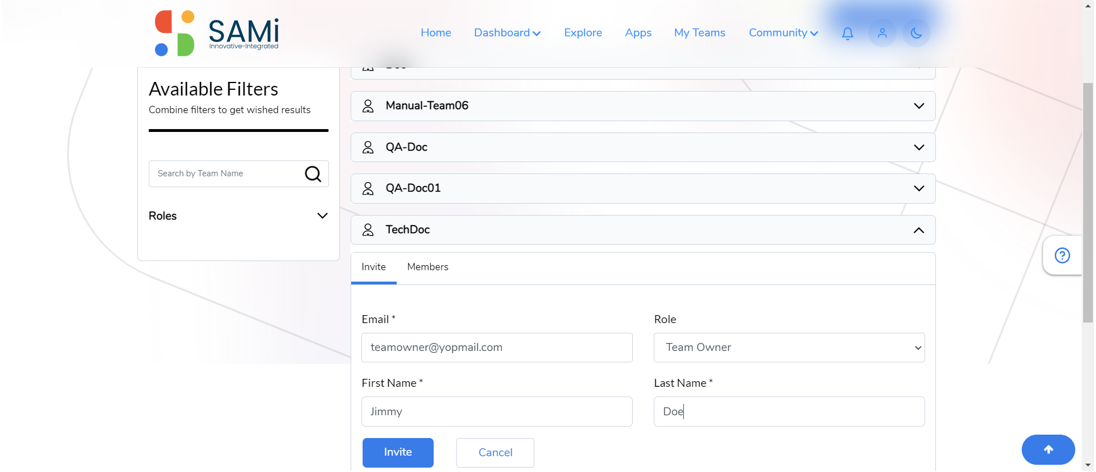
A message appears stating, the “User does not exist, enter the first name and last name fields to have the user created.
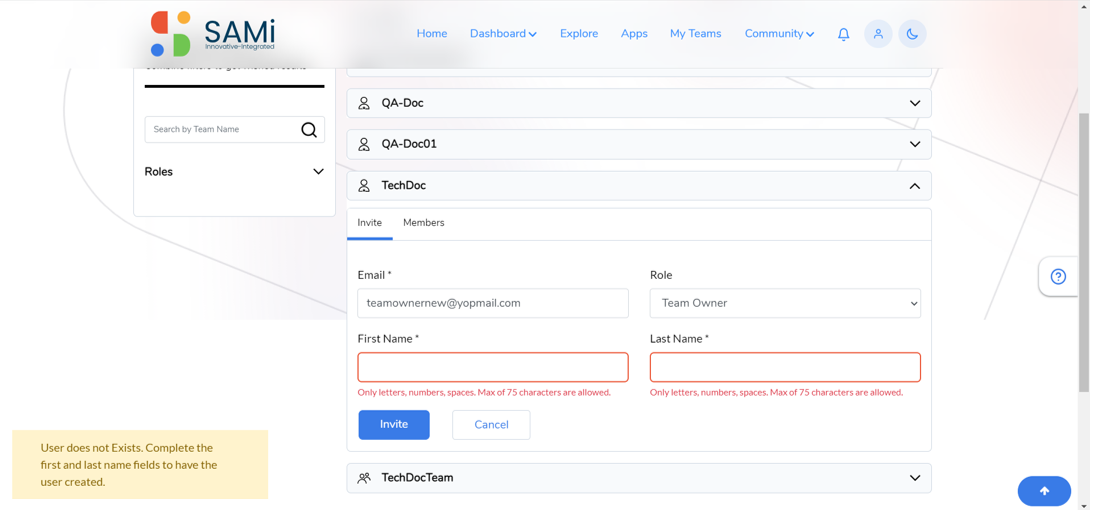
- Enter the First Name and Last name in the respective textboxes.
- Click the Invite button.
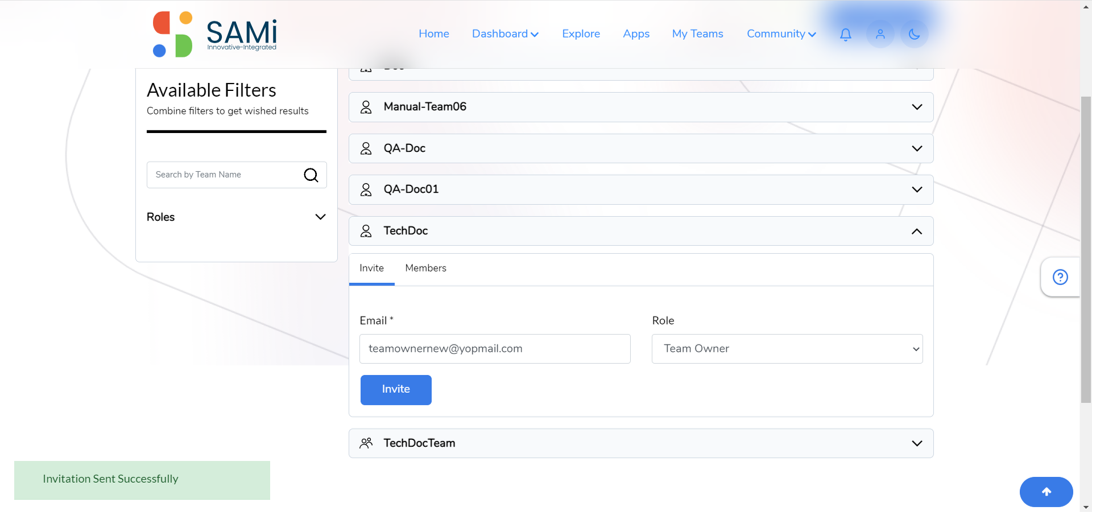
A success message appears. A new team owner was invited successfully.
An email message is sent to the team owner mentioning you have been successfully invited to join as a team owner.
- You will be able to view the team members by clicking the Members tab.
The Team member is displayed.
Scenario 4: Inviting Existing Team Owner
To invite an existing Team Owner to work on the subscribed app, do the following:
- Go to My Teams, click on TechDoc Team to expand.
- In the Invite tab, enter the Email Address of a new team member in the text box provided.
- Select the Team Owner using the Role dropdown list.
- Click on Invite button.
- Enter the First Name and Last Name in respective text boxes.
- Click the Invite button again.
A success message appears stating, Invitation Sent successfully.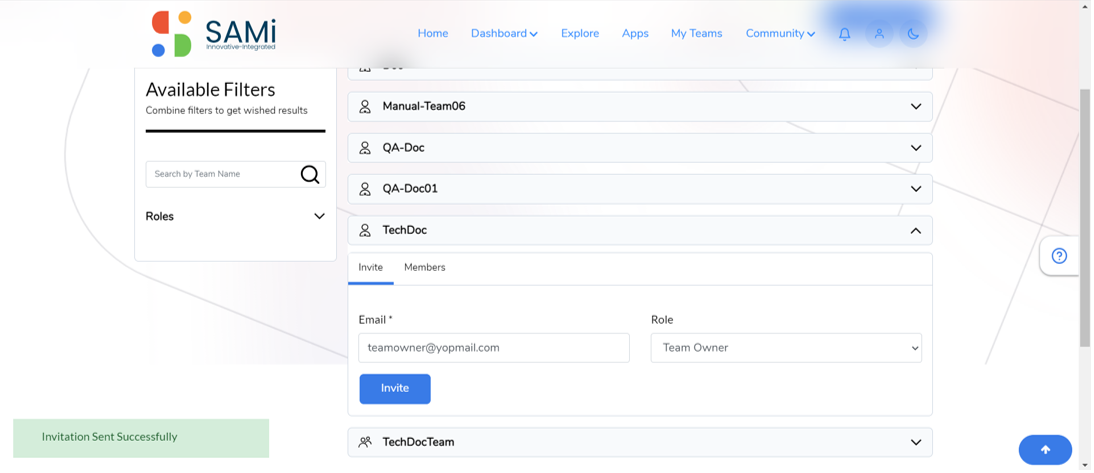
An email message is sent to the team owner mentioning you have been successfully invited to join as a team owner. - You will be able to view the team members by clicking the Members tab.

The existing Team Owner is displayed.
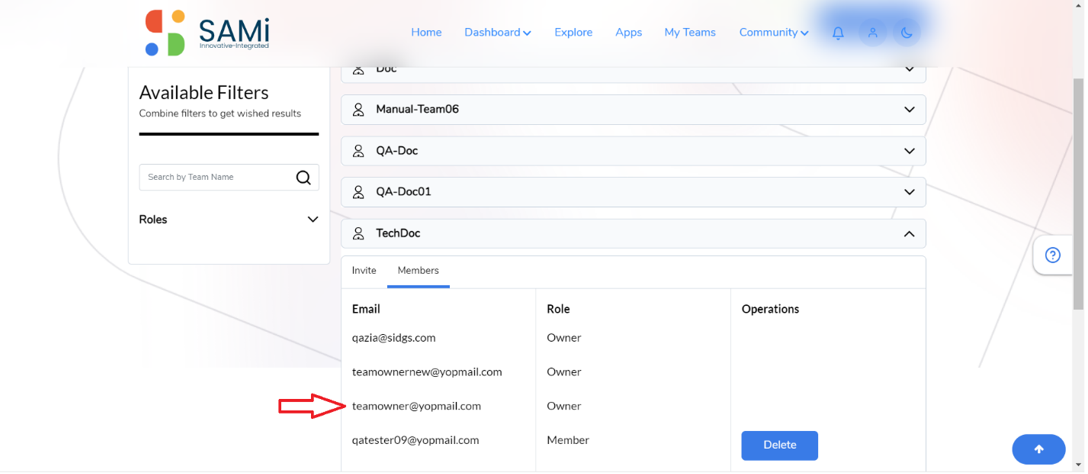
Note: The invited Team owner cannot be removed from the Team.
Search Team
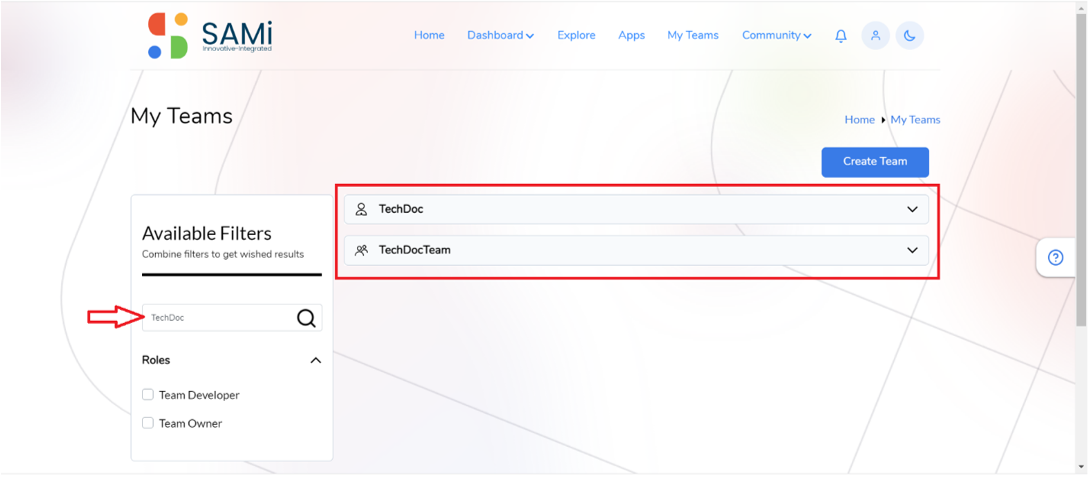
To search for a team in My Teams page, enter the Team Name in the search field and click on Search icon.
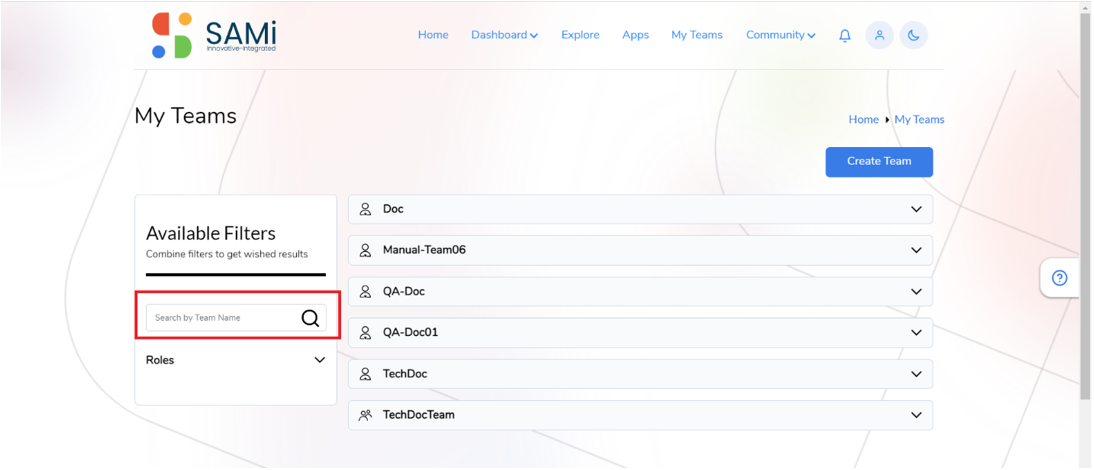
The relevant searched Team names appear in My Teams page.
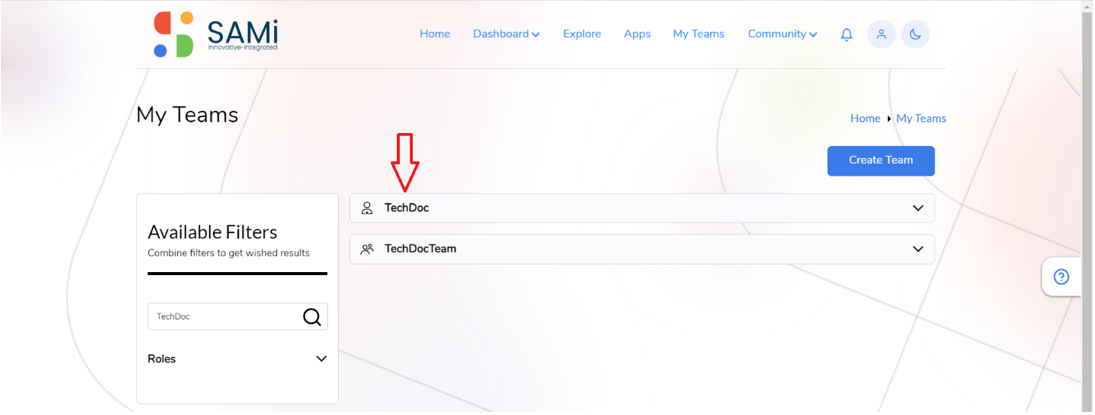
The TechDoc team section expands and provides options to the developer to invite team members to work.
Teams – Filter By Roles
The Filter by Roles option enables you to filter, search and display the relevant team on the other side of the page.
- Click on Roles option on the left navigation to expand and display filter categories.
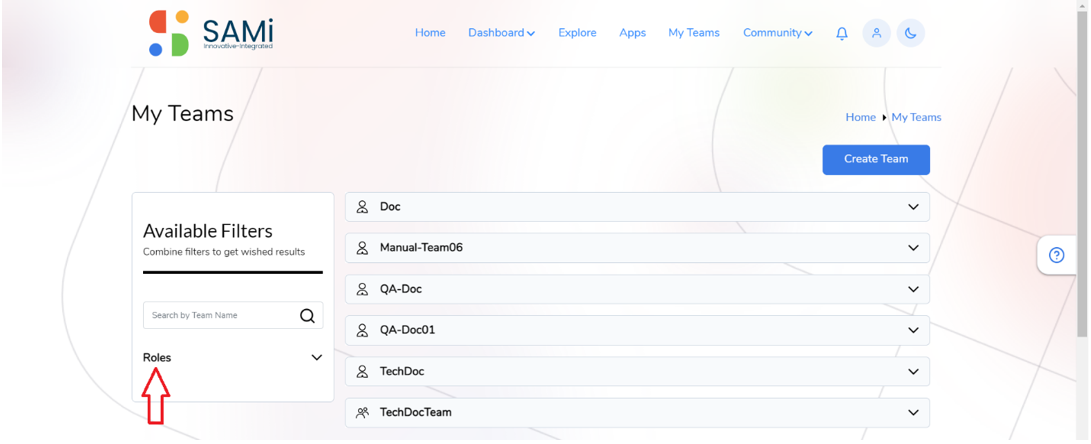
The Filter Roles with checkboxes appear to make necessary selections.
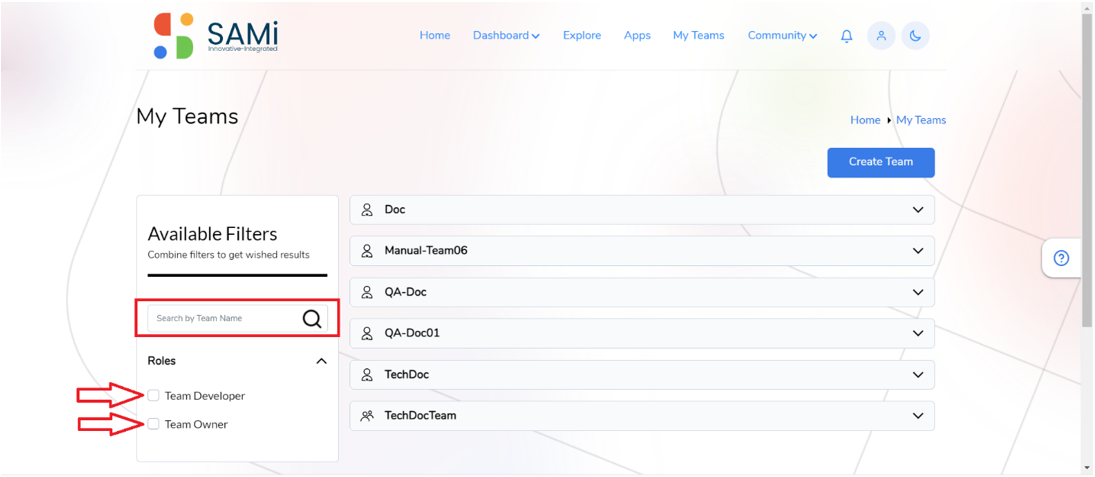
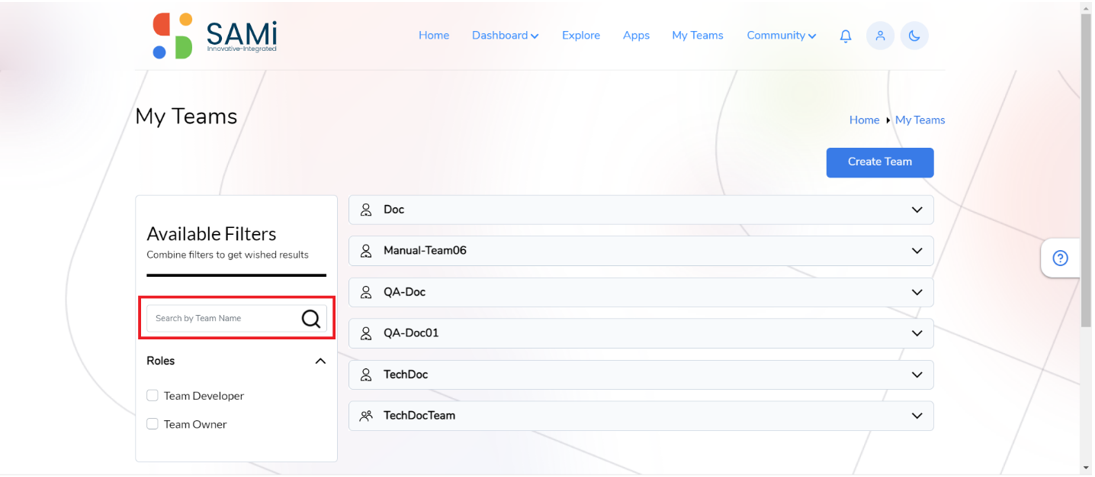
In the Available Filters options, the developer will be able to perform these operations:
- Search by Team Name – Search the Team member/owner by entering the Team name in the search field and pressing Enter.
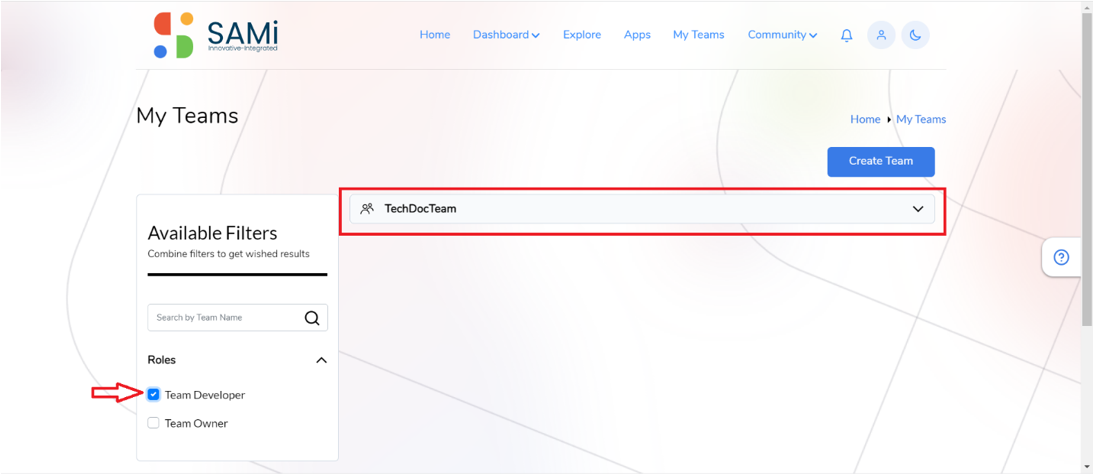
- Filter Teams by Roles – Select the Roles based on Team Developer or Team Owner categories to filter and display the relevant teams.
The searched Team is displayed.
- Select the Roles based on Team Developer or Team Owner categories.

Upon selection of Roles checkbox, the specific team is searched and displayed.
Workflow 10 – View FAQs from Main Menu
The SAMi Portal helps the developers to view the existing FAQs and add FAQ comments/feedback from the Community menu on the Home page.
Search and View FAQs
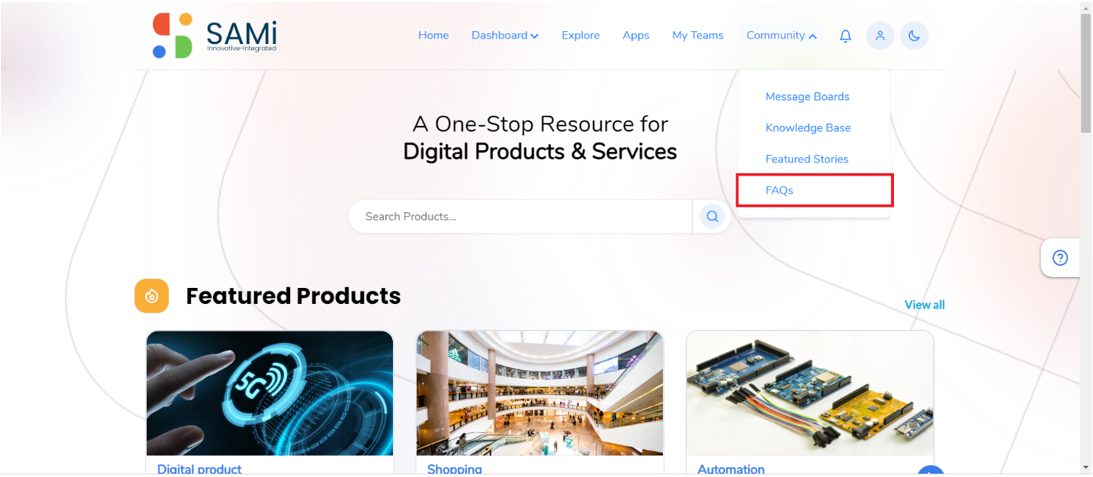
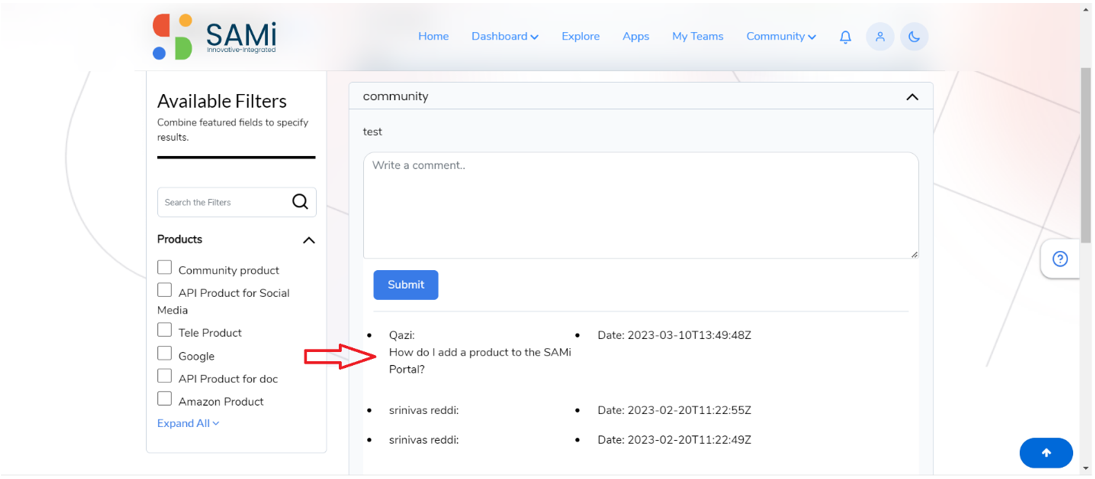
- To search for an FAQ, navigate from Home page, to Community and then FAQs in main menu.
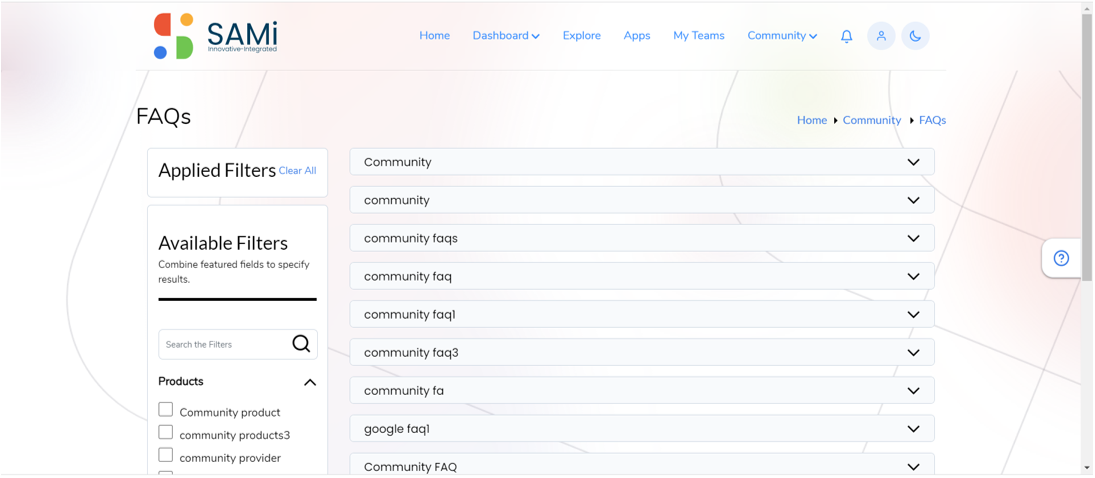
The FAQs page appears. All the FAQs listed with the most recent are displayed at the top of the list.
- In the Search field, enter the FAQs name and press Enter. All the Community FAQs appear on the list. The first FAQs Comment area is open, if you wish you can add and submit a comment or hide it by clicking on upper arrow.

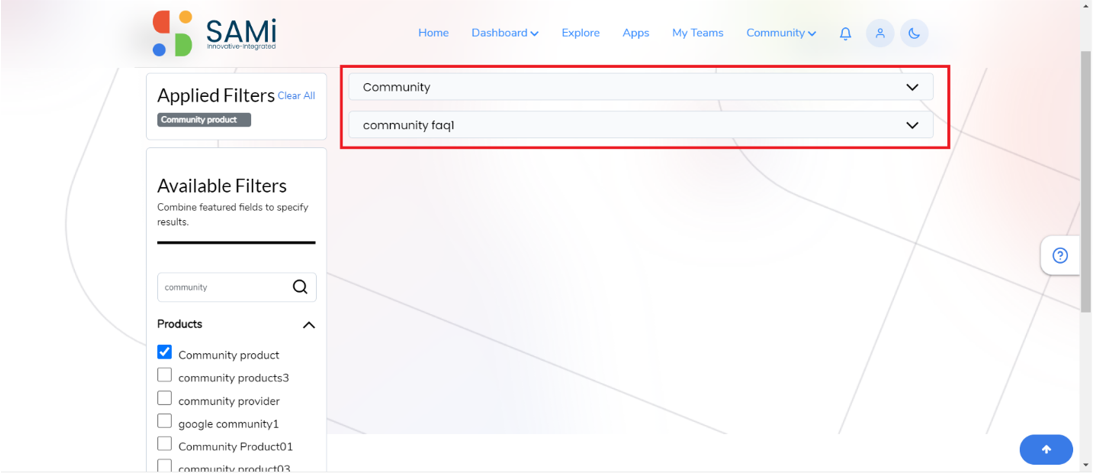
- Similarly, you can filter the FAQs based on Products, by selecting the FAQs names using checkboxes.
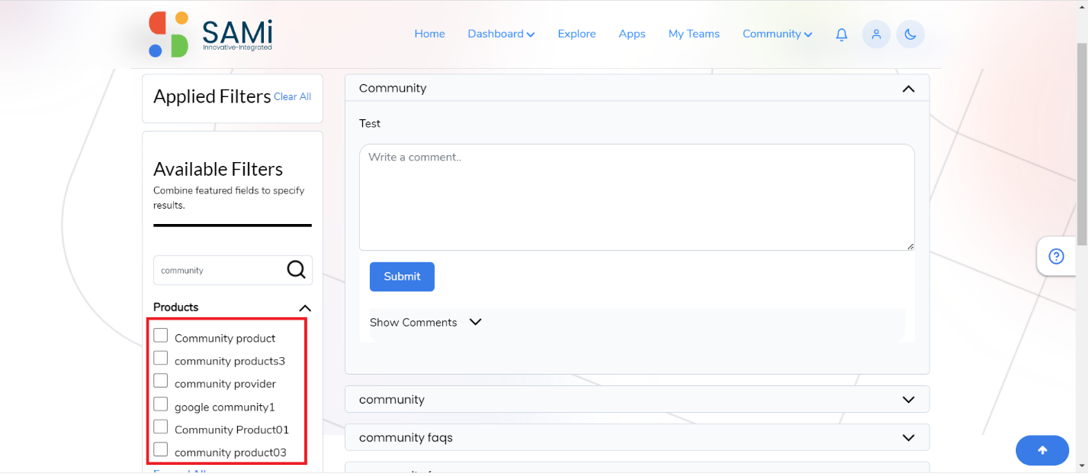
The searched FAQs after filtering are displayed.
Add FAQ Comments
To add an FAQ comment in the Community pages, do the following:
- In Home page, click on Community option and then FAQs in the main menu.
The FAQs page appears where you can find the latest FAQs appearing on top of the list. Also, as a subscriber, you will be able submit comments and publish on any of the FAQs that are relevant to the Subscribers Community.
- In the FAQs page, enter the Comments in the text area.
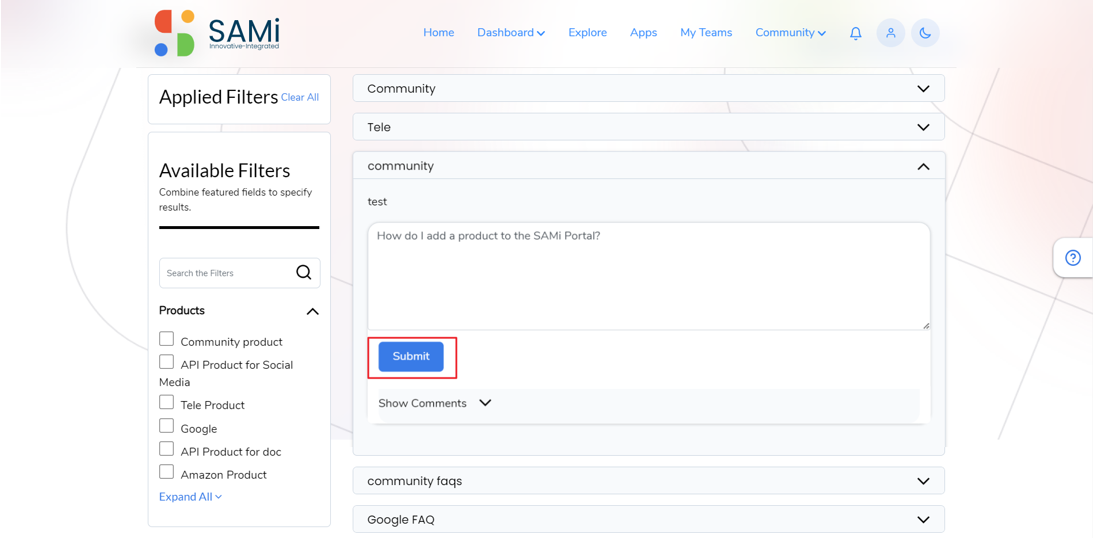
- Click Submit.
A success message appears. The feedback comment is successfully submitted.
- Navigate to the Community FAQ, click on Show Comments. The comments section expands and displays the submitted comment.
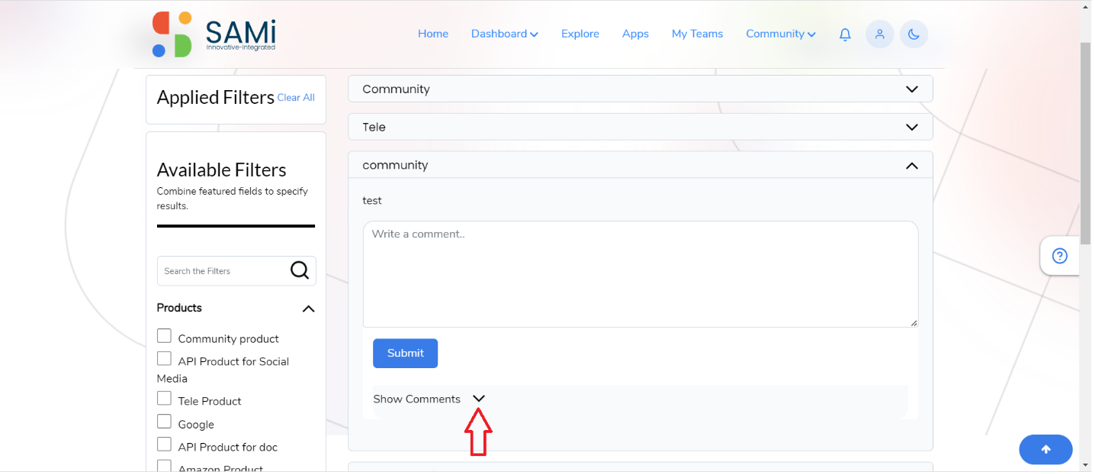
The Comment is displayed.
Workflow 11 – Explore Knowledge Base
Scenario 1: Explore Knowledge Base from Home Page
The Knowledge Base feature allows the developer to view the Knowledge based articles and give comments, like and dislikes and share.
- To navigate to Knowledge Base page from Home page, scroll down the home page to view the Knowledge Base.

The Knowledge Base page appears.
- When you navigate to the Knowledge Base section, click on View All
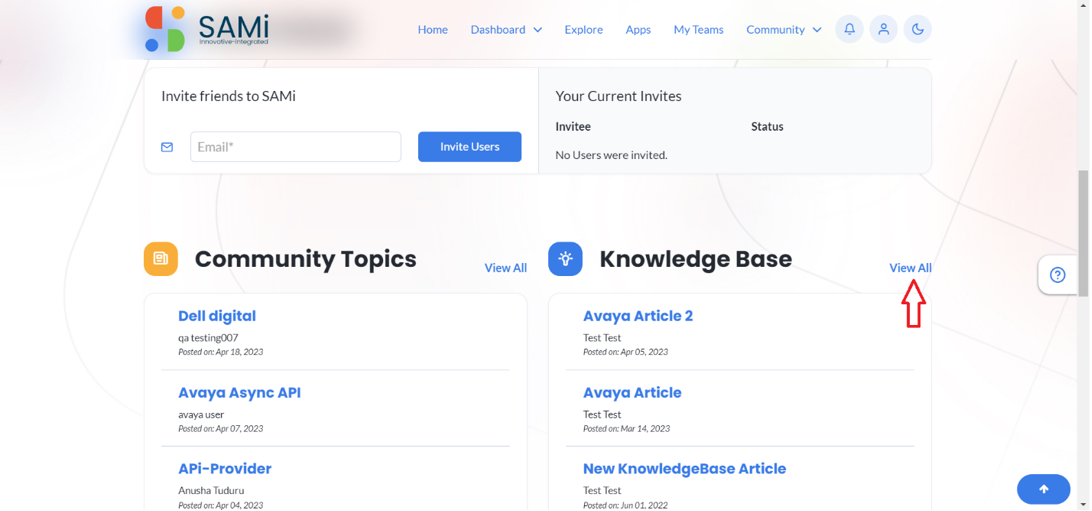 The most recent Knowledge Base article is displayed. Here, you will be able to choose the Knowledge base from the available dropdown list options. Since, at present there is only Help Knowledge base available to display.
The other features available in Knowledge Base page includes.
- Search Articles
- Provide Suggestion
- Like
- Dislike
- Share
- View History
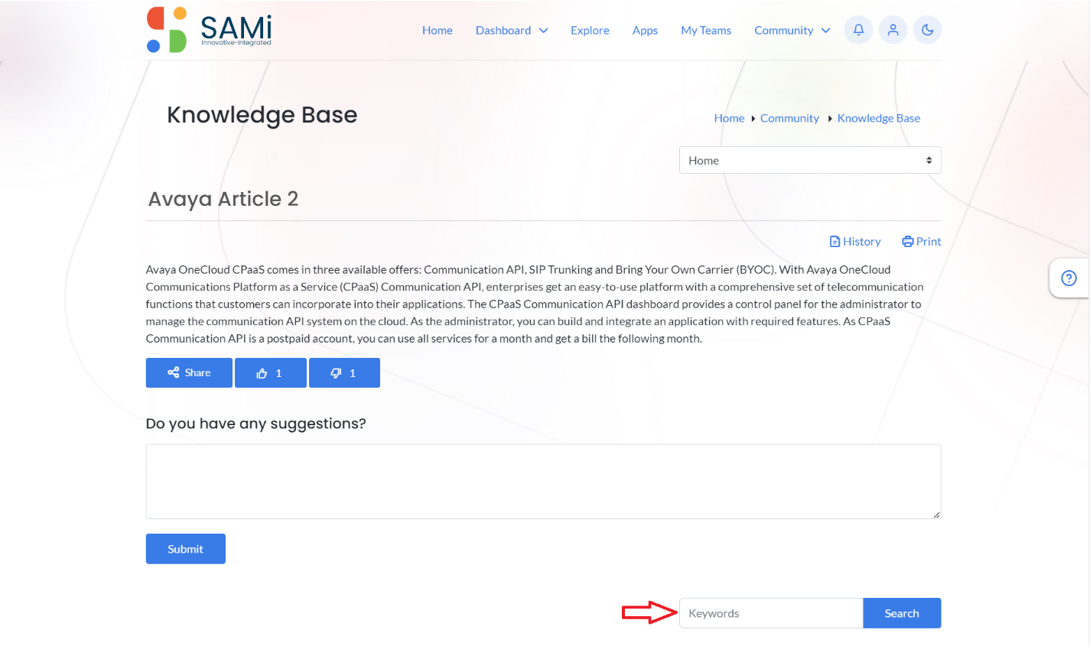
Search Articles:
- To search an article on Knowledge Base page, enter the Keywords/name of the article in the Search field and click on Search.
The Knowledge Base article is displayed for you to open and view.
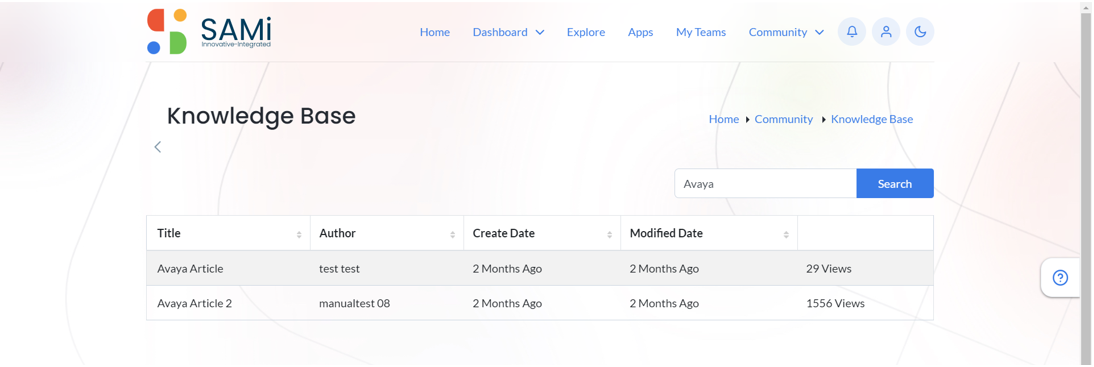
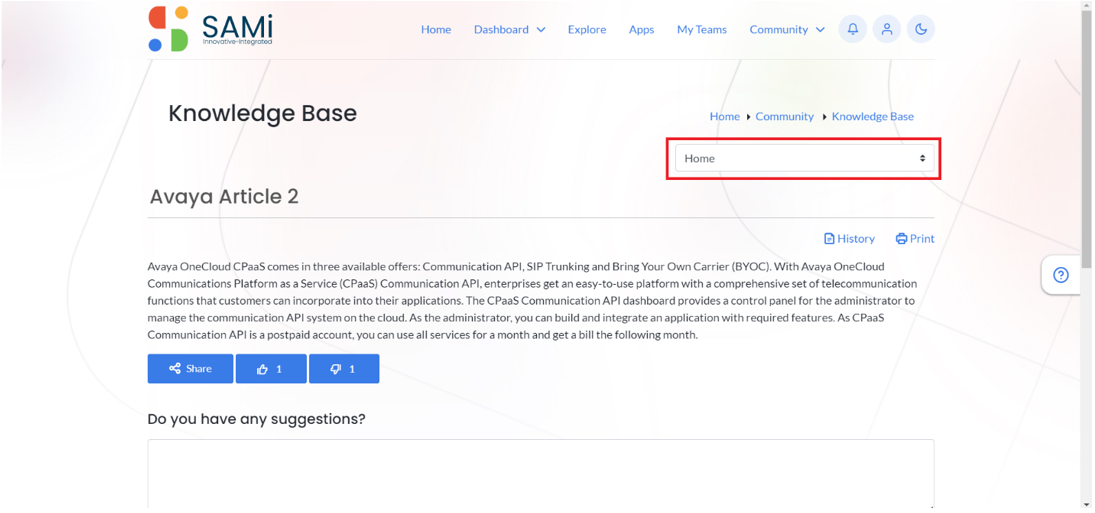
- Click to open the Avaya Article 2.
The searched Article is displayed.
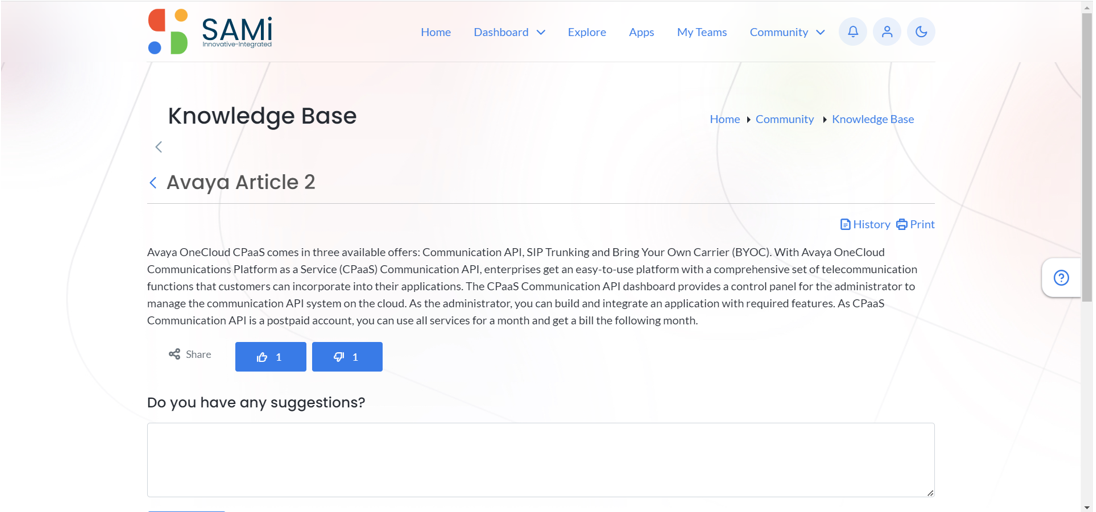
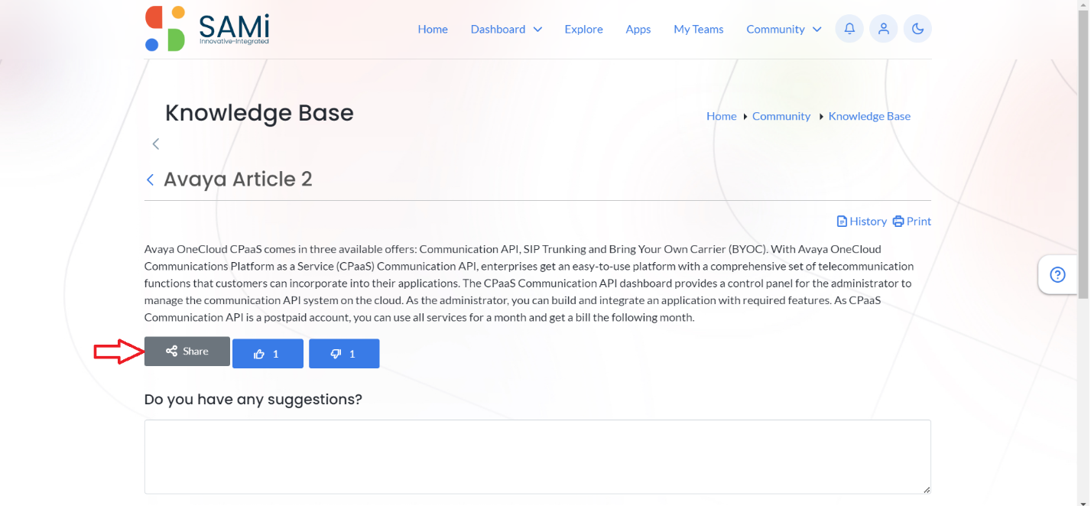
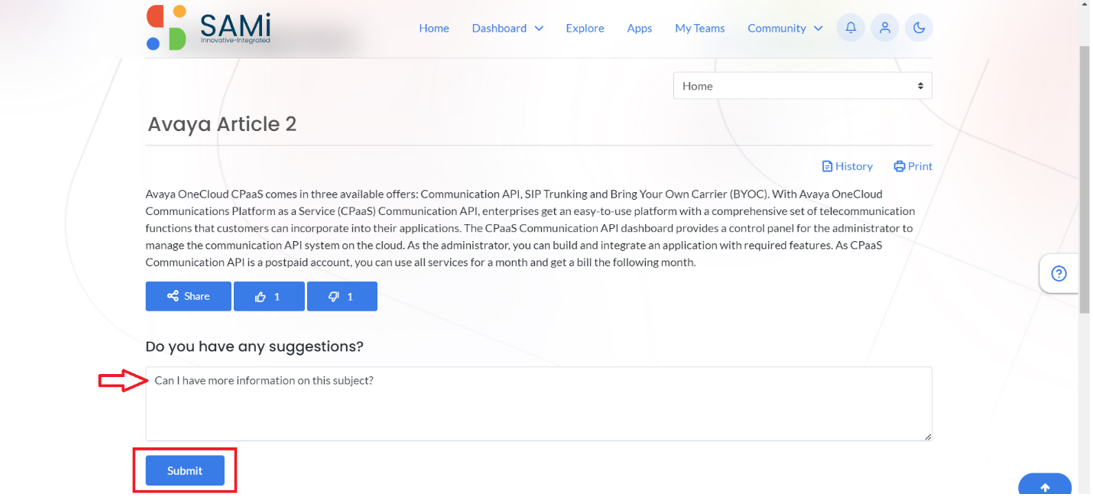
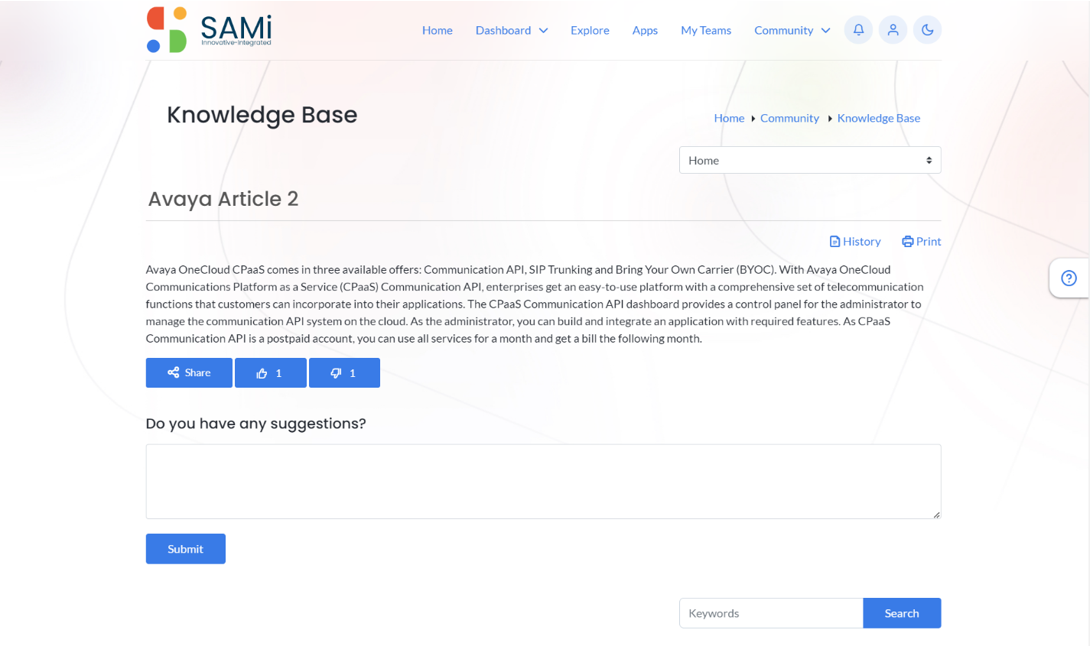
In the Knowledge Base Article, as a developer you can do the following:Share – Click on Share icon to share the article over the social media platform like, twitter, Facebook, or LinkedIn.
Like – Click on Like Icon to like the article based on the information provided in the article. Dislike – Click on Dislike icon to dislike the article based on the information provided in the article.
 History – View the revision history of the article by clicking on the History link, and also compare two versions of the same article.
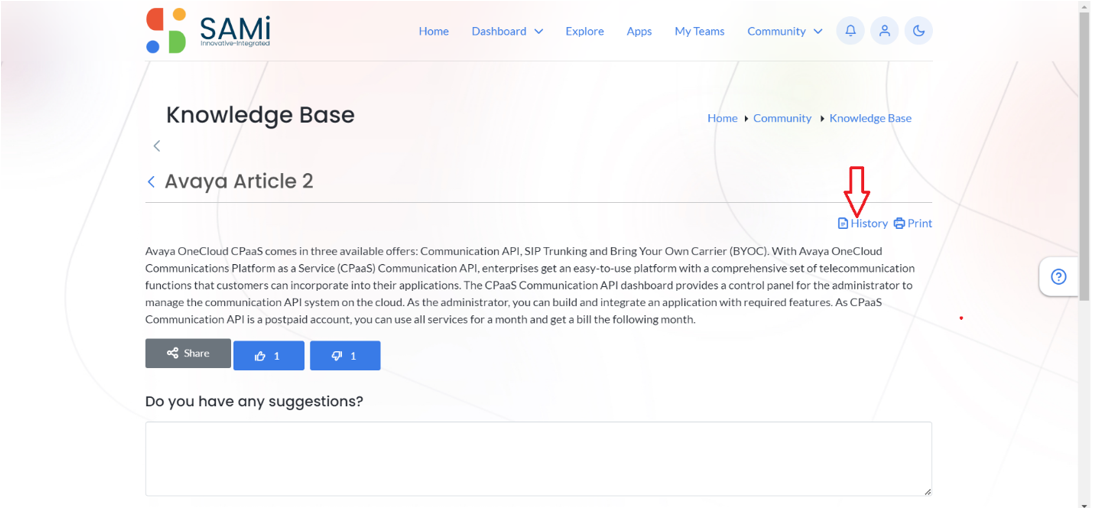 Compare Versions – When you click on History link, the Knowledge Article Compare page appears.
 Select both the article versions by selecting the checkboxes. And, then clicking on Compare Versions button.Print – Click on Print link to send the article to the printer for printing.
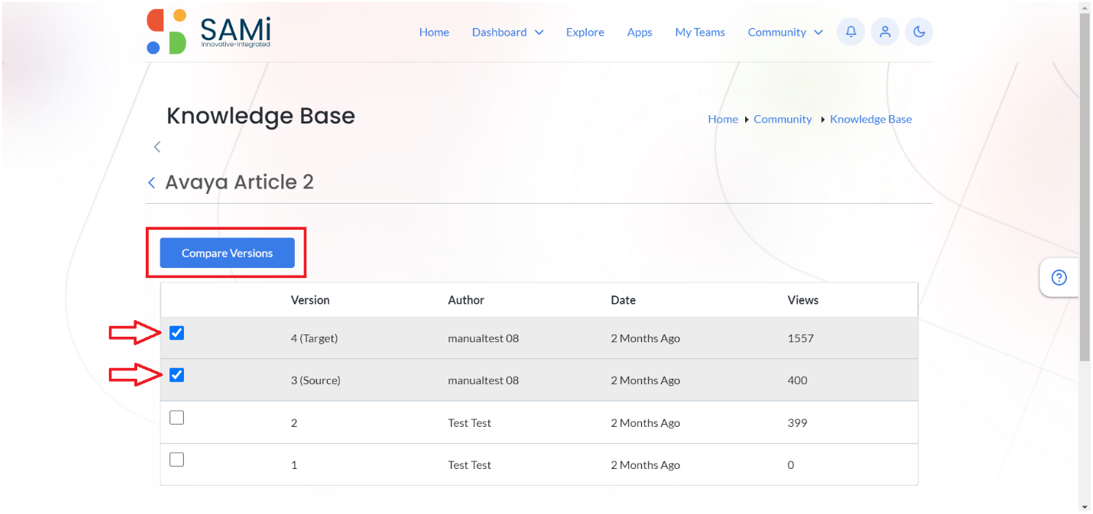 Suggestions:
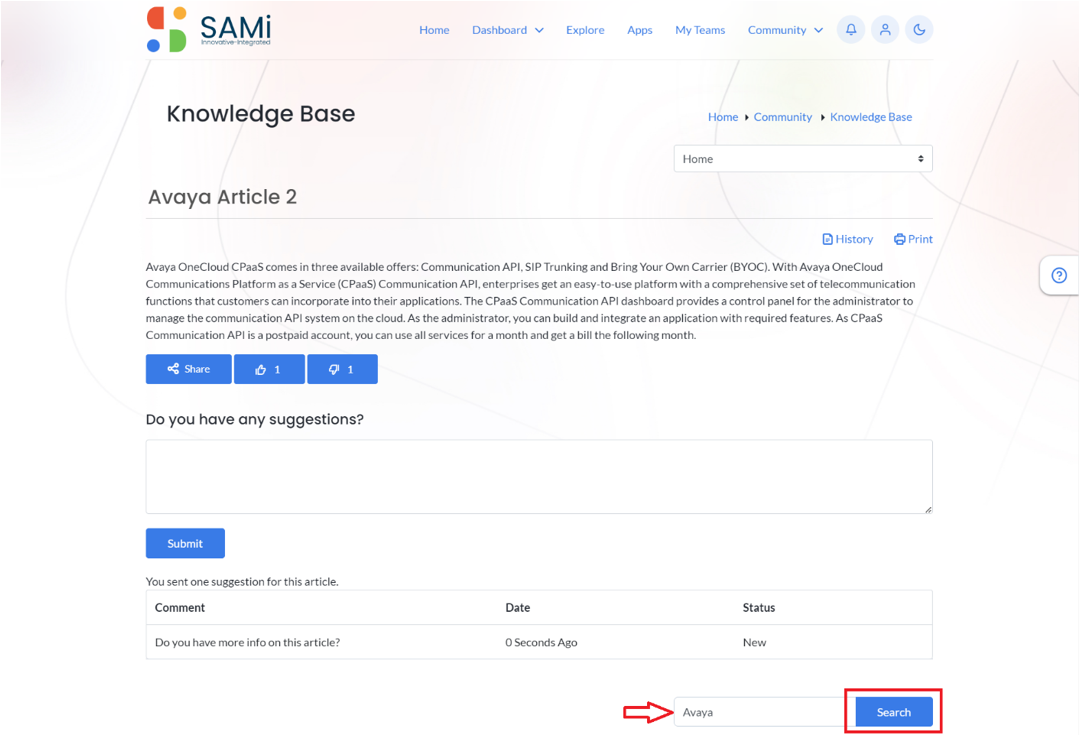
If the Developer has any suggestions, will be able to submit the suggestion in the “Do you have any suggestions?” text area provided and click on Submit button.
 A success message appears, and the suggestion message is submitted to the article.
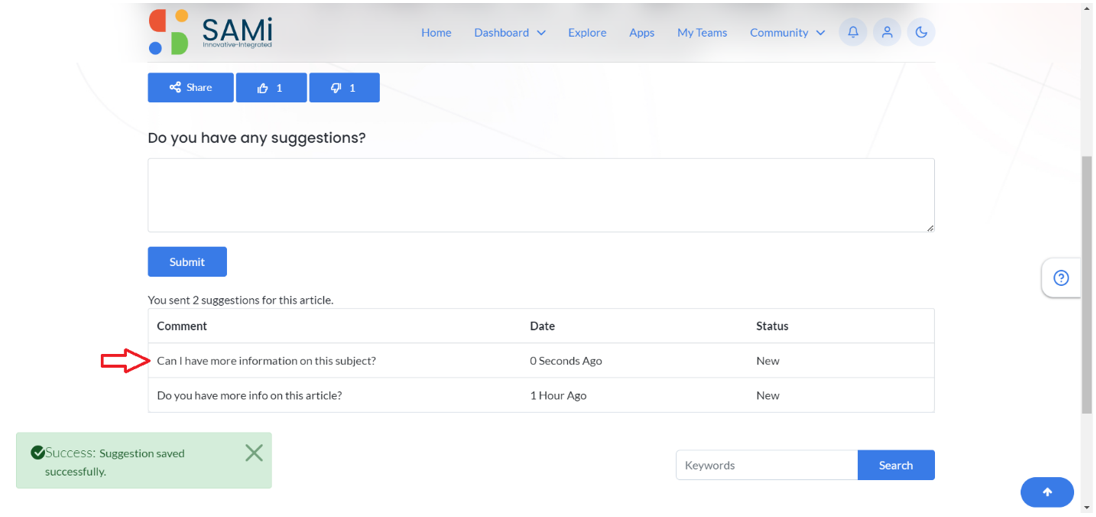
Scenario 2: Explore Knowledge Base from Main Menu (Community)
The Knowledge Base feature allows the developer to view the Knowledge based articles and give comments, like and dislikes and share.
- To navigate to Knowledge Base page from Home page, click on Community menu and then Knowledge Base option.

The Knowledge Base page appears.
 The most recent Knowledge Base article is displayed. Here, you will be able to choose the Knowledge base Home page or Help from the available dropdown list options.
By default, the Knowledge Base Home page is displayed.
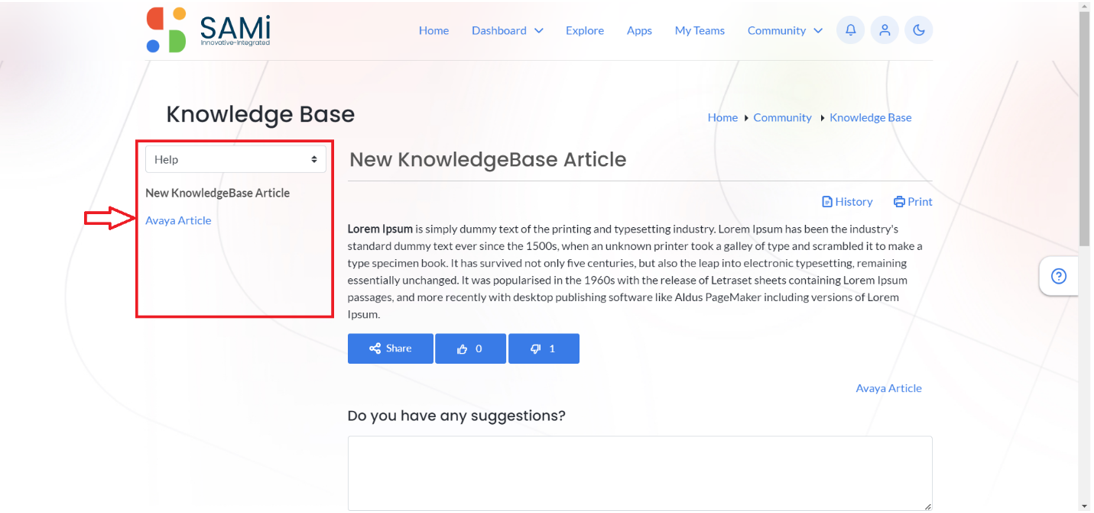
- When you choose Help, the Help option, the Help topics appear on the left corner of the page.
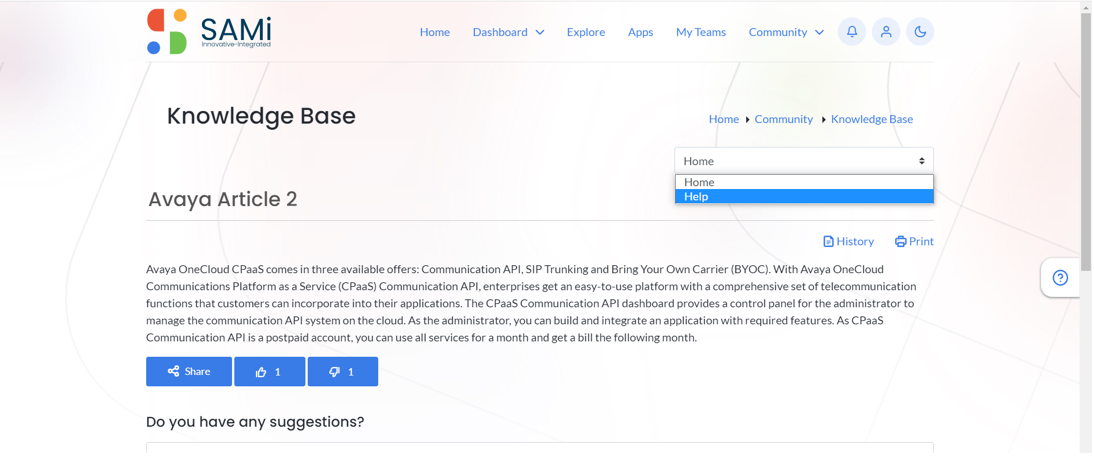
The Help Topics appear.
The other features available in Knowledge Base page includes.
- Search Articles
- Provide Suggestion
- Like
- Dislike
- Share
- View History
Search Articles:
- To search an article on Knowledge Base page, enter the Keywords/name of the article in the Search field and click on Search button.
The Knowledge Base article is displayed for you to open and view. - Click to open the New Knowledge Base Article.
The searched Article is displayed.
In the Knowledge Base Article, as a developer you can do the following:
- In the Knowledge Base Article, as a developer you can do the following:
Share – Click on Share icon to share the article over the social media platform like, twitter, Facebook, or LinkedIn.
Like – Click on Like Icon to like the article based on the information provided in the article.
Dislike – Click on Dislike icon to dislike the article based on the information provided in the article.
History – View the revision history of the article by clicking on the History link, and also compare two versions of the same article.
Compare Versions – When you click on History link, the Knowledge Article Compare page appears.
Select both the article versions by selecting the checkboxes. And, then clicking on Compare Versions button.Print – Click on Print link to send the article to the printer for printing.
Suggestions:
If the Developer has any suggestions, will be able to submit the suggestion in the “Do you have any suggestions?” text area provided and click on Submit button.
A success message appears, and the suggestion message is submitted to the article.
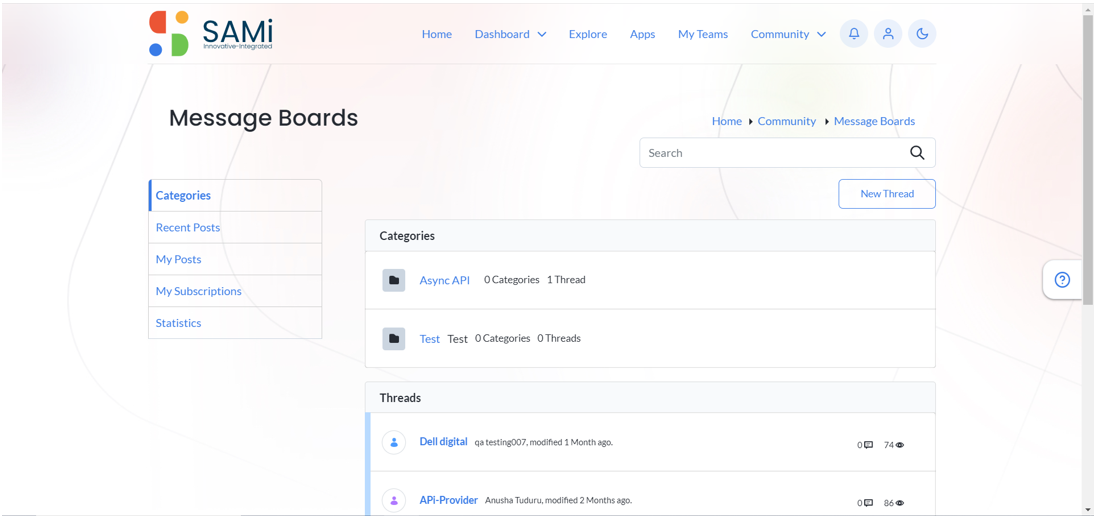
Workflow 12 – Explore Message Boards
Scenario 1: Explore Message Boards from Home Page
The Message Board feature helps a developer to visit the Message Board that is relevant to developer community and perform certain operations with:
- Categories
- Recent Posts
- My Posts
- My Subscription
- Statistics
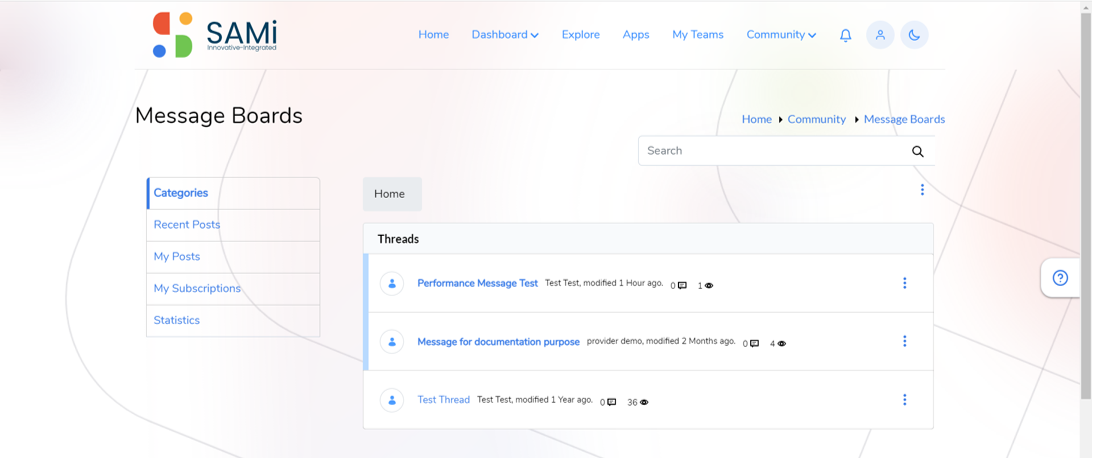
Categories
In the Categories, you will find a list of messages received from the community members.
To go to Categories, do the following:
- Scroll down the Home page and then click on View All in the Community Topics.
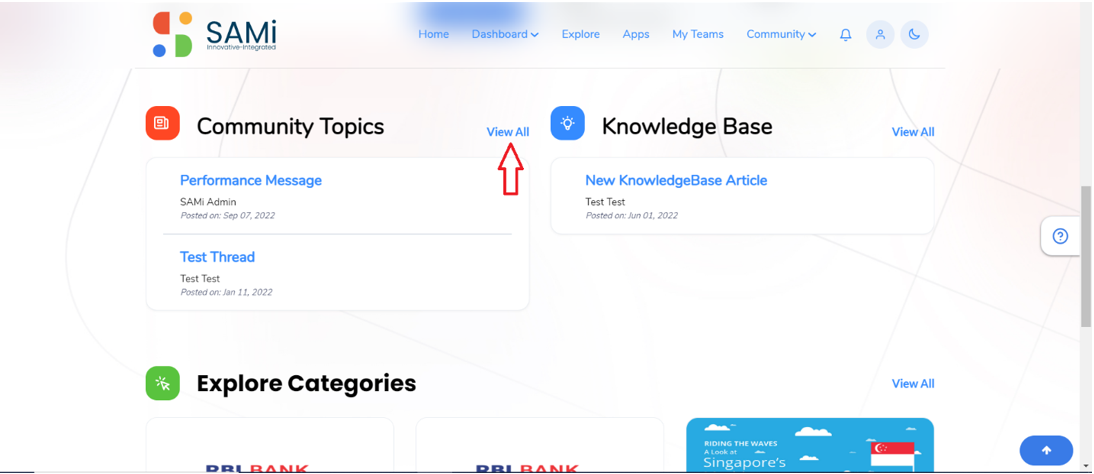
The Message Boards appear.
Create a Message Post
To create a message post, the subscriber will be able to create a post and publish it on the Message Boards.
- To create a message post on Message Boards, the subscriber clicks on the New Thread.
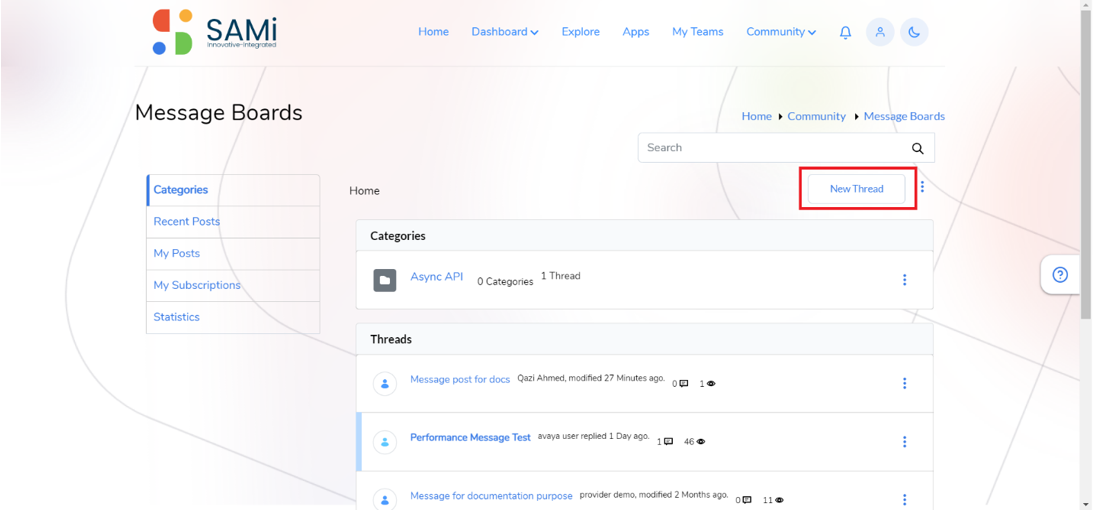
The New Thread form appears.
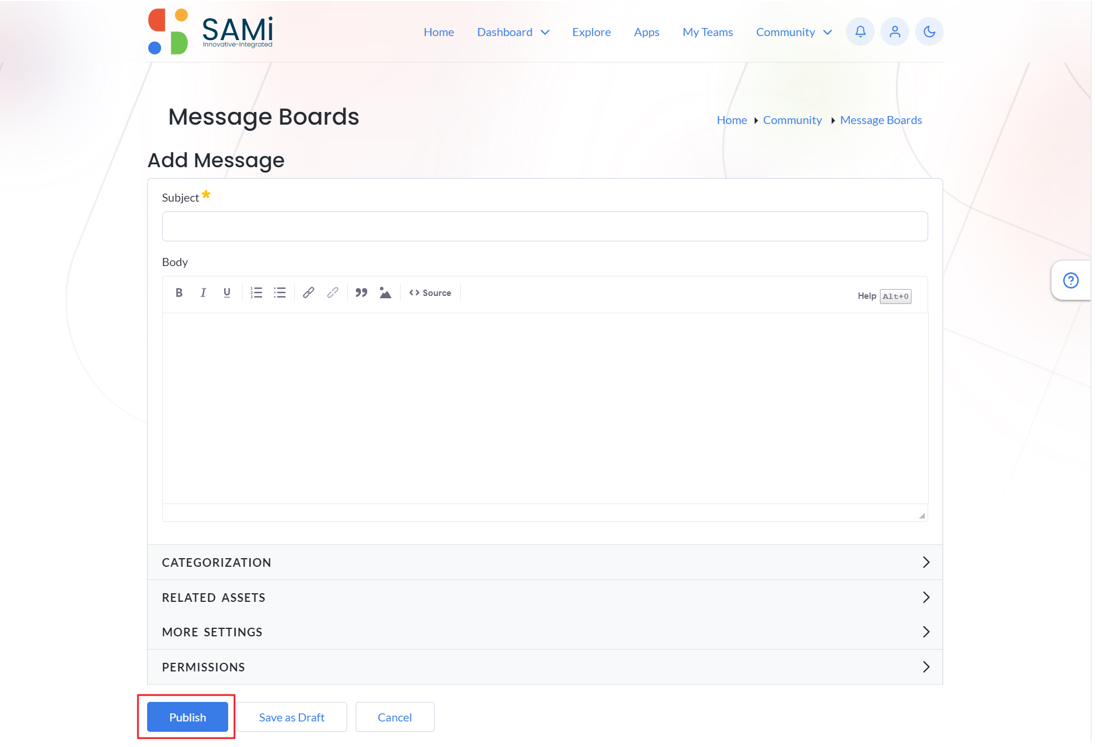
- Fill in the details to the post in the Subject, Body fields and click on each section below to expand and provide:
- Attachments
- Categorization
- Related Assets
- More Settings
- Click on the Publish.
A success message appears. And an email is sent to the subscriber to access the posts. The post is created and published successfully.
The message post is displayed in the Threads.
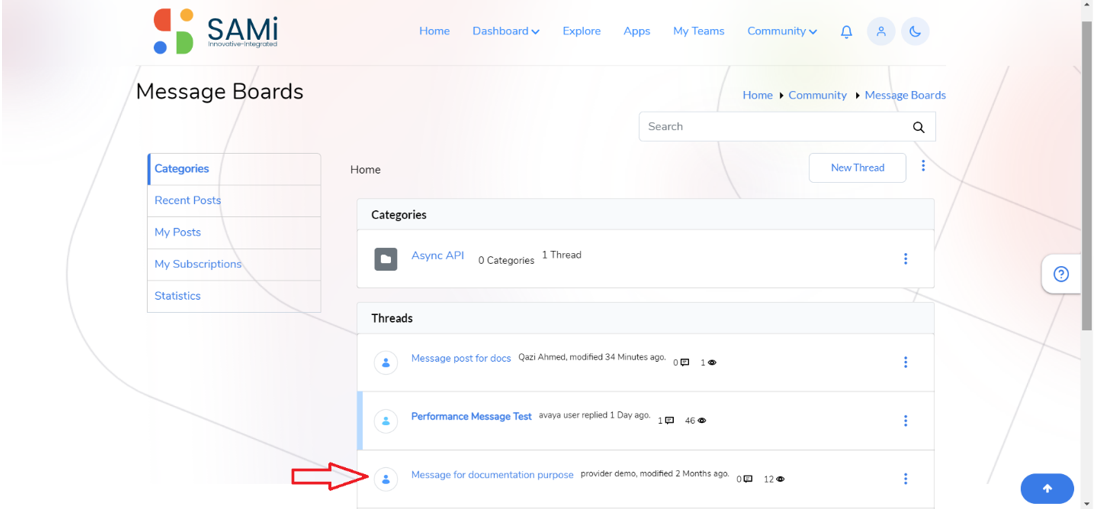
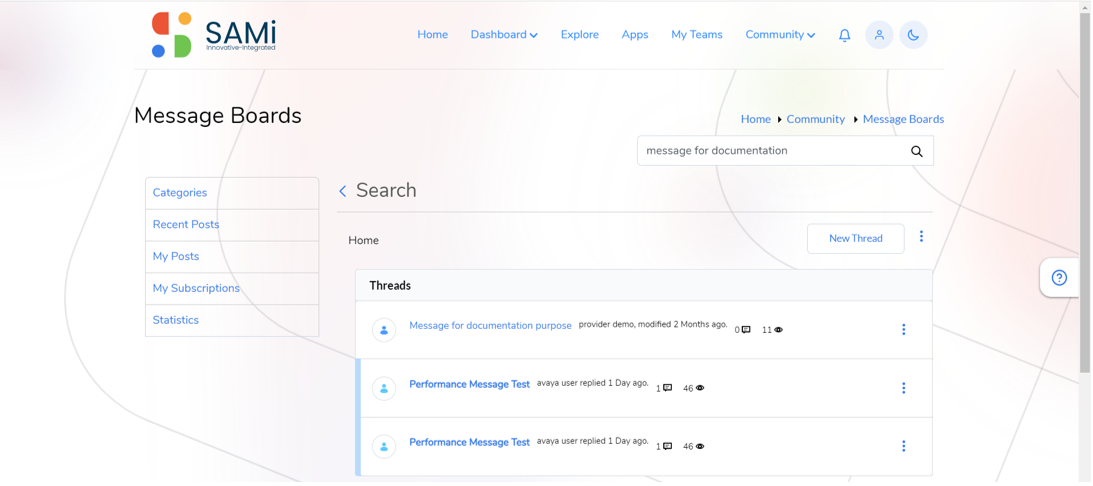
Search a Message Post
To search a message post, the subscriber can provide the keywords/post name in the Search field and clicks on Search icon.
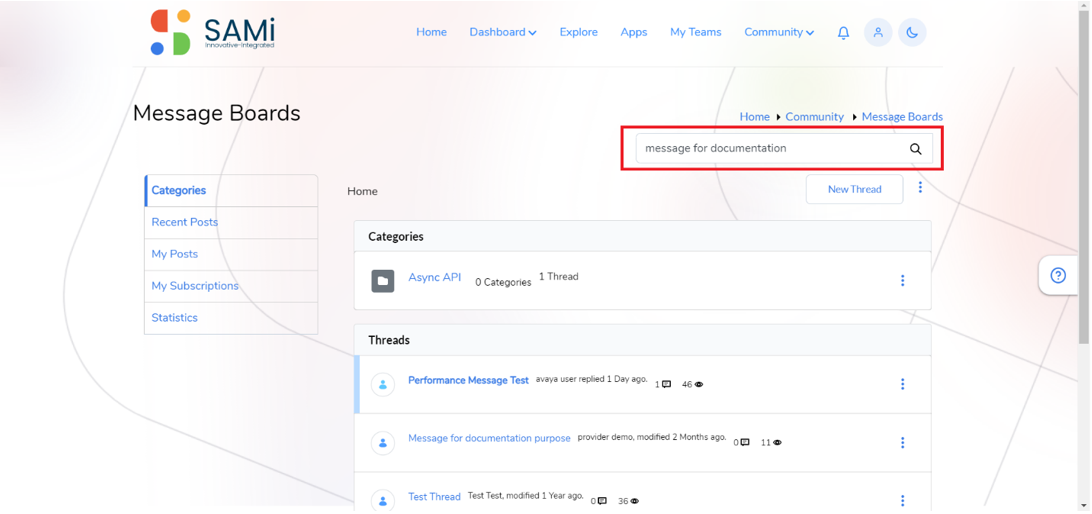
The searched results of relevant message posts appear.

Categories – Threads
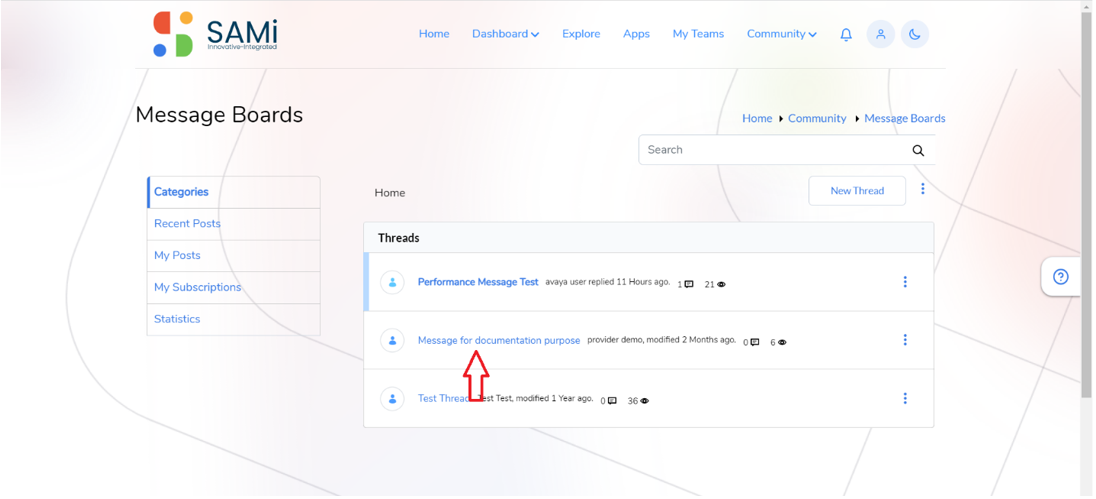
In the Categories, the developer will be able to view all the messages in threads. It shows the latest message on top of the list.
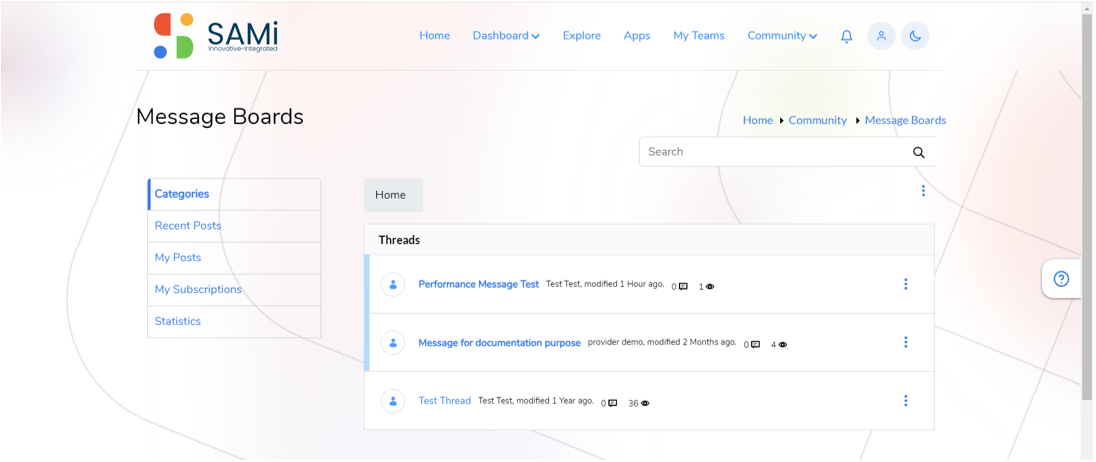
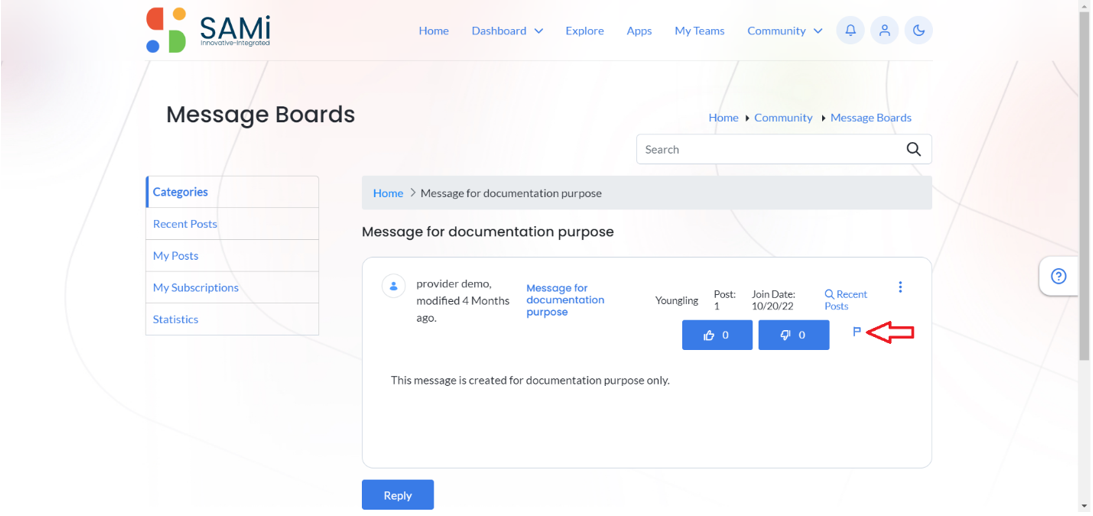
The Message Boards allows you to go to different threads, each post when posted by any member subsequently the developer is allowed to click and view those message posts, as shown below.
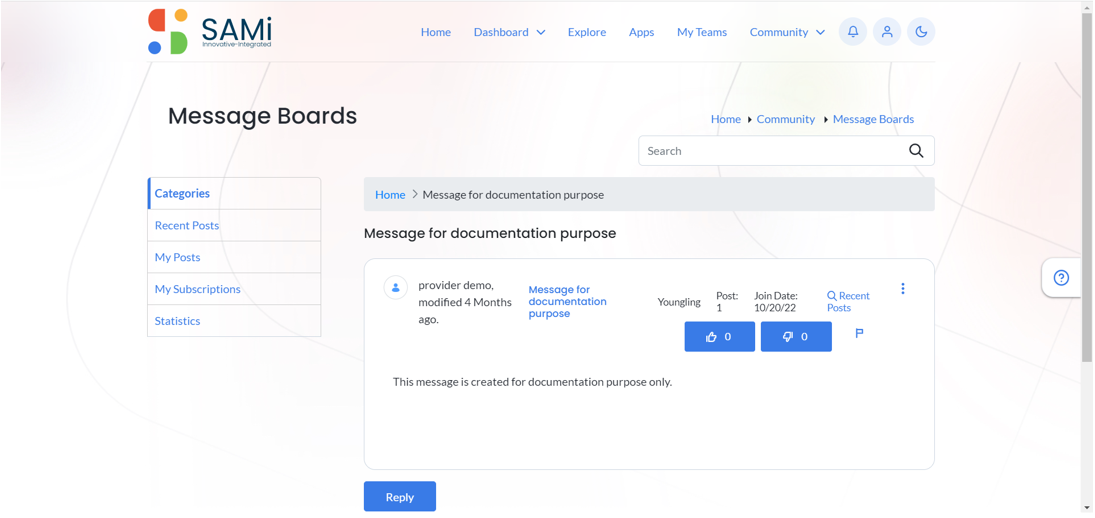
The Thread will provide all information on its publication like the date of post, join date, also the developer feels the message content to be inappropriate, can report it with the portal admin by clicking on Report button.
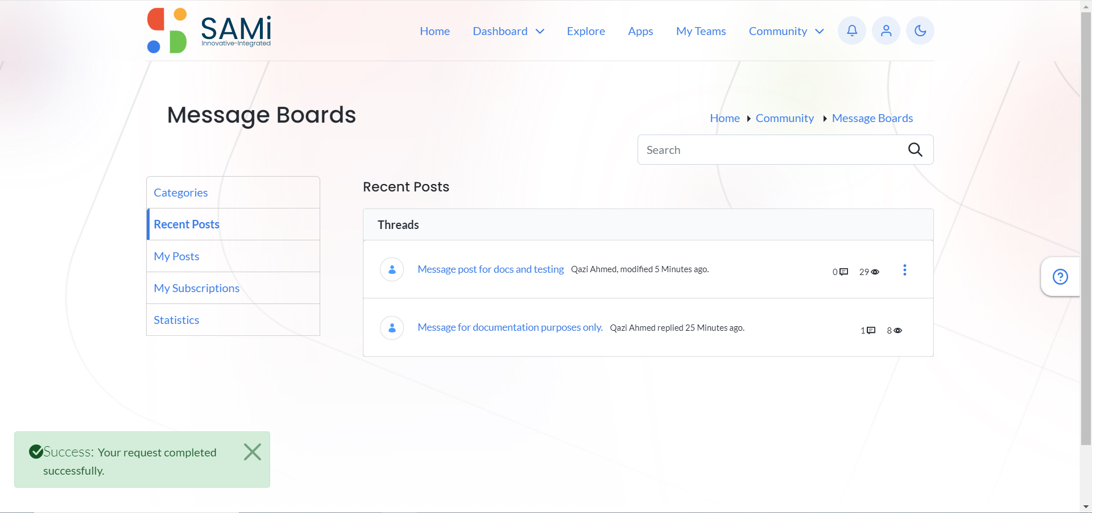
Recent Posts
To view the recent posts by Developer (Subscriber), do the following:
- In Home Page, scroll down and navigate to Community Topics and then click View All.
The Message Boards page appears.
- In Message Board, click Recent Post in left navigation pane.
The Recent Posts page appears.
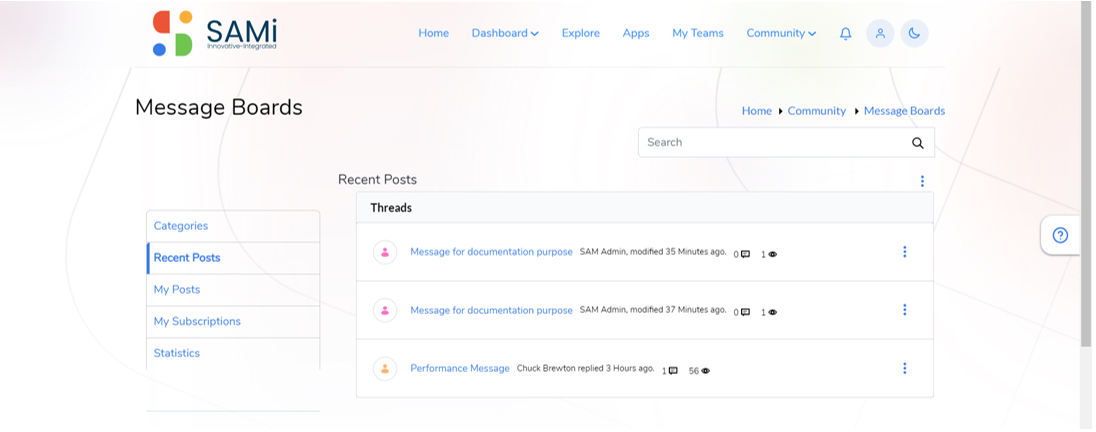
- Click on any of the message posts to open and view it.
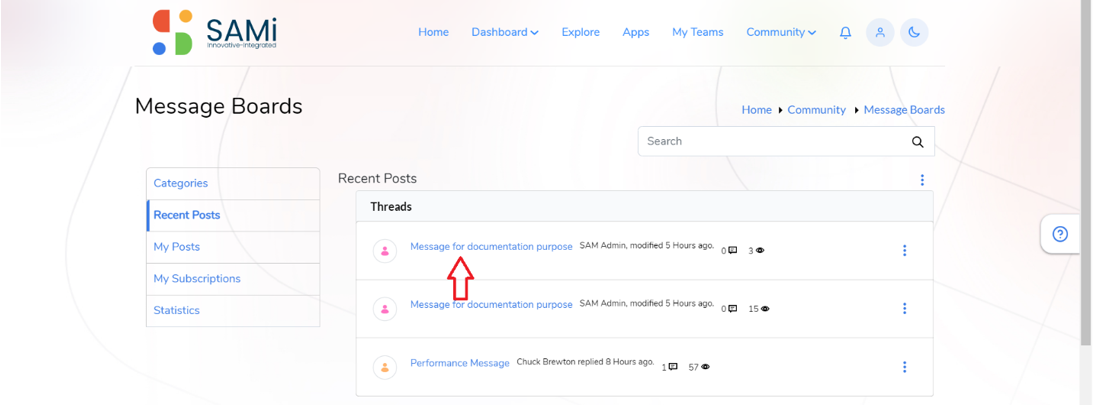
The message is opened.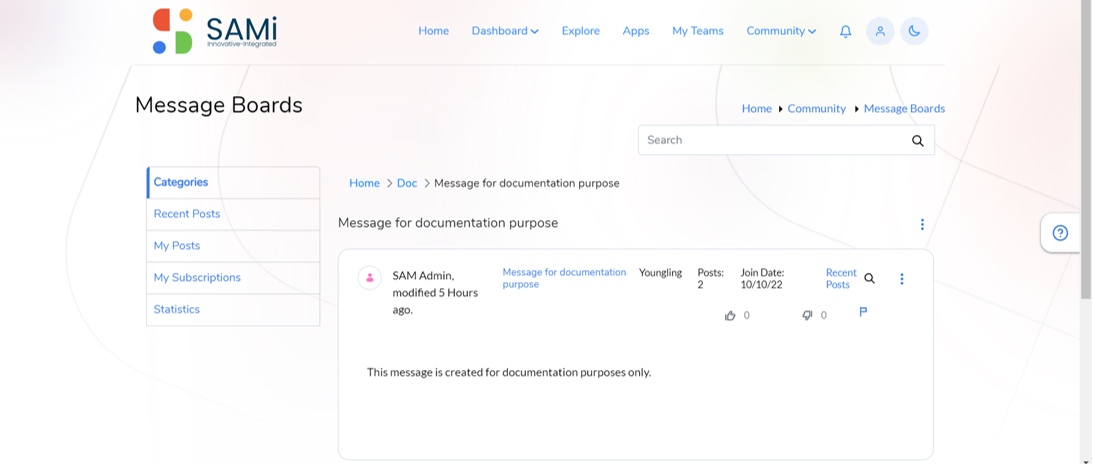
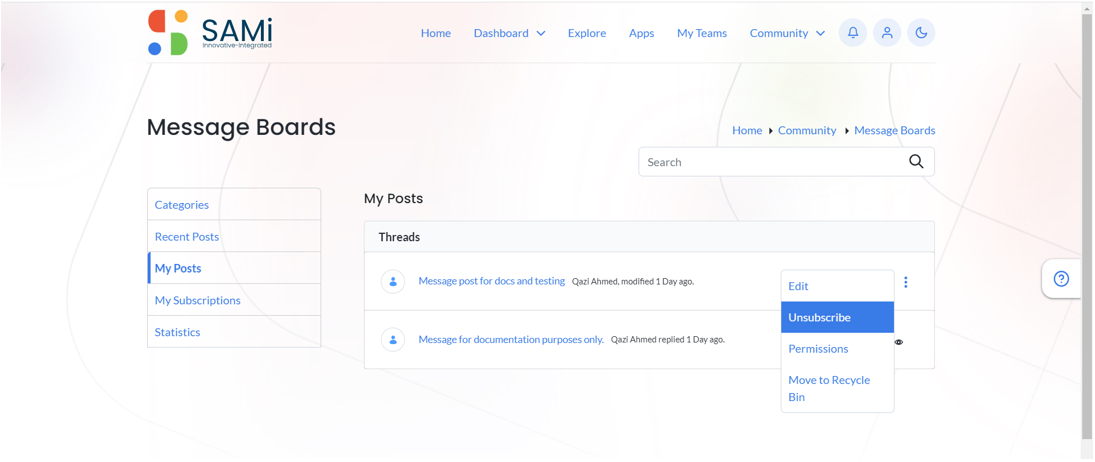
In the Message, by clicking on the 3 dots menu option, you can perform the following operations:
- Edit
- Unsubscribe
- Permissions
- Move to Recycle Bin
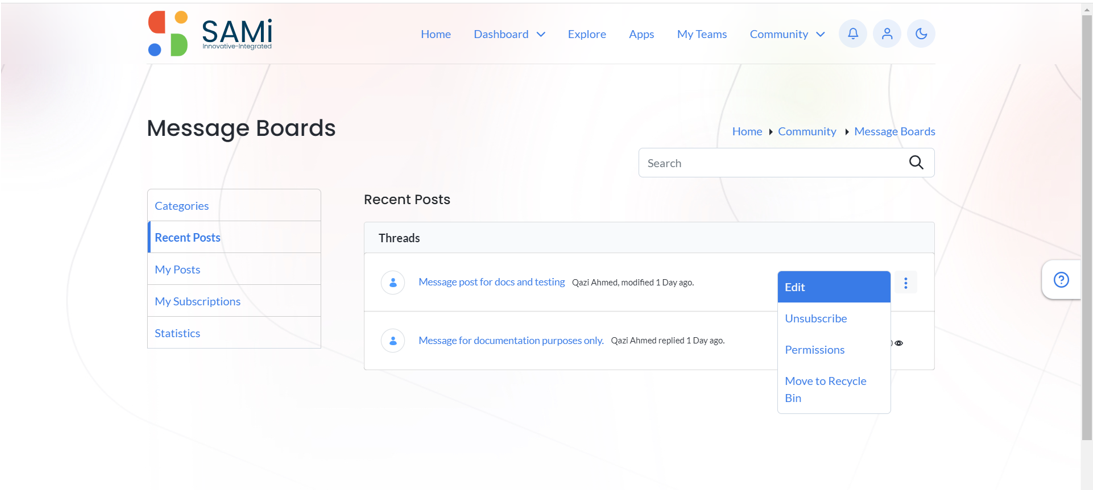
Edit Posts
- To edit an existing post, you need to navigate to Recent Posts click on 3 dots menu option of a post and then click on Edit.
The post is open for you to edit.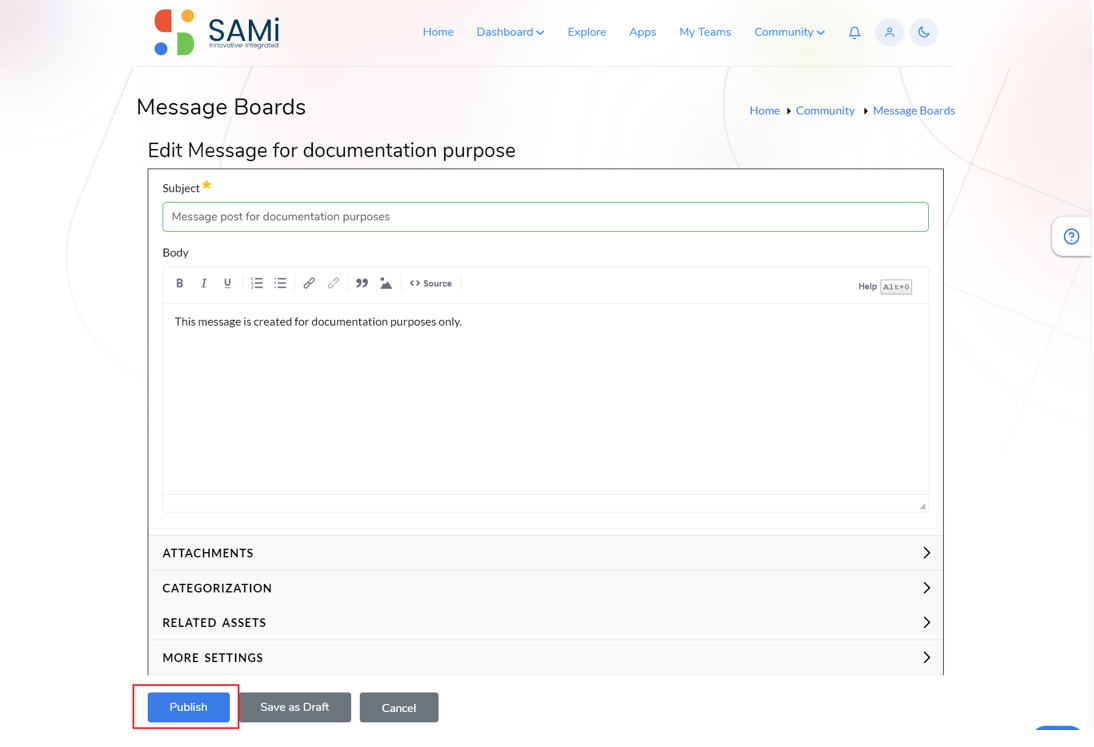
- Make necessary changes to the post in the Subject, Body fields and click on each section below to expand and provide:
- Attachments
- Categorization
- Related Assets
- More Settings
- Click on the Publish
A success message appears. The post is updated successfully.
Unsubscribe & Subscribe
The subscriber can unsubscribe and subscribe to a message post by clicking on the 3 dots menu option.
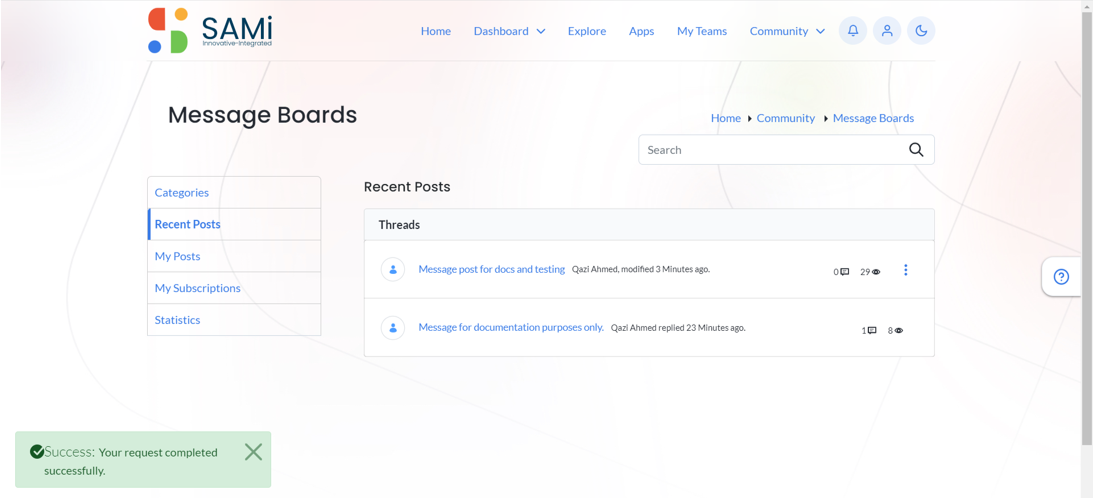
- Click on Unsubscribe.
A success message appears. The message post is unsubscribed.
- Similarly, if a post is unsubscribed earlier can be subscribed again by the Subscriber.
- The subscriber can subscribe to a message post by clicking on the 3 dots menu option.
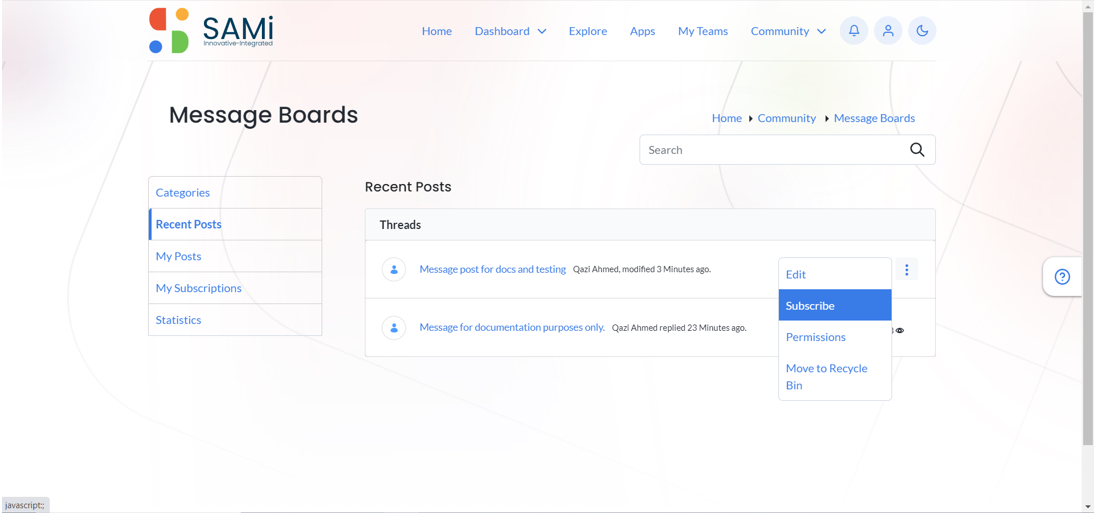
- Click on Subscribe.
A success message appears. The message post is subscribed.
Permissions
The subscriber can grant permissions to recent posts by clicking on the 3 dots menu option.
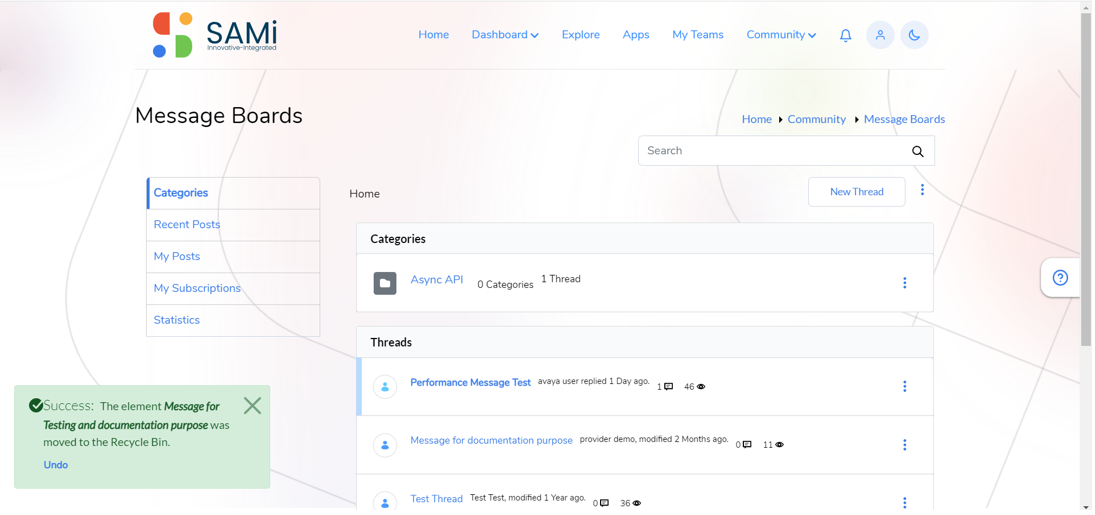
Move to Recycle Bin
The subscriber can delete a message post and move it to recycle bin clicking on the 3 dots menu option.
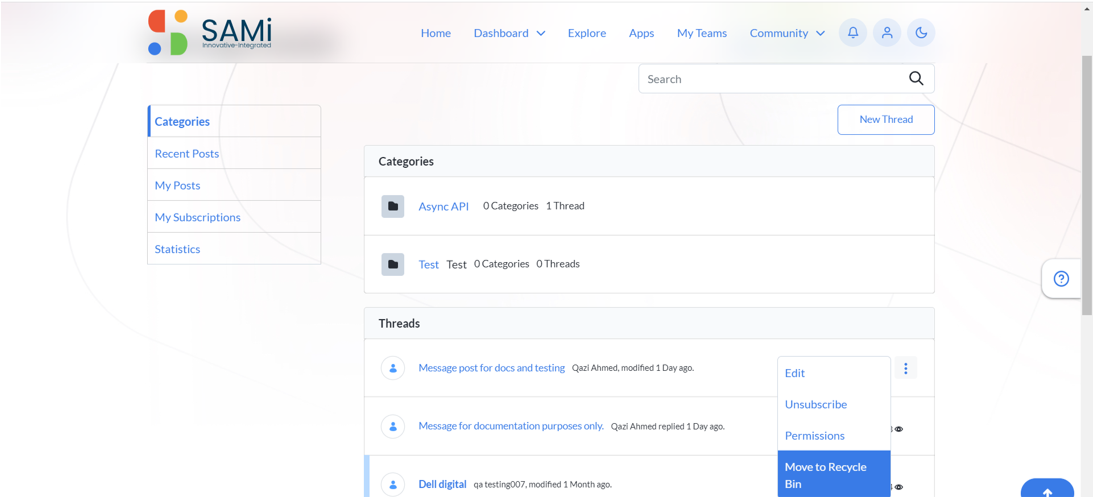
A delete success message appears. And the selected message posts moved to recycle bin.
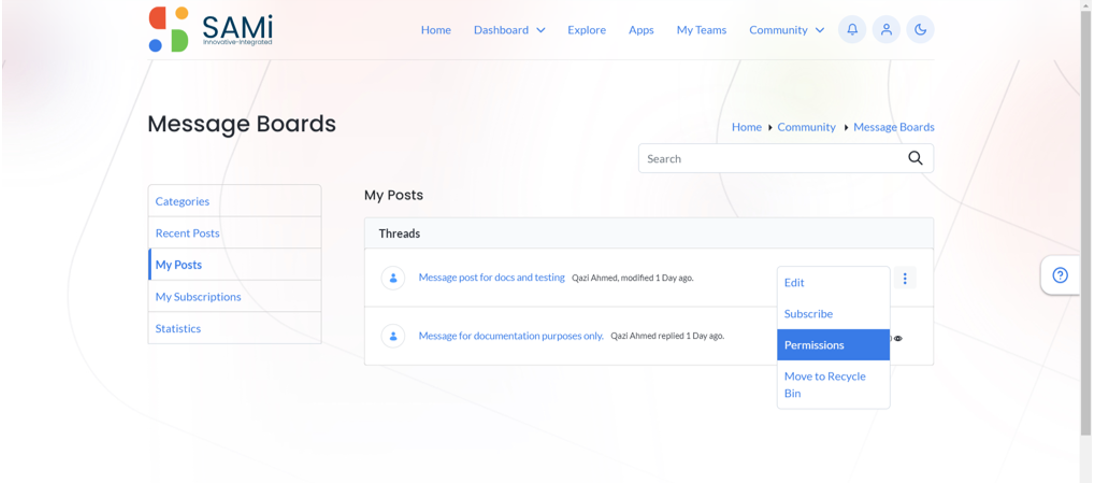
My Posts
To view the My Posts the subscriber will be able to view all his/her created posts. To view my posts, the subscriber clicks on the My Posts tab on the left navigation pane.
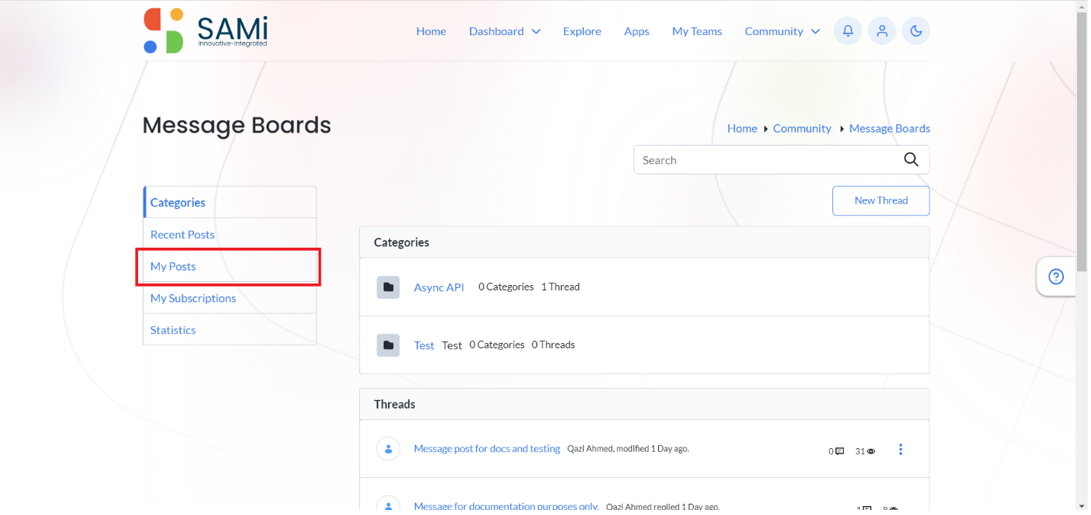
All the My Posts, the logged in subscriber’s posts are displayed on the Message boards.

In My Posts, selecting a post and then by clicking on the 3 dots menu option, you can perform the following operations:
- Edit
- Unsubscribe
- Permissions
- Move to Recycle Bin
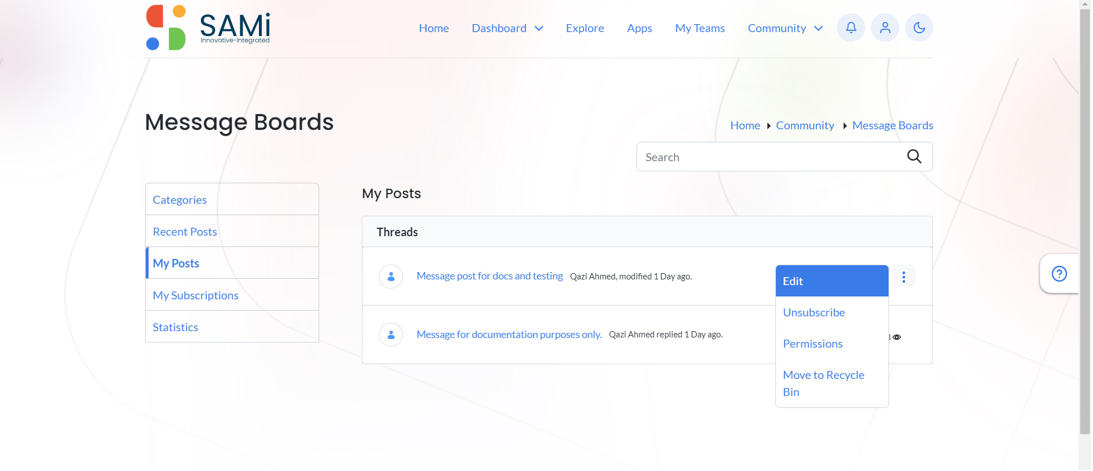
*Note: In My Posts, the subscriber can perform all the functions as it is performed in the Recent Posts. For more info, please refer to Recent Posts.
My Subscriptions
In My Subscriptions, you can view all the post subscriptions done by the subscriber.
- To navigate to the Subscribers page, click on the Subscribers tab on the left navigation pane.
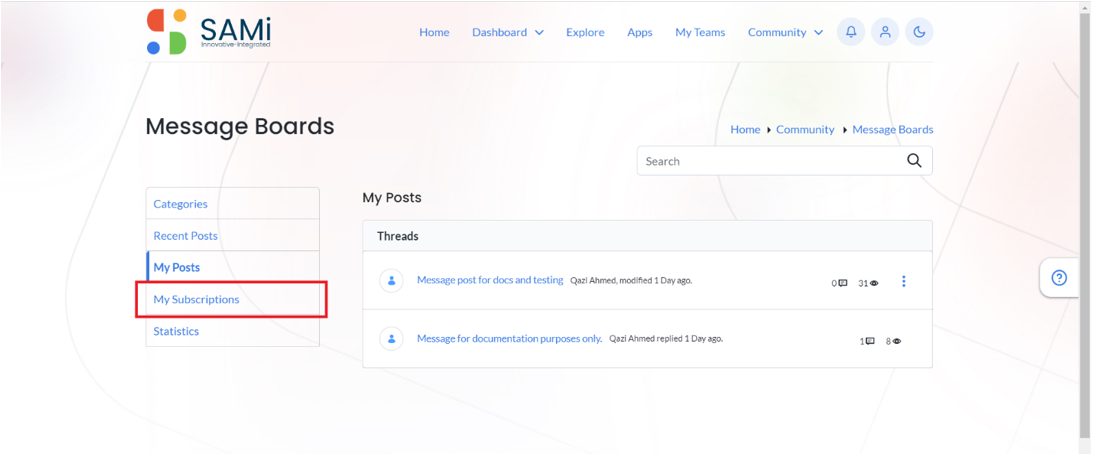
The Subscribers page appears.
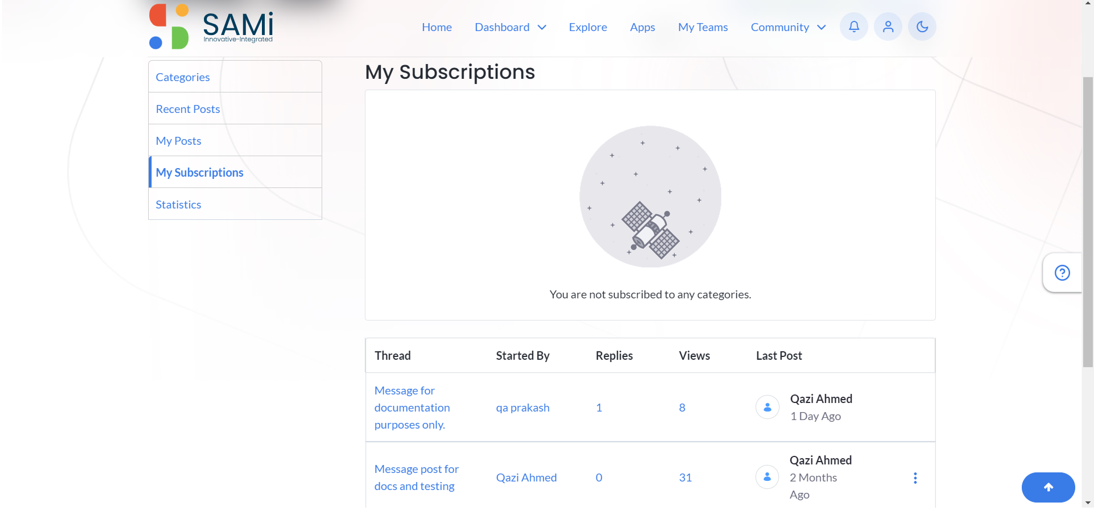
*Note: In Subscribers page, the subscriber can perform all the functions as it is performed in the Recent Posts. For more info, please refer to Recent Posts.
Statistics
The statistics page will allow the subscriber to view the trends and stats in the form of numbers related to message posts by various subscribers.
- To navigate to Statistics page, in Message Boards, click on Statistics tab on the left navigation pane.
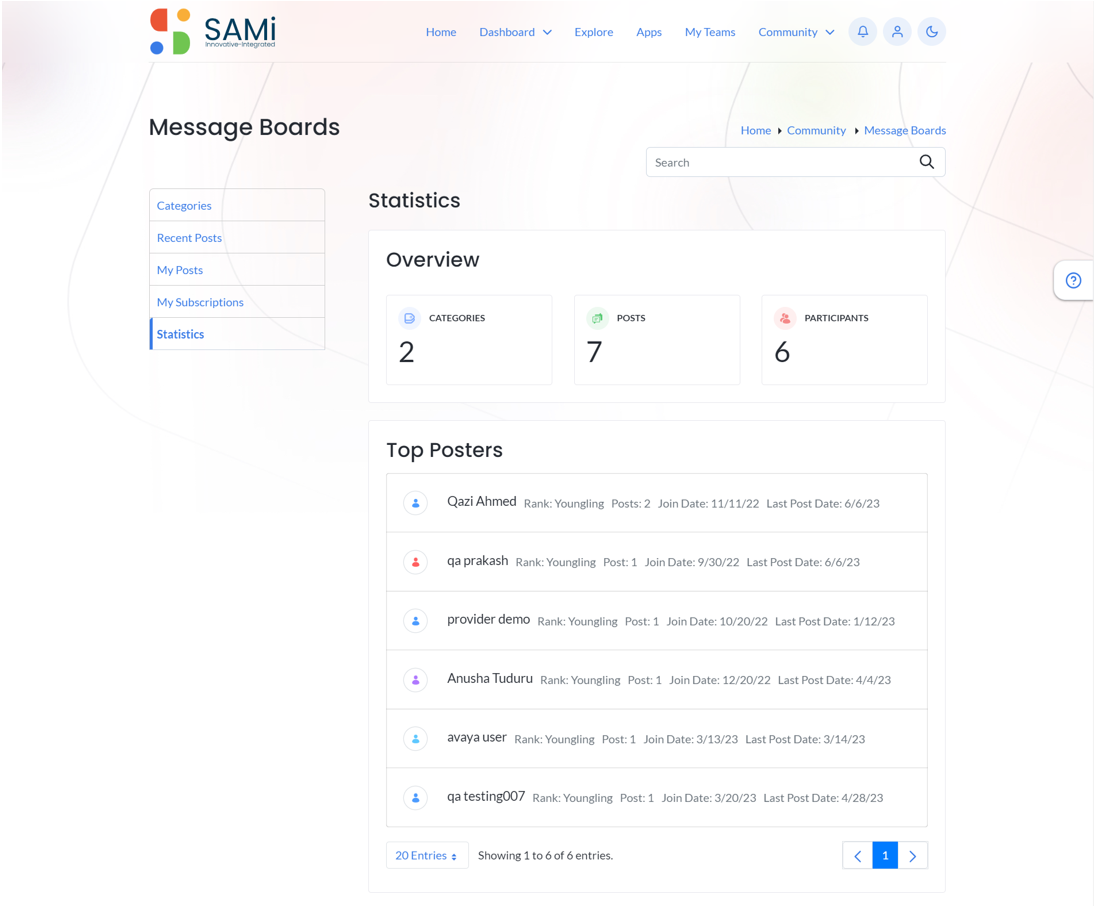
- Statistics is a view-only dashboard that showcases the number of categories, posts and participants published currently.
- Top Posters are listed with the latest message post on the top.
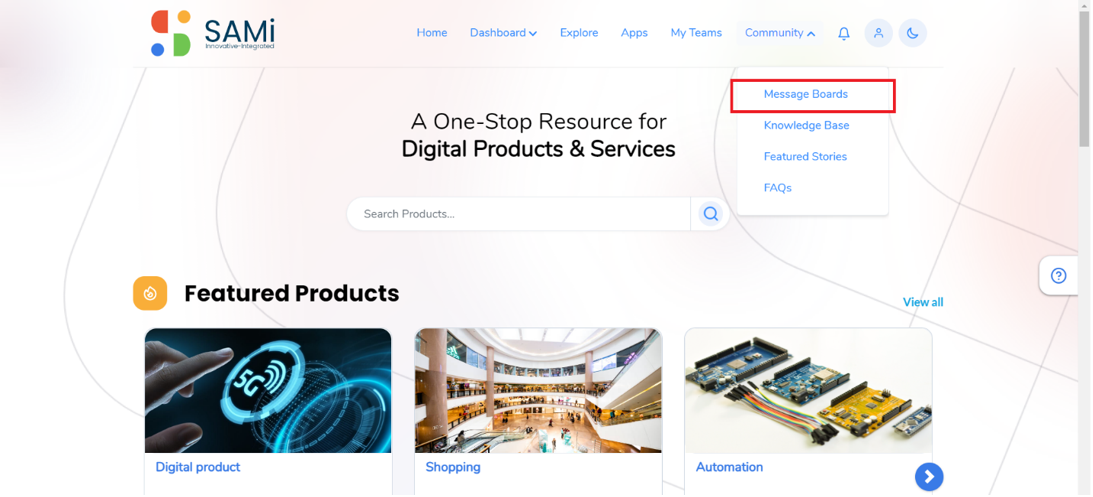
Scenario 2: To Explore Message Boards from Main Menu (Community)
The Message Board feature helps a developer to visit the Message Board that is relevant to developer community and perform certain operations with:
- Categories
- Recent Posts
- My Posts
- My Subscription
- Statistics
Categories
In the Categories, you will find a list of messages received from the community members.
To go to Categories, do the following:
- Click Community and then Message Boards in the main menu.
The Message Boards page appears.
Create a Message Post
To create a message post, the subscriber will be able to create a post and publish it on the Message Boards.
- To create a message post on Message Boards, the subscriber clicks on the New Thread.
The New Thread form appears.

- Fill in the details to the post in the Subject, Body fields and click on each section below to expand and provide:
- Attachments
- Categorization
- Related Assets
- More Settings
- Click on the Publish
A success message appears. The post is created and published successfully.
The message post is displayed in the Threads.
Search a Message Post
To search a message post, the subscriber can provide the keywords/post name in the Search field and clicks on Search icon.
The searched results of relevant message posts appear.
Categories – Threads
In the Categories, the developer will be able to view all the messages in threads. It shows the latest message on top of the list.
The Message Boards allows you to go to different threads, each post when posted by any member subsequently the developer is allowed to click and view those message posts, as shown below.
The Thread will provide all information on its publication like the date of post, join date, also the developer feels the message content to be inappropriate, can report it with the portal admin by clicking on Report Flag icon.
The report dialog box appears.
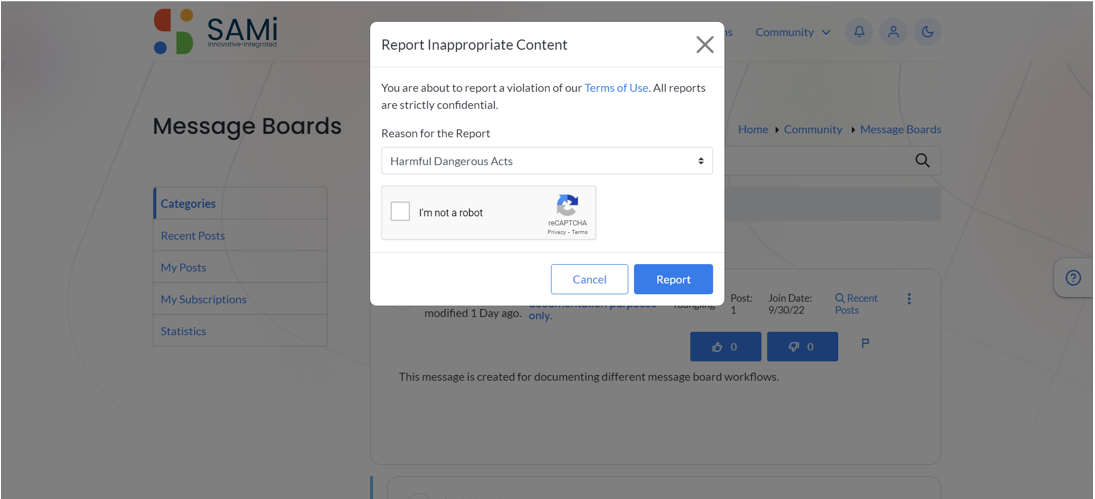
The report dialog box allows you to report inappropriate content by selecting the reason for reporting and clicking on Report button.
Recent Posts
To view the recent posts by Developer (Subscriber), do the following:
- In Home Page, scroll down and navigate to Community Topics and then click View All.
The Message Boards page appears.
- In Message Board, click Recent Post in left navigation pane.
The Recent Posts page appears.
- Click on any of the message posts to open and view it.
The message is opened.
In the Message, by clicking on the 3 dots menu option, you can perform the following operations:
- Edit
- Unsubscribe
- Permissions
- Move to Recycle Bin
Edit Posts
- To edit an existing post, you need to navigate to Recent Posts click on 3 dots menu option of a post and then click on Edit.
The post is open for you to edit. - Make necessary changes to the post in the Subject, Body fields and click on each section below to expand and provide:
- Attachments
- Categorization
- Related Assets
- More Settings
- Click on the Publish
A success message appears. The post is updated successfully.
Unsubscribe & Subscribe
The subscriber can unsubscribe and subscribe to a message post by clicking on the 3 dots menu option.
- Click on Unsubscribe.
A success message appears. The message post is unsubscribed.
- Similarly, if a post is unsubscribed earlier can be subscribed again by the Subscriber.
- The subscriber can subscribe to a message post by clicking on the 3 dots menu option.
- Click on Subscribe.
A success message appears. The message post is subscribed.
Permissions
The subscriber can grant permissions to recent posts by clicking on the 3 dots menu option.
Move to Recycle Bin
The subscriber can delete a message post and move it to recycle bin clicking on the 3 dots menu option.
A delete success message appears. And the selected message posts moved to recycle bin.
My Posts
To view the My Posts the subscriber will be able to view all his/her created posts. To view my posts, the subscriber clicks on the My Posts tab on the left navigation pane.
All the My Posts, the logged in subscriber’s posts are displayed on the Message boards.
In My Posts, selecting a post and then by clicking on the 3 dots menu option, you can perform the following operations:
- Edit
- Unsubscribe
- Permissions
- Move to Recycle Bin
*Note: In My Posts, the subscriber can perform all the functions as it is performed in the Recent Posts. For more info, please refer to Recent Posts.
My Subscriptions
In My Subscriptions, you can view all the post subscriptions done by the subscriber.
- To navigate to the Subscribers page, click on the Subscribers tab on the left navigation pane.
The Subscribers page appears.
*Note: In Subscribers page, the subscriber can perform all the functions as it is performed in the Recent Posts. For more info, please refer to Recent Posts.
Statistics
The statistics page will allow the subscriber to view the trends and stats in the form of numbers related to message posts by various subscribers.
- To navigate to Statistics page, in Message Boards, click on Statistics tab on the left navigation pane.
- Statistics is a view-only dashboard that showcases the number of categories, posts and participants published currently.
- Top Posters are listed with the latest message post on the top.
Workflow 13 – Explore Feature Stories from Main Menu (Community)
The subscriber can navigate to Featured Stories option by going to Community main menu.
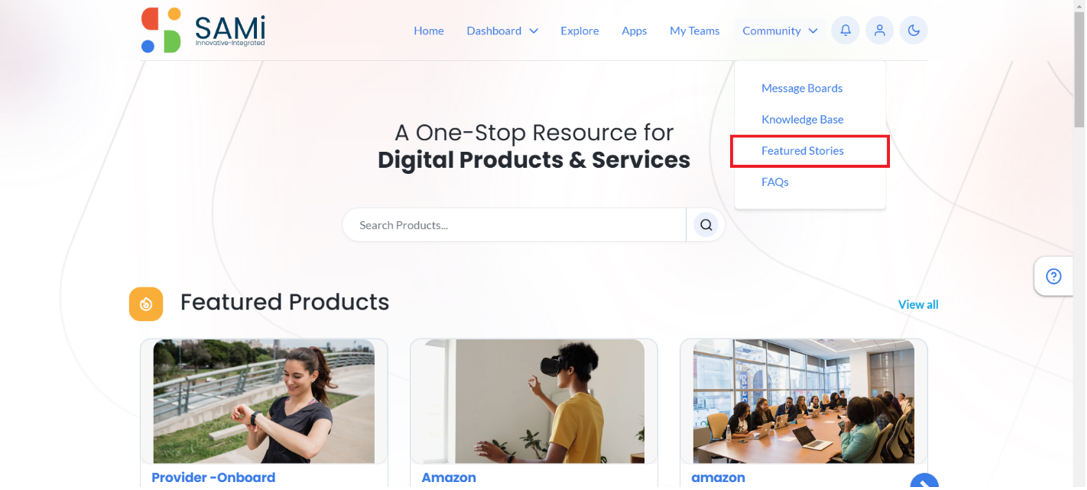
The Feature Stories page will enable the subscriber to view all the featured stories published by the subscribers till date.
- In Featured Stories, the subscriber can click and comment, like, dislike featured stories.

- Share the Featured Stories on social media platforms for instance, twitter, Facebook, and LinkedIn.
Workflow 14 – Alerts and Announcements from Main Menu
Scenario 1: Alerts and Announcements from Main Menu
The Subscriber is allowed to view alerts and announcements of particular products from the main menu. The subscriber can only view the Alerts and Announcements.
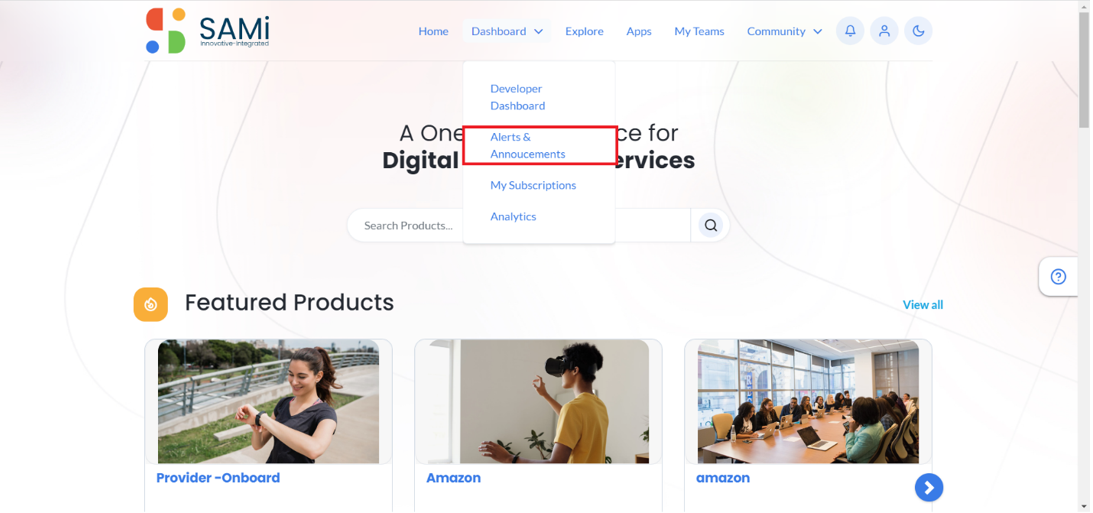
To view the Alerts and Announcements as a developer, do the following:
- In the Home Page, Click Dashboard, and then click on Alerts and Announcements Option. The Alerts and Announcement page is displayed.
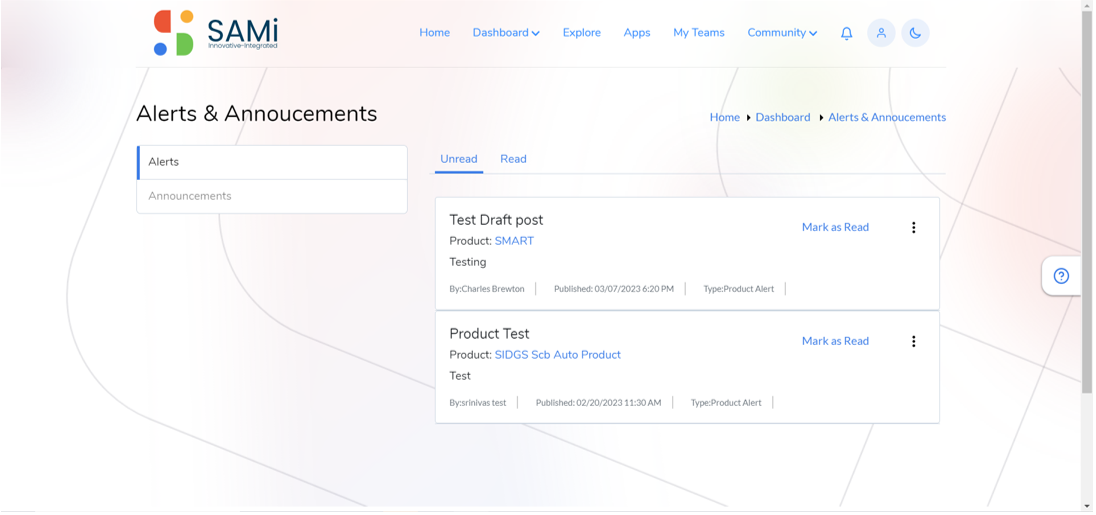
Alerts
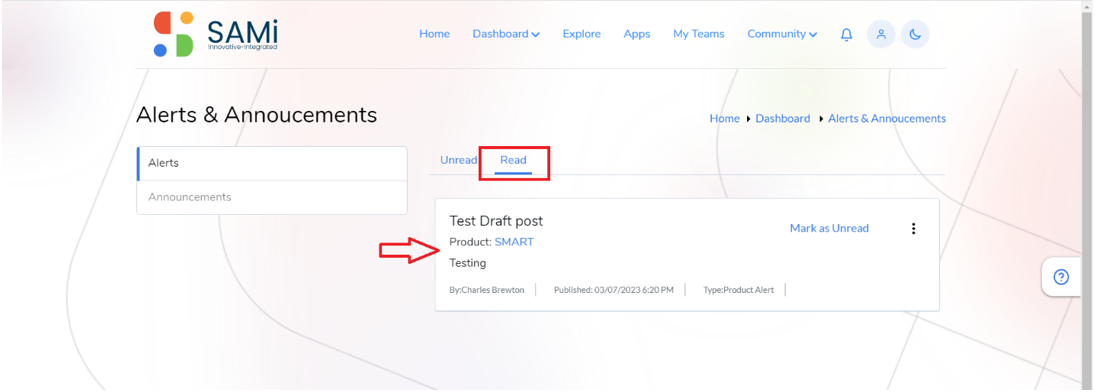
- In the Alerts & Announcements page, by default the Alerts tab is enabled, you will be able to view and read the Alerts.
- If you’ve already read any particular alert and by clicking Mark as Read link or by clicking the 3 dots menu option and then Mark as Read.
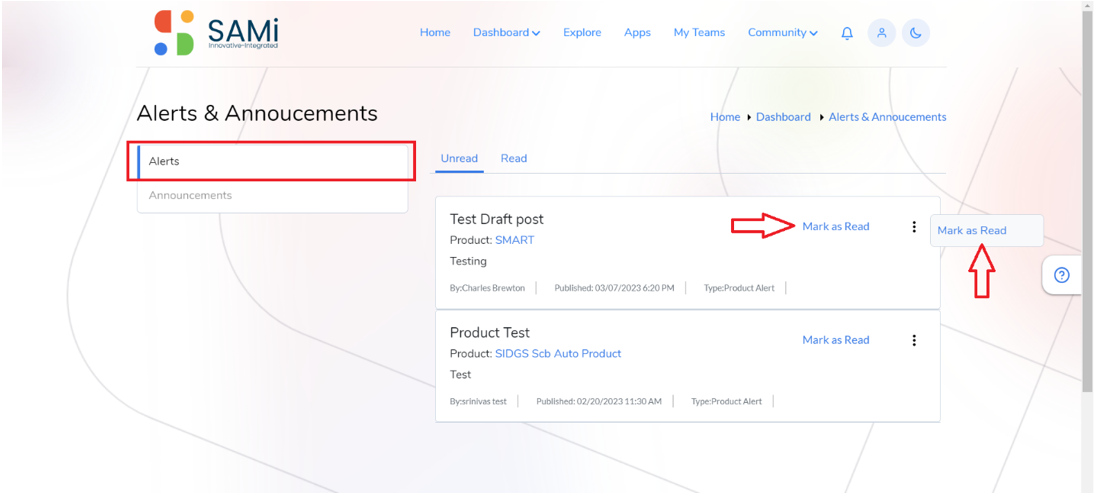
Note: Since these alerts are in read only mode, as a developer you are not allowed to perform any other operation apart from reading and marking those as read.
When the Alert is read, click on Read tab the alert will reside under Read tab.
Announcements
In the Alerts & Announcement page, click on the Announcements tab on the left navigation pane and then the Announcements page appears.
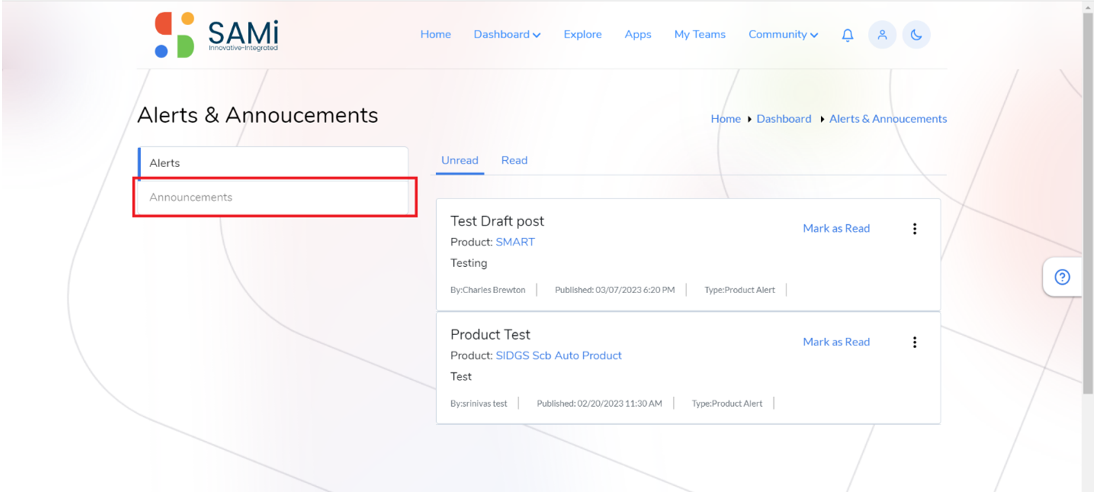
The Announcements page is displayed with all the announcements.
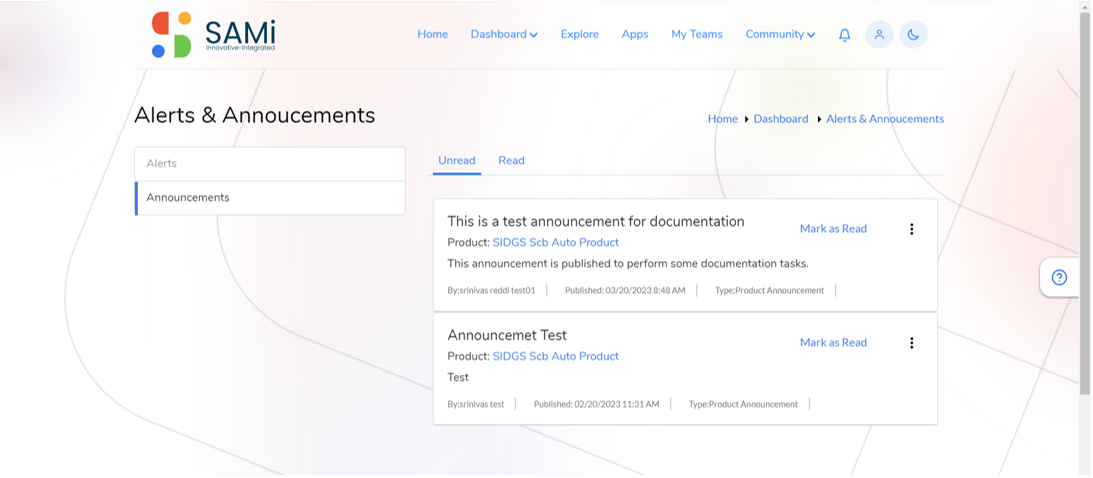
- Here, you will be able to view and read the Announcement.
- In the Announcements page, select any Announcement and you can read that announcement, and when read, you can mark it as read by clicking Mark as Read link or by clicking the 3 dots menu option and then Mark as Read.
When the Announcement is read, click on Read tab the alert will reside under Read tab.
Scenario 2: Alerts and Announcements from Alerts bell icon
The latest two topics of Alerts and Announcements will be displayed in the Bell Icon.
*Note: In another scenario, the same Alerts & Announcements operations can be performed by the subscriber from the Bell icon on the main menu.
Workflow 15 – View Analytics from Main Menu
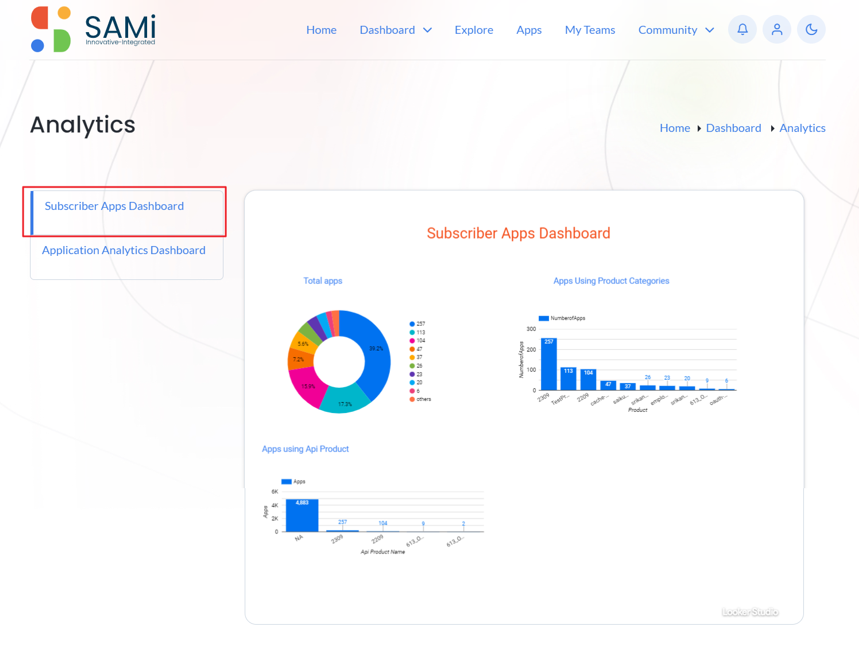
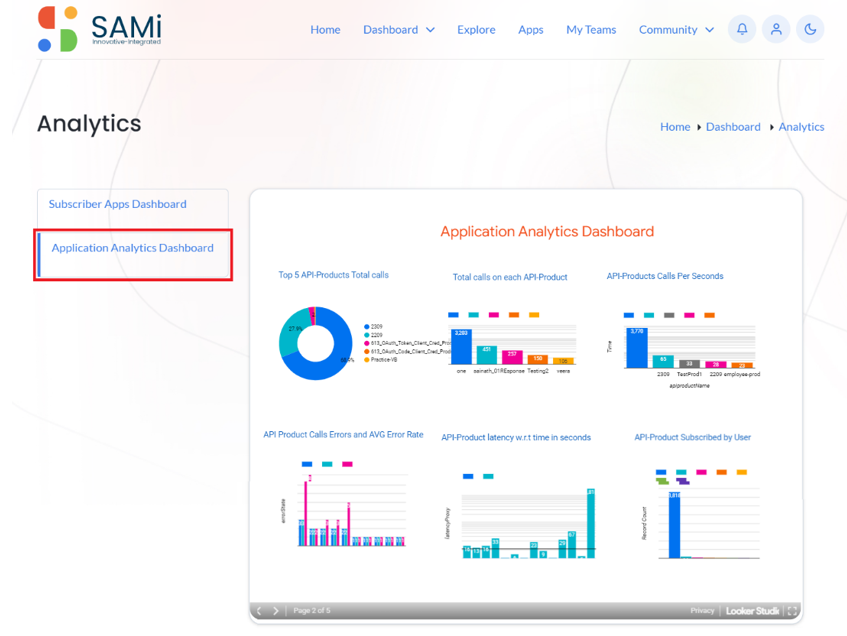
The analytics feature helps the subscriber to view the following dashboards:
- Subscriber Apps Dashboard
- Application Analytics Dashboard
Subscriber Apps Dashboard
The subscriber apps dashboard provides complete statistics of the SAMi API Marketplace portal showcasing the total apps, apps using the product categories, and apps using the APIs as products.
Application Analytics Dashboard
The Application Analytics Dashboard provides the statistics of SAMi API Marketplace portal by showcasing the trends and analytics on the Top 5 API Products Total calls, Total calls on each API Product, API products calls per second, API Product calls Errors and AVG Error Rate, API Product latency w.r.t time in seconds, and API Product Subscribed by user.
Workflow 16 – Contact Us from Home Page
The subscriber will be able to contact the SAMi Support team by navigating from the Home page to the Help icon.
![]()
- When the Help icon is clicked, you will view the expanded support window.
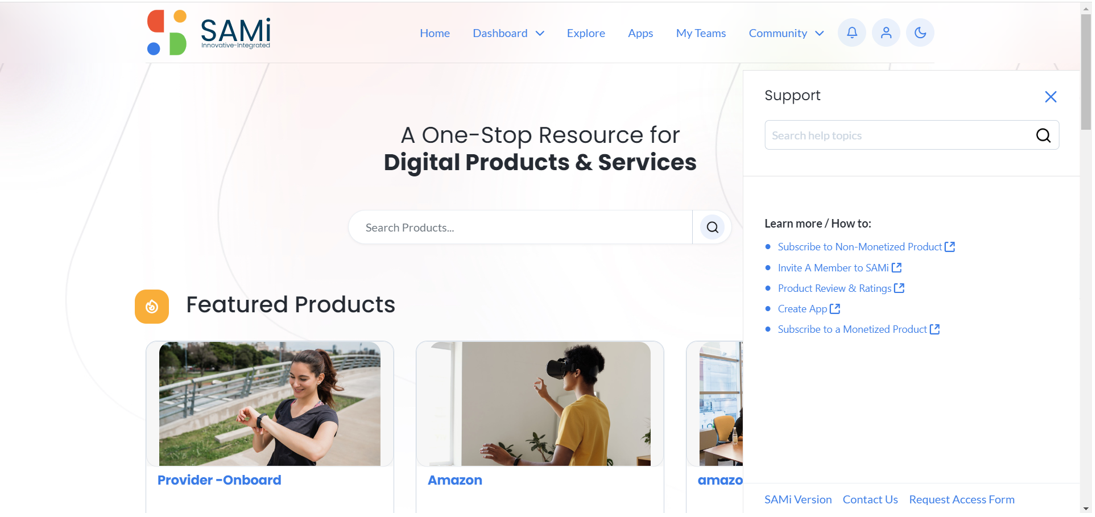
- In the Support Window, click on the Contact Us
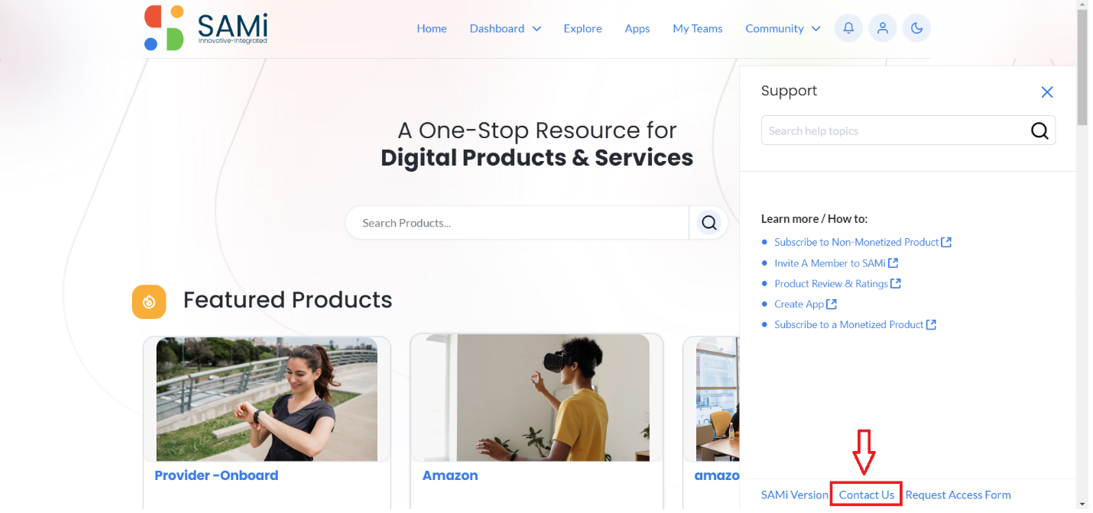
- In the Support window, click enter the required details, to allow the SAMi Support team to contact you in response:
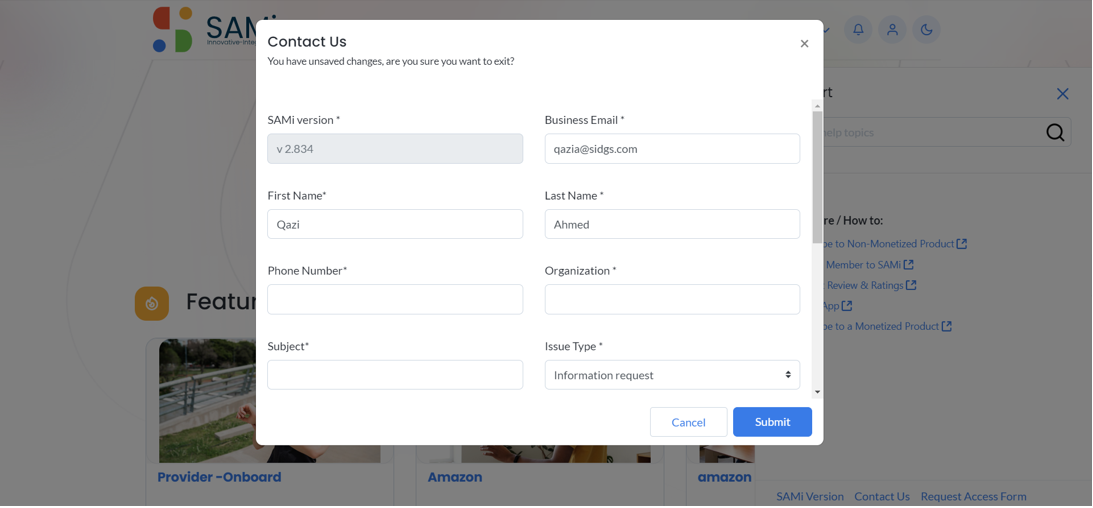
- Once all the information is provided, click Submit.
- Click Cancel, if you wish to abort sending your information and close the window.
Note: If you need info on the product subscription by clicking and opening the PDF help files like:
- Subscribe to non-monetized products
- Invite a member to SAMi
- Product Review & Ratings
- Create App
- Subscribe to Monetized Products.
SAMi Abbreviations
This page will serve as a list providing all the important terms and their meanings being used in the SAMi API Marketplace Portal.
Table 1 – SAMi Abbreviations
| S. No. | Abbreviation | Meaning |
| 1 | API | Application Programming Interface |
| 2 | PO | Product Owner |
| 3 | SAMi | Smart API Marketplace Portal – Innovative-Integrated |
| 4 | Apps | Applications created by developers or partners for business or non-business purposes. |
| 5 | SSO | Single Sign-On |
| 6 | SAML | Security Assertion Markup Language |
| 7 | FAQ | Frequently Asked Question |
| 8 | KVM | Key Value Map |
| 9 | SKU | Stock Keeping Unit |
| 10 | SaaS | Software as a Service |
Support & Point of Contact
Table 2 – Support Points of Contact
| Contact | Organization | Role | Responsibility | ||
| Rajender Muddam | SIDGS | rajenderm@sidgs.com | Senior Developer | Write, Update |
Revision History
Provide information on how the development and distribution of the User Guide will be controlled and tracked. Use the table below to provide the version number, the date of the version, the author/owner of the version, and a brief description of the reason for creating the revised version.
Table 3 – Record of Changes
| Version Number | Date | Author/Owner | Description of Change |
| 3.0.0 | 8/28/2023 | Rajender Muddam | |