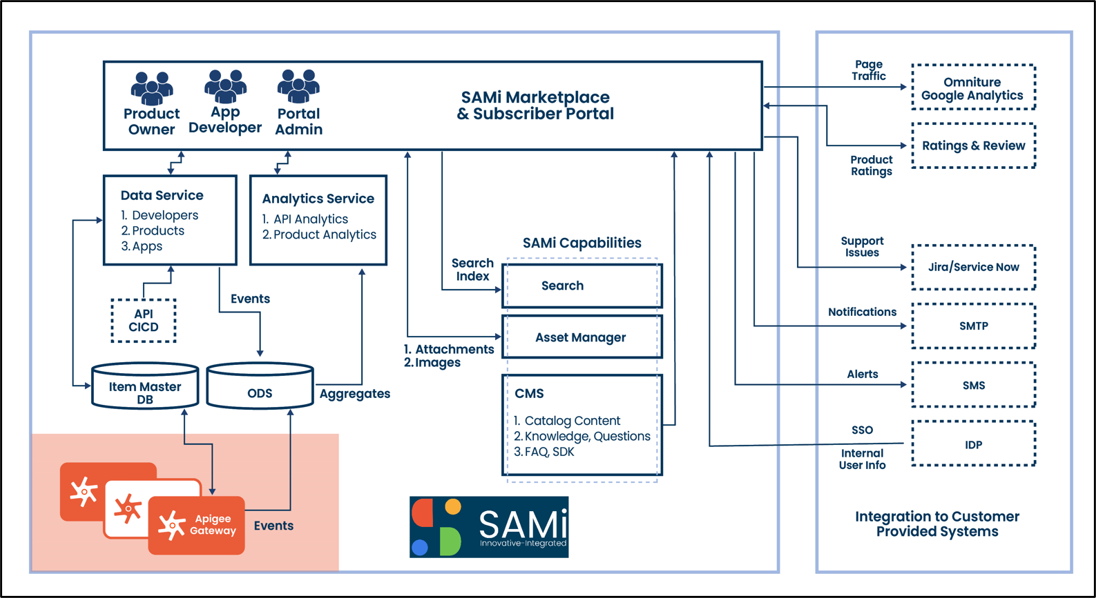
Introduction
SAMi User Guide provides the information necessary for developers, product managers and administrators to follow the user instructions provided herein and perform specific operations. The authorized users are allowed to access the SAMi product effectively and perform different user-based operations with respect to API marketplace subscription. The user guide also helps the marketplace subscribers in-turn to easily build their apps using these APIs in collaboration with our developers.
Overview
SAMi helps technology consumers to leverage the benefits of our most popular Smart API product available in the Marketplace that can be utilized to build apps in collaboration with our developers and consumer development teams and assist in smoothly integrating with different domain applications. Our consumers and developer communities from our consumers can visit the API Marketplace, and subscribe to these API products, and try them out to make sure they work perfectly to perform specific functions when integrated with their customized applications.
These are the key features of SAMi, but is not limited to, the following:
- SAMi Marketplace and Configuration – A unique API marketplace product that can be easily configured with an intelligent rate card system
- SAMi Product Management – A Unified Product Catalog Management of multiple Product categories. Set Recommendation of Products for user consumption.
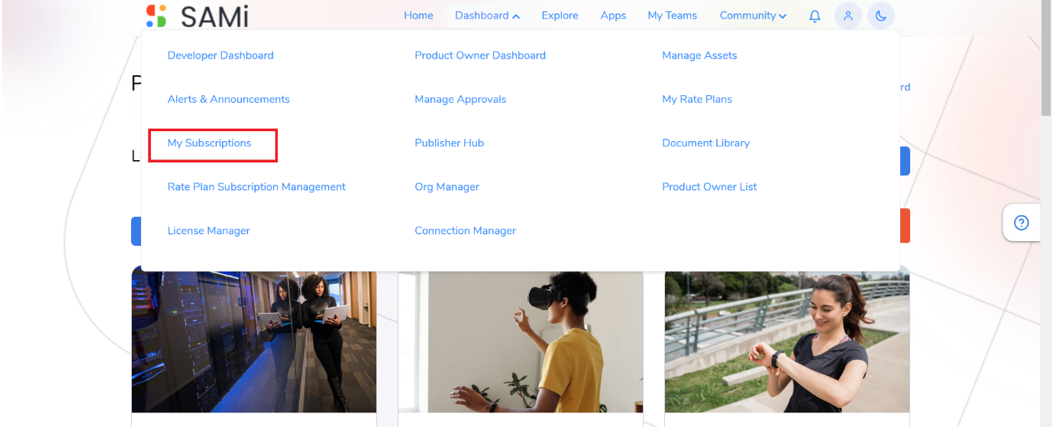
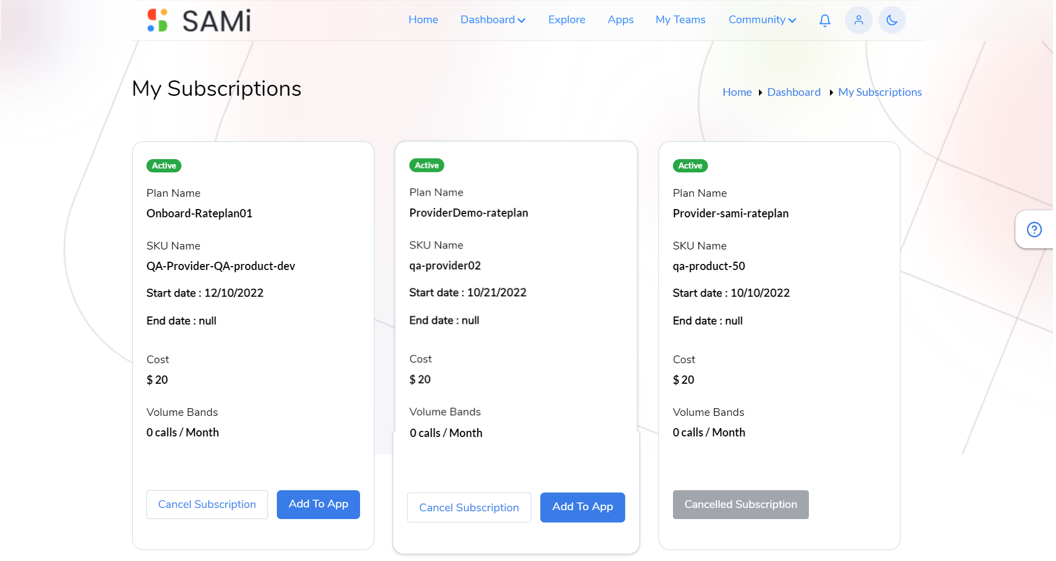
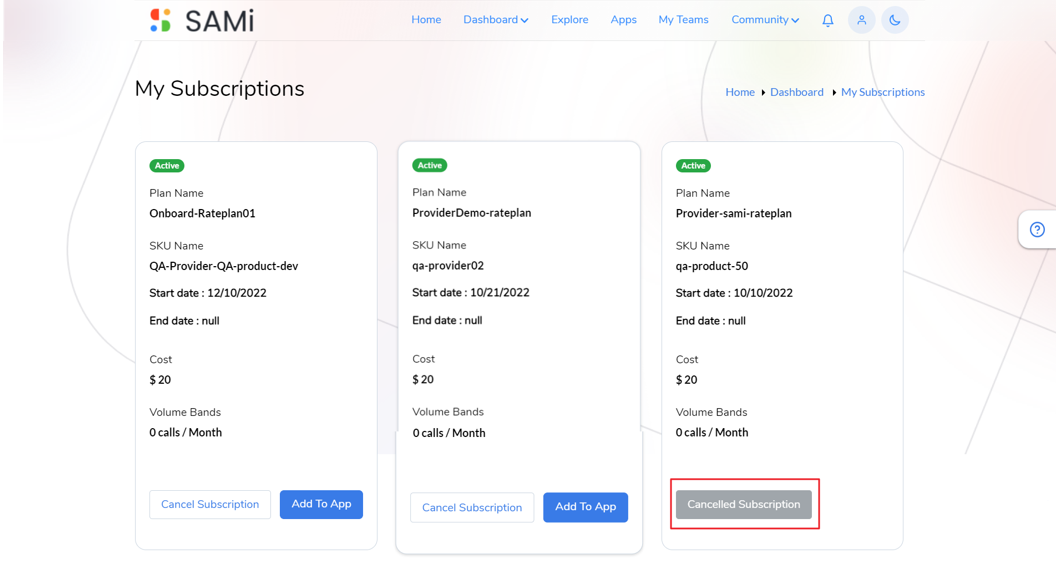
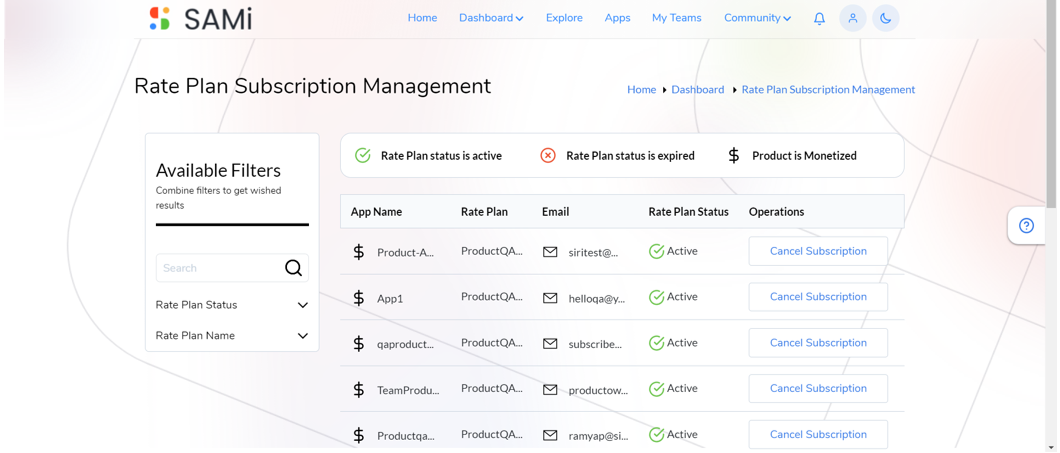
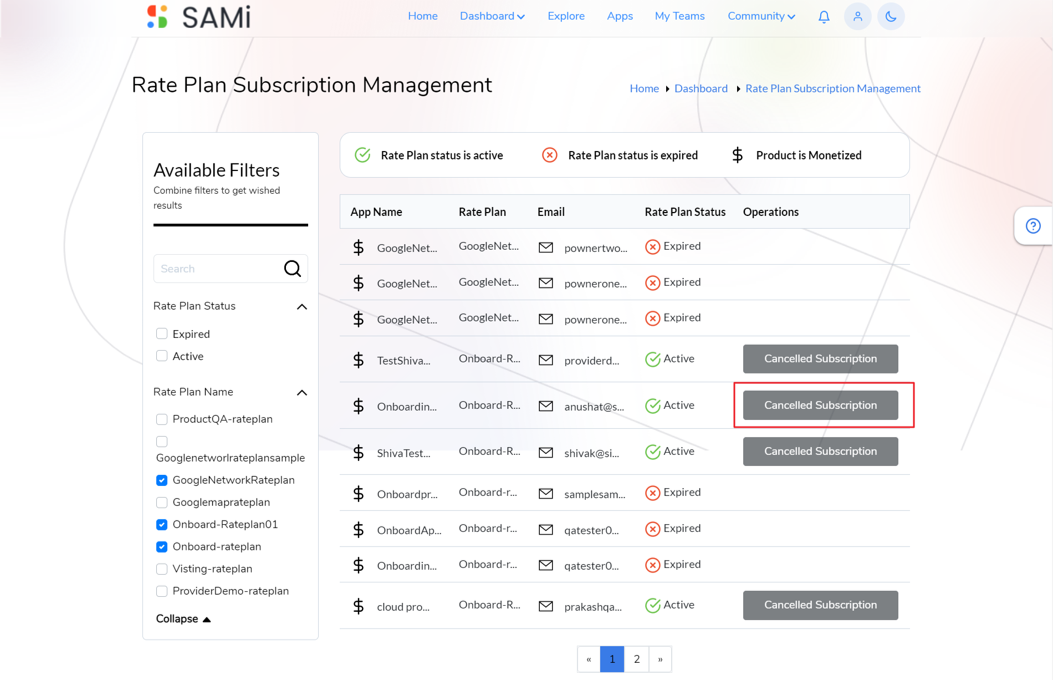
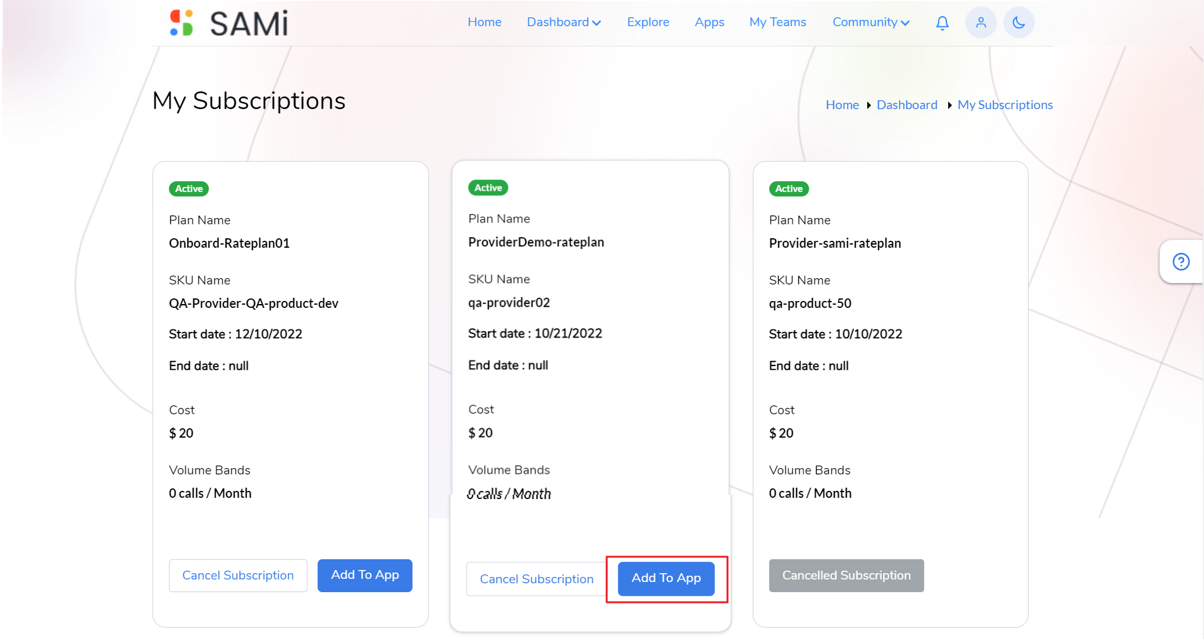
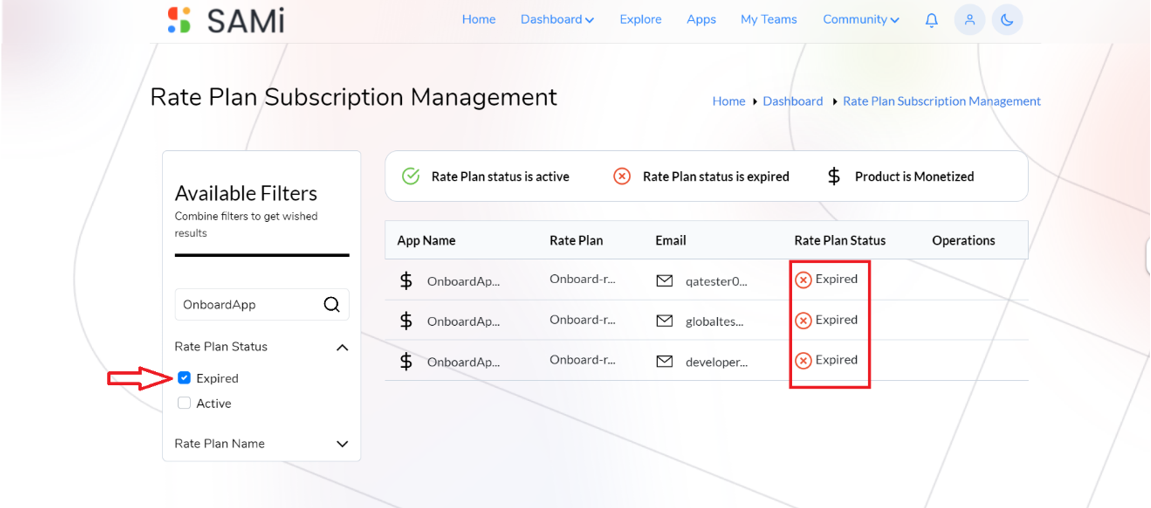
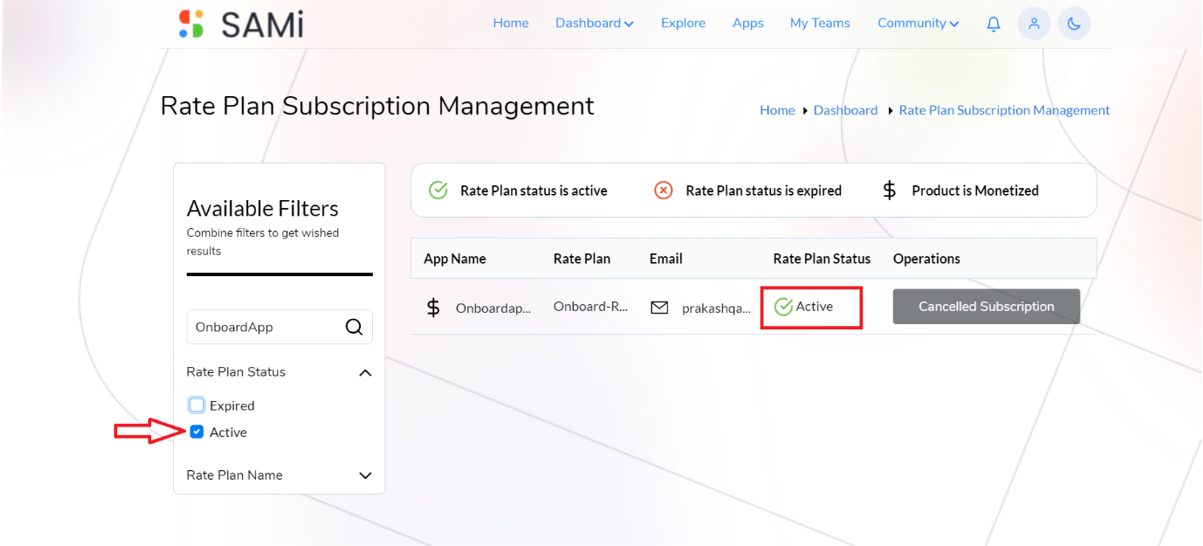
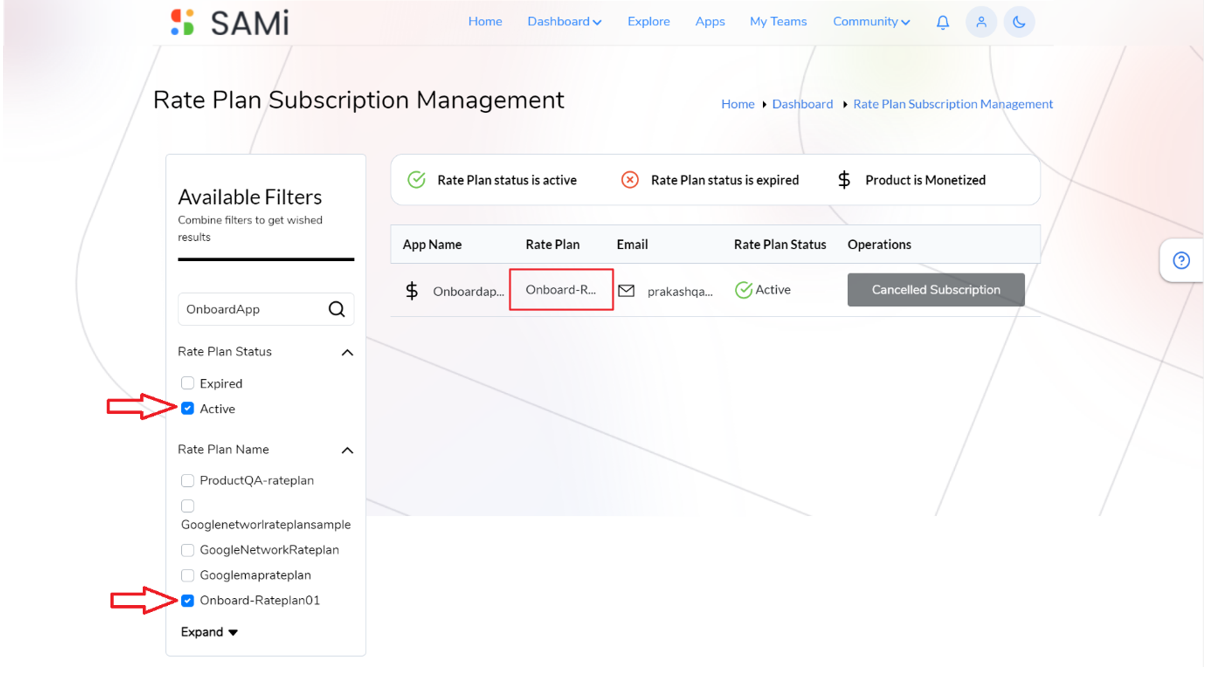
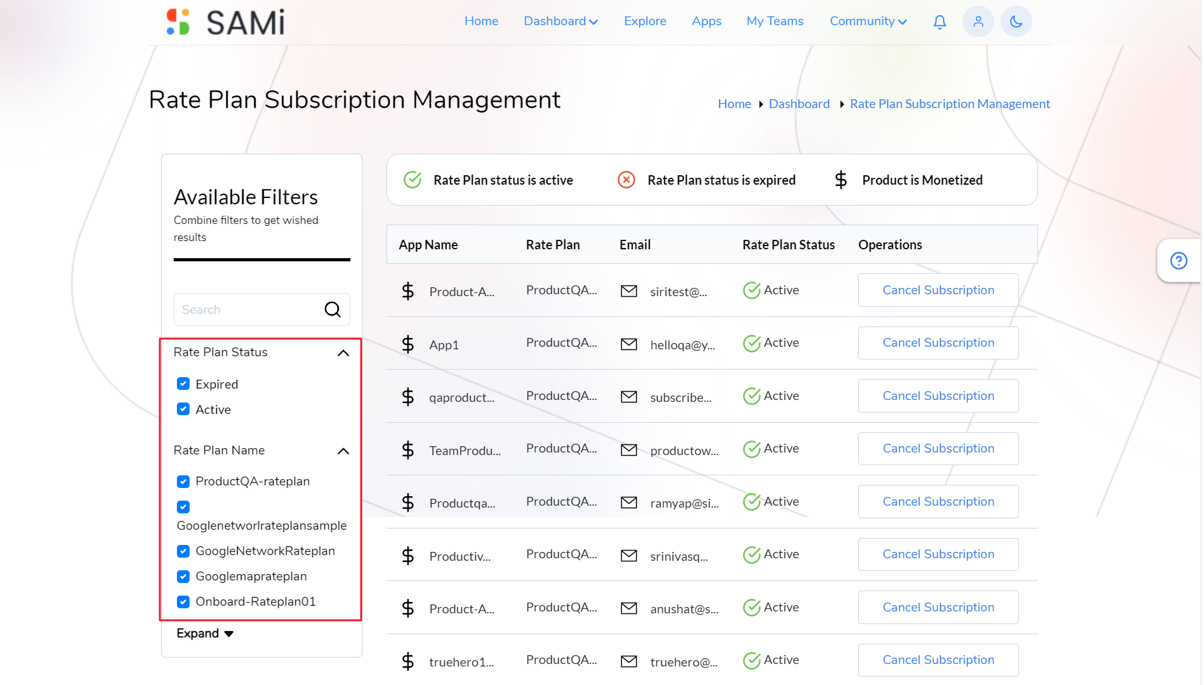
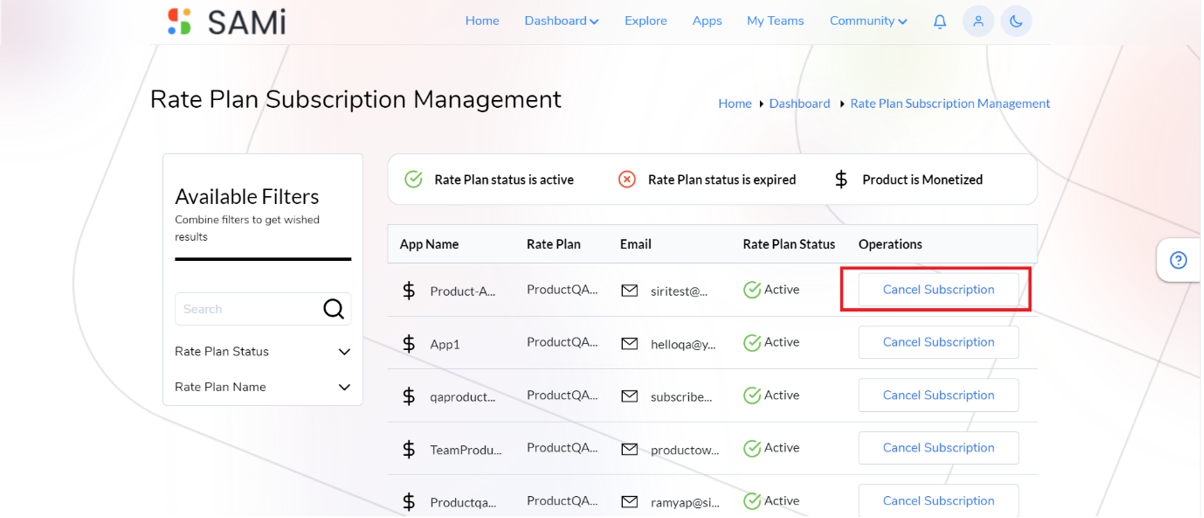
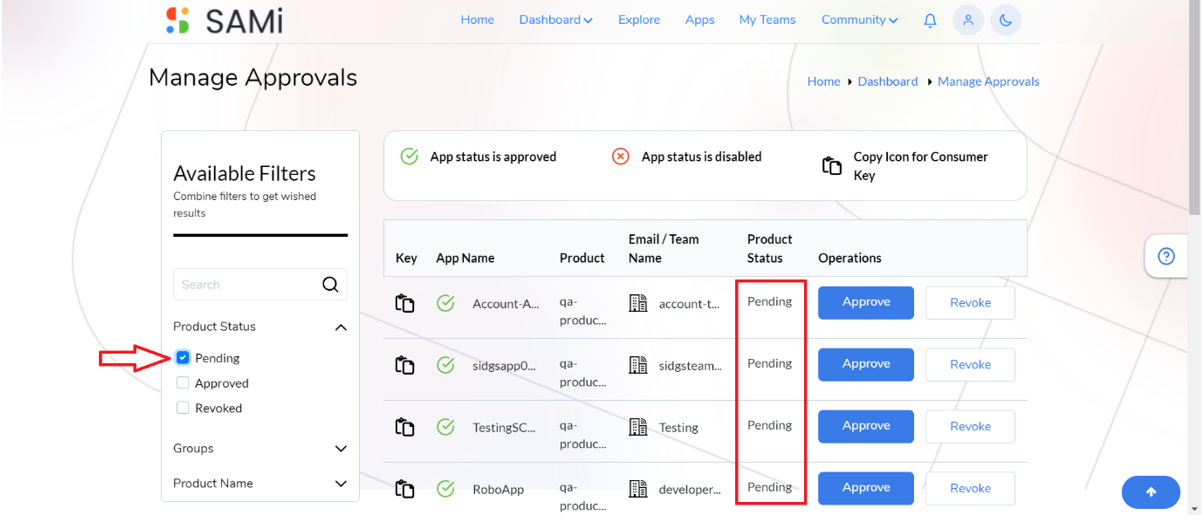
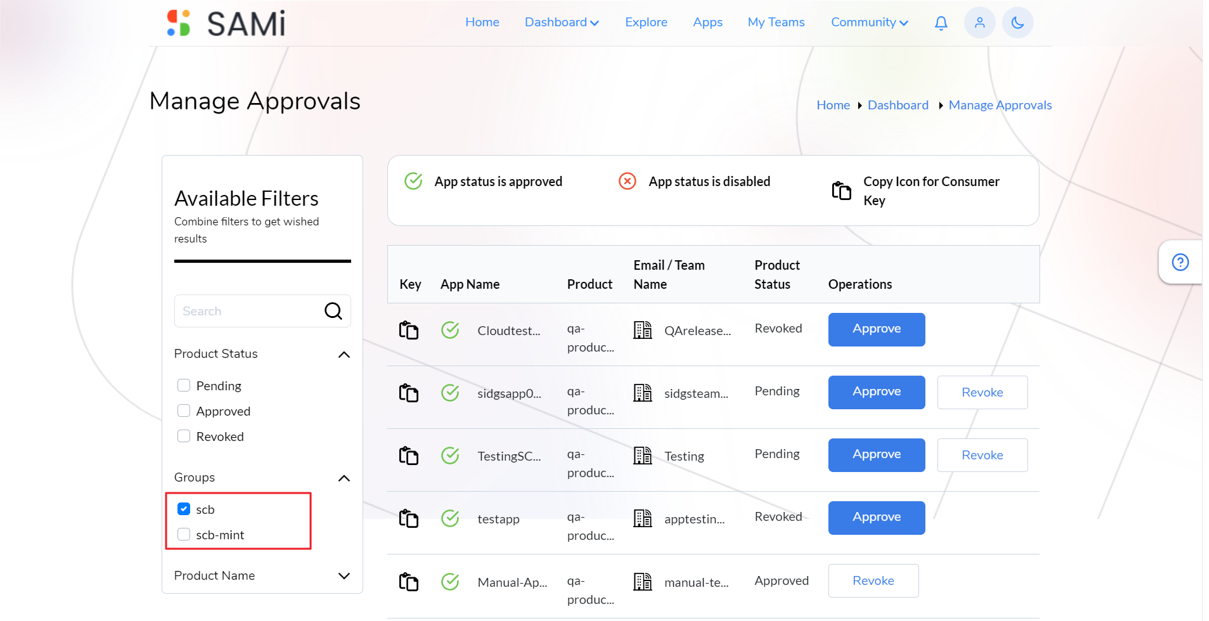
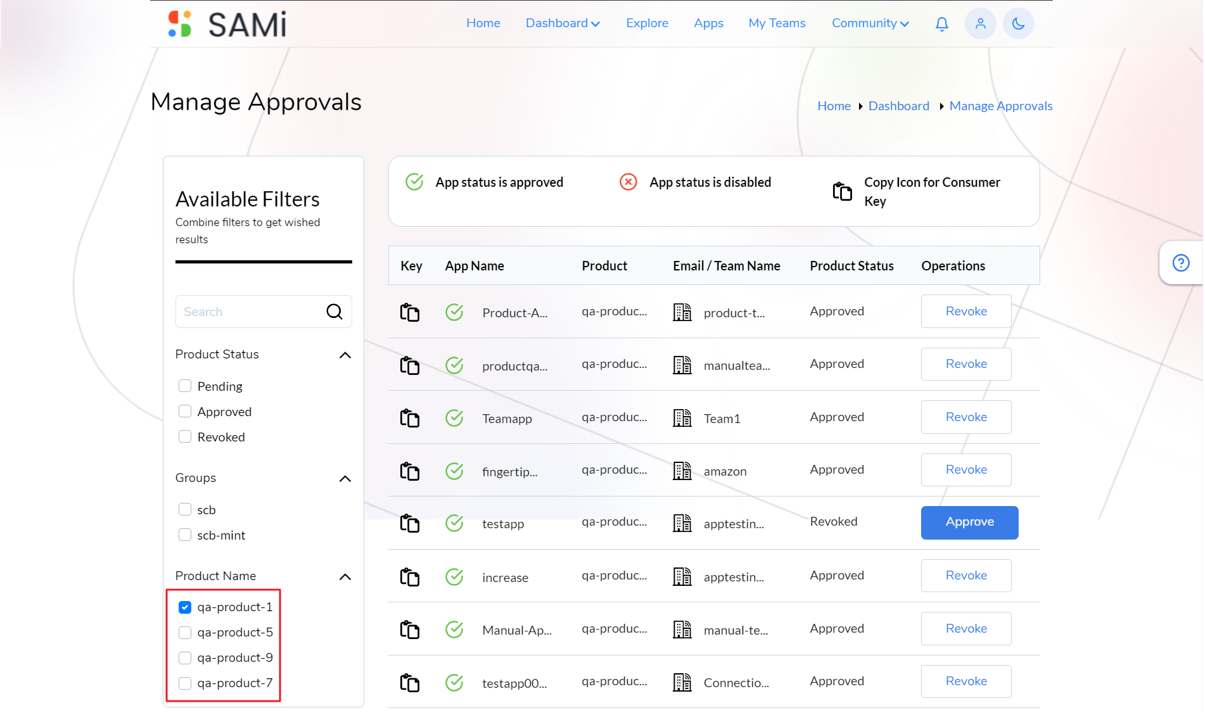
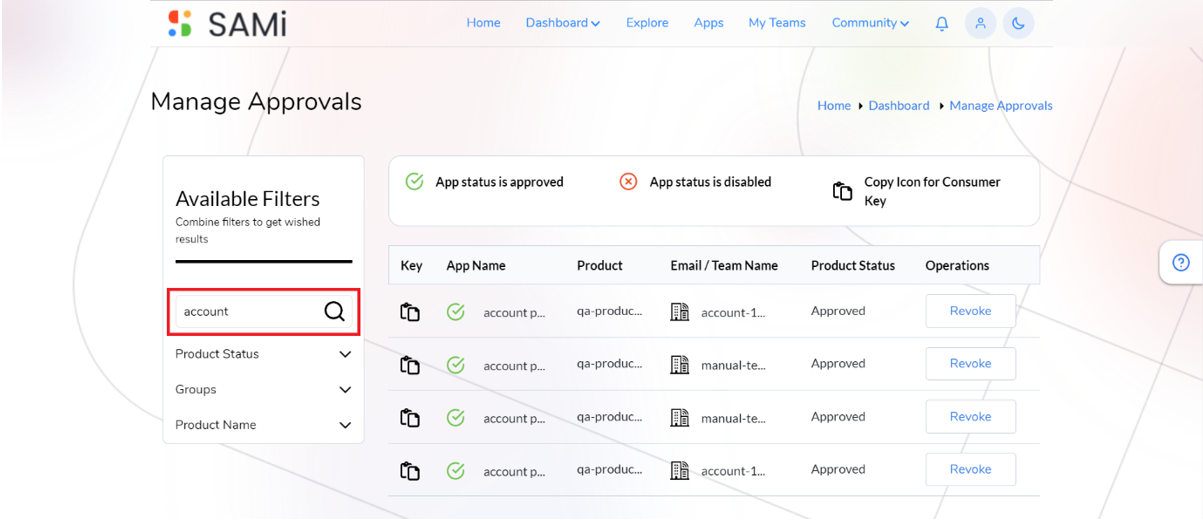
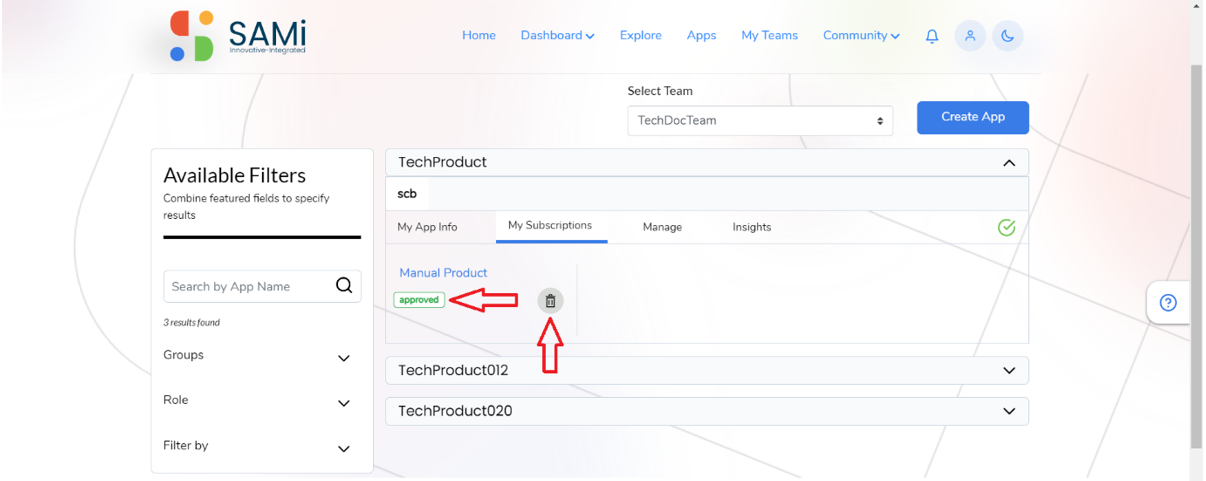
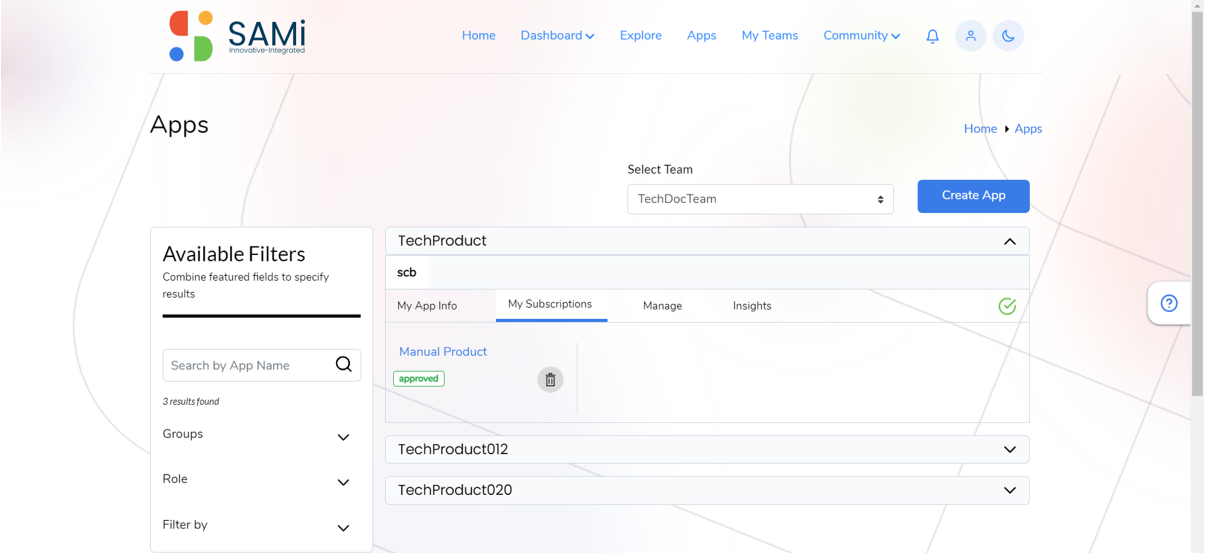
- Subscription Management – A Centralized Subscription Management for all category API-products. Active & Inactive subscription listings with individual Active durations & Subscription Approval Management. Profile Management of individual developers, Product Managers, and Administrators. Product Unsubscribe and App disablement options are available
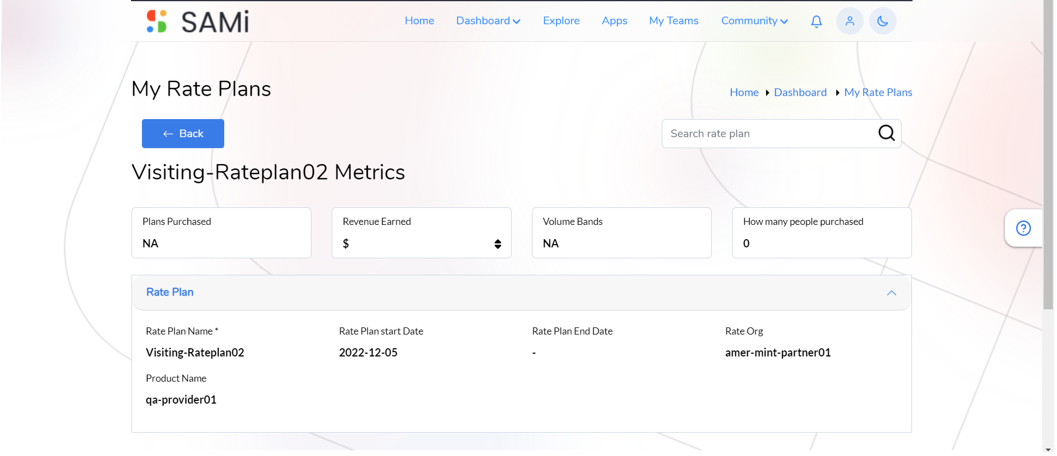
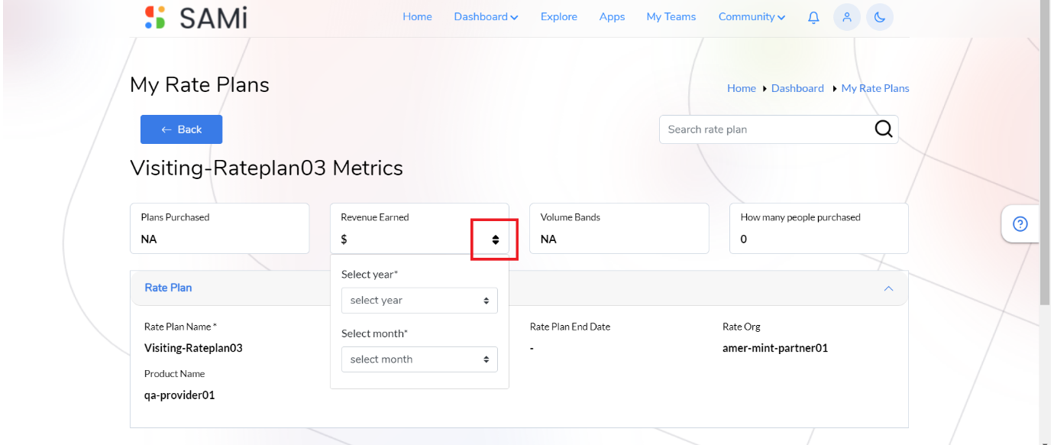
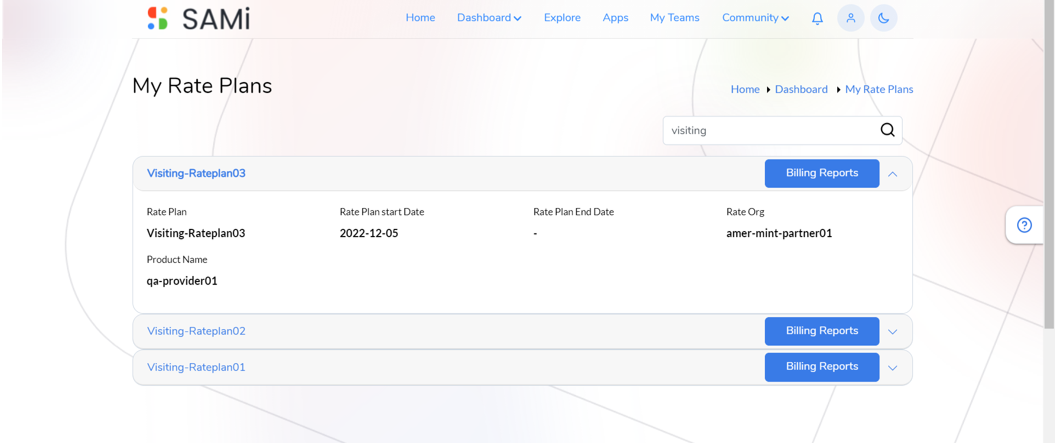
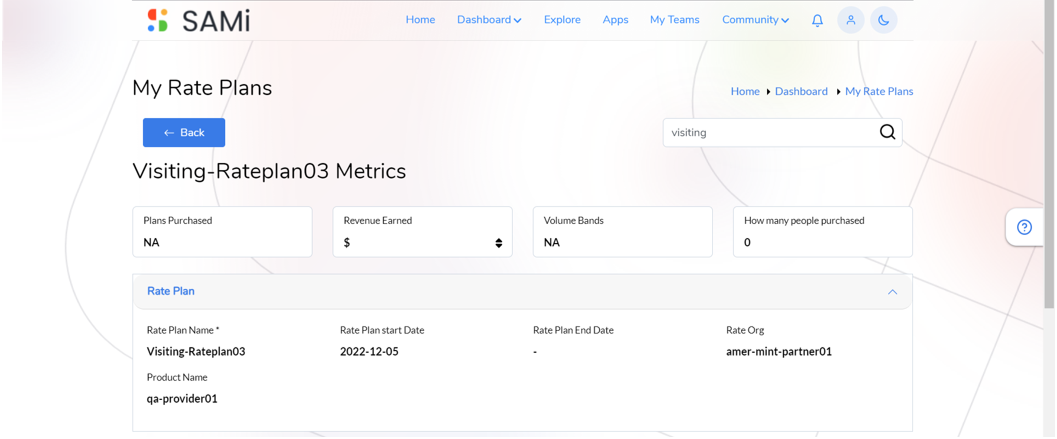
- Monetization – Helps Monetize assets faster. Create Multiple rate plans for users. A user-specific product rate-plan capability. Billing Reports with earnings per product and rate plans based. PayPal integration for monetization. Recurring payments for API subscriptions
- Asset Management – Manage all assets like SDKs, API specifications, Product Features & FAQs from a single pane. Reuse Assets for Products resulting in efficient portfolio consolidation. Create & manage Product SKUs with versioning & permissions for users. Quick search capabilities and display customizations for individual assets’ documentation
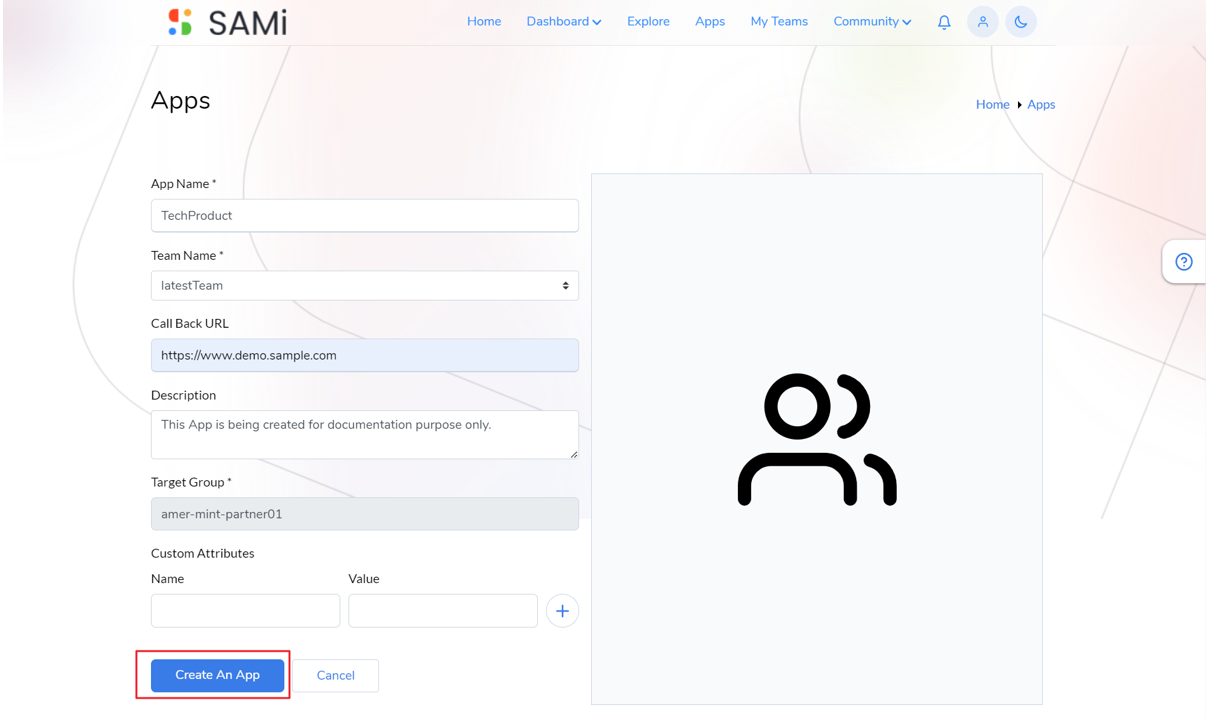
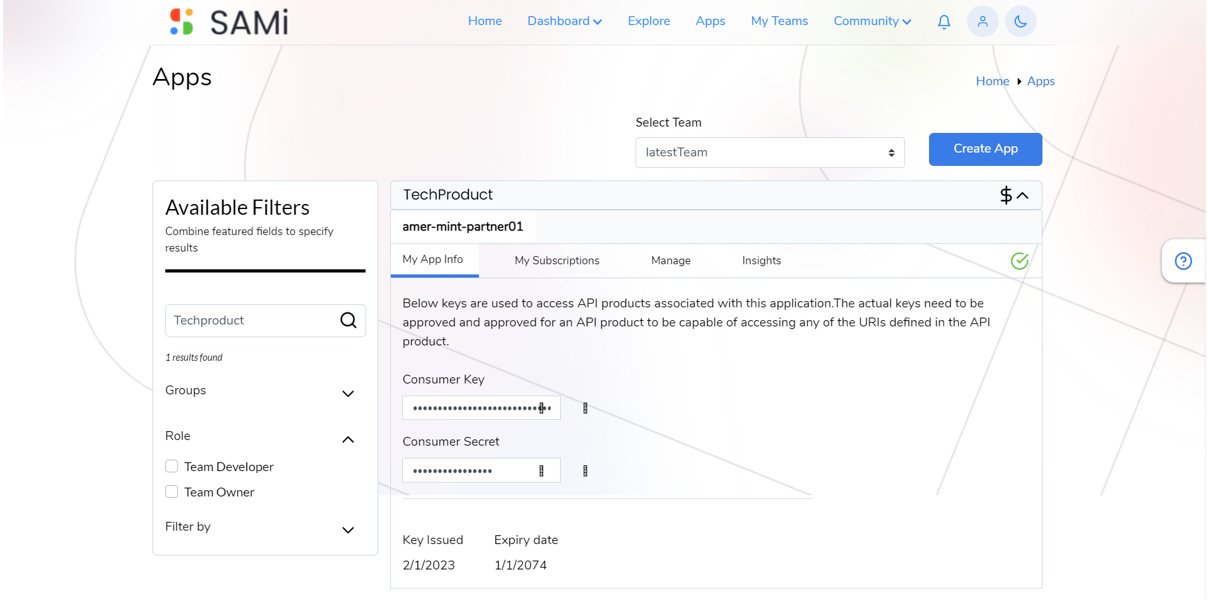
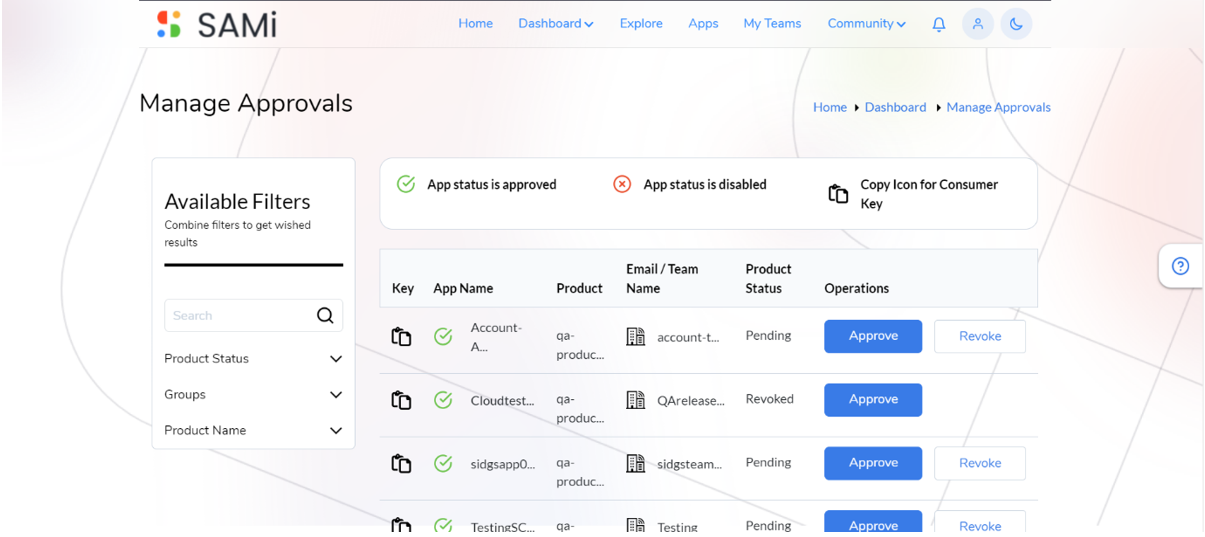
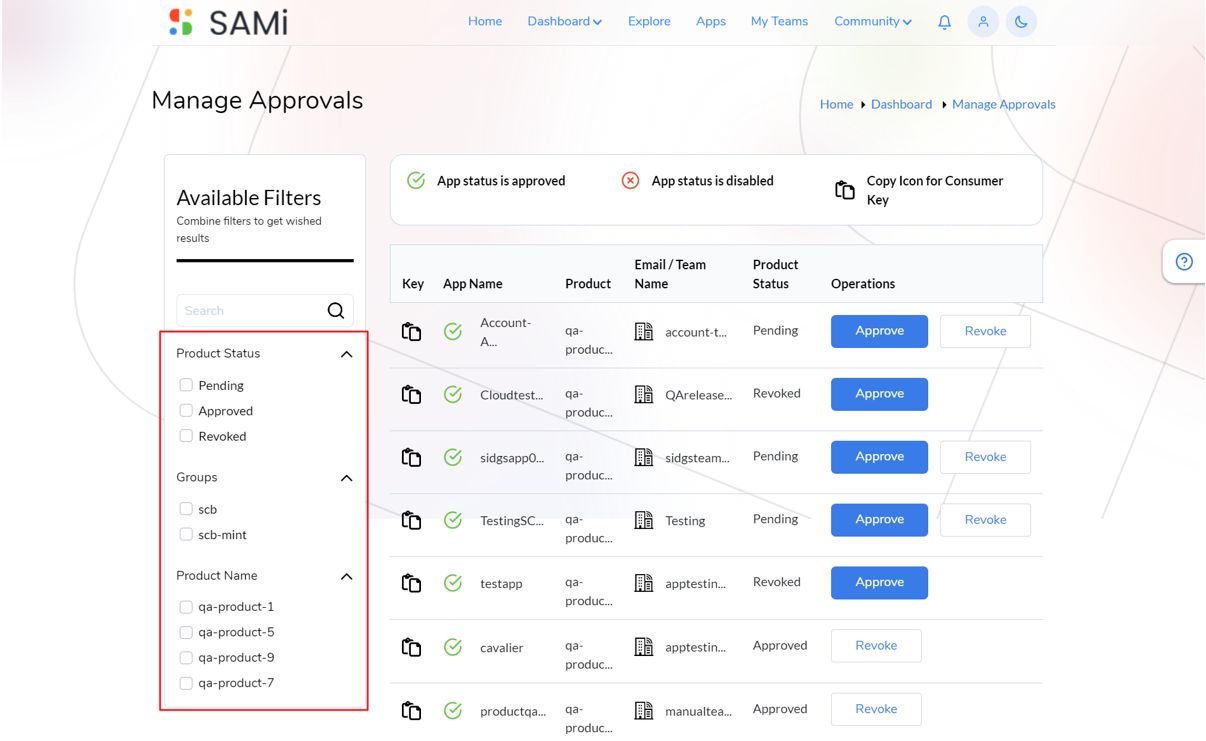
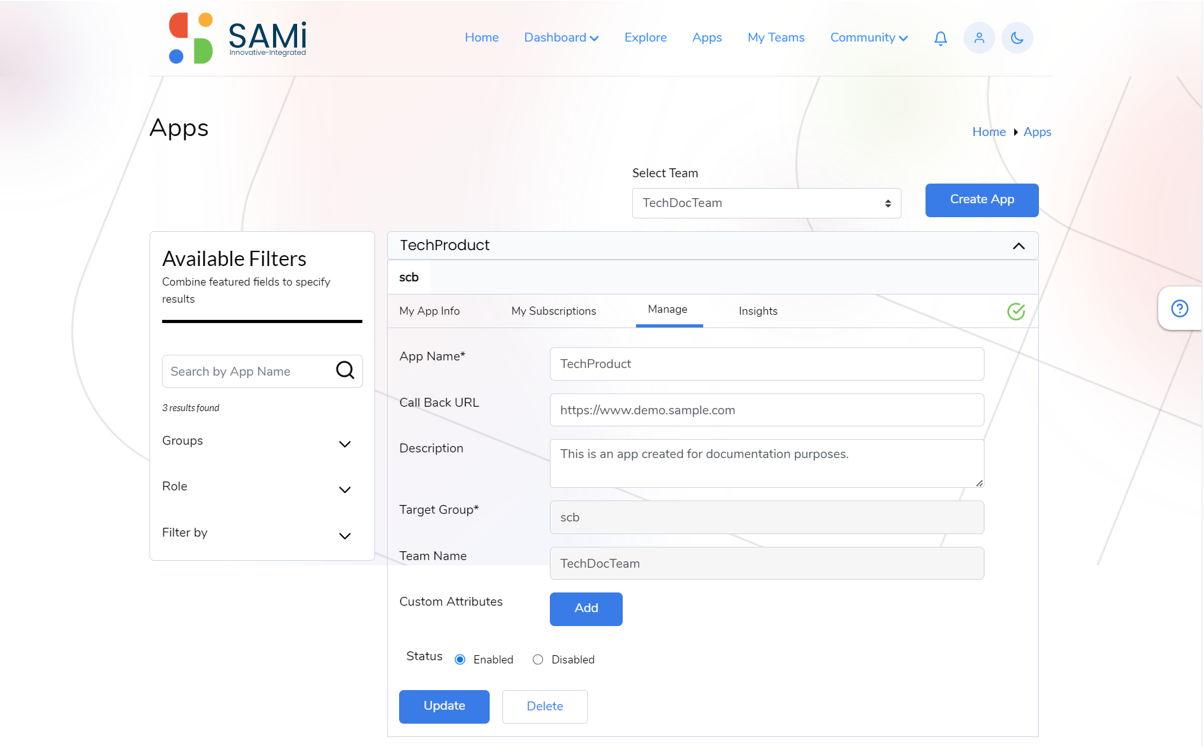
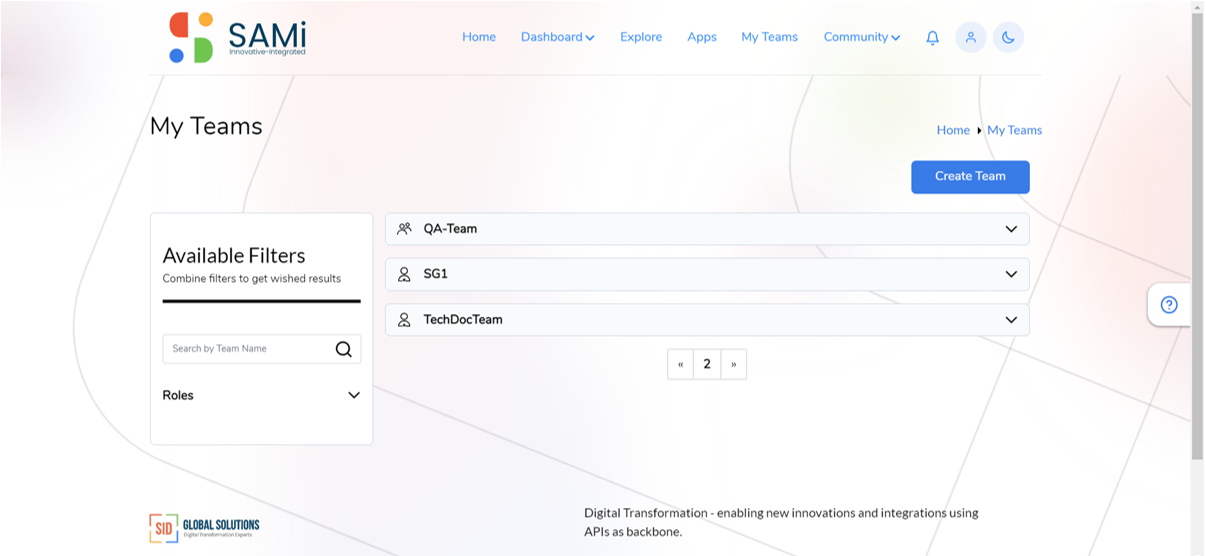
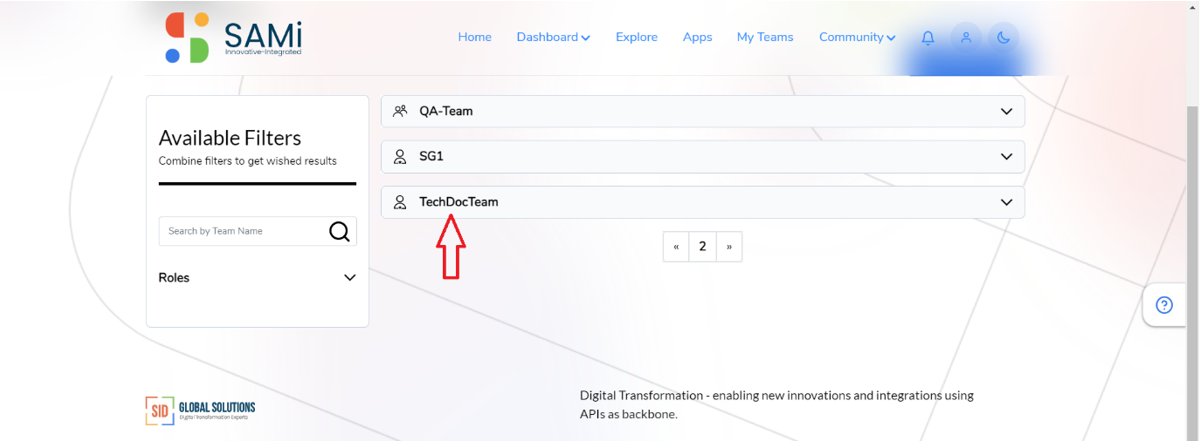
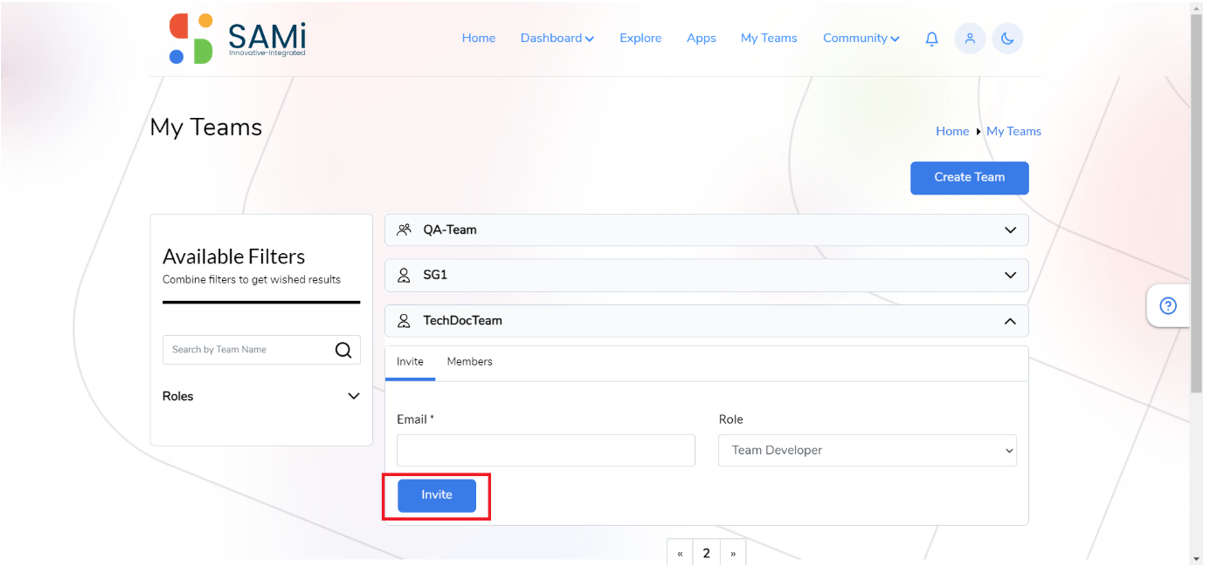
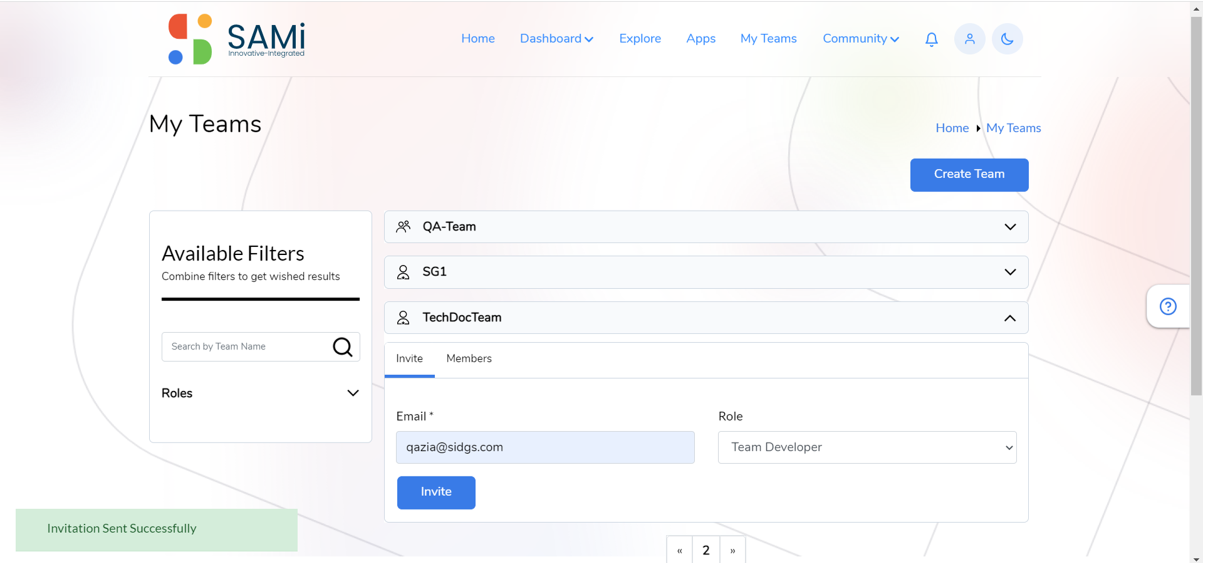
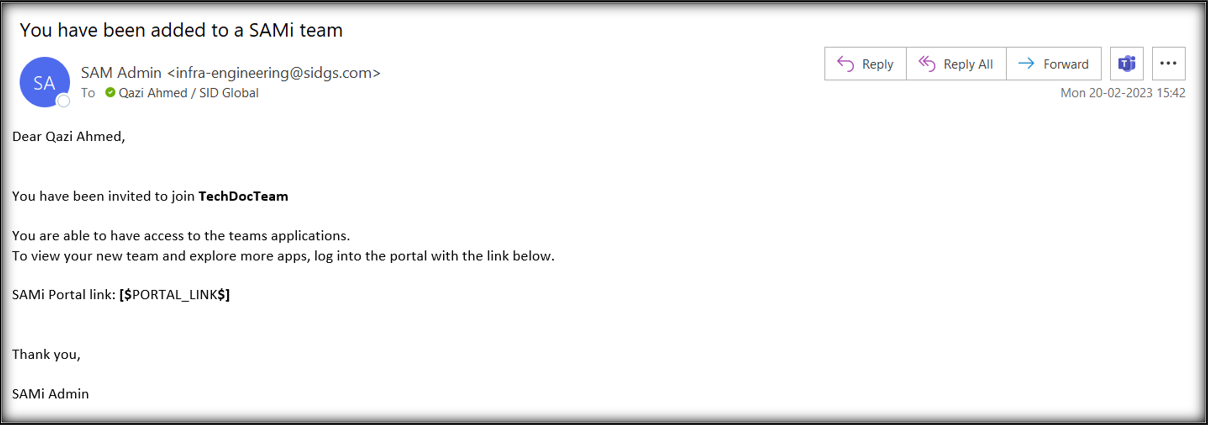
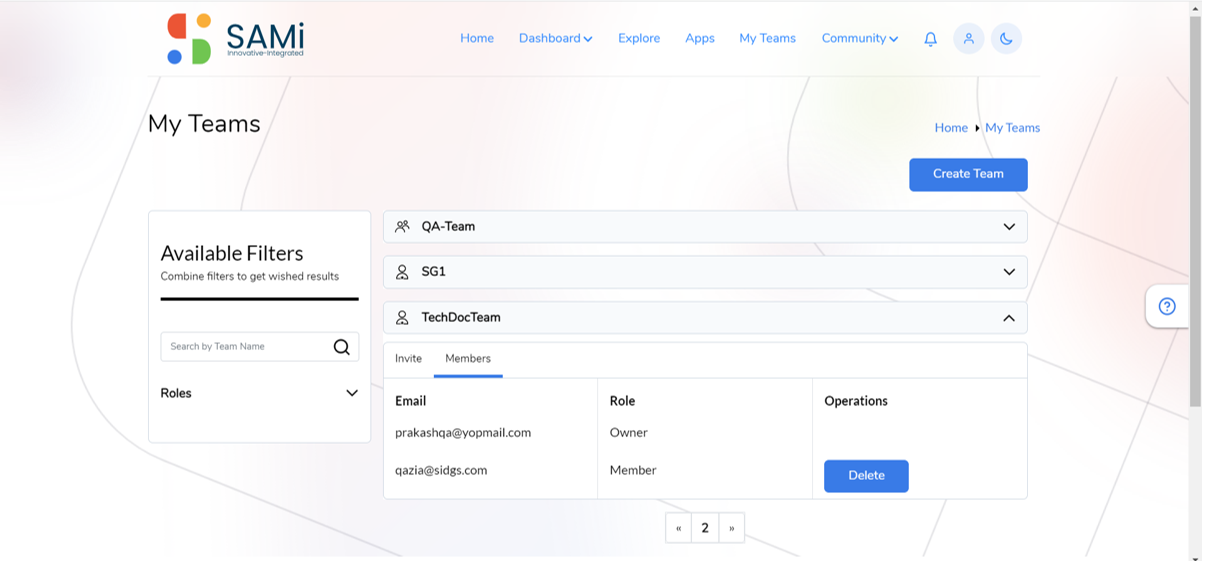
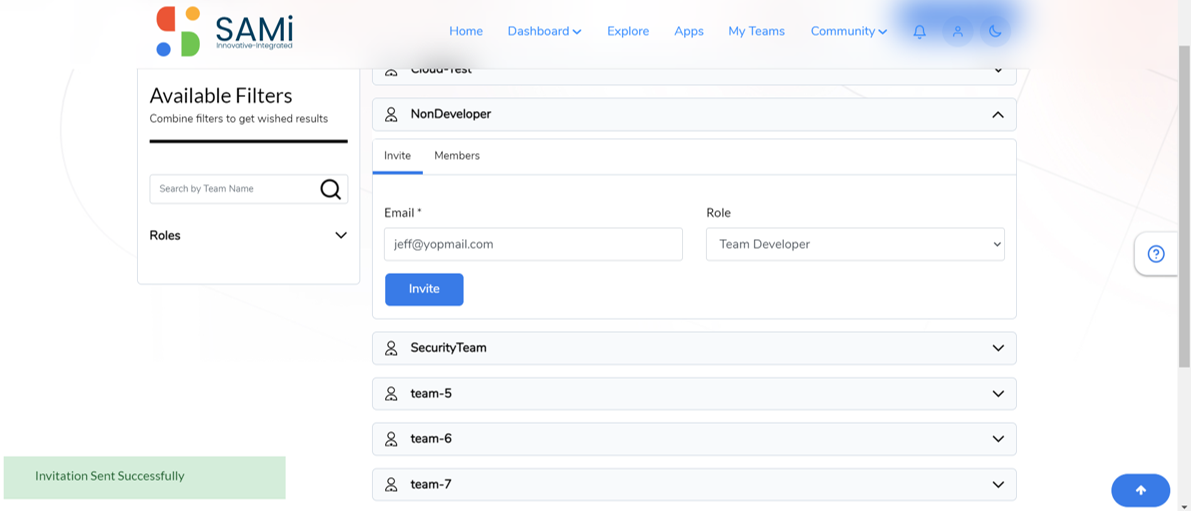
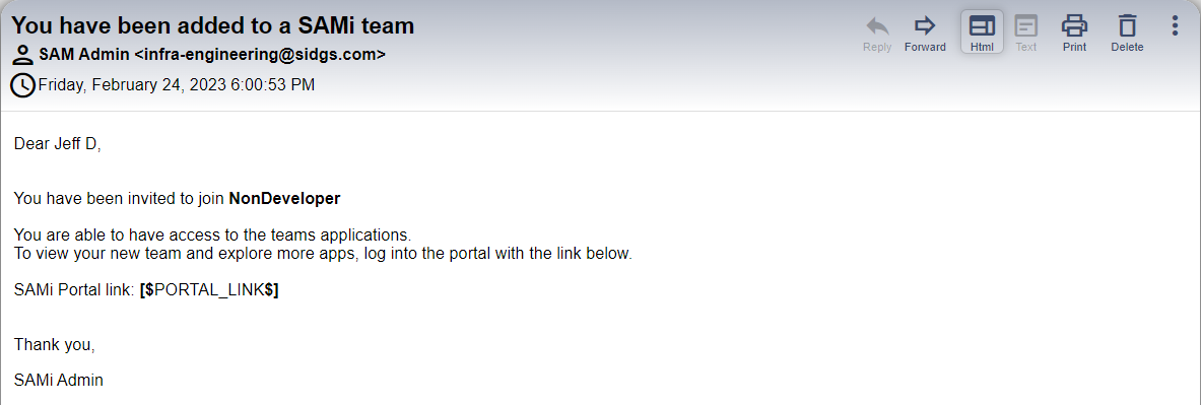
- Apps & Teams – Define Apps & create teams to collaborate on the development Invite developers/subscribers for Apps. Built-in approvals workflow capability. Unsubscribe users and apps
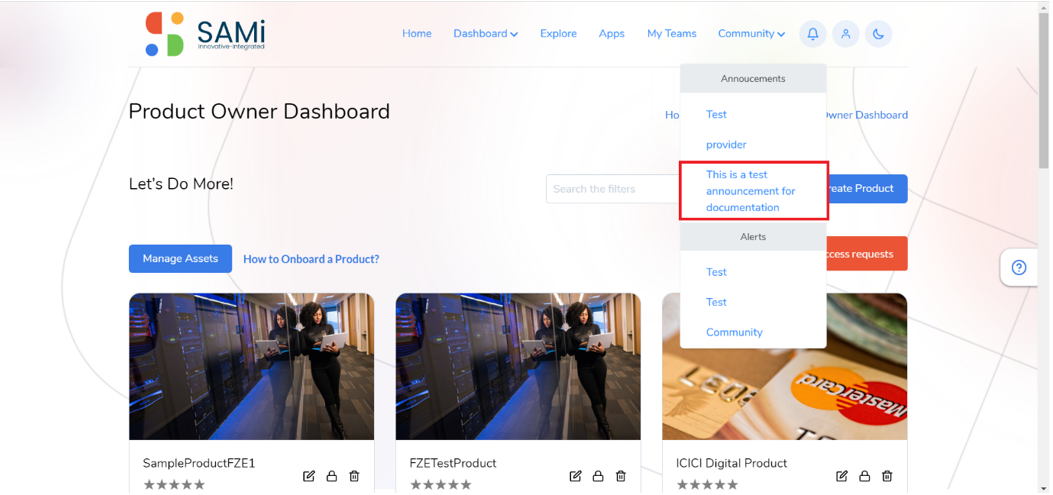
- API Consumer Management – A Unified catalog for all API gateways. Guest user onboarding & unified catalog. API Product Subscription Management System, Application Alerts, Notifications & Announcements broadcast. Built-in Sandbox capabilities. A Real-time Theming & UX capabilities
- SAMI Architecture – a SaaS based platform product and its technology stack
User Registration
The user registration page will allow you to register as a user to SAMi portal.
1. Type the SAMi Portal URL in the Internet Browser address bar, and Press Enter.
The SAMi Sign In page is displayed.
2. In the Sign In page, click Sign Up link.
The Registration page is displayed.
In the Registration page, do the following:
1. Enter the First Name and Last Name in the respective textboxes.
2. Enter the Email address in the respective textbox.
3. Enter the Phone Number in the respective textbox.
4. Click to check the “By signing up you confirm that you’ve read and accepted our Terms and Conditions and Privacy Notice” checkbox.
5. Click Sign Up.
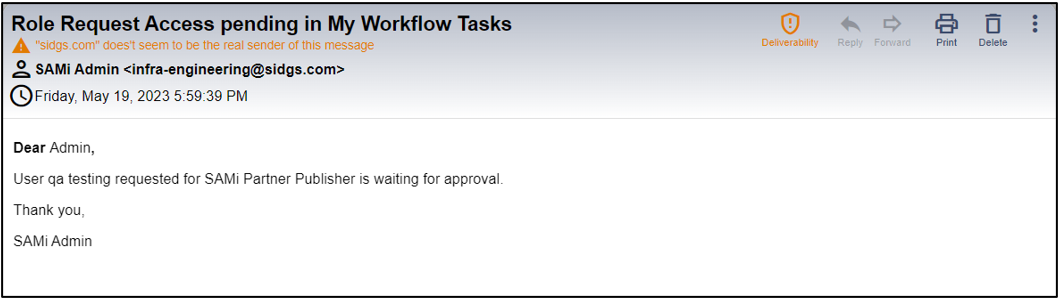
6. An email is sent to the approver (Administrator), the Admin will review and approve it. And after approval, grant the requested role-based access.
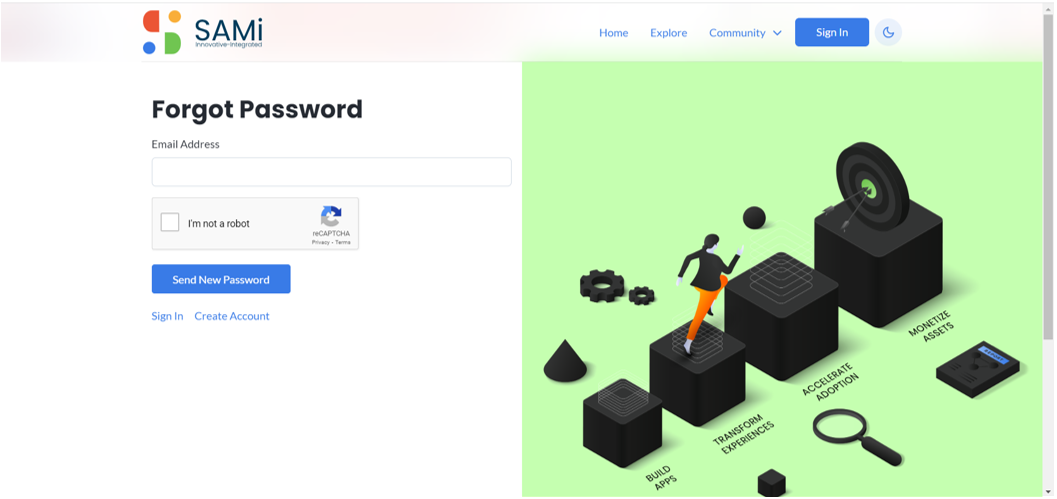
Forgot Password
The forgot password feature allows you to change your existing password if you’ve forgotten it or wanted to change it for security reasons.
To change the password, do the following:
1. In Sign In page, click Forgot your Password?
The New Password creation page is displayed.
2. In New Password creation page, enter your Email Address in the textbox.
3. Click on the “I’m not a robot” checkbox.
4. Enter the Text Verification, by viewing the captcha, if it’s not clear click on refresh icon to see a new captcha and enter it.
5. Click Send New Password in the textbox.
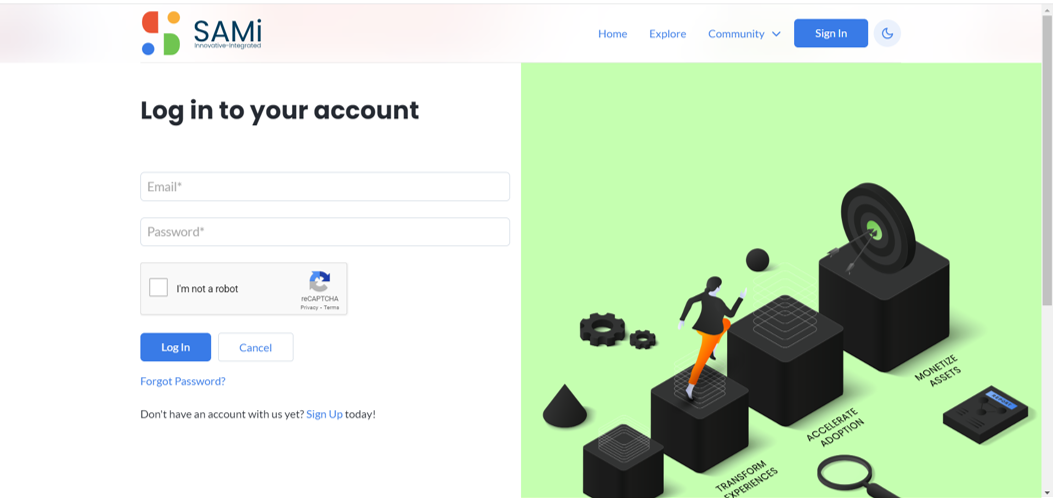
Sign In to SAMi
The Sign In page will allow you to login to the SAMi Portal with the help of your valid email and password in the Registration page.
To Sign In to SAMi portal, do the following:
1. Type the SAMi Portal URL in the Internet Browser address bar, and Press Enter.
The SAMi Sign In page is displayed.
2. In the Sign In page, enter the Email Address, and Password in respective textboxes.
3. Click on the “I’m not a robot” checkbox, and then enter the captcha words displaying on the screen.
4. Click Log In.
You will Sign In to the SAMi Portal successfully, and the SAMi Home page is displayed.
User Access Considerations
SAMi as a product has different user personas. There are specific users who can access SAMi – an API marketplace provided with different user roles. The table given below describes different roles and their access permissions to the product.
The following roles are most common, who are authorized to access the application most.
- A Developer (Subscriber)
- Product Owner (Publisher)
- System Administrator
- ONEAPI Team
| Developer |
Product Owner |
System Administrator |
ONEAPI Team |
| ● Search products
● Browse Catalog of categorized products
● View selected product details
● “Try it out” feature to try and experience selected product
● Subscribe for Products
● Subscribe for Monetized Products
● Provide product reviews and ratings.
● Manage Developer Apps
● Manage Team Apps
● Manage Teams
● FAQs
a. Search
b. Browse
c. View and Comment
● Knowledge Base
a. Browse topics
b. View, share, Rate, Comment, and perform all knowledgeable developer activities
● Message Boards
a. Post messages
b. Manage his/her messages
● Featured Stories
a. View list
b. Explore feature stories detail page
● Most Wanted API
a. Create
b. Update
c. comment
d. Like/Dislike
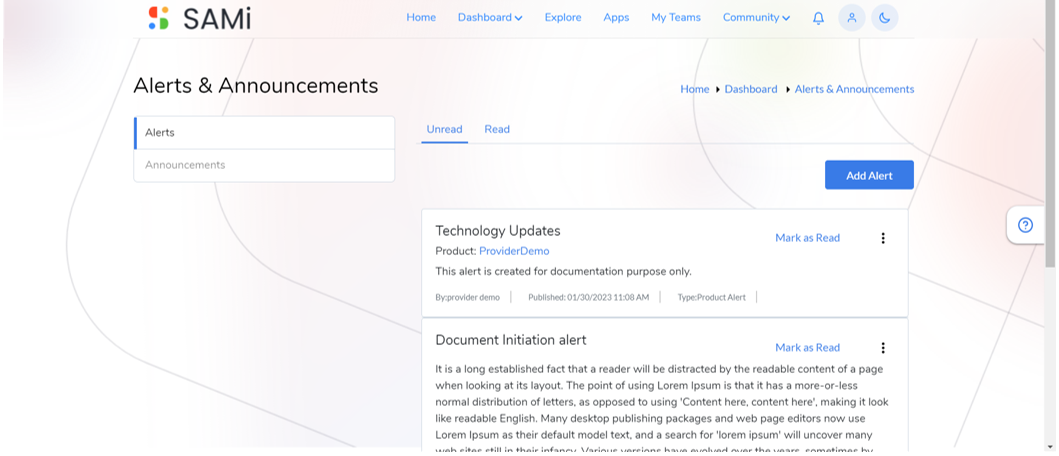
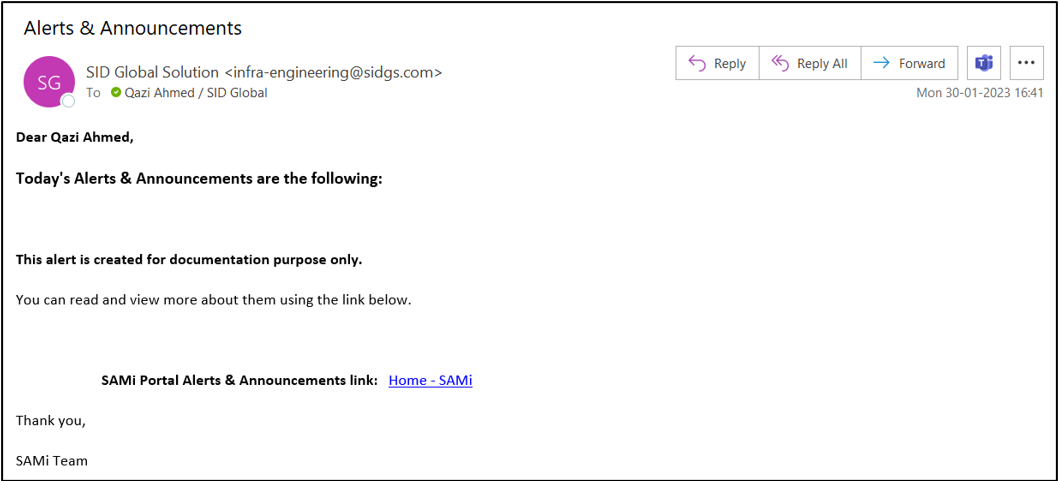
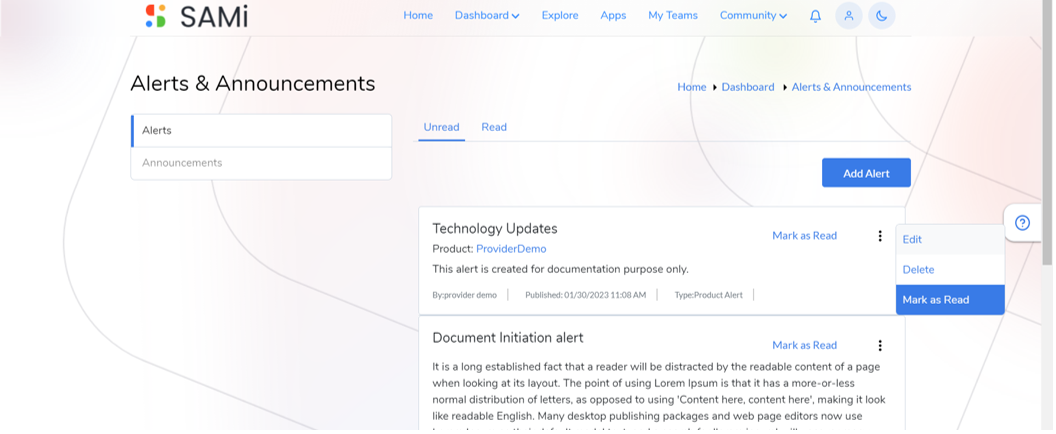
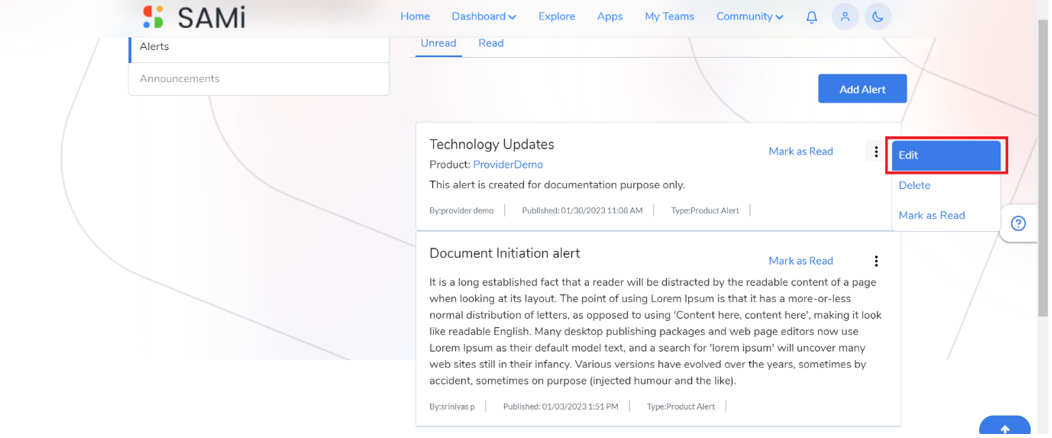
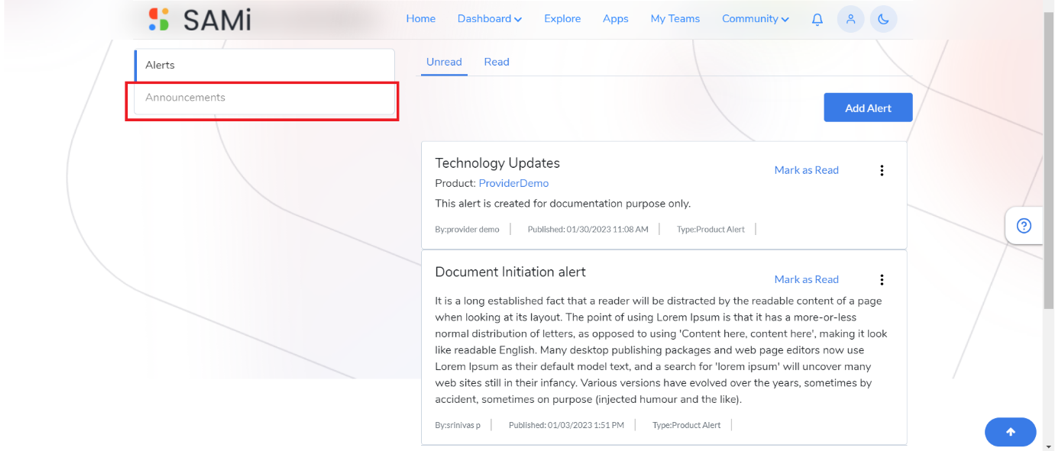
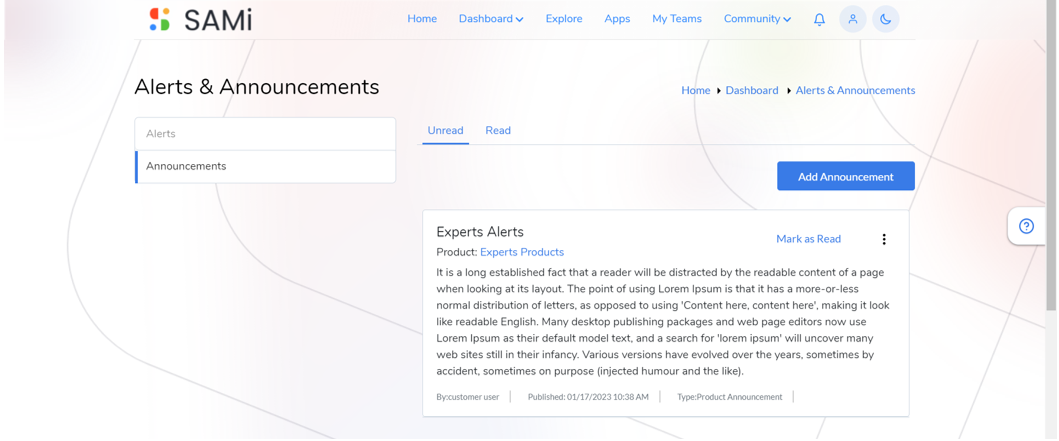
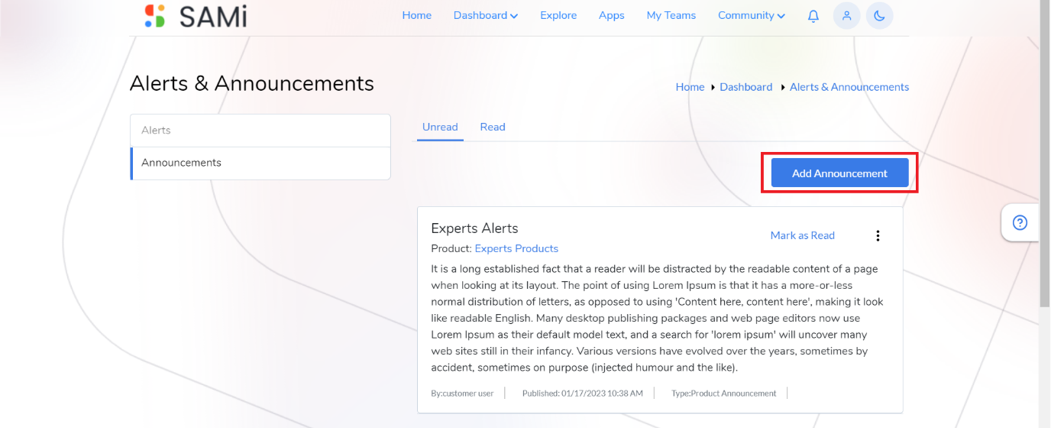
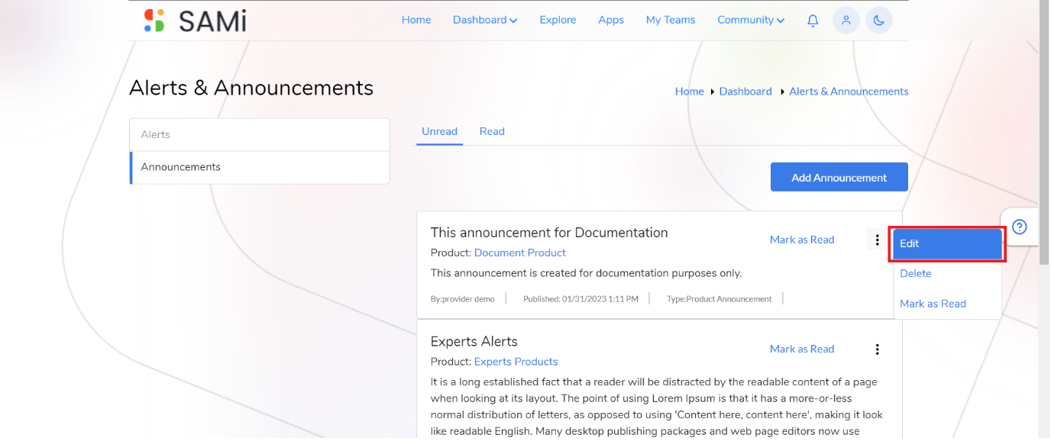
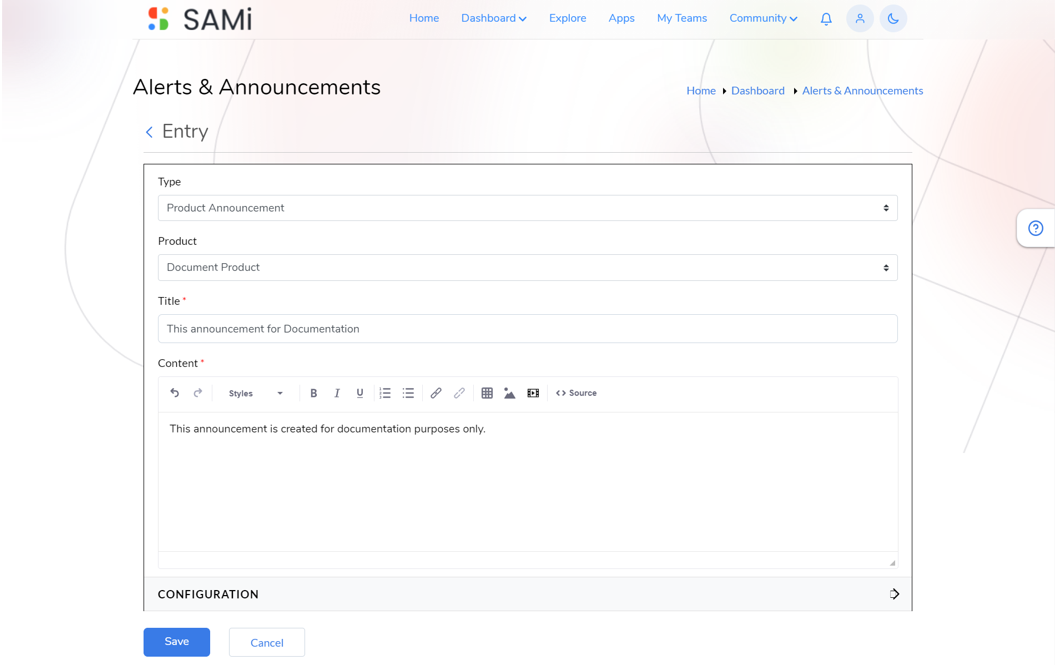
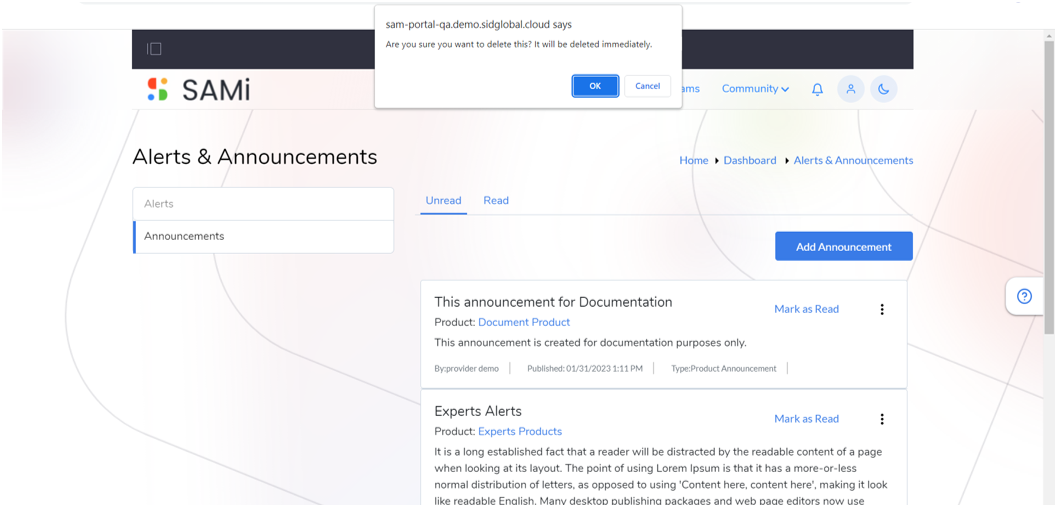
● Alerts and Announcements
a. View alerts
b. View announcements
● Analytics
a. View Team Apps Analytics
b. View Developer Apps Analytics
● Contact Us
a. Submit contact Us request |
● Manage Products
● Manage SDKs
● Manage FAQs
● Manage API Specs (e.g., Swagger, SOAP WSDLs, etc.)
● Manage Product Document Libraries
● Manage Product Features
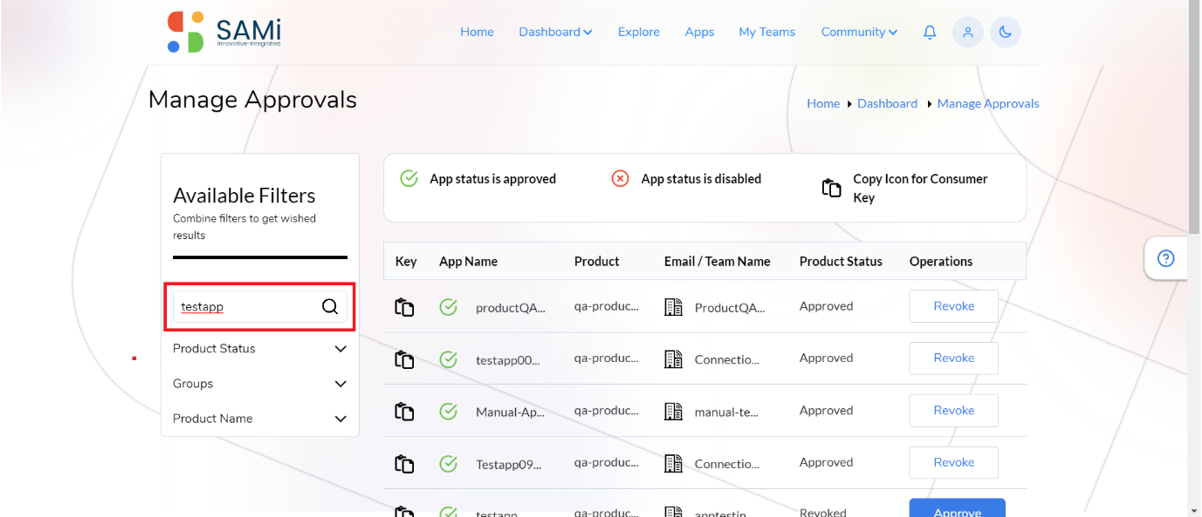
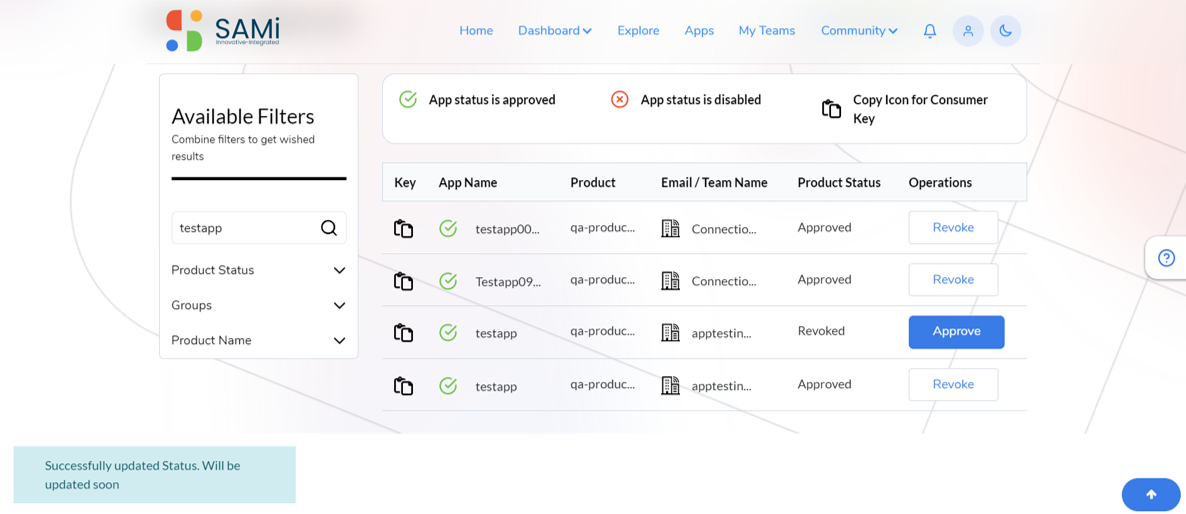
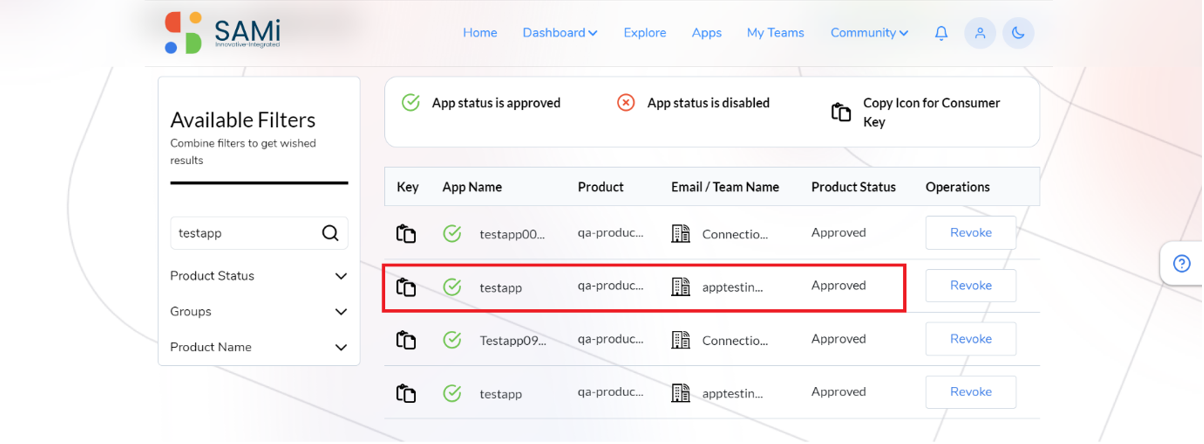
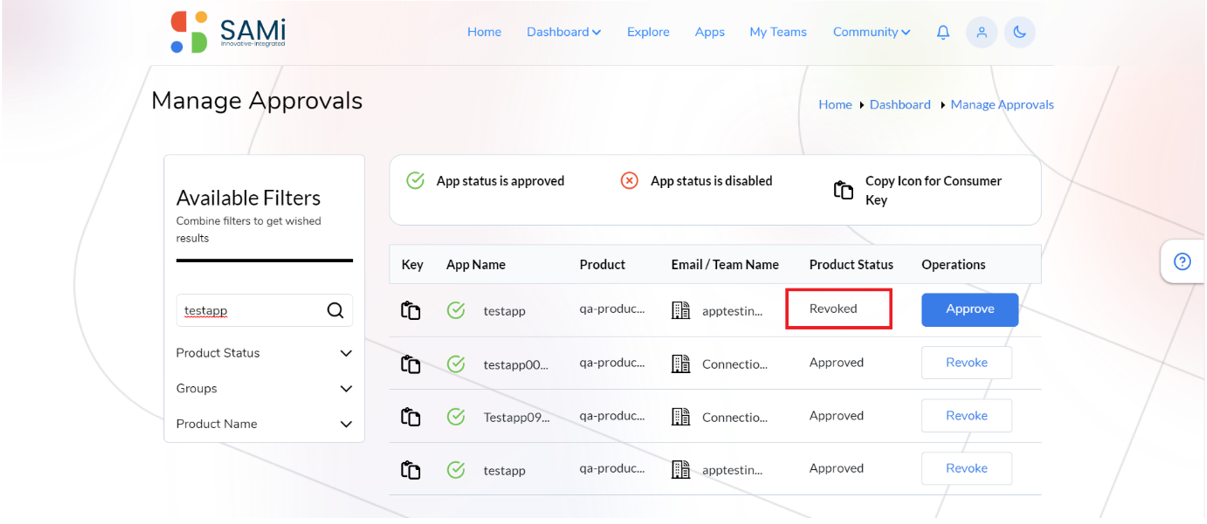
● Developer Product Subscription Approvals
● Track key data points via API Compliance Dashboard
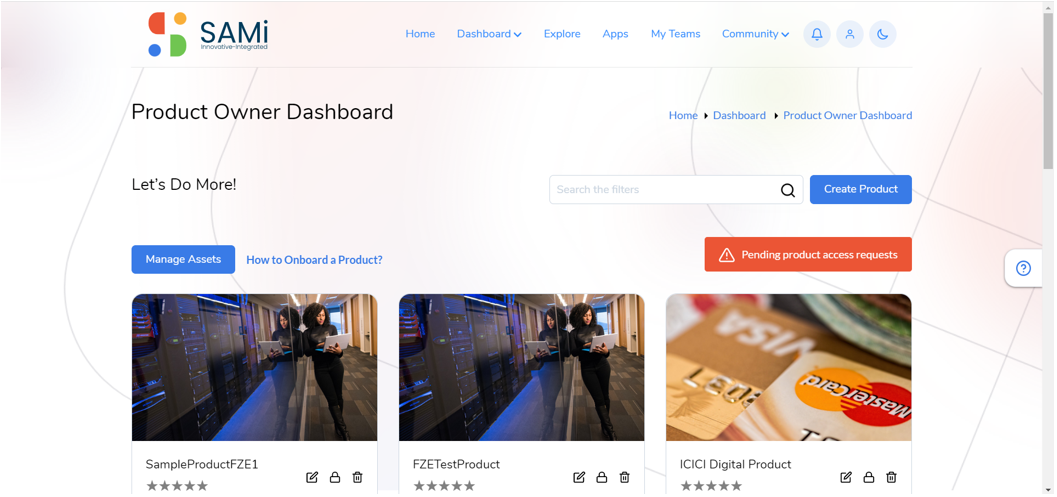
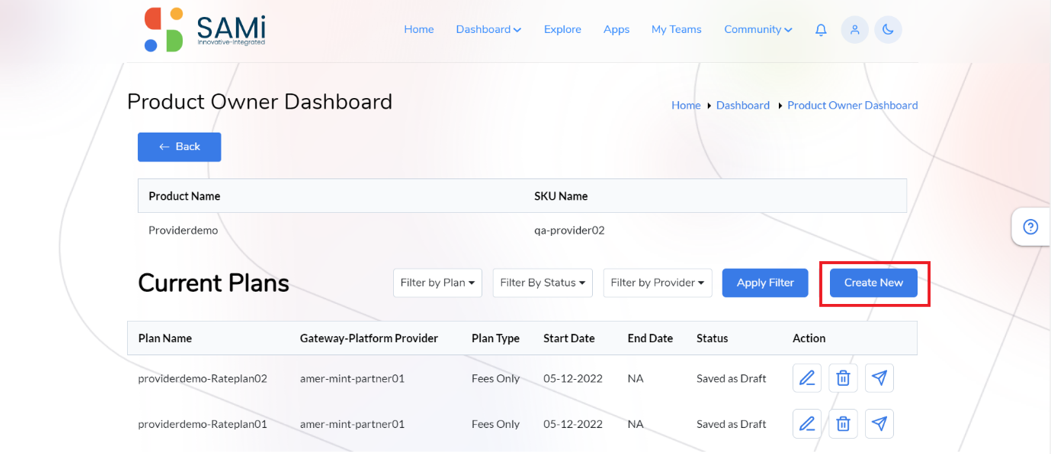
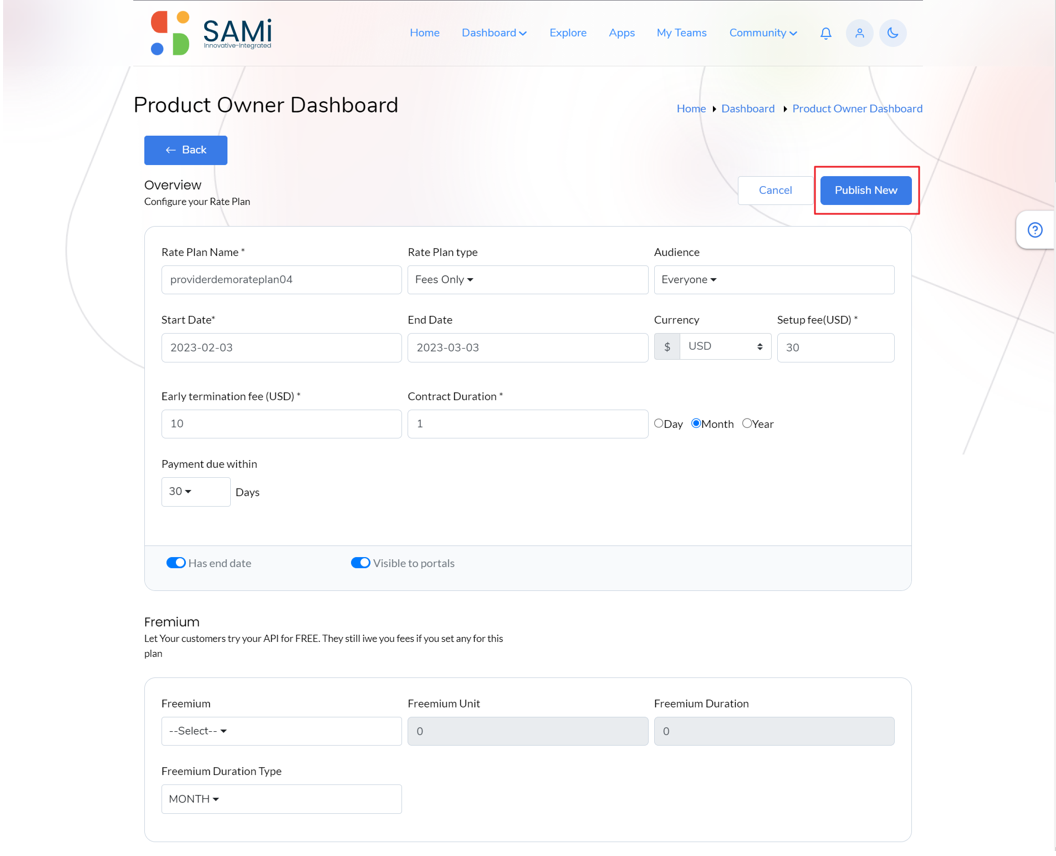
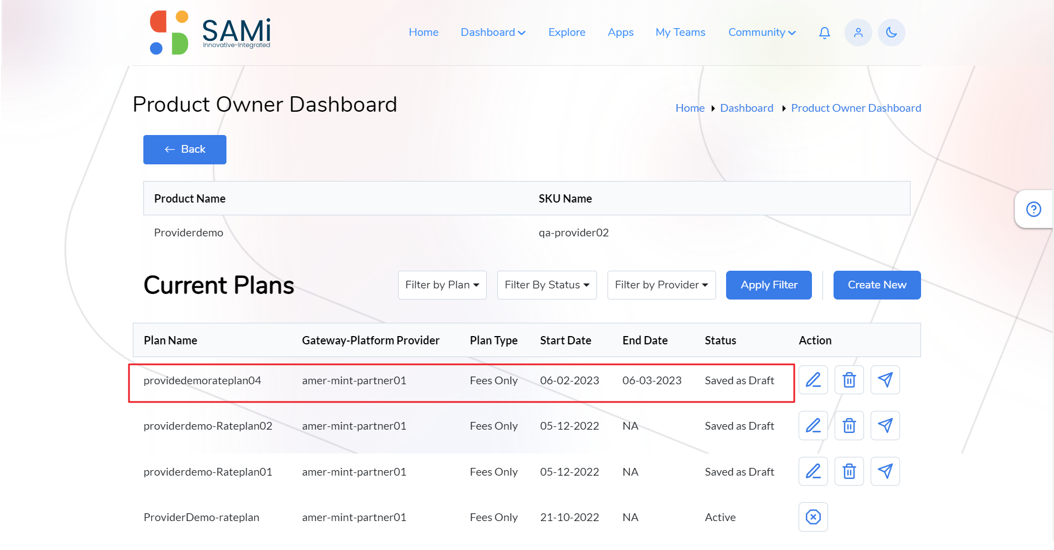
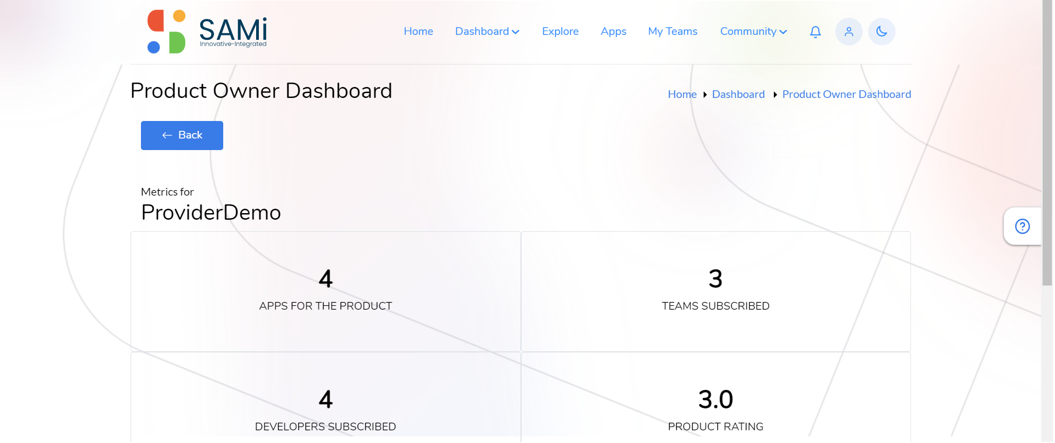
● Track key data points via Product Owner Dashboard
● Manage Knowledge Base
● Manage Message Boards
● Manage Feature Stories
● Product Analytics (redirect to Hygeia analytics portal)
● API Governance
● Product Subscription PO-Approval Type
|
● Manage Users
● Manage Roles
● Manage Orgs
● Manage Categories
|
● Most Wanted API
a. Approvals
b. Reject
c. Expire Date
|
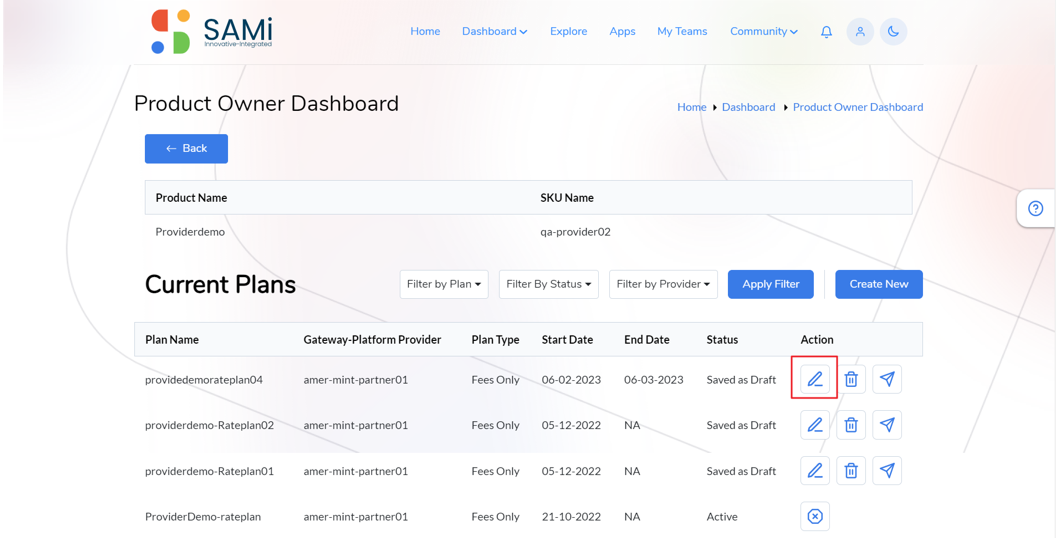
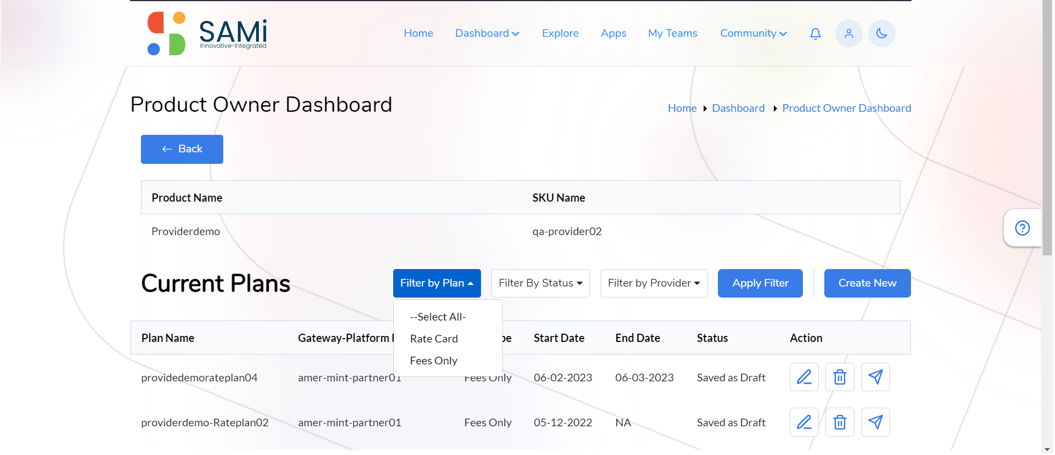
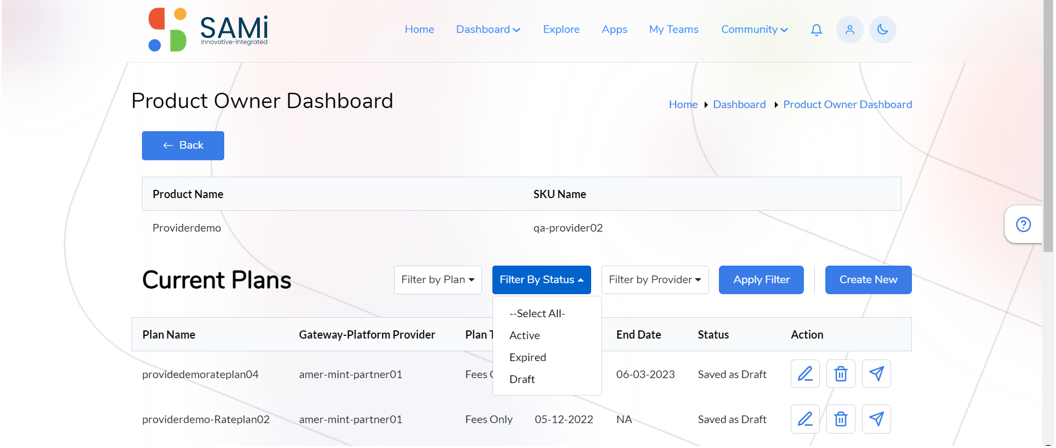
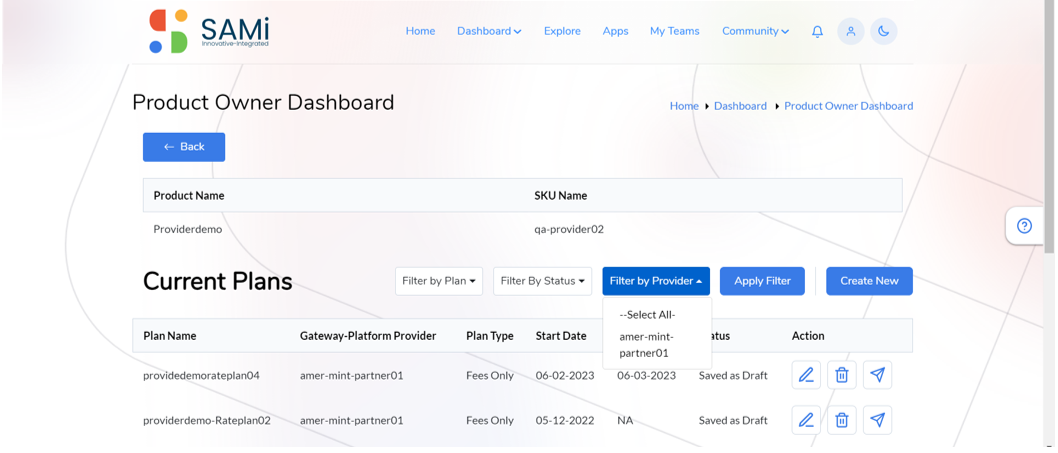
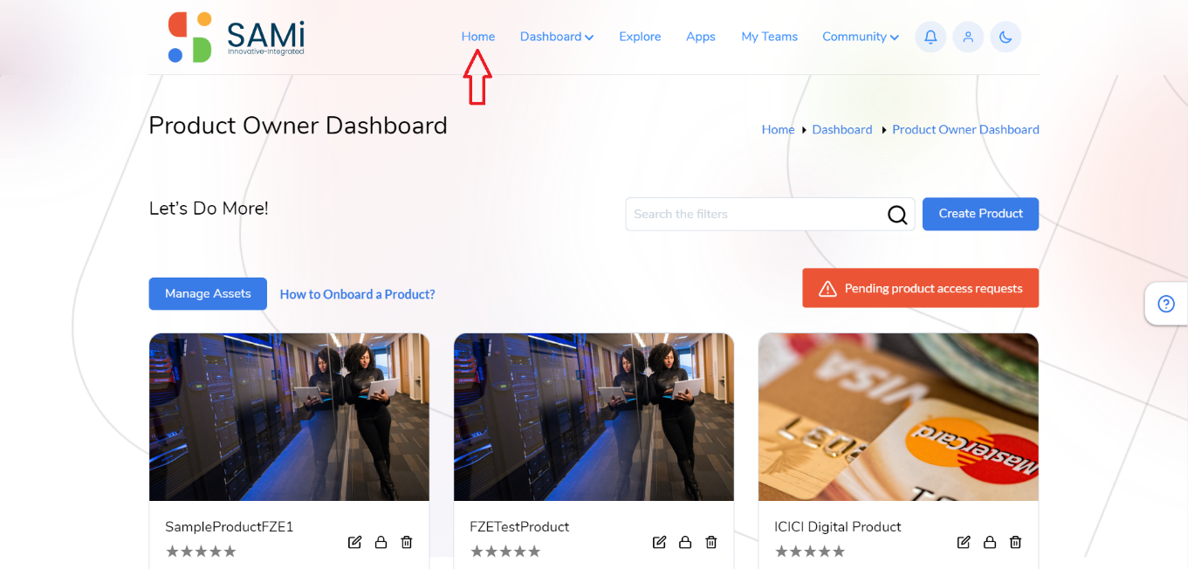
Workflow 1 – Search a Product
Scenario 1: Search a Product from Home Page
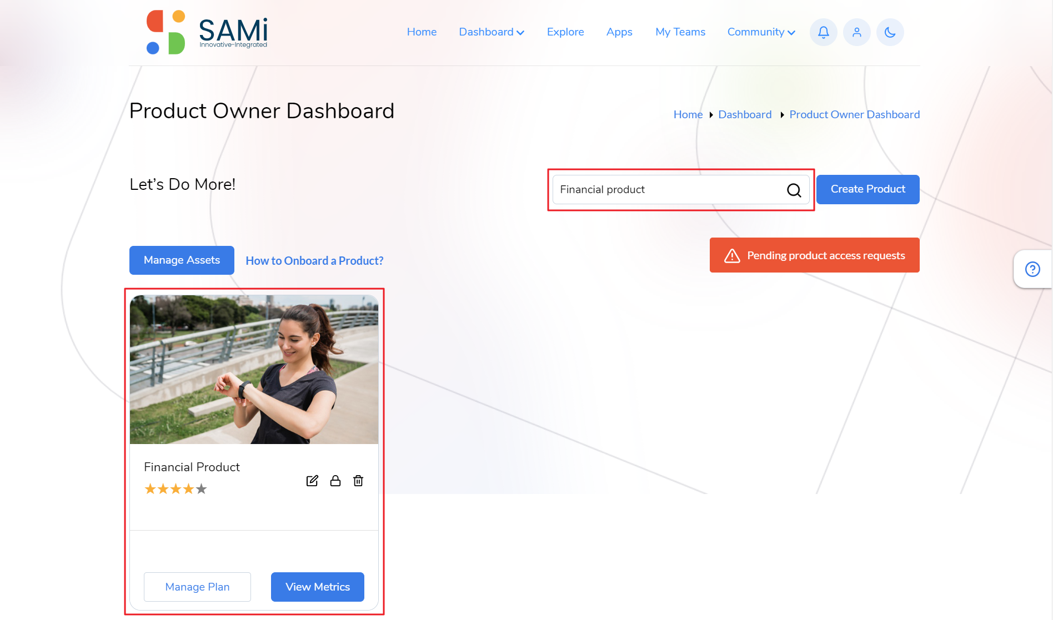
Step 1: Login as Product Owner.
Step 2: Enter the SAMi Portal URL in the browser.
Once your account is created successfully, login with the valid credentials.
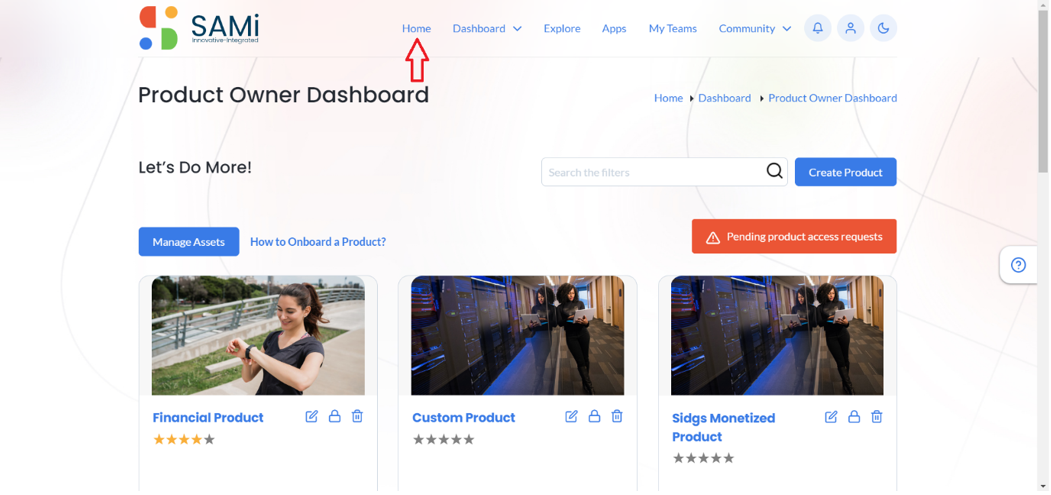
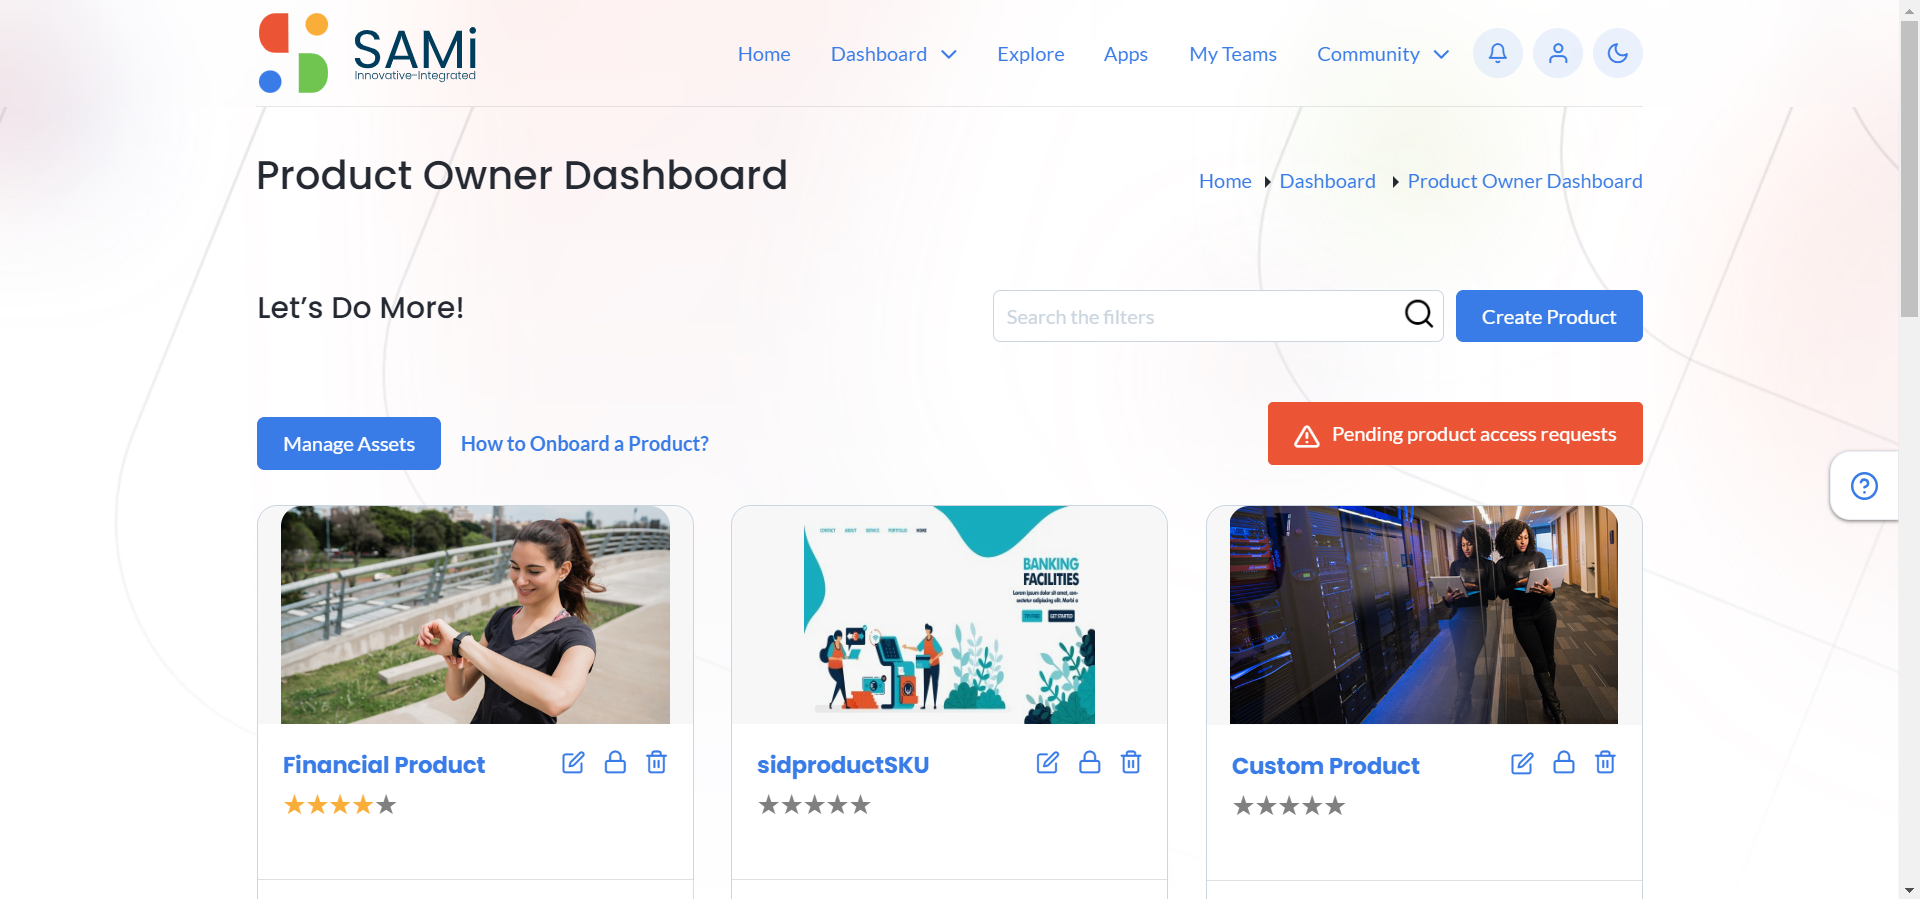
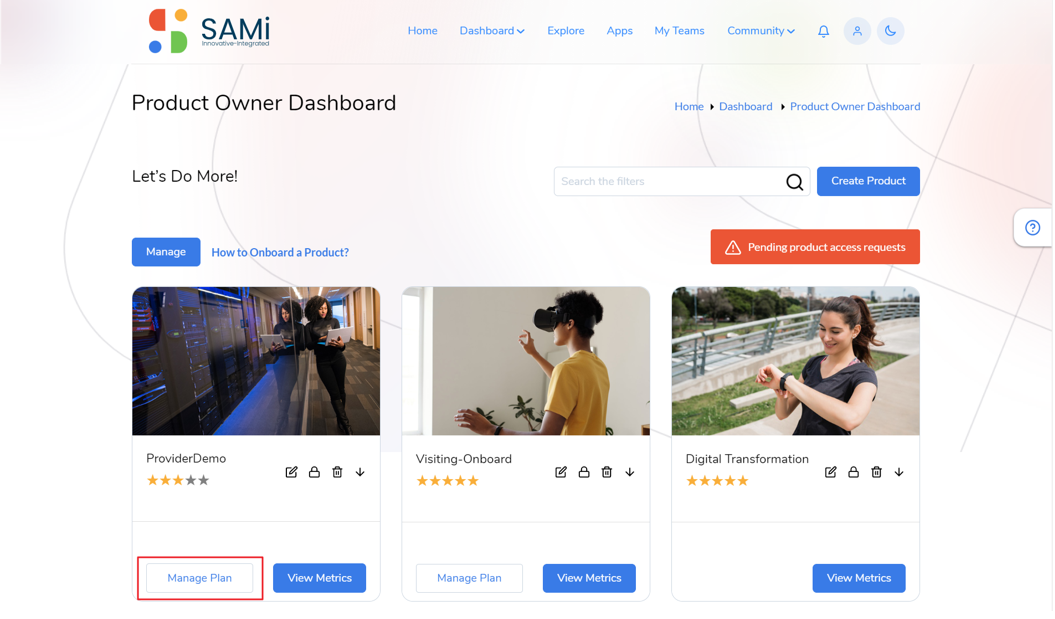
Step 3: Once you log in with PO credentials, by default you will land on to the Product Owner Dashboard.
Step 4: Navigate to the Home page by clicking on Home option on main menu.
The Home page appears.
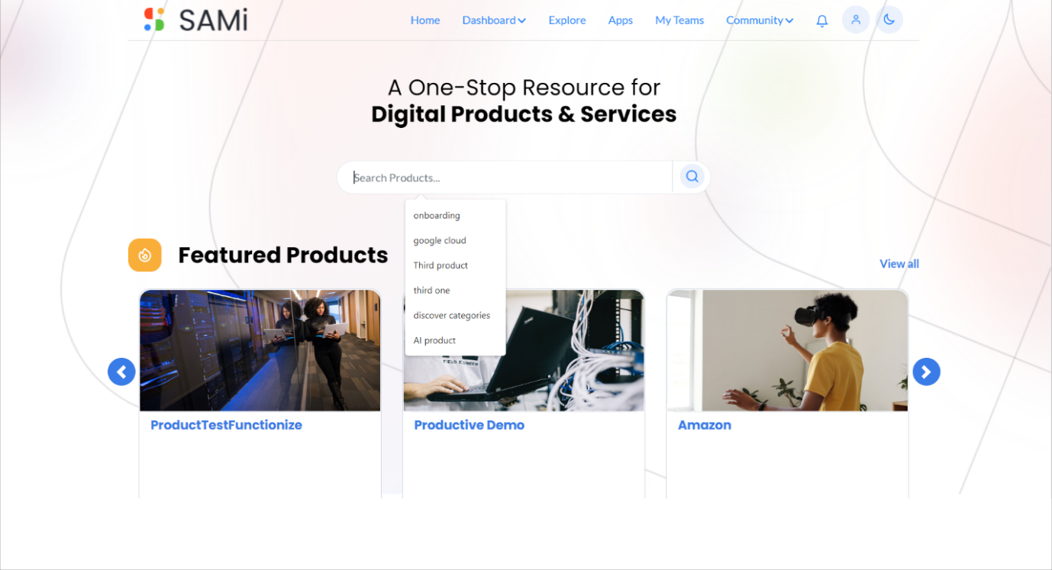
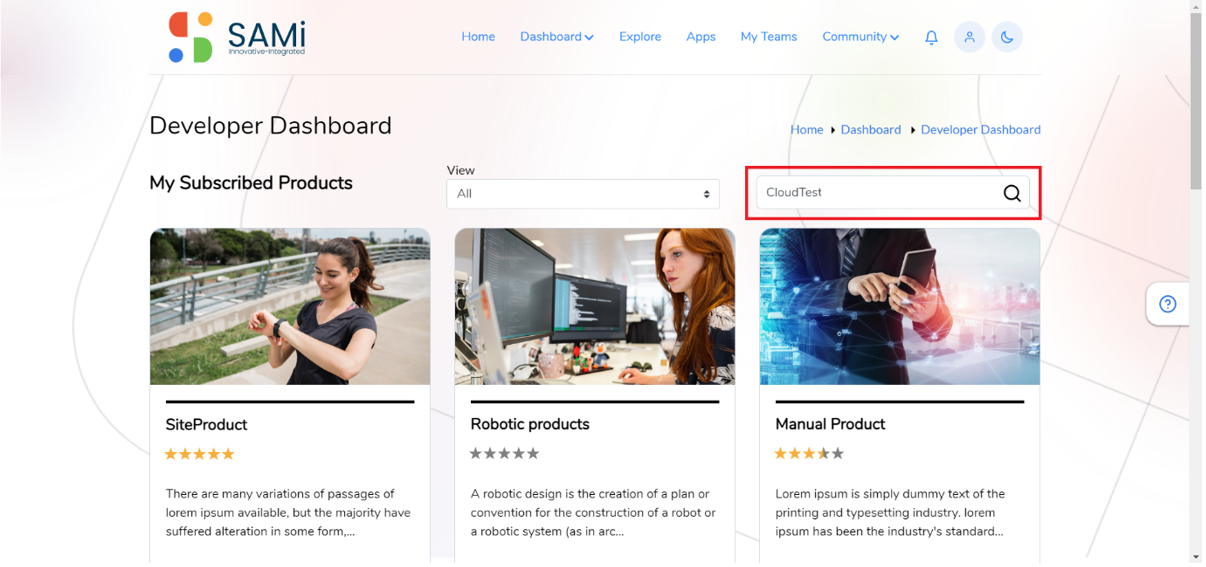
Step 5: The Product Owner will be able to Search Products from the Search icon on the Homepage.
In the Homepage, you are allowed to search products by providing search parameters in the search bar.
Step 6: Search with Product name/ Keyword providing in the Search field.
The product is searched and displayed in the Explore page.
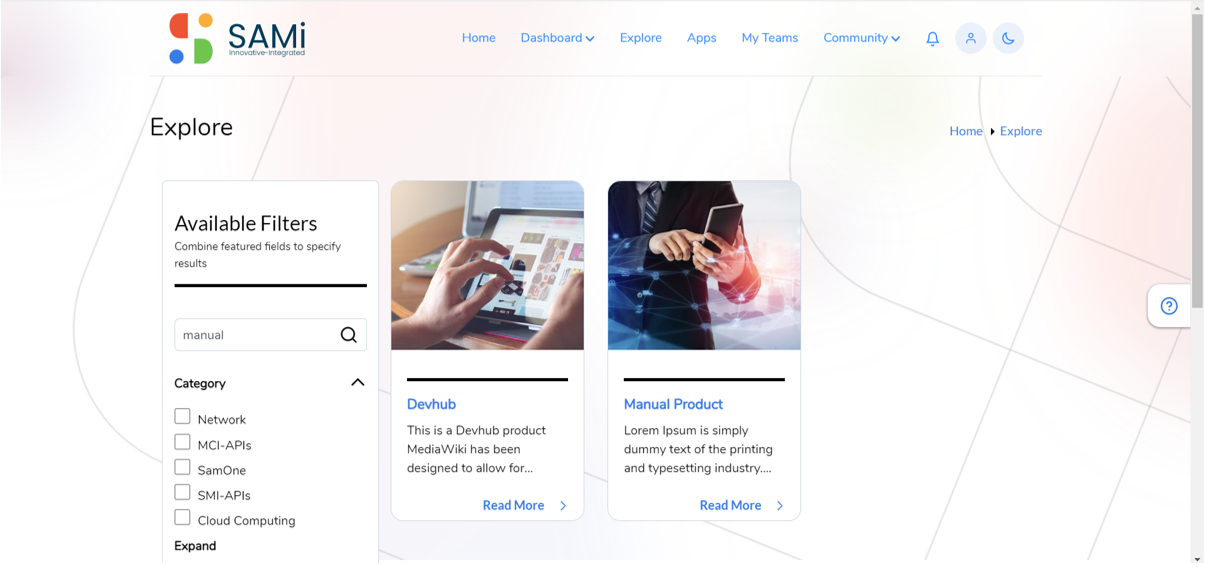
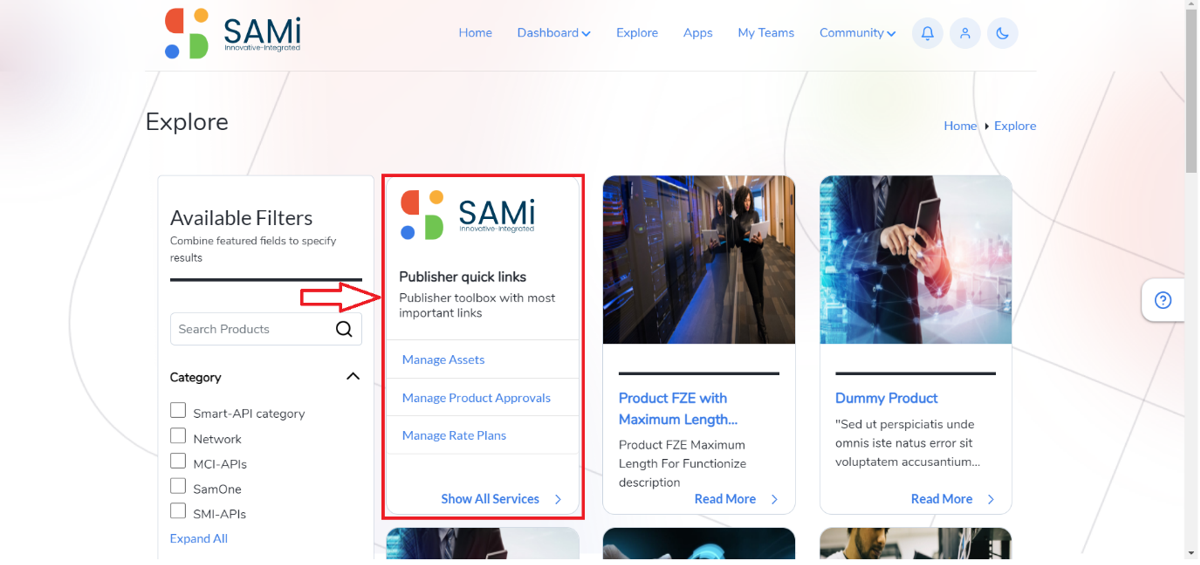
Scenario 2 – Search a Product from Explore Page
Step 1: Login as a Product Owner.
Step 2: Enter the SAMi Portal URL in the browser.
Step 3: Enter the Email and the Password in the respective fields and click Login.
Once you login, you will land on to Product Owner Dashboard.
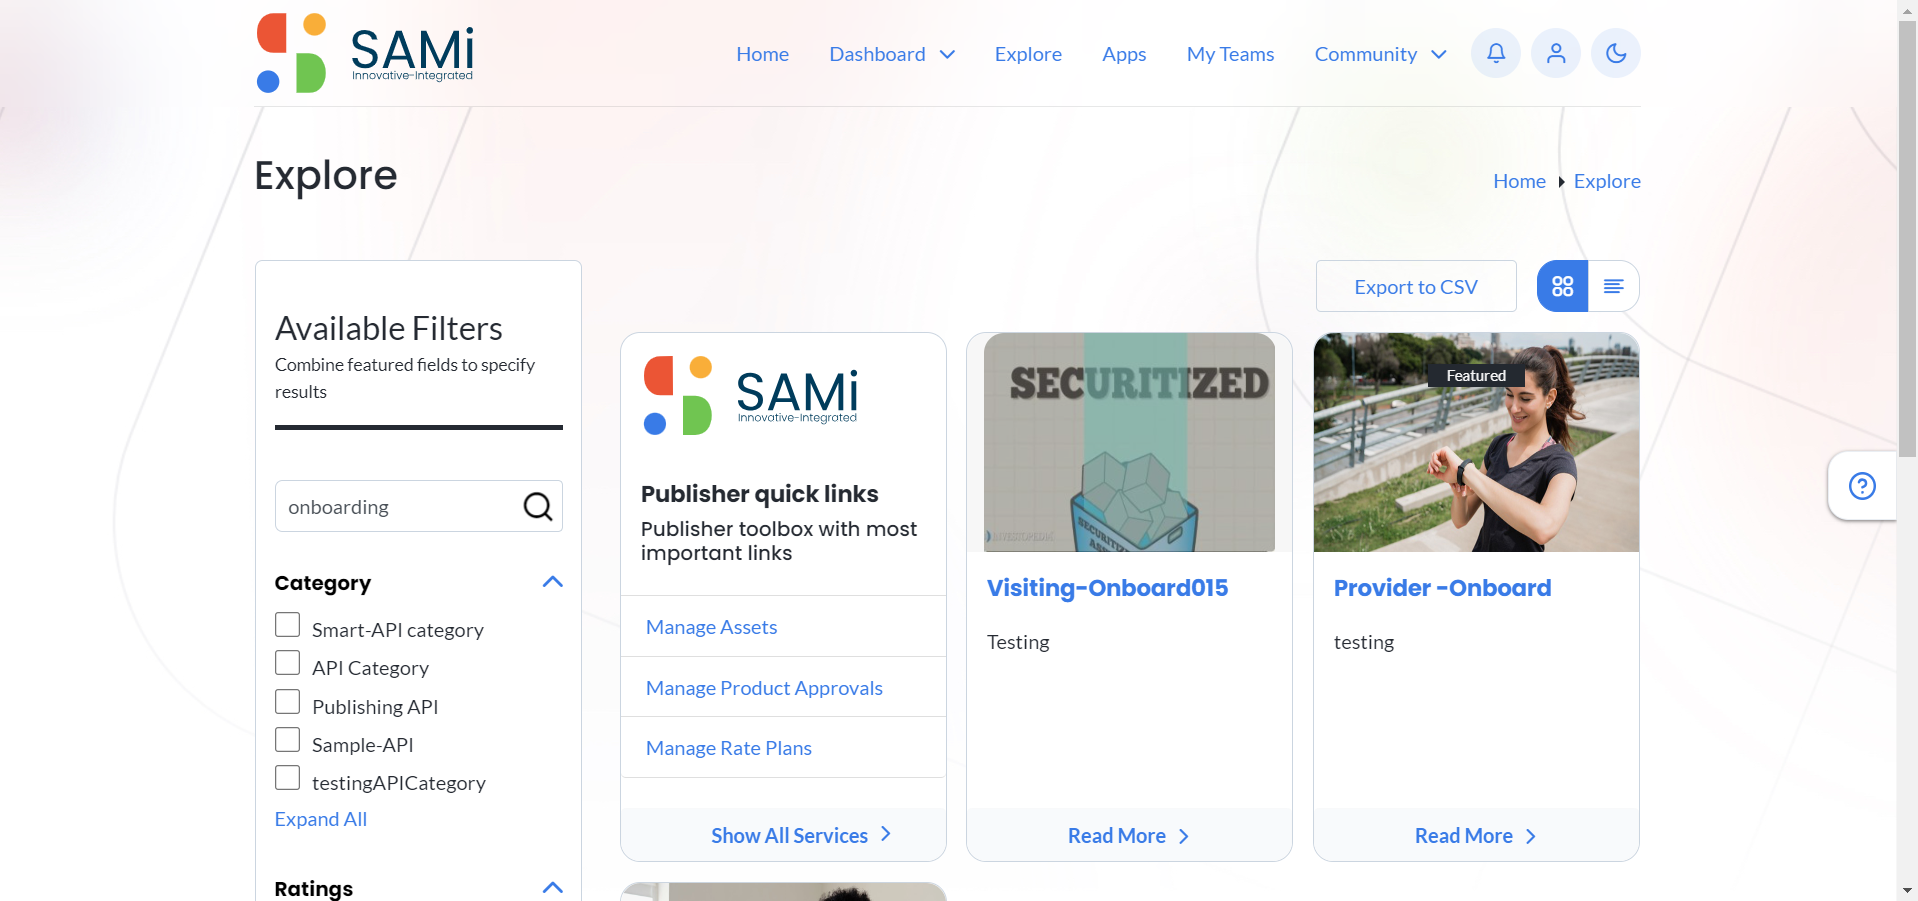
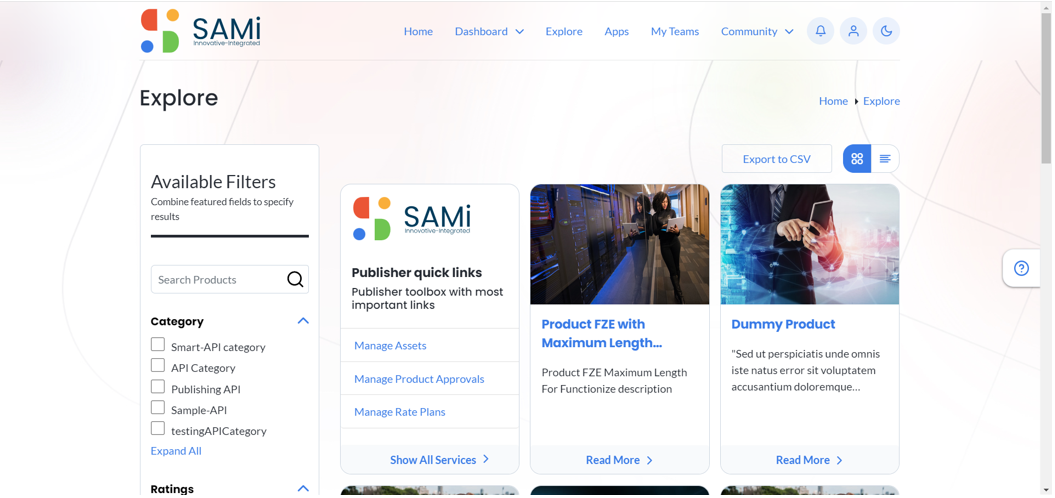
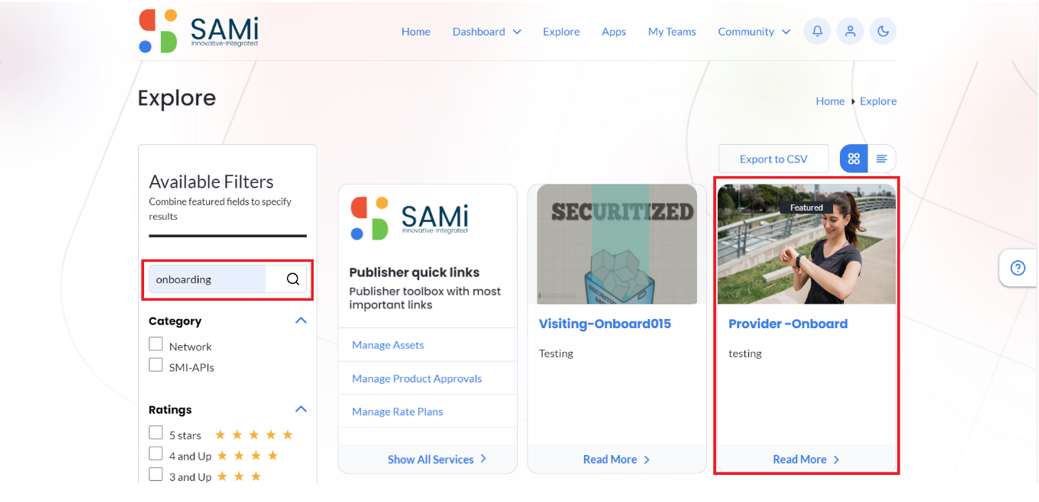
Step 4: Navigate to Explore Page by clicking Explore from the Main Menu.
Step 5: You will land on to the Explore page.
Step 6: In Explore page, you will be allowed to do the following:
• Scroll down to view the products available on Explore page.
• You can search any Product by providing search parameter in the search products field in the left navigation.
• Click on Magnifying glass icon.
The searched product is displayed in the Explore page itself.
Scenario 3: Search a Product from Product Owner Dashboard
Step 1: Login as a Product Owner
Step 2: Enter the SAMi Portal URL in the browser.
Step 3: Enter the Email and the Password in the respective fields and click Login.
Once you login, you will land on to Product Owner Dashboard.
Step 4: In Product Owner Dashboard, provide the Search Keywords in the search field and click search icon.
The Searched product is displayed in Product Owner Dashboard itself.
Step 5: You can also browse and search the product on Product Owner Dashboard using the pagination option at the bottom of the page.
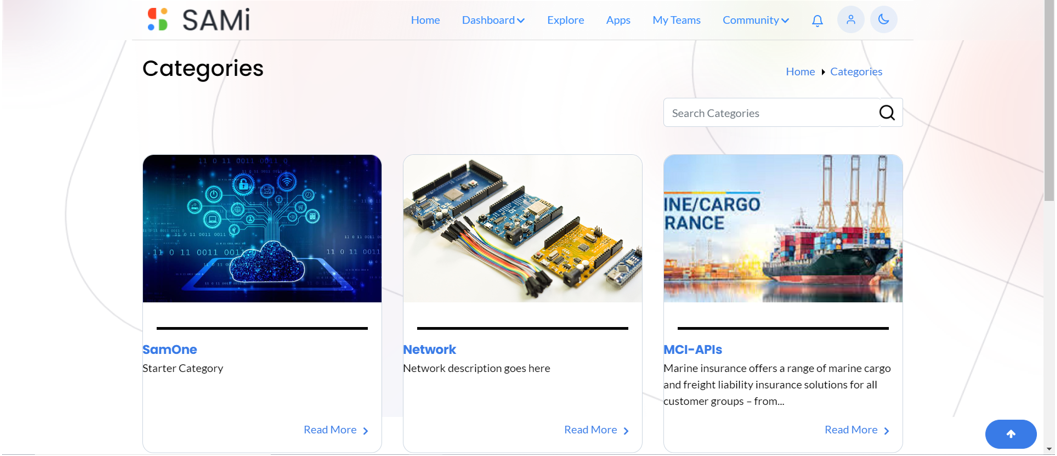
Workflow 2 – Explore Categories
Step 1: Login as a Product Owner
Step 2: Enter the SAMi Portal URL in the browser.
Step 3: Enter the Email and the Password in the respective fields and click Login.
Once you login, you will land on to Product Owner Dashboard.
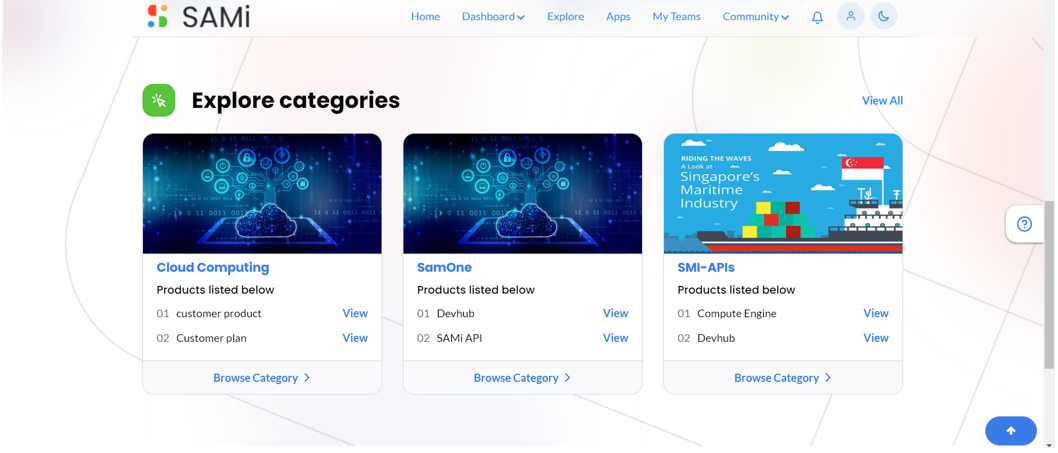
Step 4: Go to Homepage, to visit category page, scroll down to “Explore Categories” and click View all to view all categories.
Step 5: Land on to the Categories page. Select the Category to view the list of Products in Particular Category
Step 6: From the Homepage, scroll down to “Explore Categories” to browse the Catalog of categorized products.
Step 7: In Explore Categories, click Browse Categories to view the particular category of the products.
Here, you will view the description of the Product Category.
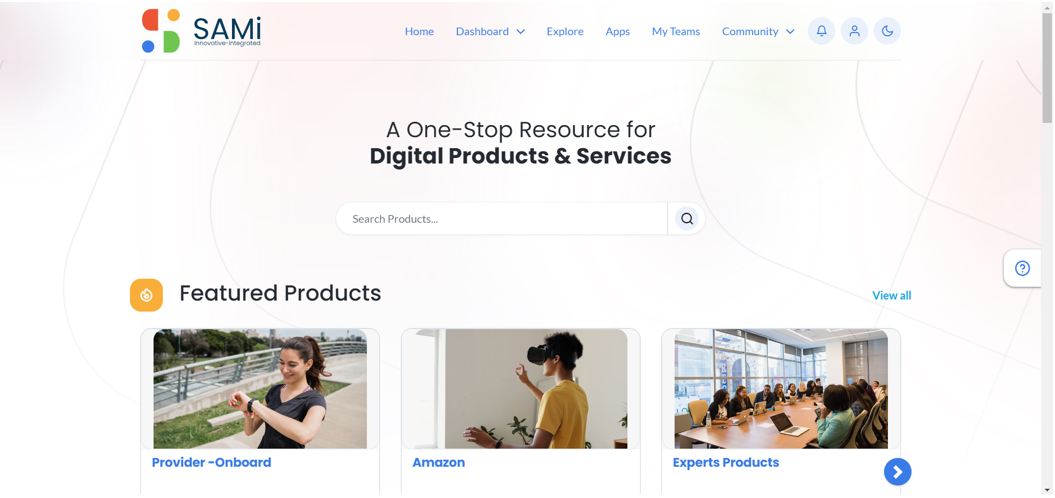
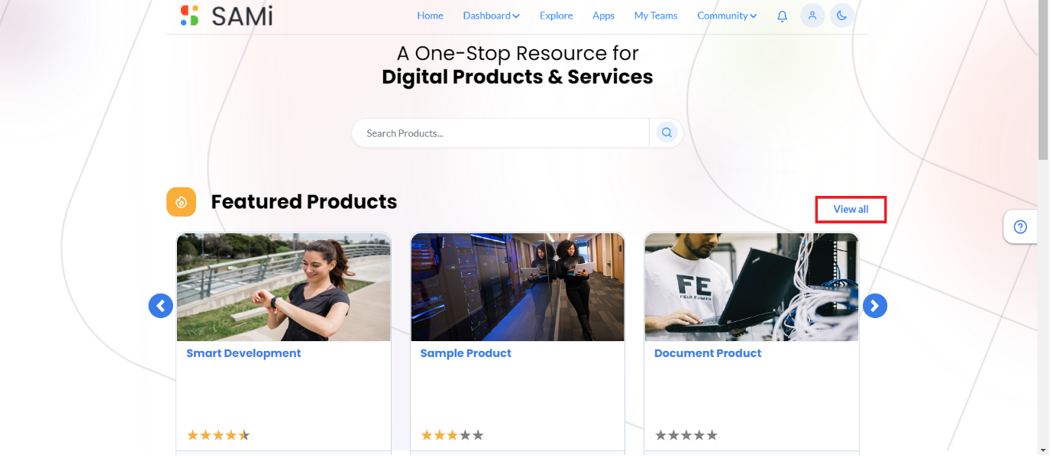
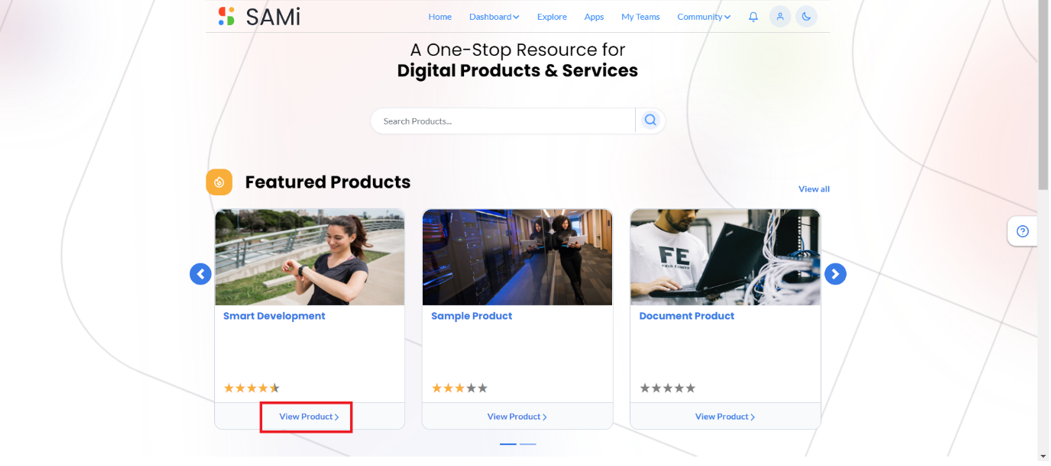
Workflow 3 – Featured Products
Step 1: Login as a Product Owner.
Step 2: Enter the SAMi Portal URL in the browser.
Step 3: Enter the Email and the Password in the respective fields and click Login.
Once you login, you will land on to Product Owner Dashboard.
Step 4: Go to Homepage, you will view the Featured Products.
Step 5: Click on View All to view all the featured products.
Step 6: Also, you will be able to browse all featured products by clicking right or left arrow keys.
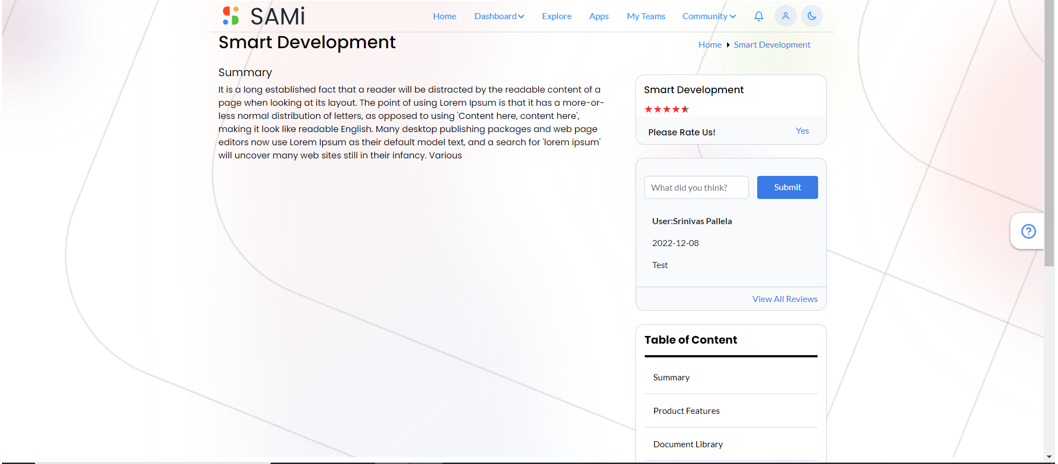
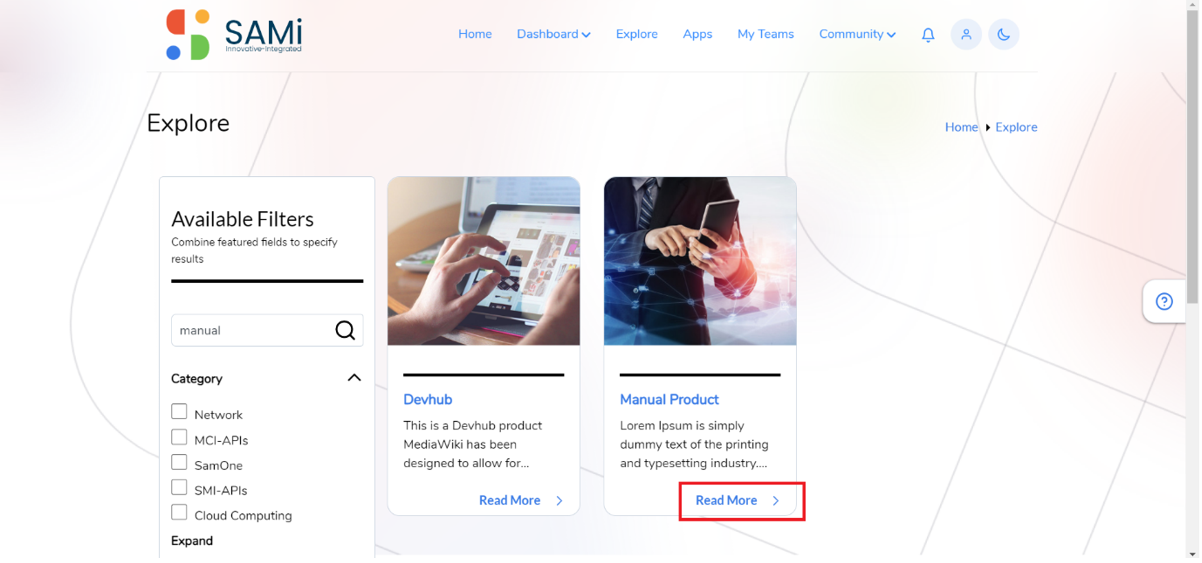
Step 7: Click on View Products of any particular product to view its summary.
The product summary is displayed.
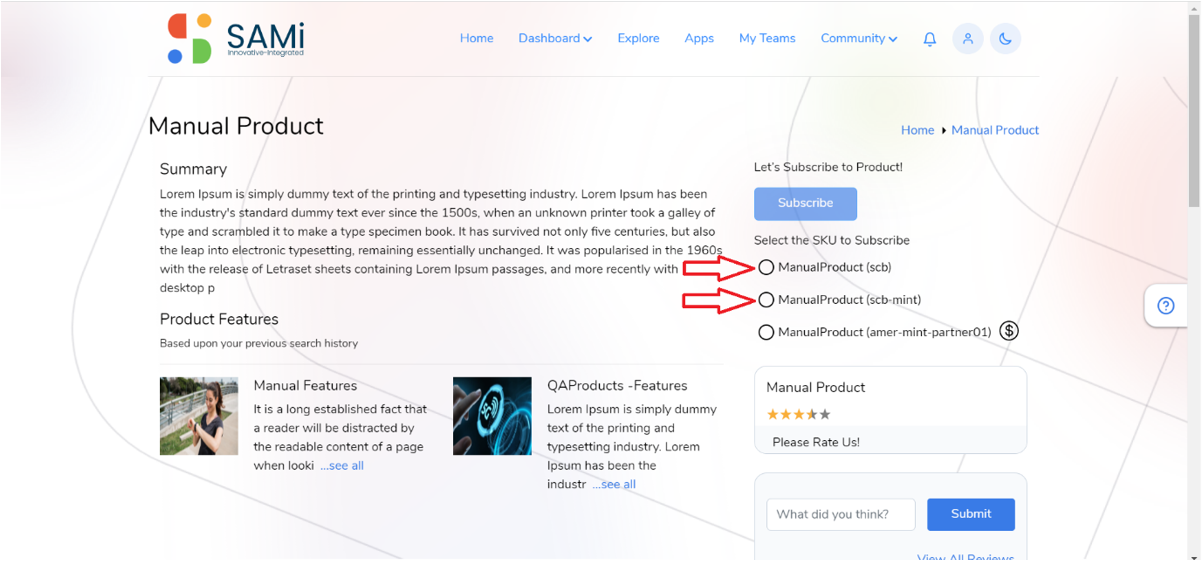
In Summary page, if you wish you can Rate the product, submit a Query and view the Table of Contents and Subscribe the product.
Workflow 4 – Message Boards
Scenario 1: View Message Boards from Home Page
Step 1: Login as a Product Owner.
Step 2: Enter the SAMi Portal URL in the browser.
Step 3: Enter the Email and the Password in the respective fields and click Login.
Once you login, you will land on to Product Owner Dashboard.
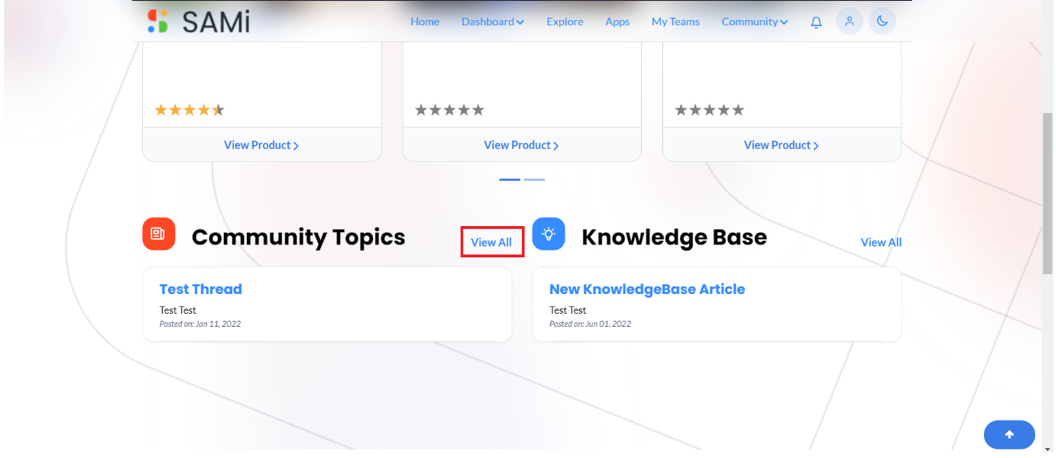
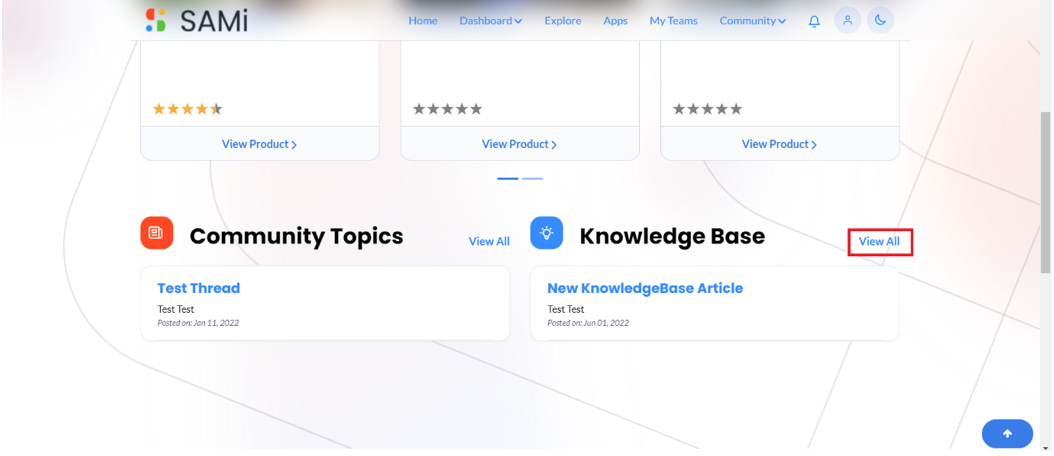
Step 4: Go to Homepage, you will view the Featured Products.
Step 5: Scroll down to go to the Community Topics from homepage and see the latest Community Topics is displayed. To View all community topics, click “View All”.
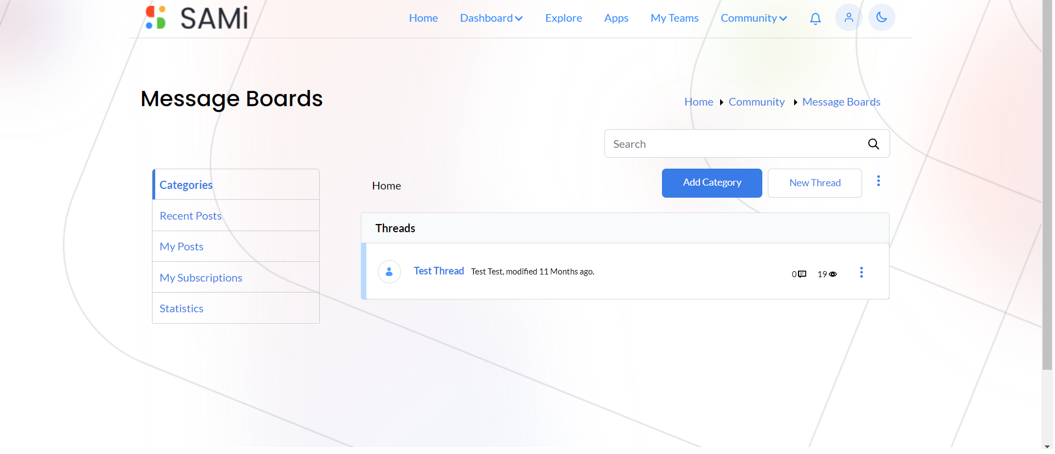
Step 6: When you click View All, you will land on to the Message Boards page.
In the Message Boards page, you will view the following:
- Categories
- Recent Posts
- My Posts
- My Subscriptions
- Statistics
Scenario 2: View Message Boards from Main Menu
To view the message boards from the main menu do the following:
Step 1: Login as a Product Owner.
Step 2: Enter the SAMi Portal URL in the browser.
Step 3: Enter the Email and the Password in the respective fields and click Login.
Once you login, you will land on to Product Owner Dashboard.
Step 4: Form the Dashboard, click Community and then Message Boards.
The Message Boards page is displayed.
In the Message Boards page, you will view the following:
- Categories
- Recent Posts
- My Posts
- My Subscriptions
- Statistics
Workflow 5 – Knowledge Base
Scenario 1: View Knowledge Base from Home Page
Step 1: Login as a Product Owner.
Step 2: Once you login, you will land on to Product Owner Dashboard.
Step 3: Go to Homepage, and scroll down to Knowledge Base and see the latest Knowledge Base Article. To view all Articles, click on “View All”.
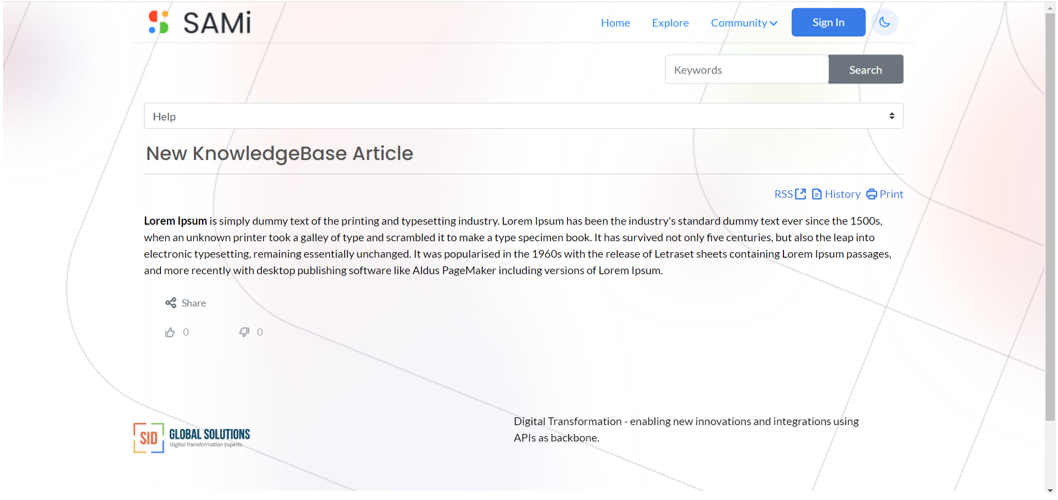
Step 4: You will land on to the Knowledge Base page.
In the Knowledge Base page, you can provide suggestions, like or dislike on those suggestions.
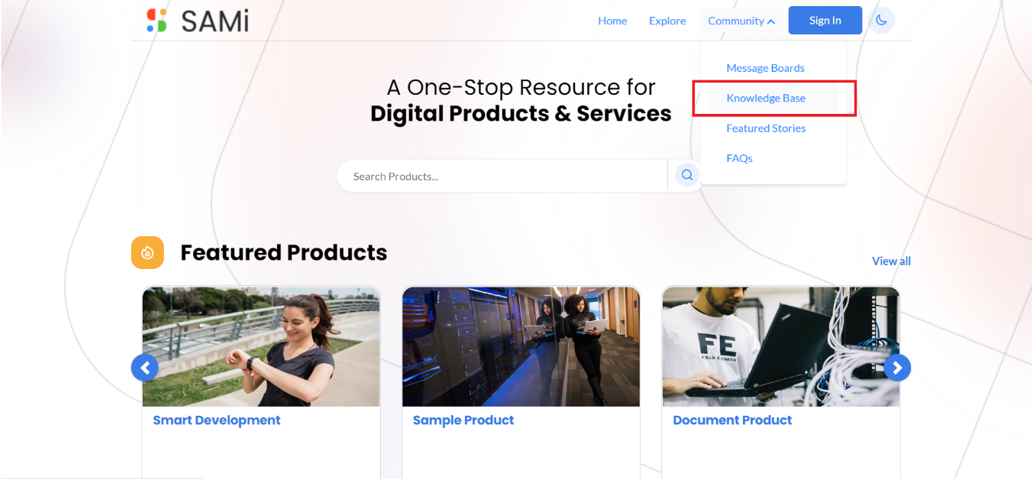
Scenario 2: View Knowledge Base from Main Menu (Community Menu)
To view the Knowledge Base from the main menu do the following:
Step 1: Login as a Product Owner.
Step 2: Enter the SAMi Portal URL in the browser.
Step 3: Enter the Email and the Password in the respective fields and click Login.
Once you login, you will land on to Product Owner Dashboard.
Step 4: Form the Dashboard, click Community and then Knowledge Base.
The Knowledge Base page is displayed.
In the Knowledge Base page, you will be able to search articles, print the article, view RSS feeds and history.
Workflow 6 – Manage Products
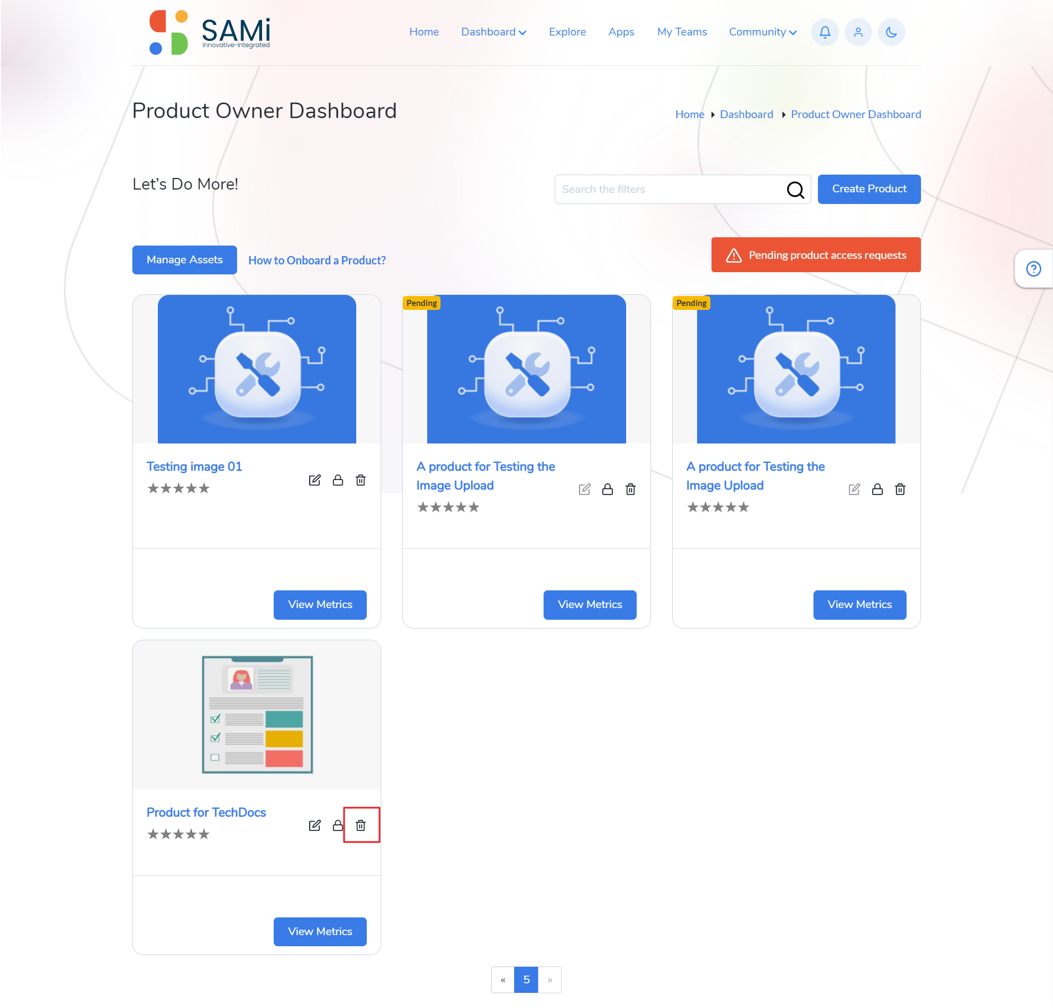
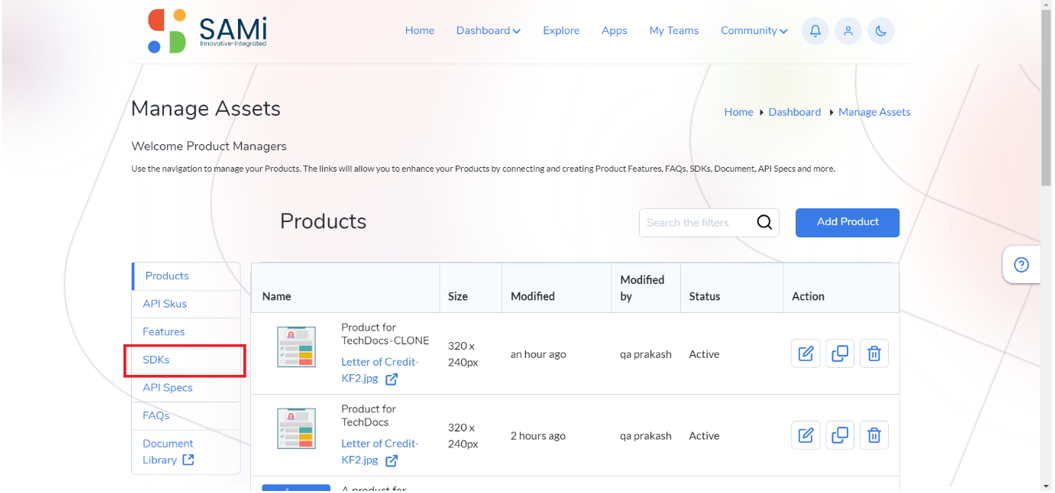
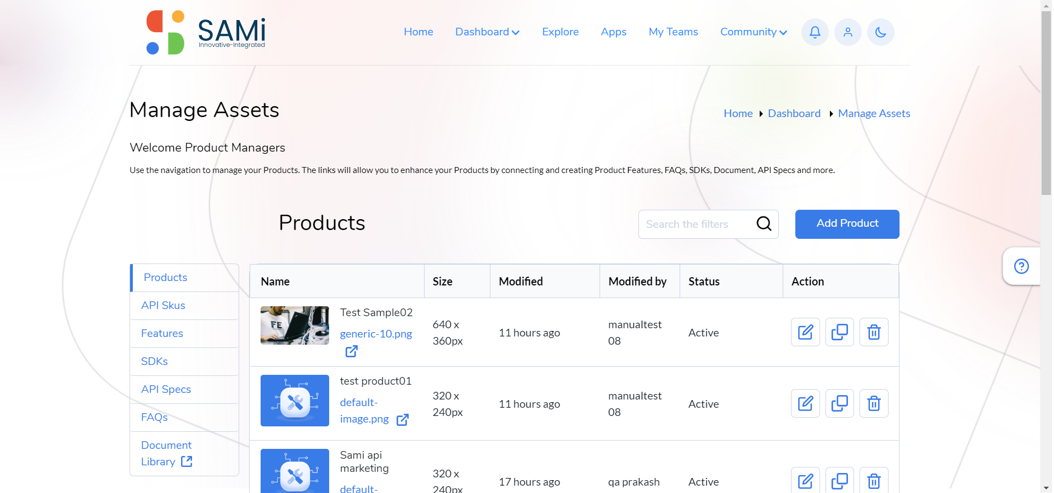
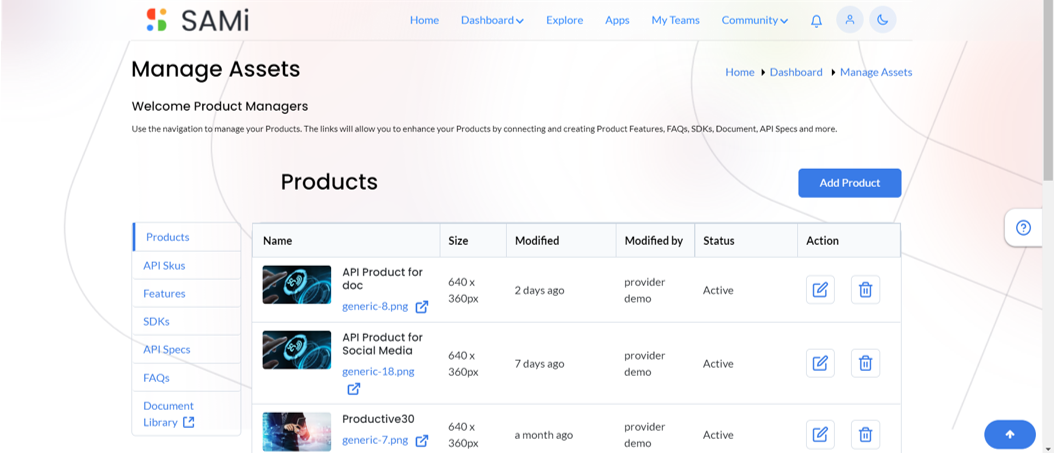
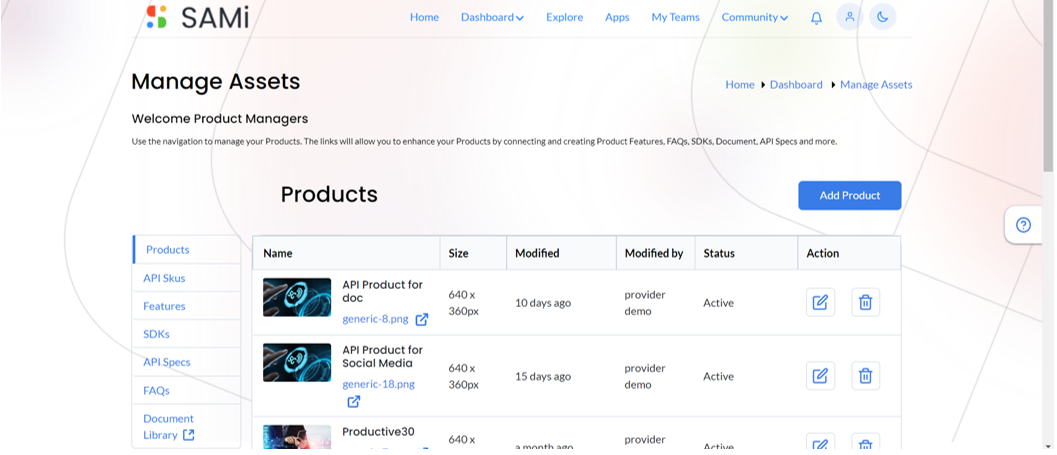
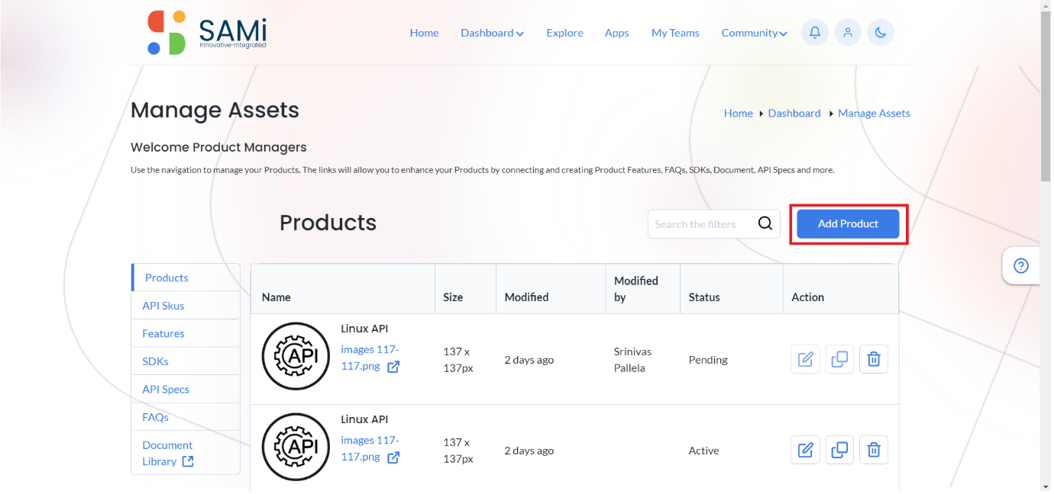
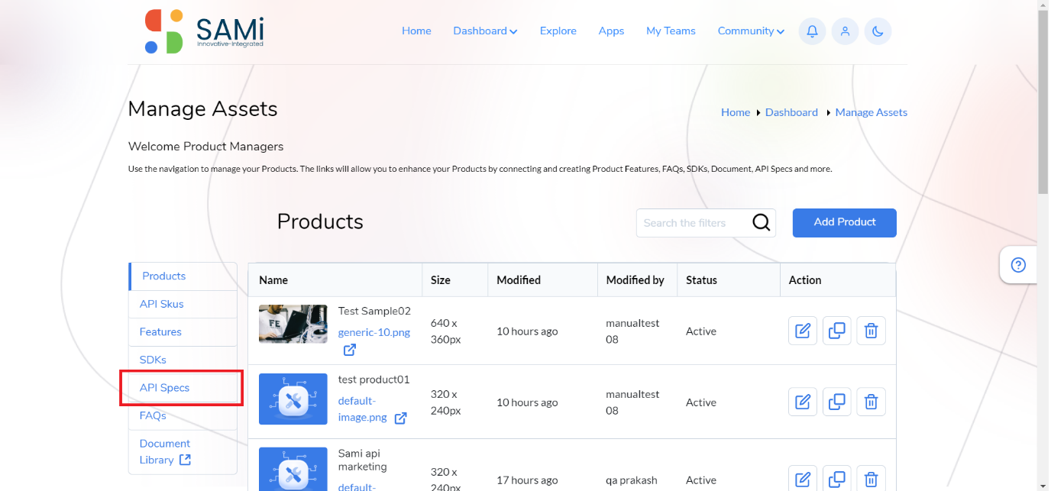
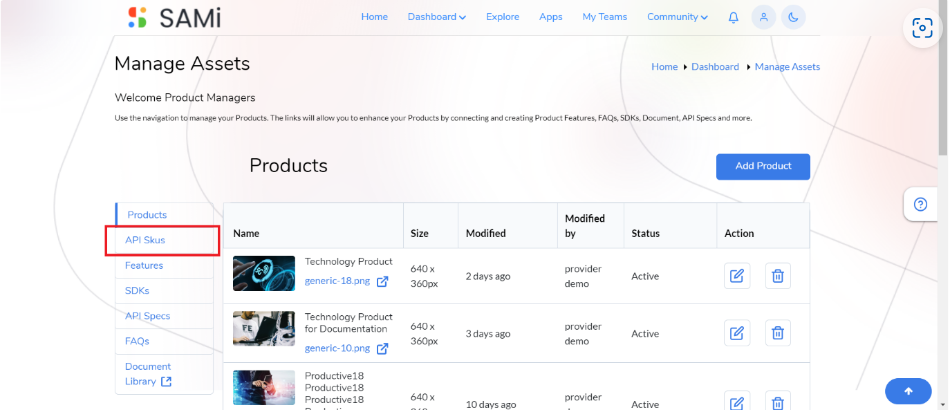
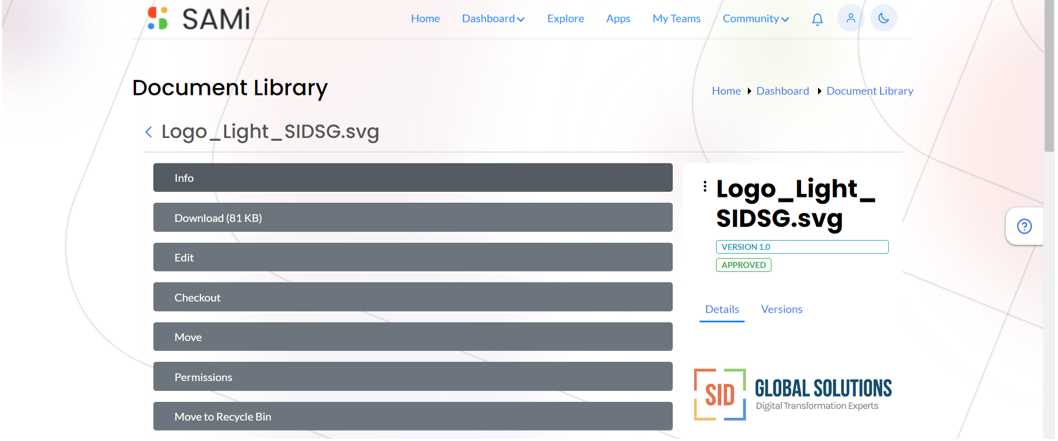
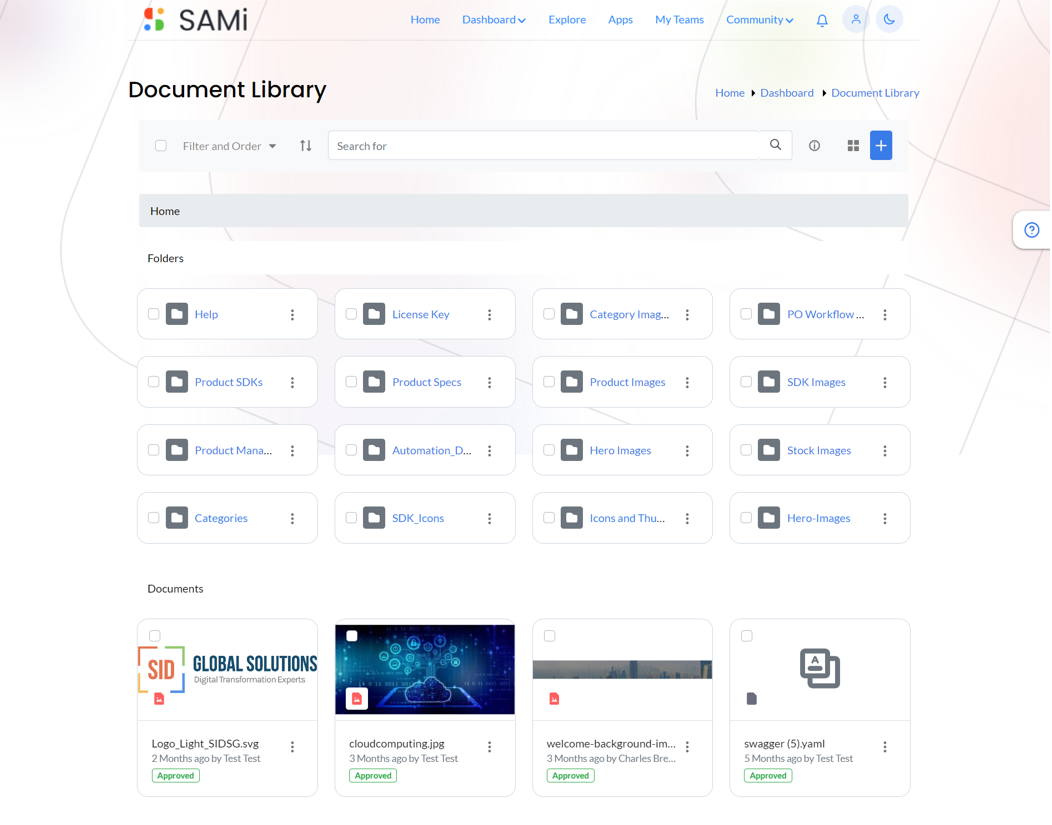
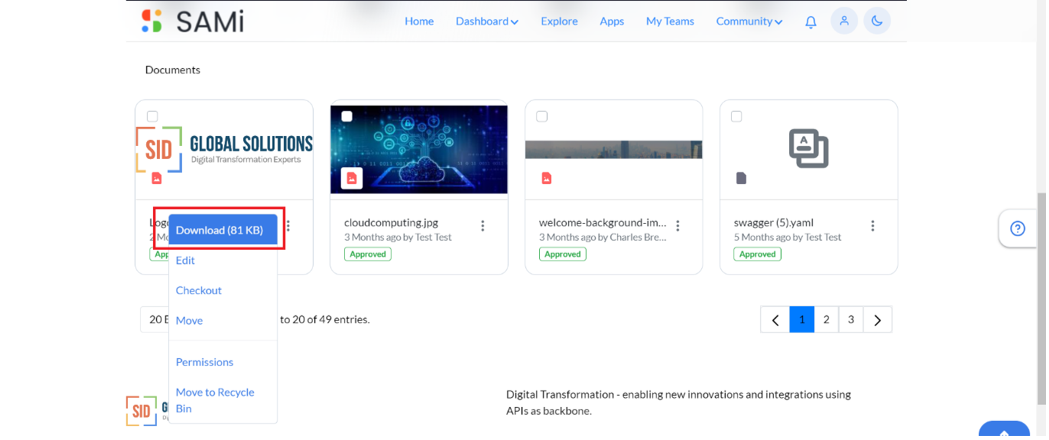
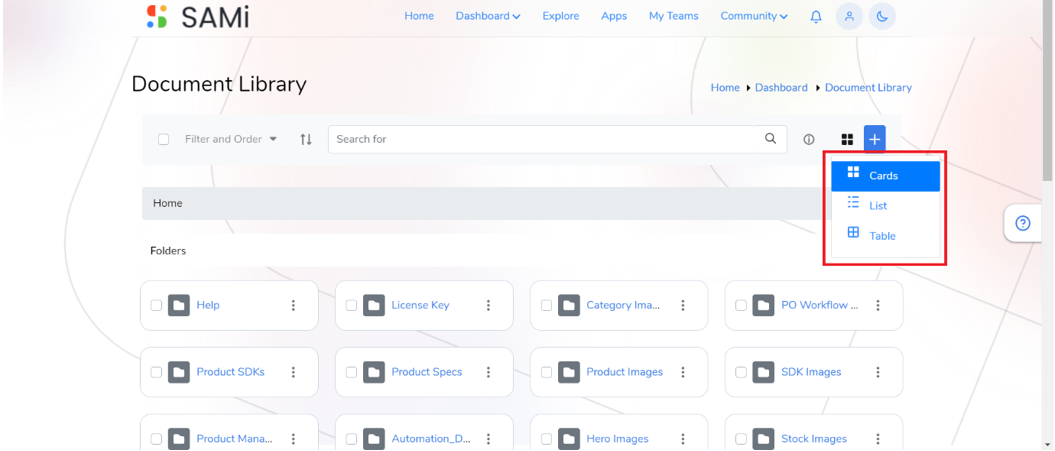
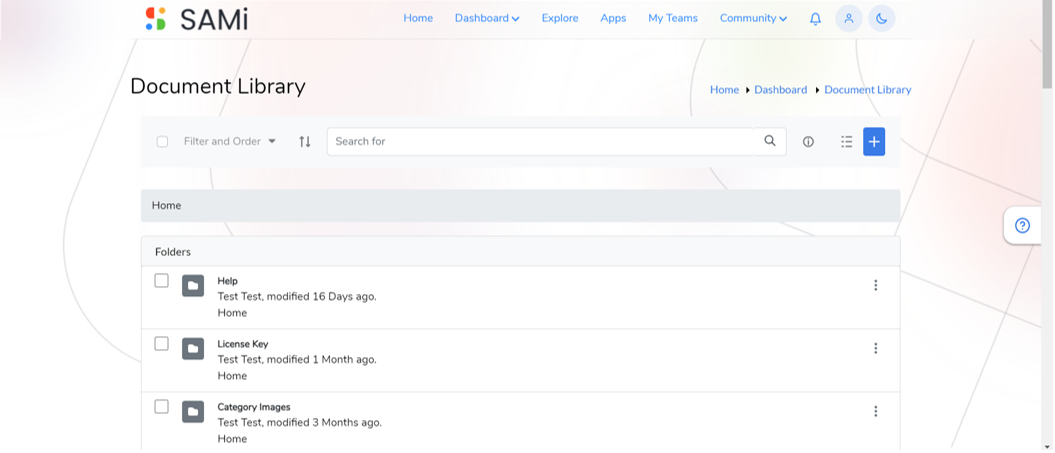
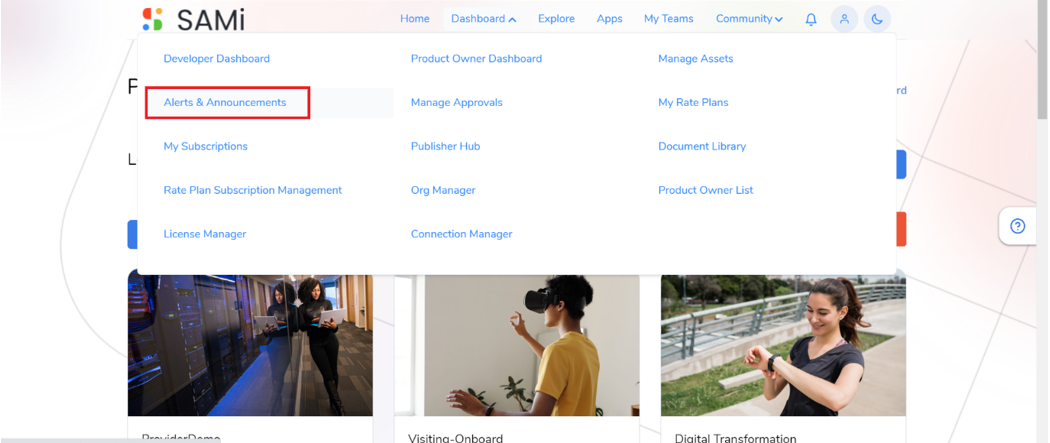
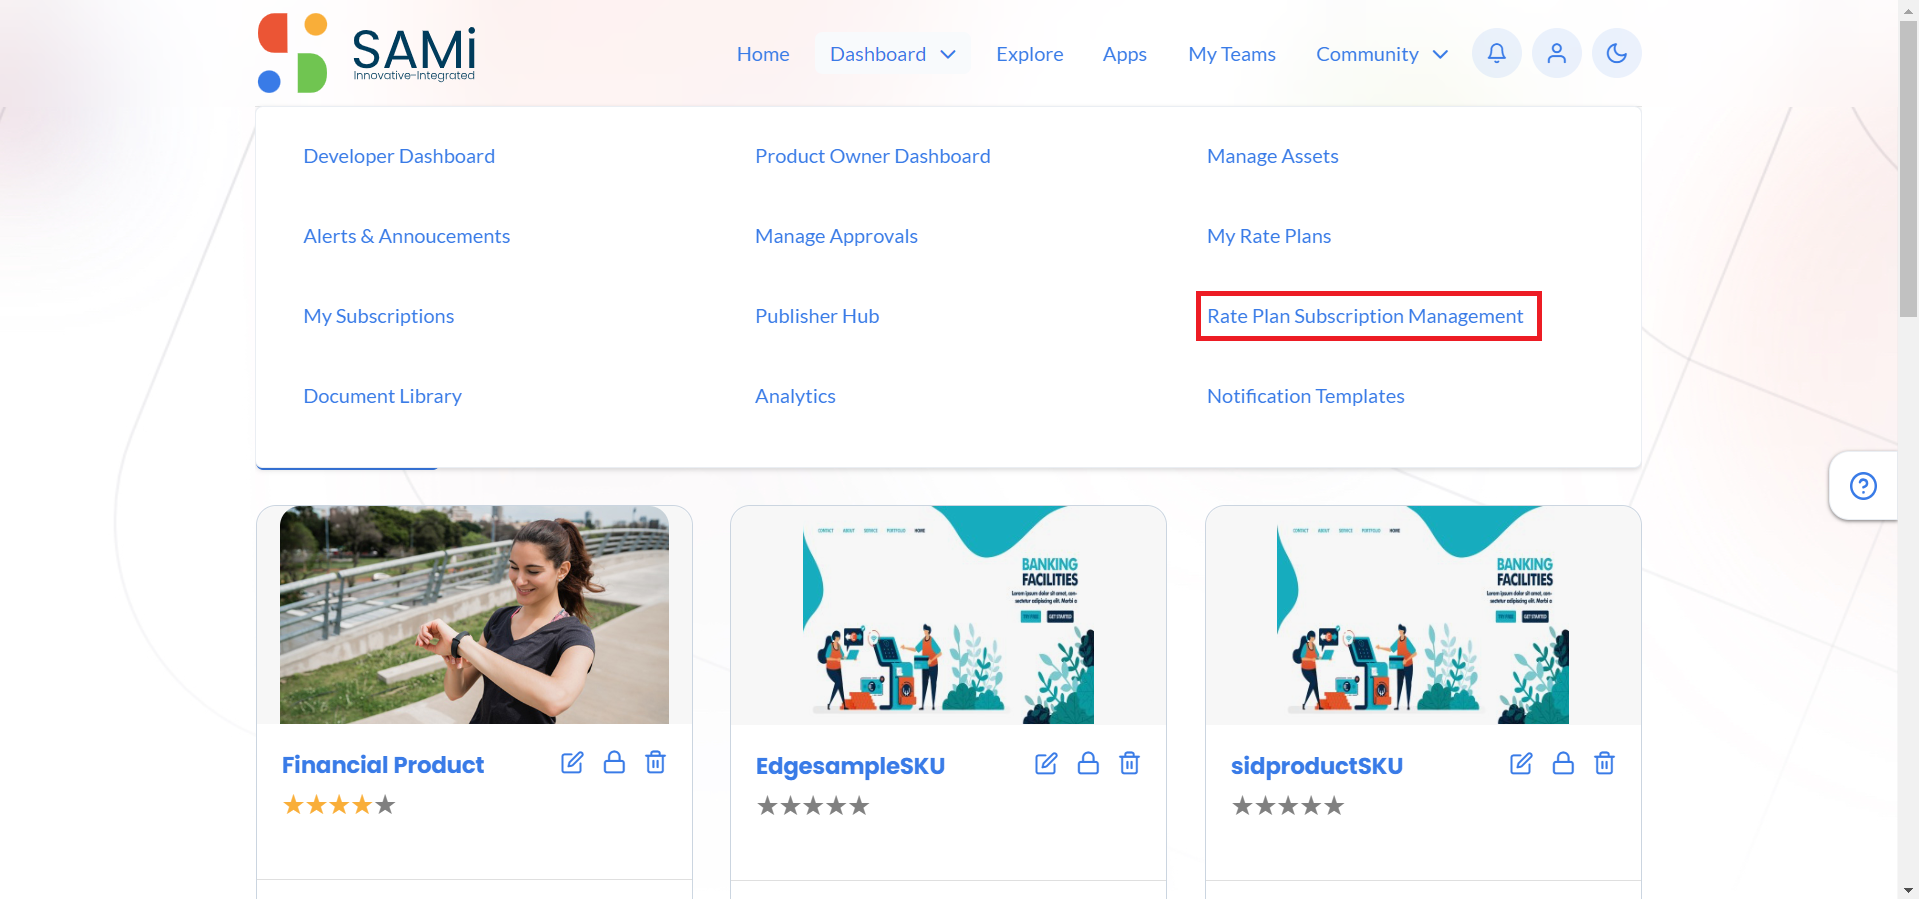
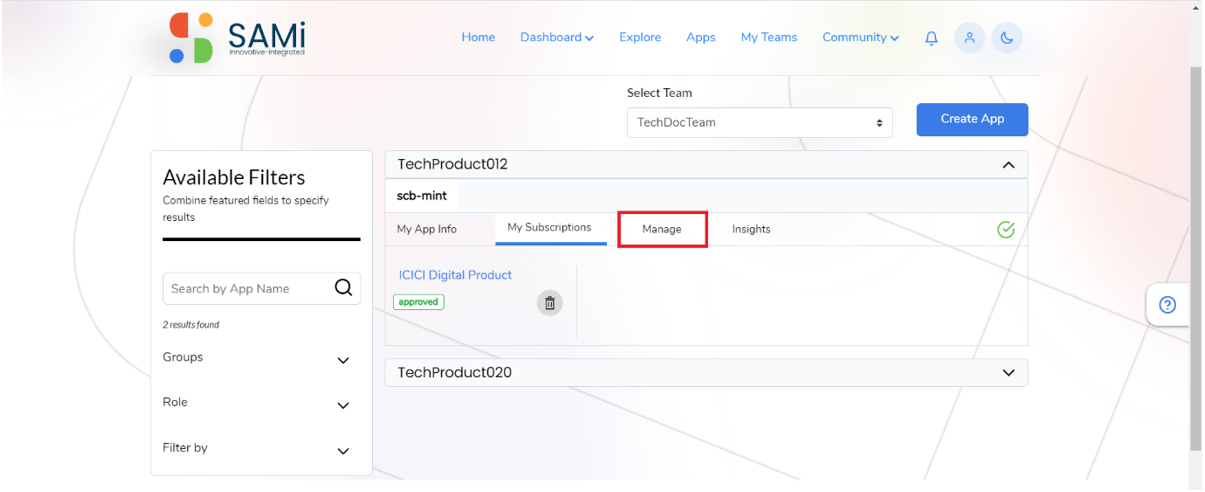
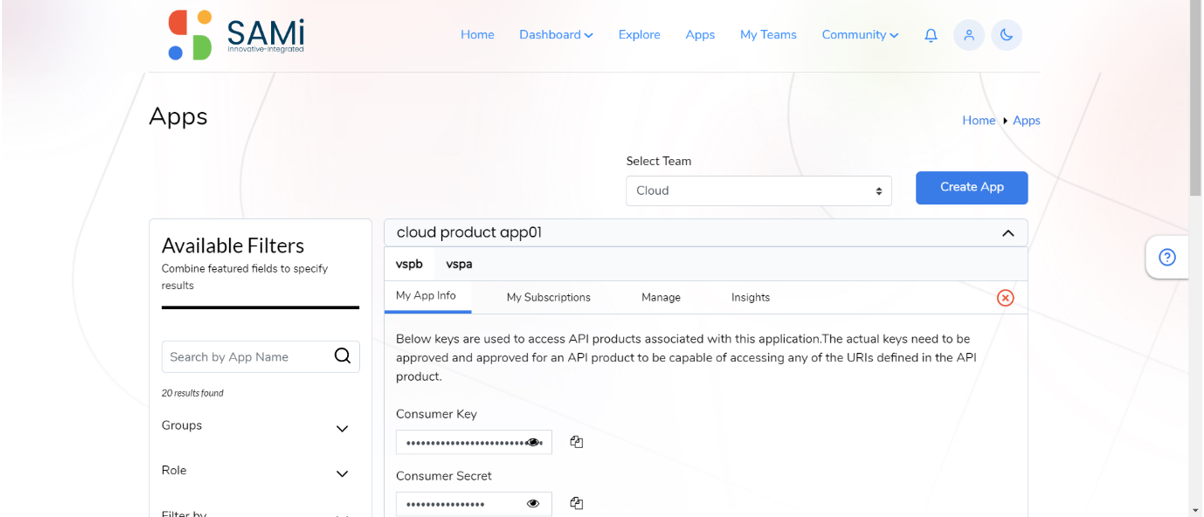
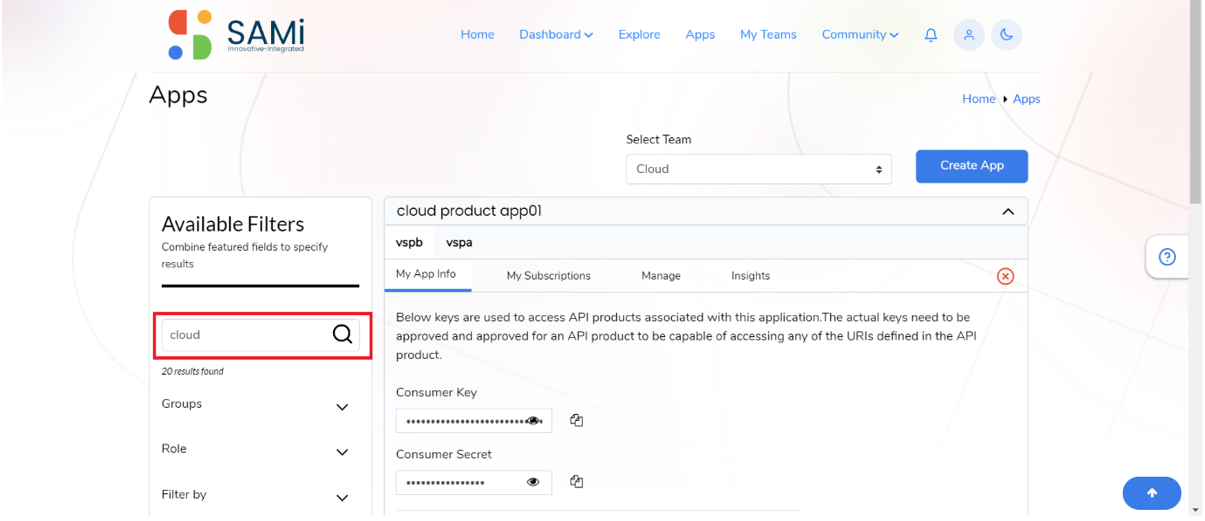
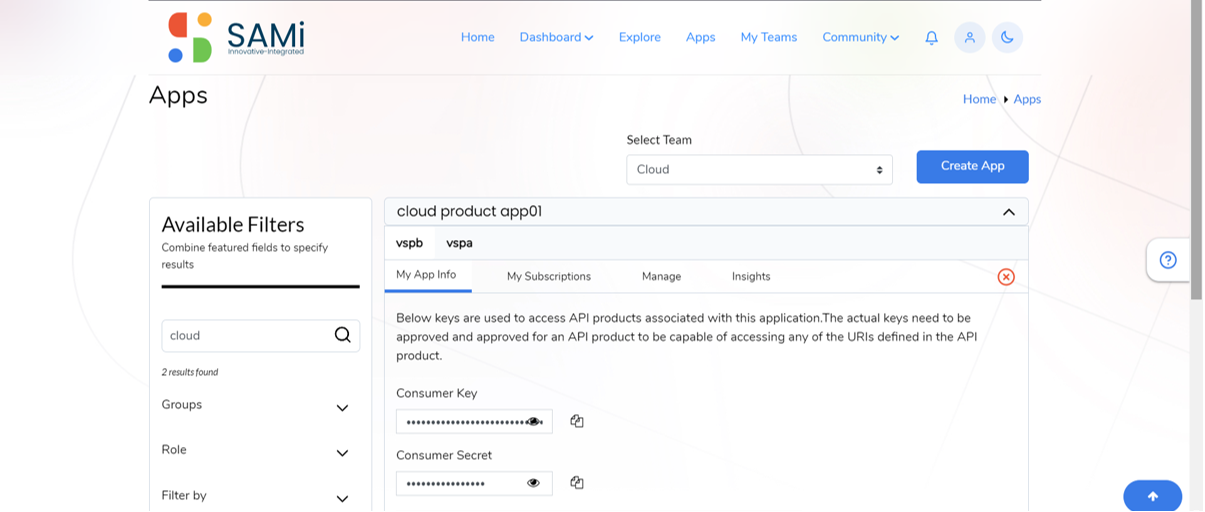
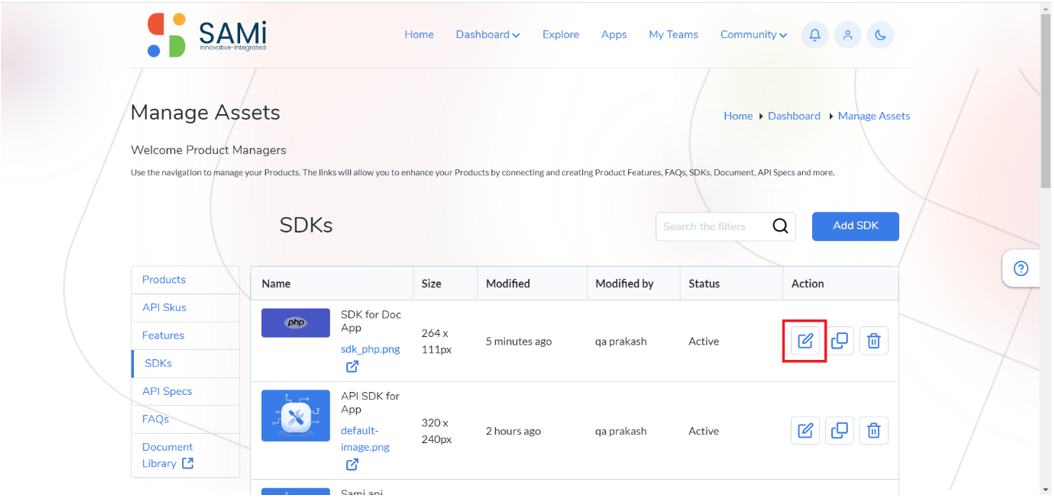
The Manage Assets feature helps the Product Owner to manage the assets on the SAMi API Marketplace portal for instance to perform the CRUD operations on the products, product features, SDKs, API Specs and Document Libraries.
Scenario 1 – Manage Products from PO Dashboard (Without Approvals)
In the PO Dashboard page, you will be able to do the following:
- Add Product
- Edit Product
- Delete Product.
- Set Permissions.
- Clone a Product from Manage Assets menu option
Add Product
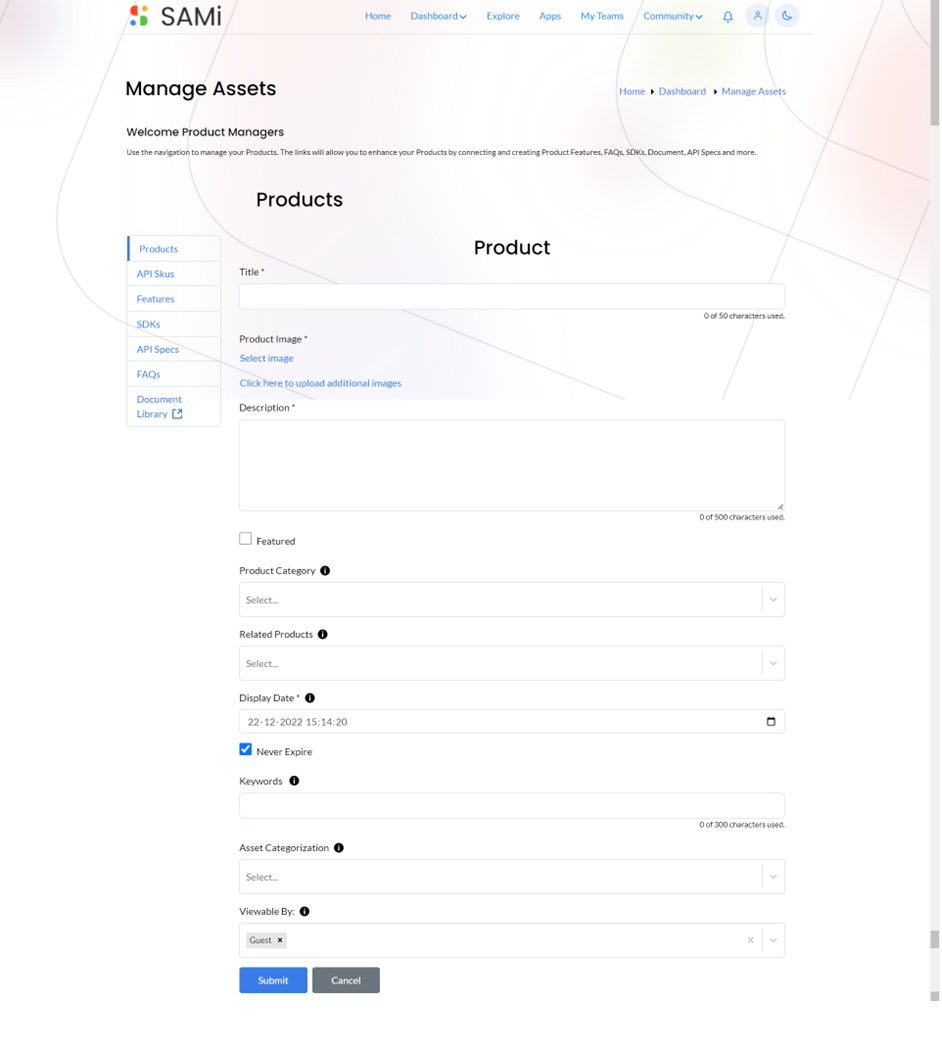
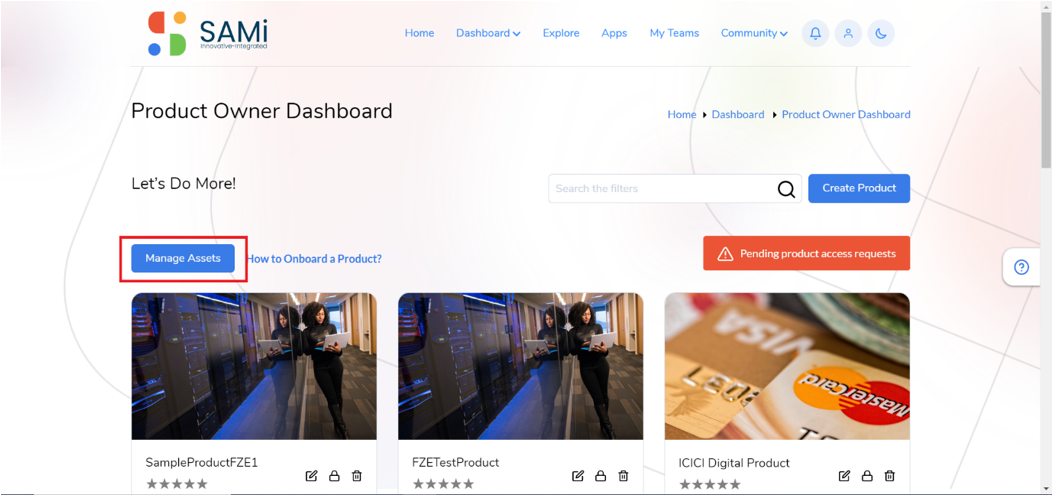
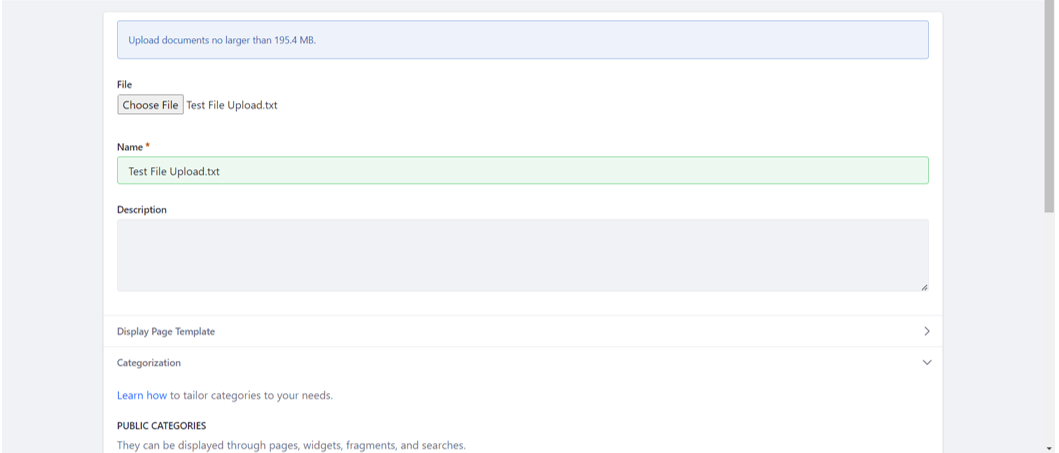
In Manage Assets, the Product Owner will be able to Add New Product from the Product Owner Dashboard.
Step 1: Login as a Product Owner.
Step 2: Enter the SAMi Portal URL in the browser.
Step 3: Enter the Email and the Password in the respective fields and click Login.
Step 4: You will land on to Product Owner Dashboard.
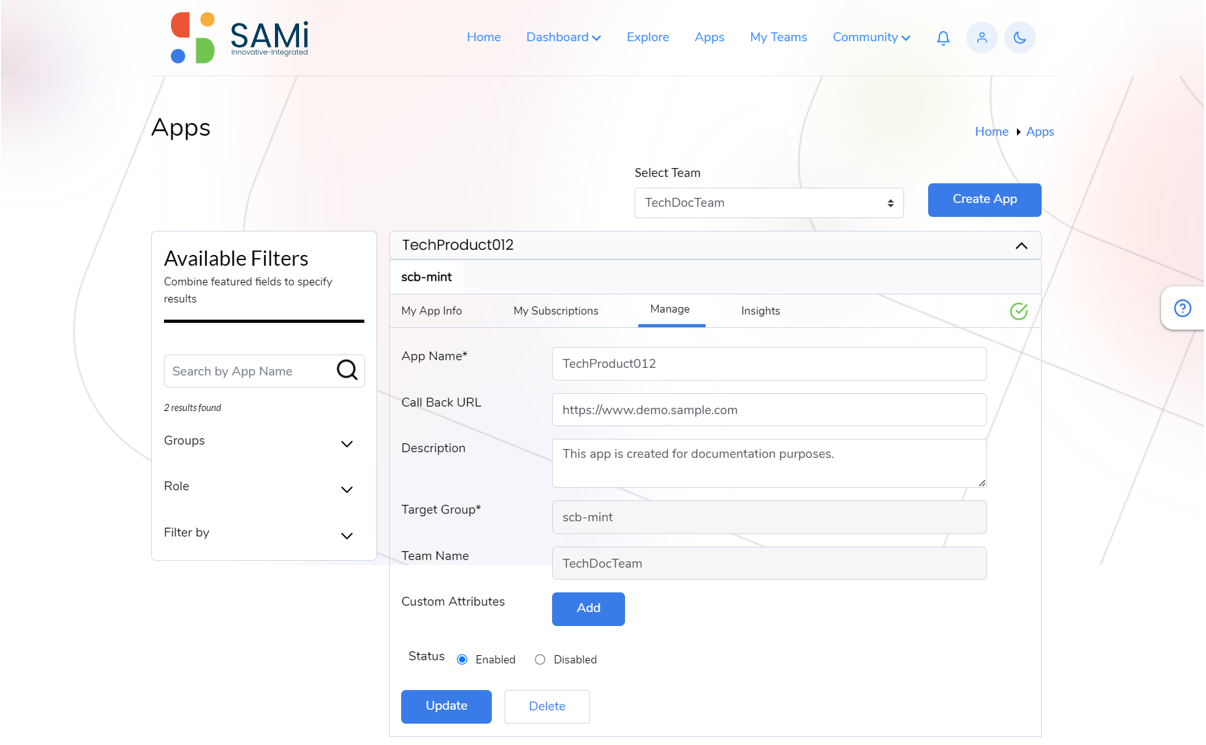
Step 5: In Product Owner Dashboard, click Create Product.
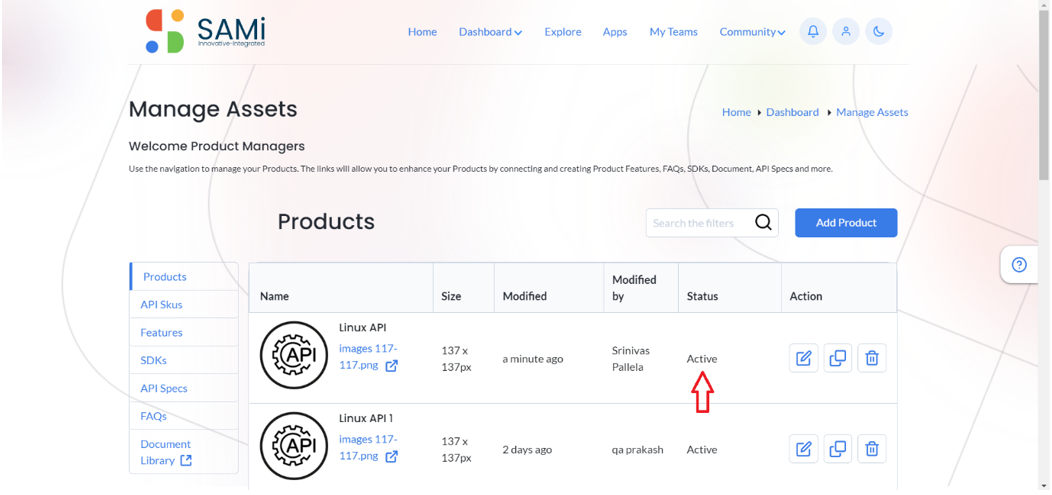
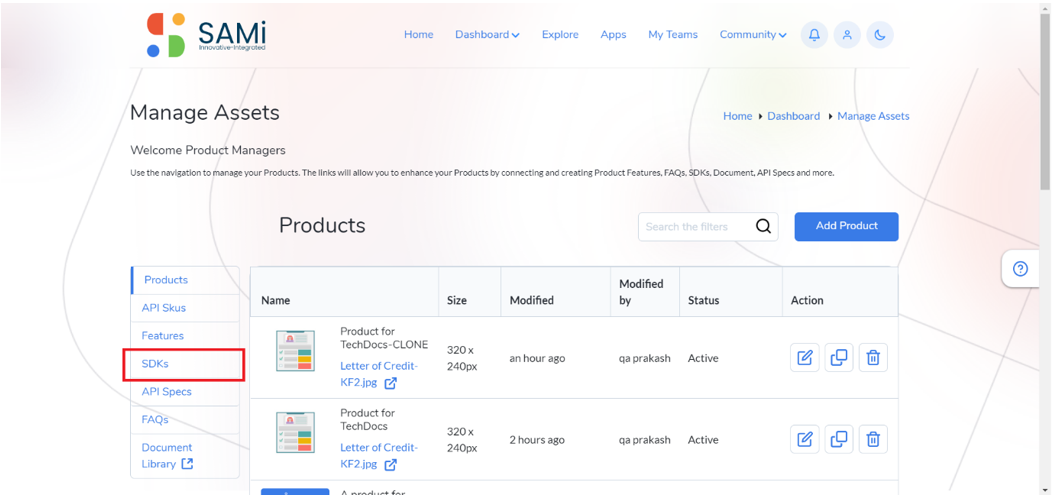
The Manage Assets page is displayed – Products
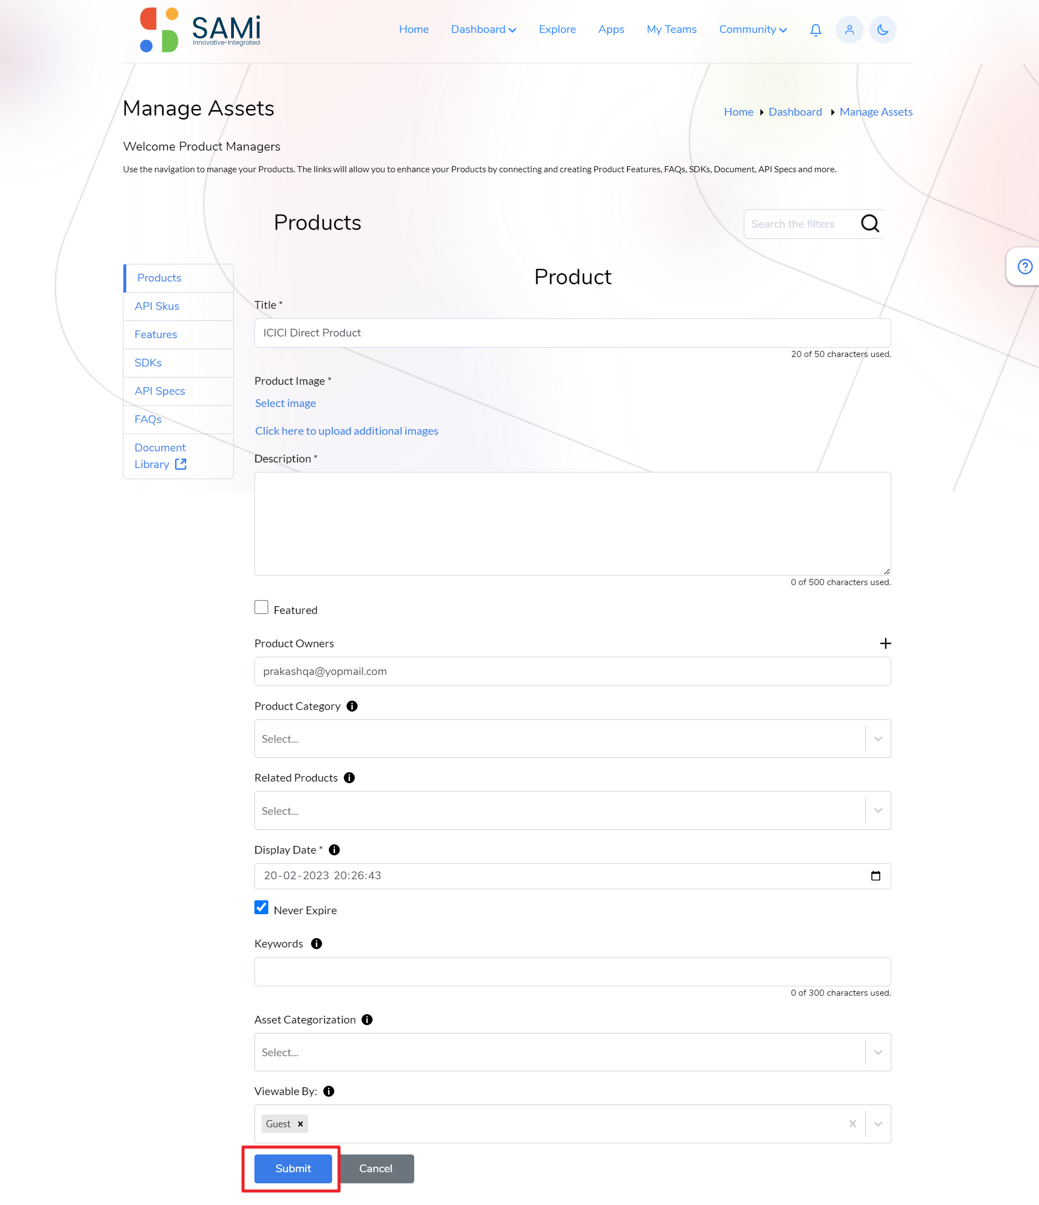
Step 6: In the Manage Assets page, enter the following:
- Enter the Title of the product.
- Select the Product Image (Select image or Click here to upload additional images)
*Note: If the Product Image is not selected the system will by default selects a default image for that product.
- Enter the Description in the text area.
- Check on Featured checkbox, if would like to create a featured product, otherwise uncheck it.
- Select the Product Category Example: SamOne/Network/MCI-APIs/SMI_APIs
- Select Related Products if the product is related to other products in the portal.
- Select the Display Date, if you wish to display the product from specific date, otherwise leave it blank as it automatically captures the current date to display.
- When you check Never Expire, the product will not expire anytime in future. Note: when you uncheck it, if you need to provide Display date and Expiry date as well.
- Enter keywords, as many as possible, this will be helpful to search the product later.
- Select Asset Categorization, to list the product in the available list of categories.
- Choose the role permissions Viewable By (External Developer/Internal Developer/Product Manager/SAMi Admin/User)
Step 7: Click Submit.
Step 8: Click Cancel, if you wish to abort the operation and close the page.
When the Submit button is clicked, a Success message appears.
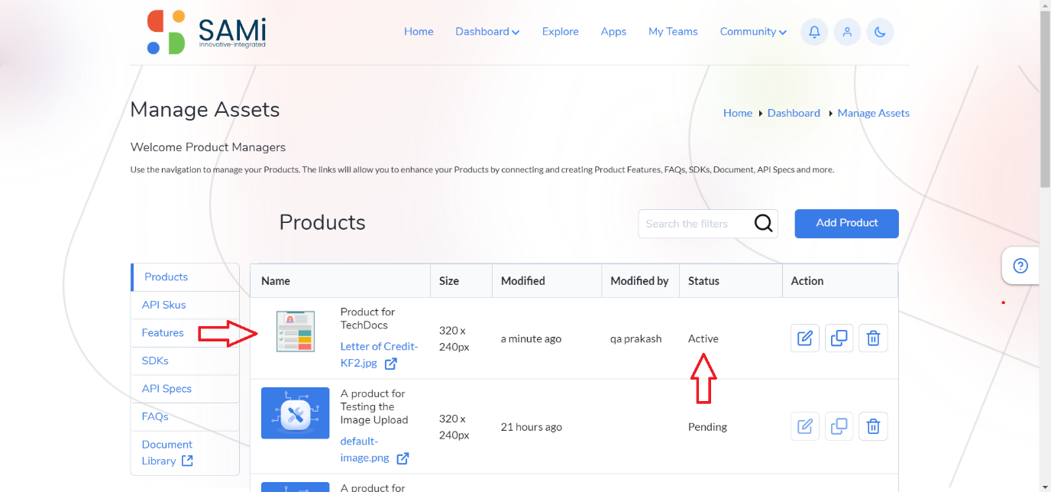
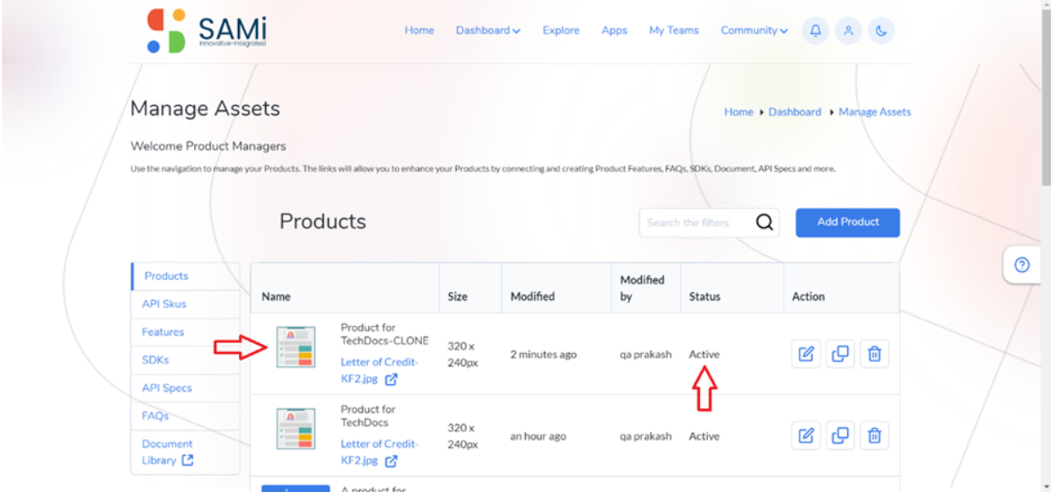
The PO will be able to view the product in Manage Assets page after login in to the SAMi Portal and the product Status will be shown as, ‘Active.’
Edit Product
To edit the product from Product Owner Dashboard, do the following:
Step 1: Login as a Product Owner.
Step 2: Enter the SAMi Portal URL in the browser.
Step 3: Enter the Email and the Password in the respective fields and click Login.
You will land on to Product Owner Dashboard.
Step 4: From Product Owner Dashboard, browse the product to edit it.
Step 5: Click on Edit icon in the product card.
The Product details page appears.
In Product page, add or update any of the sections like, Title, Description, Product Category, Check or uncheck Featured checkbox, if you’d like to make it a featured product or general product, Related Products, Display Date, Asset Categorization, and Viewable By.
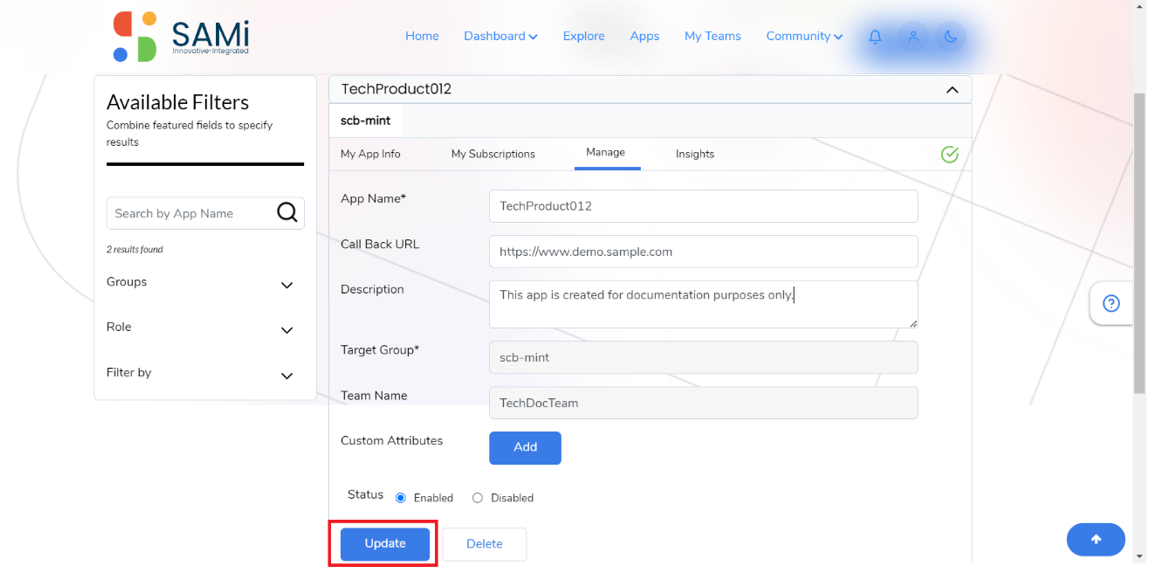
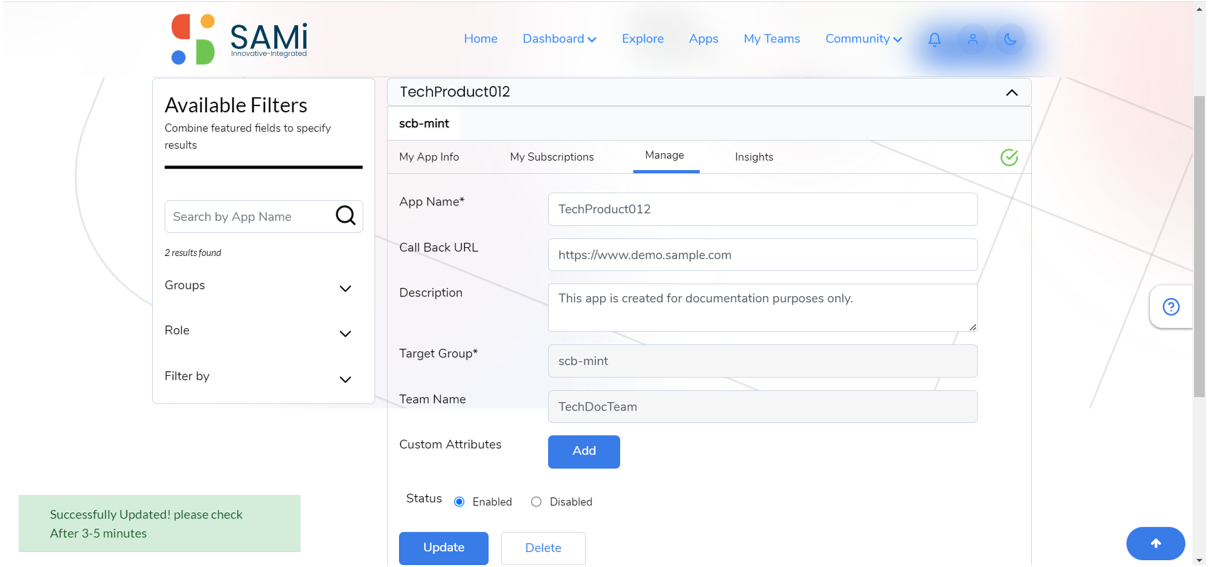
Step 6: Click Submit.
A success message is displayed stating, the product is successfully updated.
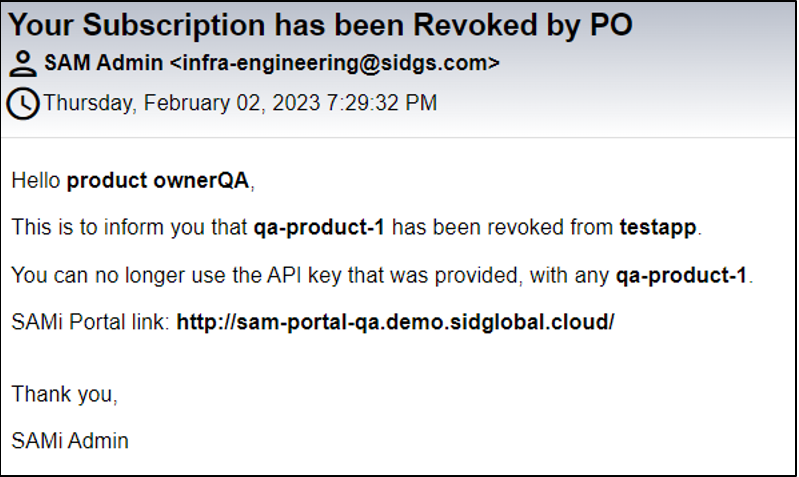
An email notification is sent to the PO with the Status as ‘Active’.
Delete Product
To delete a product from Product Owner Dashboard, do the following:
Step 1: Login as a Product Owner.
Step 2: Enter the SAMi Portal URL in the browser.
Step 3: Enter the Email and the Password in the respective fields and click Login.
You will land on to Product Owner Dashboard.
Step 4: From Product Owner Dashboard, browse the product to delete it.
Step 5: Click on Delete icon in the product card.
*Note: a product is in the Pending status, the PO will not be able to delete it. Unless the status is changed to Active.
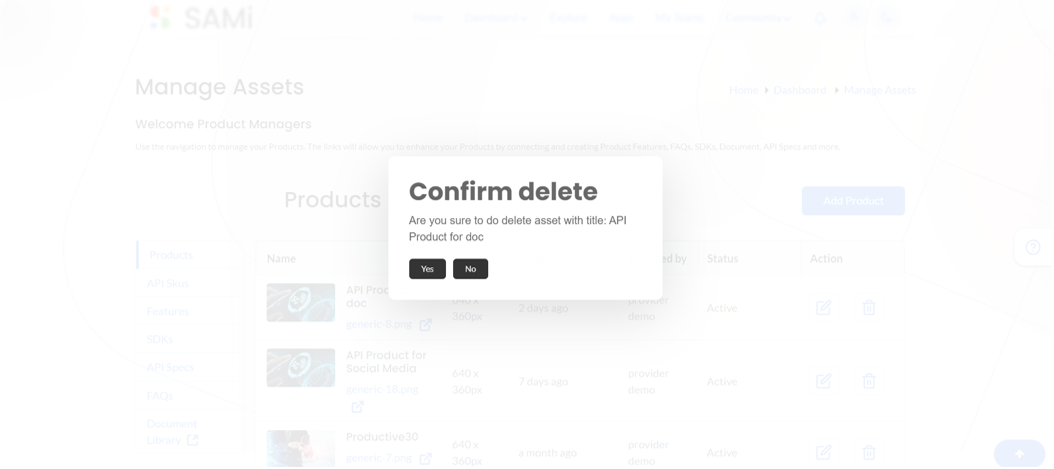
A delete confirmation popup appears. Click Yes to delete and click No to cancel.
The selected product is deleted. A confirmation message appears stating, “Product Deleted Successfully.”
Clone a Product
To clone an existing product from Manage Assets menu option, do the following:
Step 1: Login as a Product Owner.
Step 2: Enter the SAMi Portal URL in the browser.
Step 3: Enter the Email and Password in the respective fields and click Login.
Step 4: You will land on to Product Owner Dashboard.
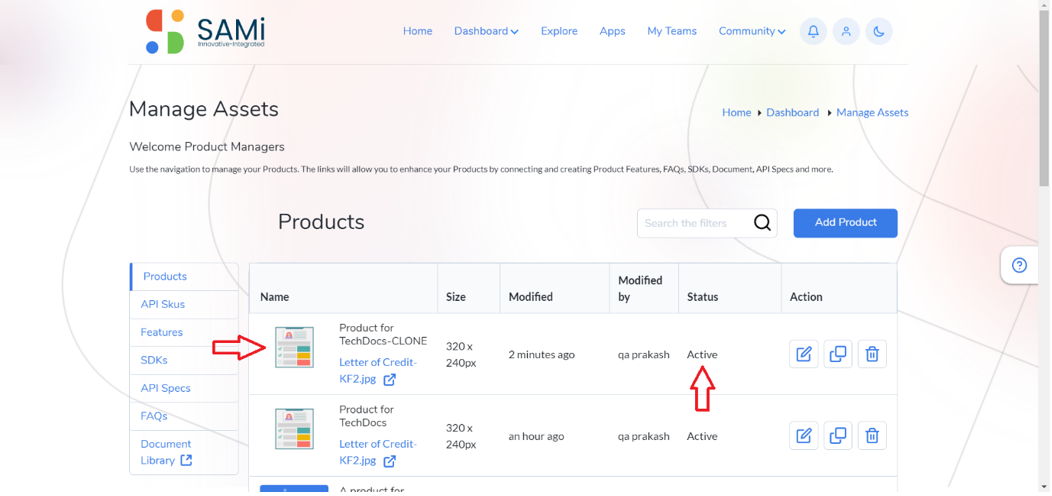
Step 5: By default, the Products are listed, select the product and click on the Clone icon.
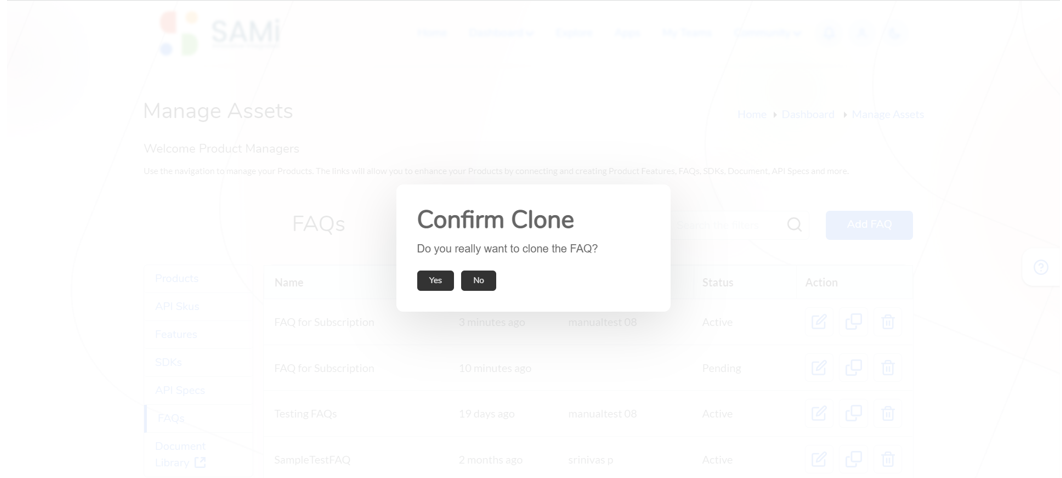
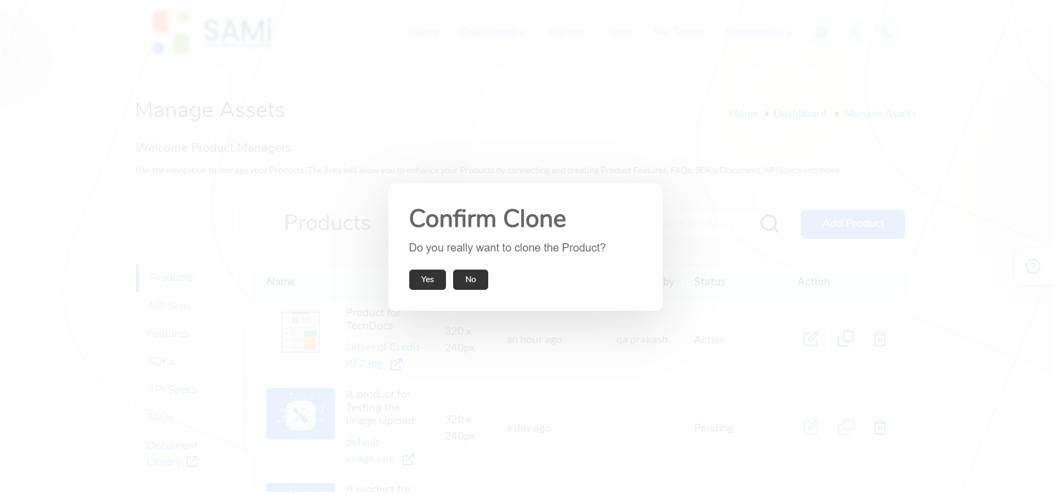
A Clone confirmation dialog box appears.
Step 6: Click Yes, to confirm. A success message appears.
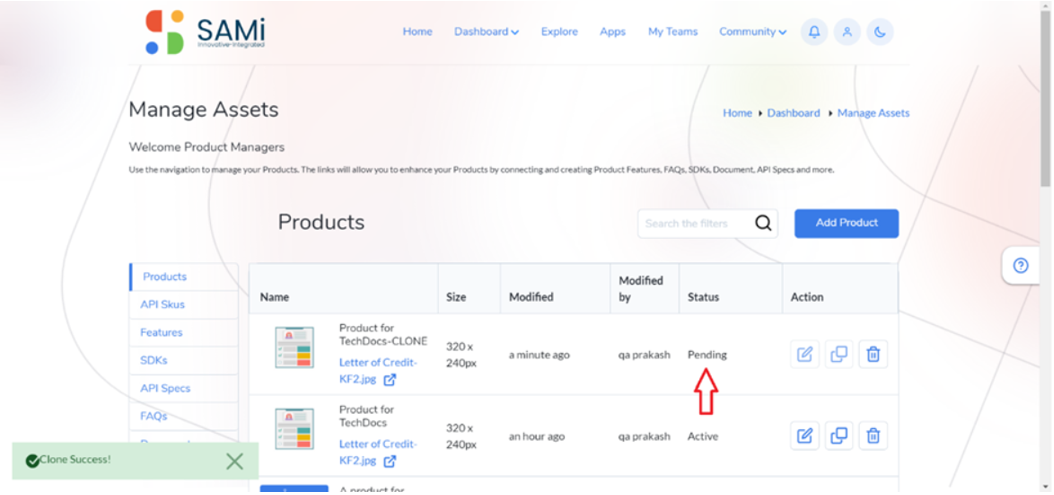
When the SAMi Admin reviews and approves the clone of the product, the product will be displayed in the product list, and it will show the status as ‘Active’.
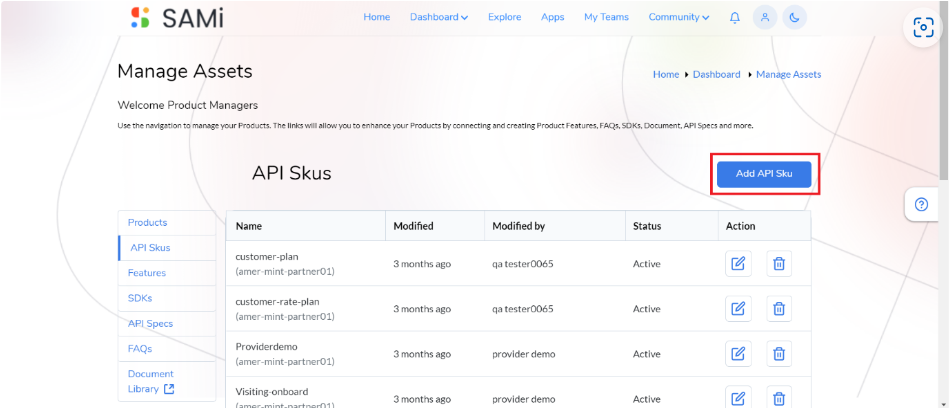
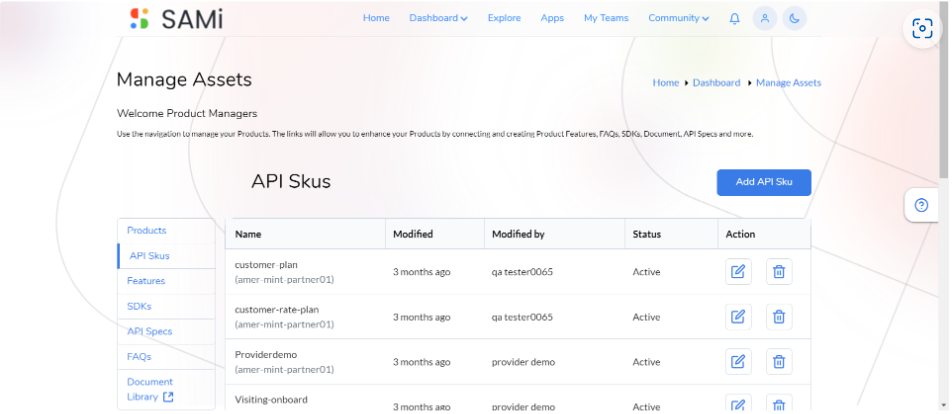
*Important Note: The process of Cloning an asset is same for Products, API Specs, API SKUs, Features, SDKs, and FAQs.
The PO will be able to view the product in Manage Assets page after login in to the SAMi Portal and the product Status will be shown as, ‘Active.’
Scenario 2 – Manage Products from Main Menu (Manage Assets) (Without Approval)
Add Product
As a Product Owner, you will also be able to manage the product from the main menu from Product Owner Dashboard.
To manage products from the main menu, do the following:
Step 1: Login as a Product Owner.
Step 2: Enter the SAMi Portal URL in the browser.
Step 3: Enter the Email and the Password in the respective fields and click Login.
You will land on to Product Owner Dashboard.
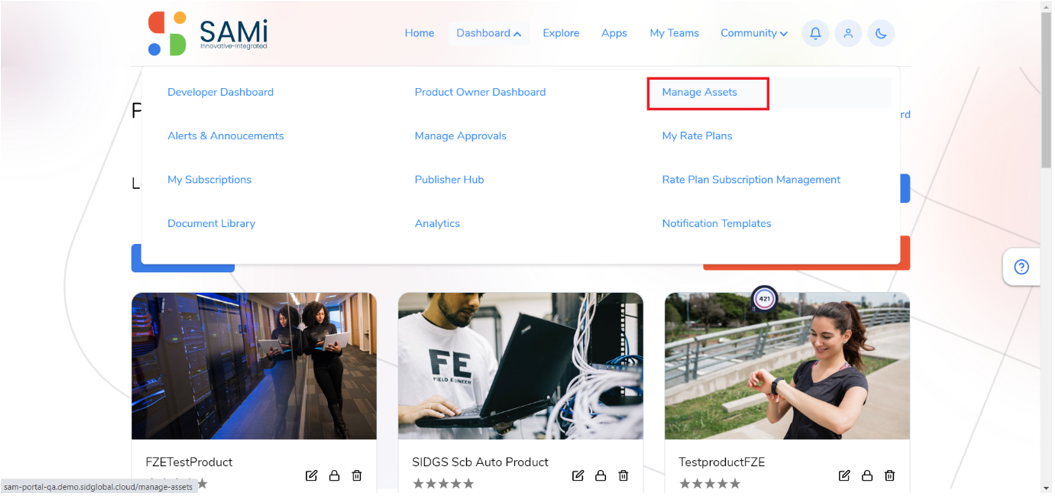
Step 4: In Product Owner Dashboard, click Dashboard and then Manage Assets.
The Manage Assets page is displayed.
In the Manage Assets page, you will be able to do the following:
- Add Product
- Edit Product
- Delete Product.
- Clone a Product
For more information on managing the products refer: Scenario 3 – Manage Products from Manage Assets button.
Again, when the PO adds/updates the product, the approval is required from SAMi Administrator, the same process of approval is performed for updating the product as well.
Workflow 7 – Manage Products from PO Dashboard
Scenario 1: To Manage SDKs from the main menu (Without Approval)
The product owner will be able to manage the SDKs from main menu and perform the following:
- Add SDKs
- Edit SDKs
- Delete SDKs
- Clone SDKs
Add SDKs
Step 1: Login as a Product Owner.
Step 2: Enter the SAMi Portal URL in the browser.
Step 3: Enter the Email and the Password in the respective fields and click Login.
You will land on to the Product Owner Dashboard.
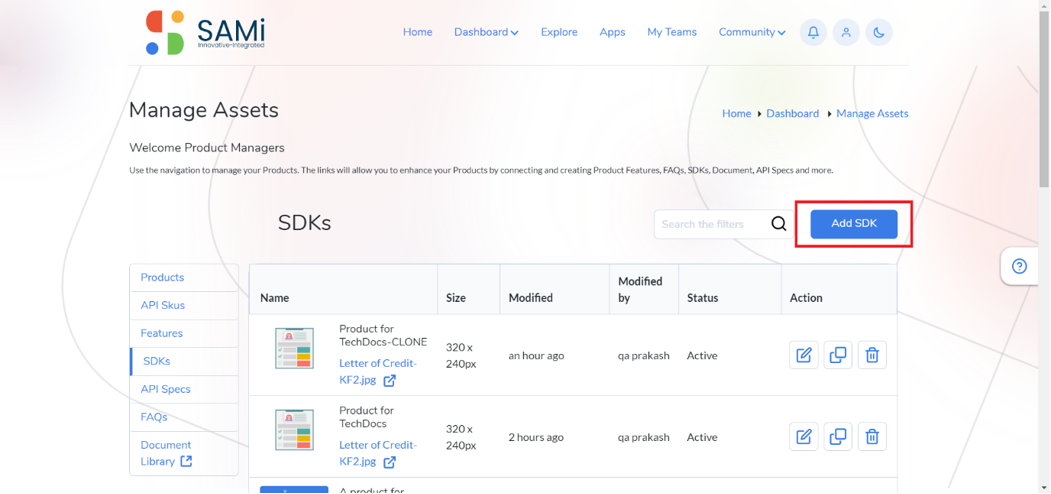
Step 4: Product Owner will be able to manage SDK’s by clicking on Dashboard > Manage Assets menu.
The Manage Assets page is displayed.
Step 5: To Manage SDK’s click on SDK’s tab on the left navigation.

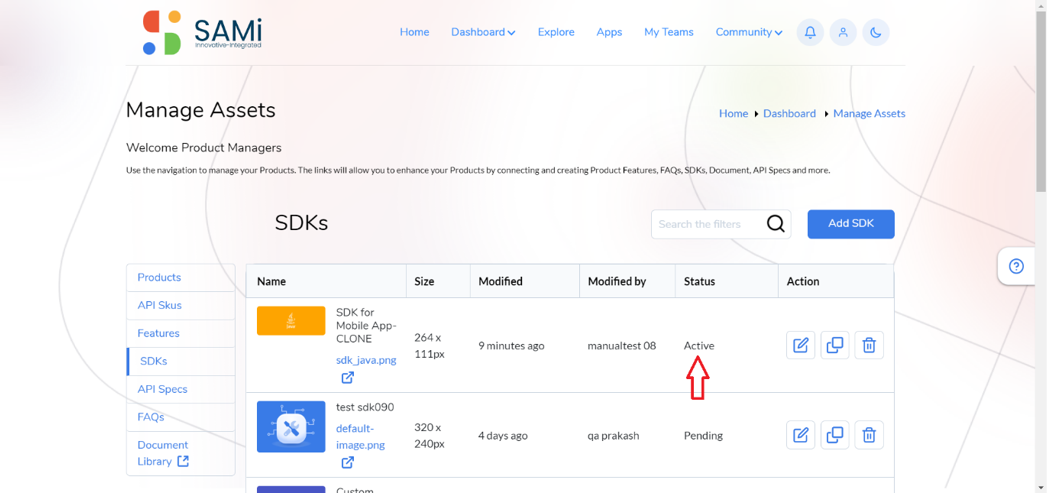
All the available SDKs are displayed in the SDK page.
Step 6: As a Product Owner, click Add SDK button.
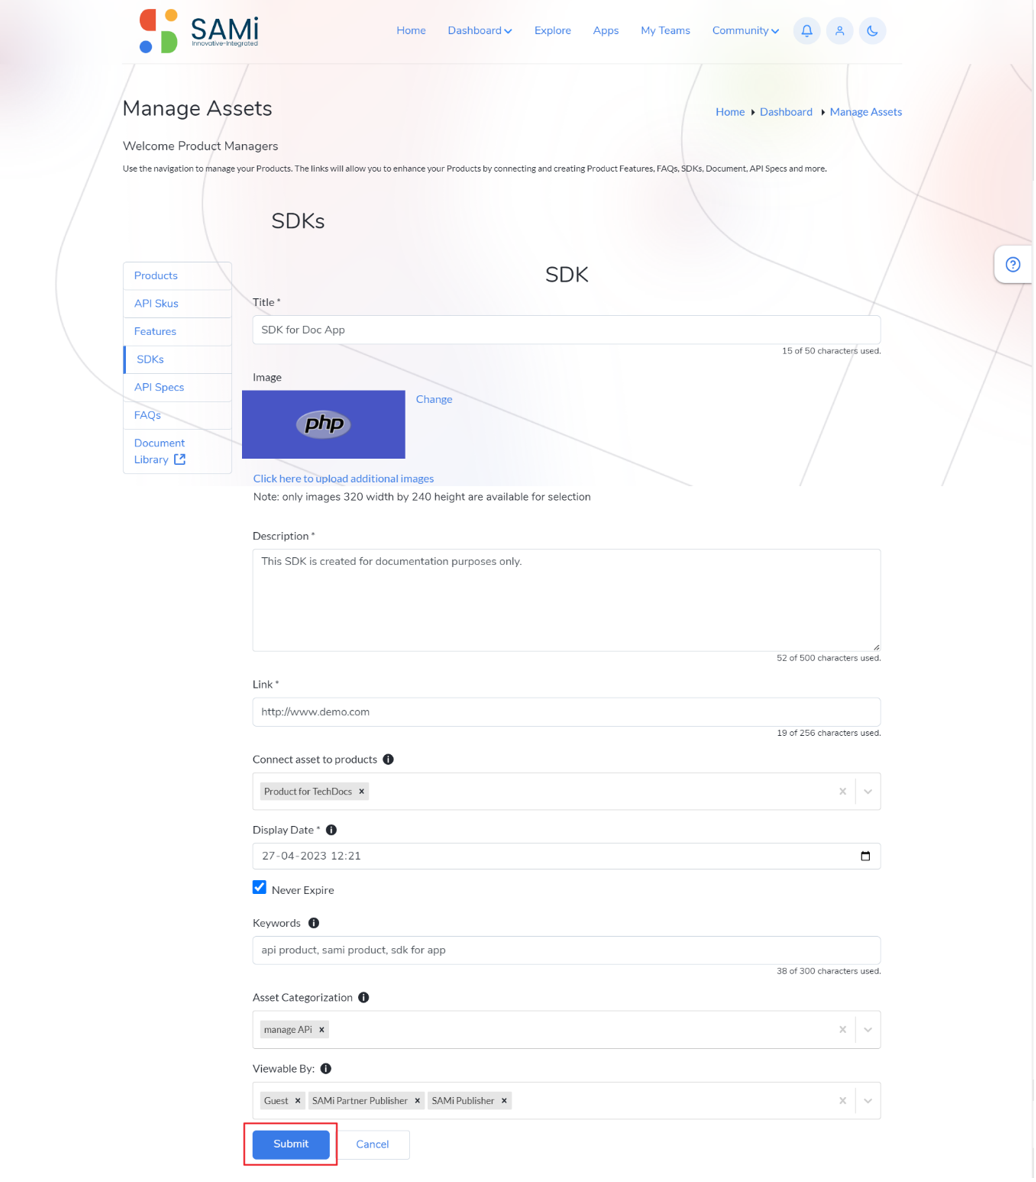
You will be able to fill the details:
Title, Image, Description, Link, Connect asset to Products, Viewable By etc.
*Note: If the SDKs Image is not selected the system will by default selects a default image for that SDK.
• Click on Submit button to Add SDK to the Product
• Product Owner will be able to see the Added SDK in the list with the status as ‘Pending’.
• Click Cancel, to cancel adding SDK.
• When the Submit button is clicked, a Success message appears. The SDK is created and listed in the SDKs page.
The PO will be able to view the SDK in Manage Assets page after login in to the SAMi Portal and the SDK Status will be shown as, ‘Active.’
Edit SDKs
To edit the SDK, do the following:
Step 1: Login as a Product Owner.
Step 2: Enter the SAMi Portal URL in the browser.
Step 3: Enter the Email and the Password in the respective fields and click Login.
You will land on to the Product Owner Dashboard.
Step 4: Click on Dashboard and then Manage Assets menu.
The Manage Assets page appears.
Step 5: Click on SDKs in the left navigation pane.
The SDKs page appears.
The SDK page is opened for the Product Owner to edit the SDK information and submit it.
Step 6: The Product Owner will be able to edit the existing SDK by clicking on the Edit icon.
Step 7: Make necessary changes to the SDK details and click Submit button.
When the Submit button is clicked, a success message appears.
The PO will be able to view the SDK in Manage Assets page after login in to the SAMi Portal and the SDK Status will be shown as, ‘Active.’
Delete SDKs
The Product owner will be able to delete any of the existing SDK from the available SDKs in the list.
To delete the SDK, do the following:
Step 1: Login as a Product Owner.
Step 2: Enter the SAMi Portal URL in the browser.
Step 3: Enter the Email and the Password in the respective fields and click Login.
You will land on to the Product Owner Dashboard.
Step 4: Click on Dashboard and then Manage Assets menu.
The Manage Assets page appears.
Step 5: Click on SDKs in the left navigation pane.
The SDKs page appears.
Step 6: Click on Delete icon.
*Note: When the SDK is in the Pending status, the PO will not be able to delete it. Unless the status is changed to Active.
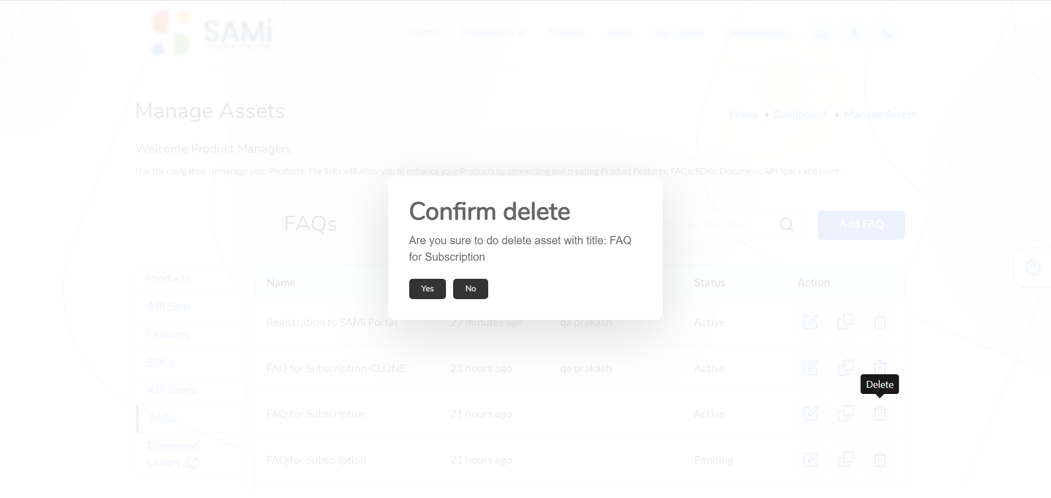
A Confirm delete message appears.
Step 7: Click on Yes button then the selected SDK is deleted successfully.
Step 8: Click No to cancel deletion.
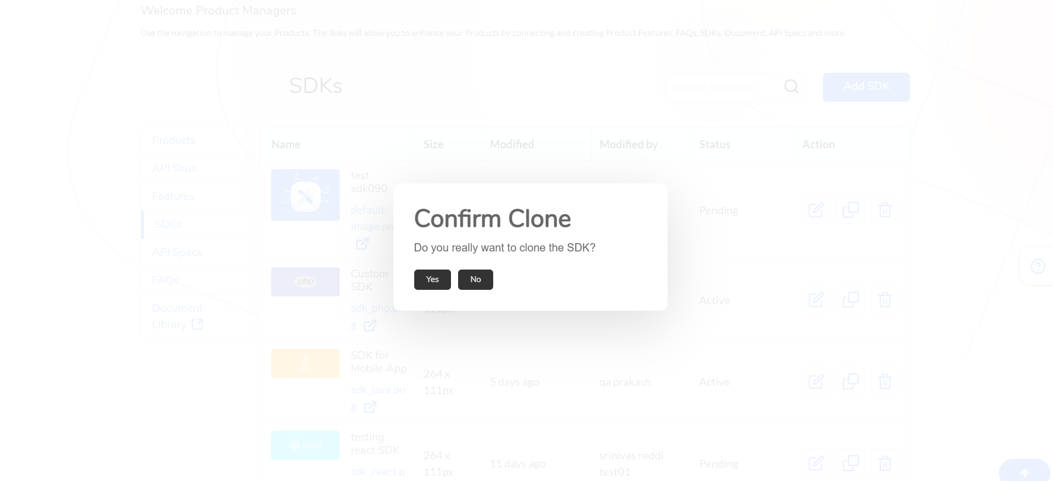
Clone SDKs
To clone the SDK, do the following:
Step 1: Login as a Product Owner.
Step 2: Enter the SAMi Portal URL in the browser.
Step 3: Enter the Email and the Password in the respective fields and click Login.
You will land on to the Product Owner Dashboard.
Step 4: Click on Dashboard and then Manage Assets.

The Manage Assets page appears.
The SDKs page appears.
Step 5: In the SDKs page, select an SDK to clone and click on Clone icon.
A Clone confirmation page appears.
Step 6: Click Yes to Clone.
A Clone success message appears.
The Clone will be displayed in ‘Active’ Status.
When the SDK Cloned it is shown in the SDKs list in ‘Active’ Status.
*Important Note: The process of Cloning an asset is same for Products, API Specs, API SKUs, Features, SDKs, and FAQs. It clones only the Products, API Specs, API SKUs, Features, SDKs, and FAQs details not the Asserts, Categories attached to it.
Scenario 2 – To manage SDKs from Product Owner Dashboard Manage button (Without Approval)
Scenario 2 – To manage SDKs from Product Owner Dashboard Manage Assets button (Without Approval)
Add SDK
To add an SDK from Manage button, do the following:
Step 1: Login as a Product Owner.
Step 2: Enter the SAMi Portal URL in the browser.
Step 3: Enter the Email and the Password in the respective fields and click Login.
Once you log in with PO credentials, by default you will land on to the Product Owner Dashboard.
Step 4: Product Owner will be able to manage SDK’s by clicking on Manage Assets button, it redirects you to Manage Assets page.
The Manage Assets page appears.
Step 6: To Manage SDK’s click on SDK’s tab on the left navigation.
All the available SDKs are displayed in the SDK page.
Step 7: As a Product Owner, clicks Add SDK button.
You will be able to fill the details:
Title, Image, Description, Link, Connect asset to Products, Viewable By etc.
*Note: If the SDKs Image is not selected the system will by default selects a default image for that particular SDK.
- Click on Submit button to Add SDK to the Product
- Product Owner will be able to see the Added SDK in the list with the status as ‘Active’
- Click Cancel, to cancel adding SDK
- When the Submit button is clicked, a Success message appears. An email notification is sent to the Product Owner.
Edit SDK
To edit an SDK from Manage button, do the following:
Step 1: Login as a Product Owner.
Step 2: Enter the SAMi Portal URL in the browser.
Step 3: Enter the Email and the Password in the respective fields and click Login.
Once you log in with PO credentials, by default you will land to the Product Owner Dashboard.
Step 4: Product Owner will be able to manage SDK’s by clicking on Manage Assets button, it redirects you to Manage Assets page.
Step 5: Click on SDKs tab in the left navigation pane.
The SDKs page appears.
The SDK page is opened for the Product Owner to edit the SDK information and submit it.
Step 6: The Product Owner will be able to edit the existing SDK by clicking on the Edit icon.
Step 7: Make necessary changes to the SDK details and click Submit button.
When the Submit button is clicked, a success message appears. The selected SDK is updated and viewed in the SDK list in the ‘Active’ Status.
After the SAMi Administrator approves the SDK, the PO will be able to view the SDK in Manage Assets page after login in to the SAMi Portal and the SDK Status will be shown as, ‘Active.’
Delete SDK
To delete an SDK from Manage button, do the following:
Step 1: Login as a Product Owner.
Step 2: Enter the SAMi Portal URL in the browser.
Step 3: Enter the Email and the Password in the respective fields and click Login.
By default, you will land on to Product Owner Dashboard.
Step 4: Product Owner will be able to manage SDK’s by clicking on Manage Assets button, it redirects you to Manage Assets page.
Step 5: Click on SDKs in the left navigation pane.
The SDKs page appears.
Step 6: Click on Delete icon.
*Note: When the SDK is in the Pending status, the PO will not be able to delete it. Unless the status is changed to Active.
A Confirm delete message appears.
Step 7: Click on Yes button then the selected SDK is deleted successfully.
Step 8: Click No to cancel deletion.
Clone SDKs
To clone the SDK, do the following:
Step 1: Login as a Product Owner.
Step 2: Enter the SAMi Portal URL in the browser.
Step 3: Enter the Email and the Password in the respective fields and click Login.
You will land on to the Product Owner Dashboard.
The Manage Assets page appears.
The SDKs page appears.
Step 4: In the SDKs page, select an SDK to clone and click on Clone icon.
A Clone confirmation page appears.
Step 5: Click Yes to Clone.
A Clone success message appears.
The Clone will be displayed in ‘Active’ Status.
When the SDK Cloned it is shown in the SDKs list in ‘Active’ Status.
*Important Notes:
- The process of Cloning an asset is same for Products, API Specs, API SKUs, Features, SDKs, and FAQs. It clones only the Products, API Specs, API SKUs, Features, SDKs, and FAQs details not the Asserts, Categories attached to it.
- Clone option will clone only the details of the SDK. It will not clone the attached Assets and Category of the SDK.
Workflow 8 – Manage FAQ’s
Scenario 1 – To Manage FAQs from the main menu (Without Approvals)
As a product owner you will be able to manage FAQs from the main menu. This involves the following operations:
- Add FAQs
- Edit FAQs
- Delete FAQs
- Clone FAQs
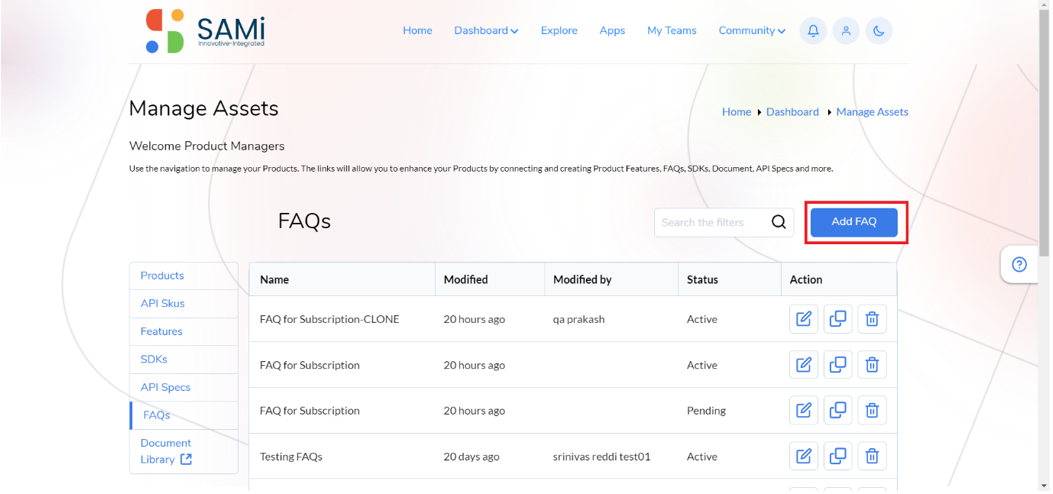
Add FAQs
To add an FAQ from main menu, do the following:
Step 1: Login as a Product Owner.
Step 2: Enter the SAMi Portal URL in the browser.
Step 3: Enter the Email and the Password in the respective fields and click Login.
You will land on to Product Owner Dashboard.
Step 4: Product Owner will be able to Manage FAQ’s from Main Menu by clicking Dashboard > Manage Assets.
The Manage Assets page appears.
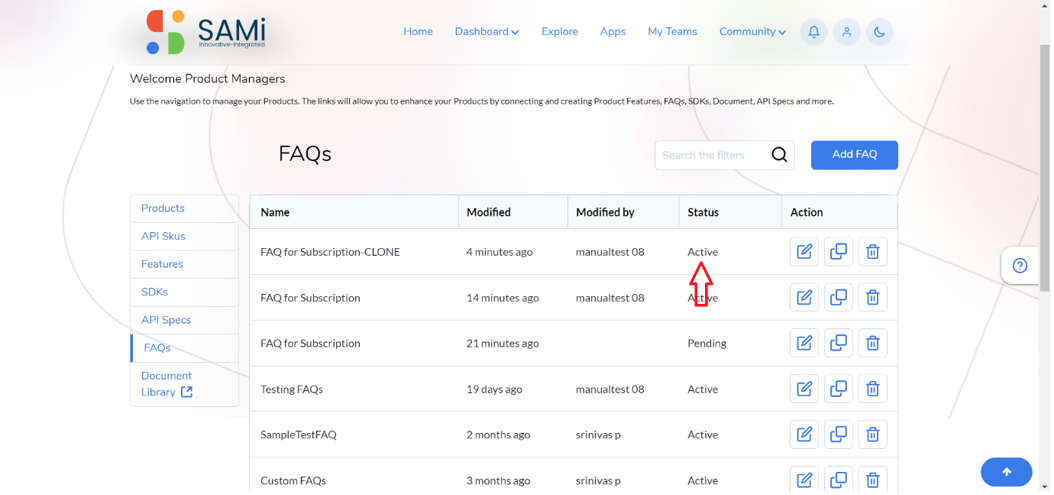
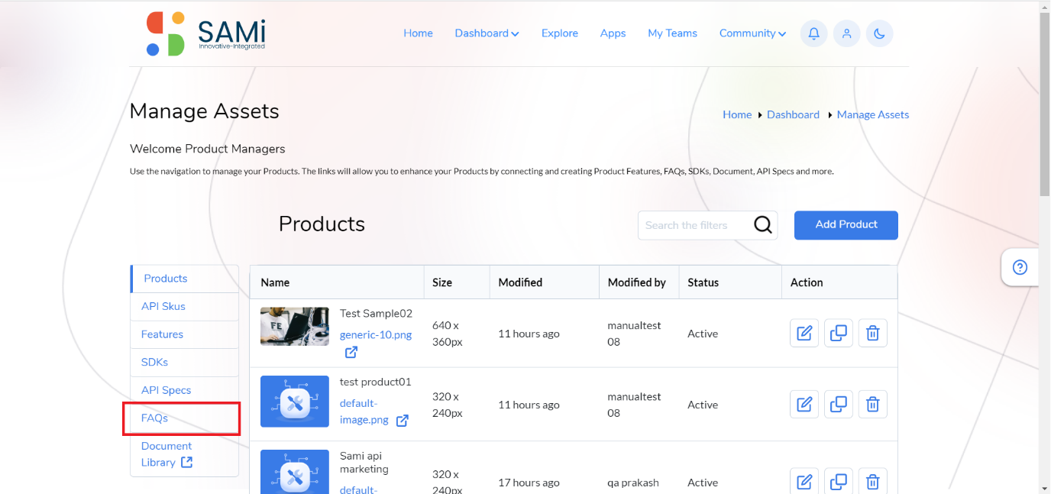
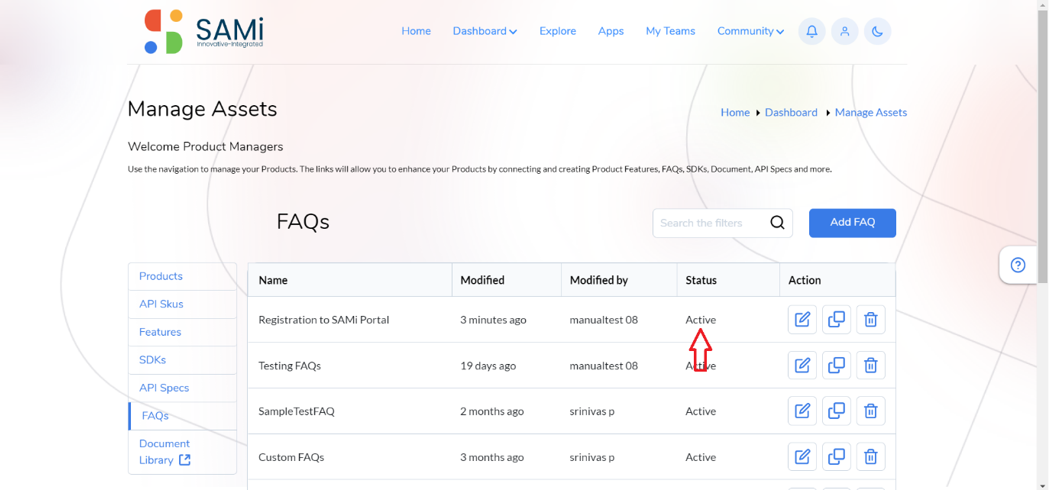
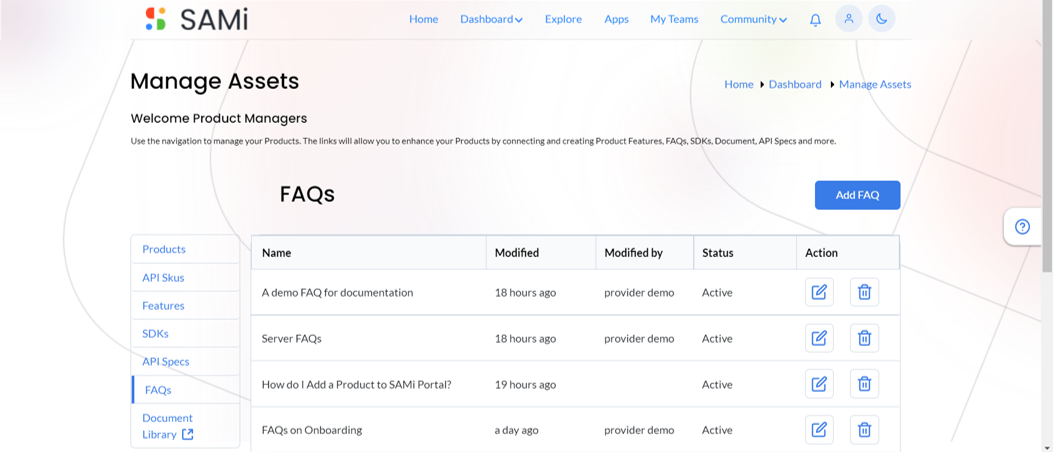
Step 5: Product Owner will be able to manage FAQ’s by clicking on FAQ’s tab on the left navigation pane.
The Product Owner will be able to view all the FAQs in the Manage Assets page.
Step 6: The Product Owner will be able to Add FAQ by clicking Add FAQ Button.
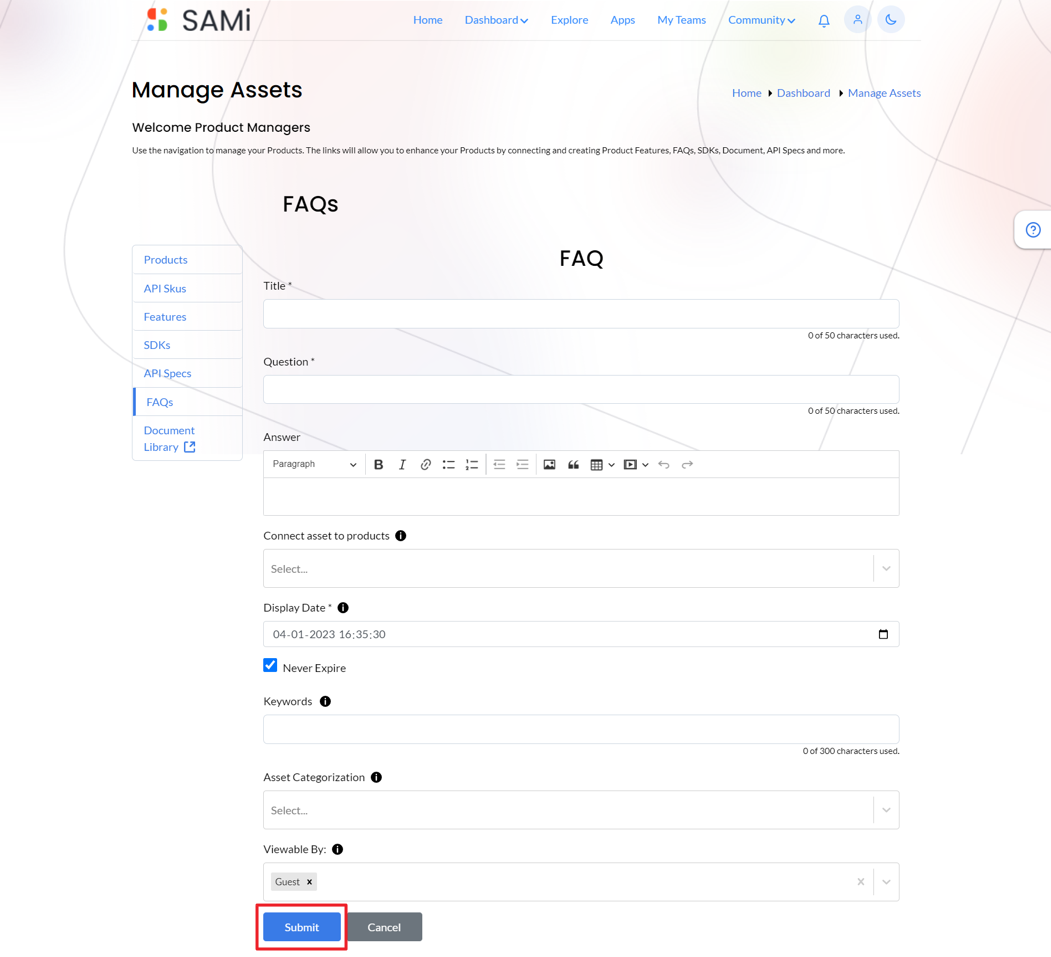
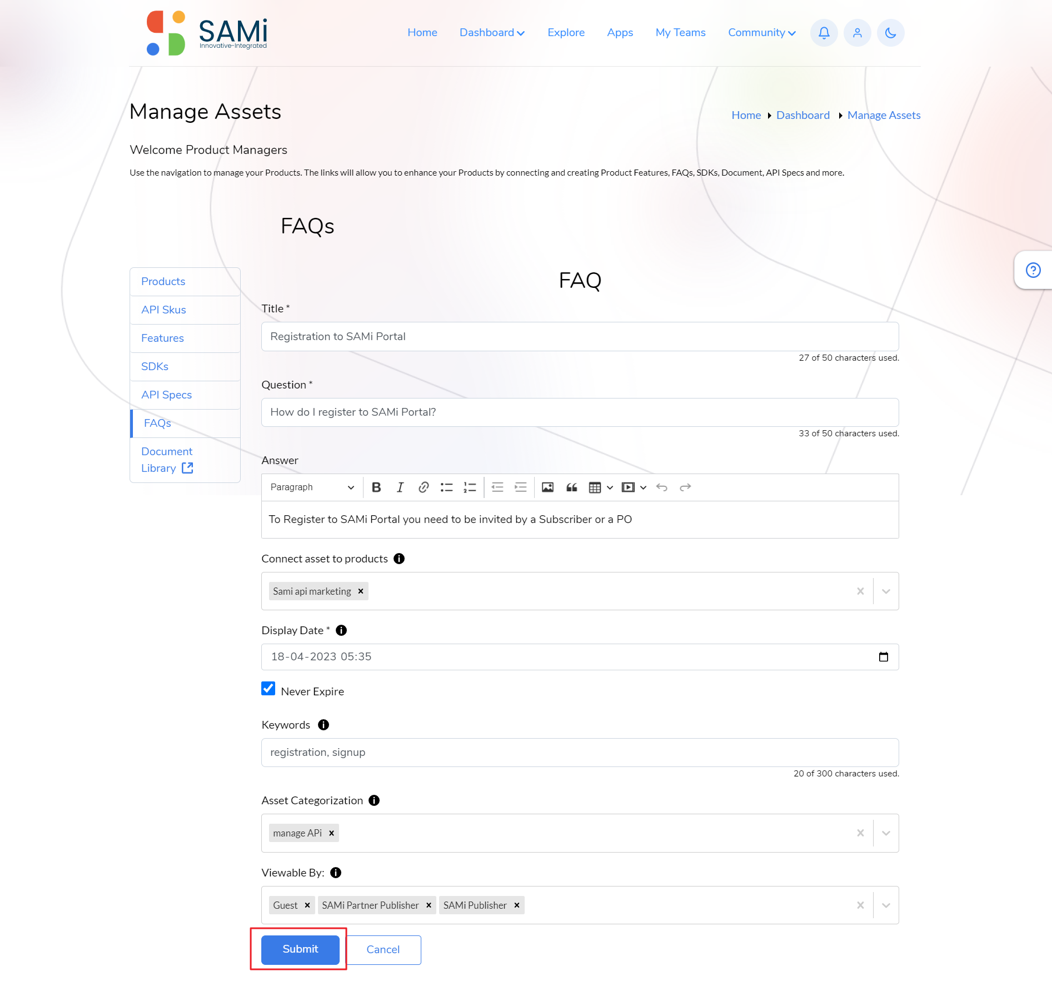
Step 7: In the FAQs page, the Product Owner is required to fill in the details:
- Title
- Question
- Answer
- Connect Assert to Products,
- Viewable By
Step 8: Click on Submit button to add an FAQ.
Step 9: Click Cancel button, to cancel adding an FAQ.
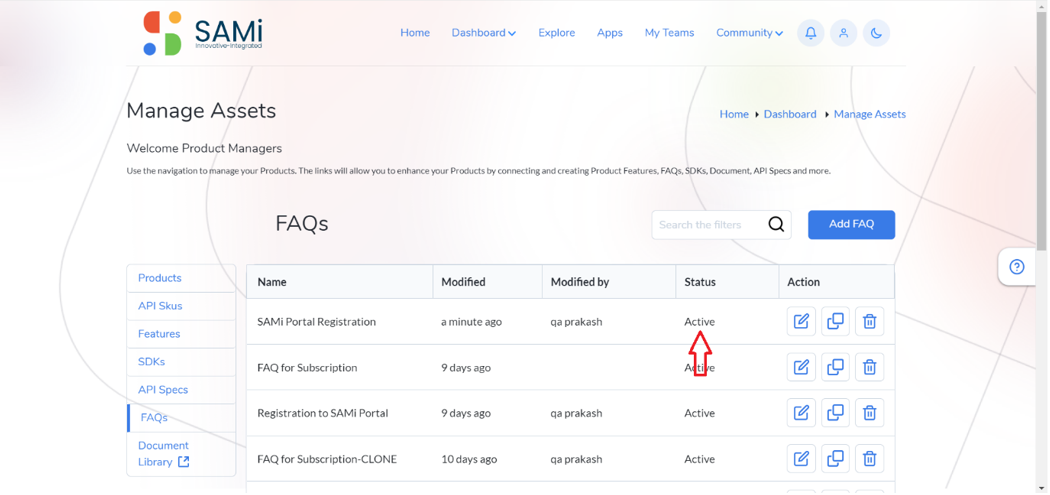
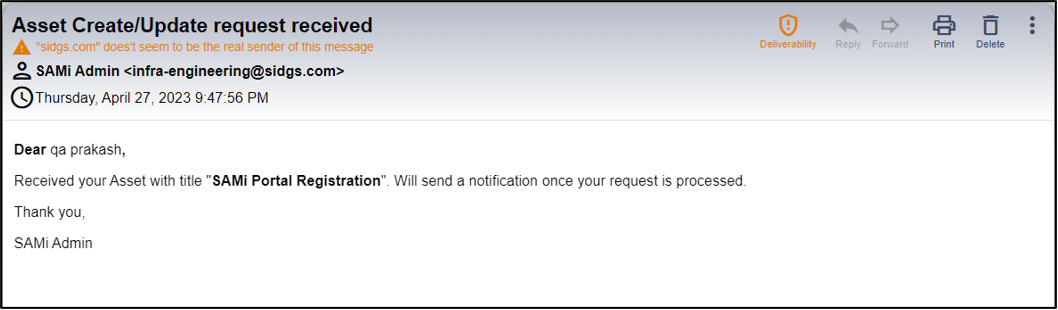
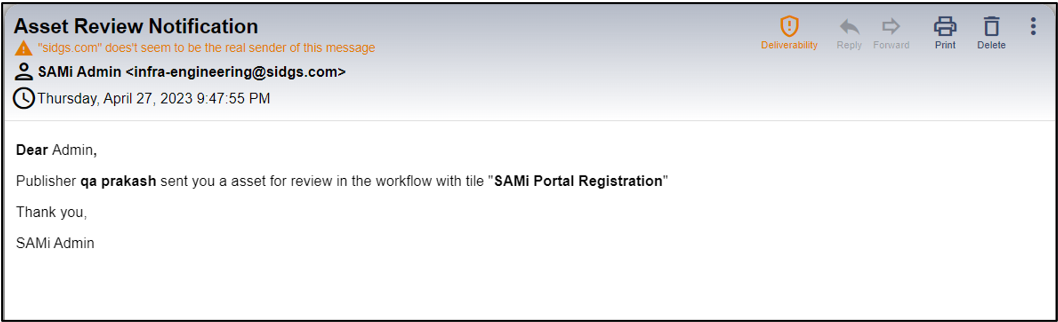
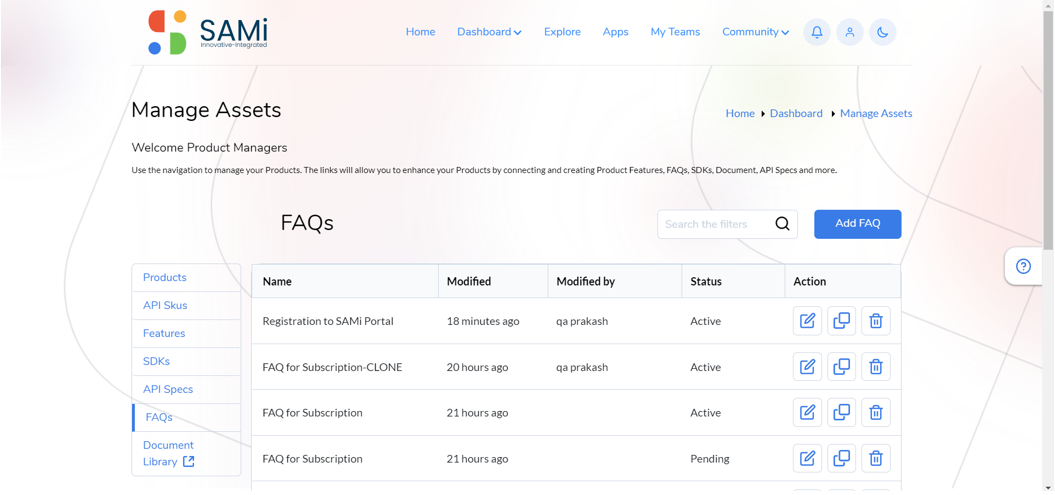
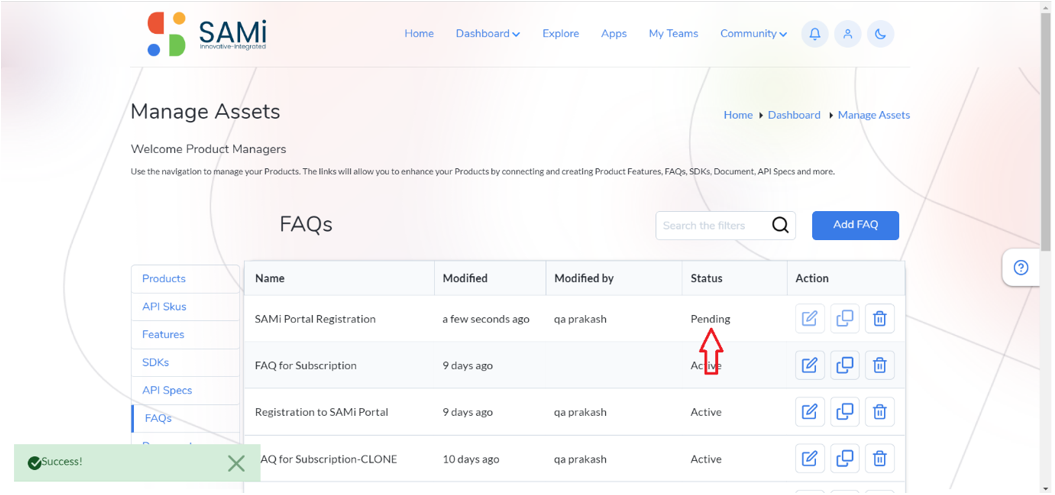
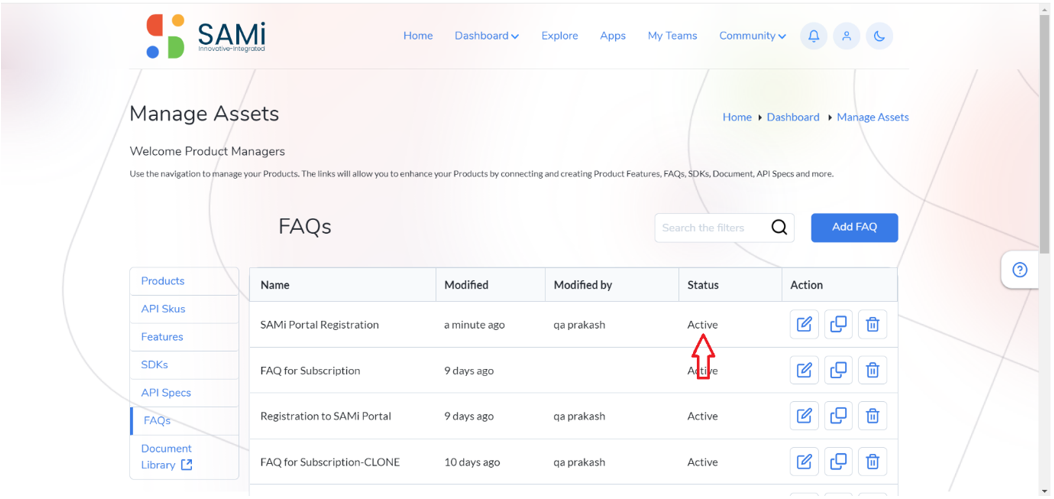
Once the Submit button is clicked. The FAQ will be listed in FAQs list in a ‘Active’ Status. An email message is sent to the SAMi Admin.
Edit FAQs
To edit an existing FAQ from the Manage Assets page, do the following:
Step 1: Login as a Product Owner.
Step 2: Enter the SAMi Portal URL in the browser.
Step 3: Enter the Email and the Password in the respective fields and click Login.
You will land on to Product Owner Dashboard.
Step 4: From Product Owner Dashboard, click Dashboard > Manage Assets.
The Manage Assets page is displayed.
Step 5: Click FAQs tab in the left navigation pane. The FAQs page will list all the FAQs.
The FAQs page appears.
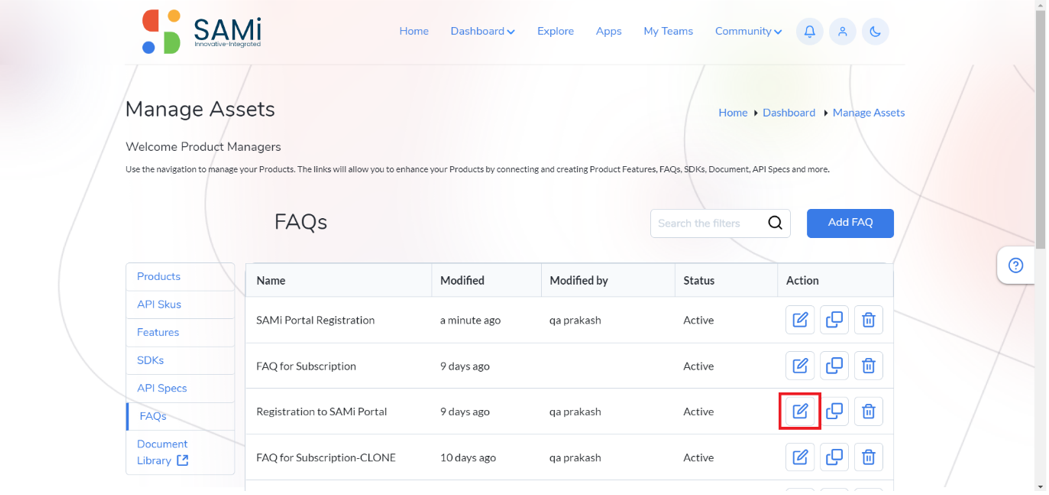
Step 6: The Product Owner will be able to edit the existing FAQ upon clicking on the Edit icon in the Actions column.
The FAQ page is displayed.
Step 7: As a Product Owner, you will be able to make necessary changes to the FAQ information.
Step 8: Once all changes are done, click Submit button.
The PO will be able to view the edited FAQ in the FAQs list with the Status as ‘Active’
Delete FAQs
To delete an existing FAQ from the Manage Assets page, do the following:
Step 1: Login as a Product Owner.
Step 2: Enter the SAMi Portal URL in the browser.
You will land on to Product Owner Dashboard.
Step 3: From Product Owner Dashboard, click Dashboard > Manage Assets.
The Manage Assets page is displayed.
Step 5: Product Owner will be able to edit FAQs by clicking on FAQs tab on the left navigation pane.
The Product Owner will be able to view all the FAQs in the Manage Assets page.
Step 5: The Product owner will be able to delete the Existing FAQ upon clicking on the Delete icon in the Action column.
A confirmation message appears.
Step 6: Click on Yes button, and then the selected FAQ will be deleted successfully.
Step 7: Click No to cancel deletion.
Upon deleting, in the FAQs page, the deleted FAQ you will no longer viewed in the list of FAQs.
Clone FAQs
To clone an existing FAQ from the Manage Assets page, do the following:
Step 1: Login as a Product Owner.
Step 2: Enter the SAMi Portal URL in the browser.
You will land on to Product Owner Dashboard.
Step 3: From Product Owner Dashboard, click Dashboard > Manage Assets.
The Manage Assets page is displayed.
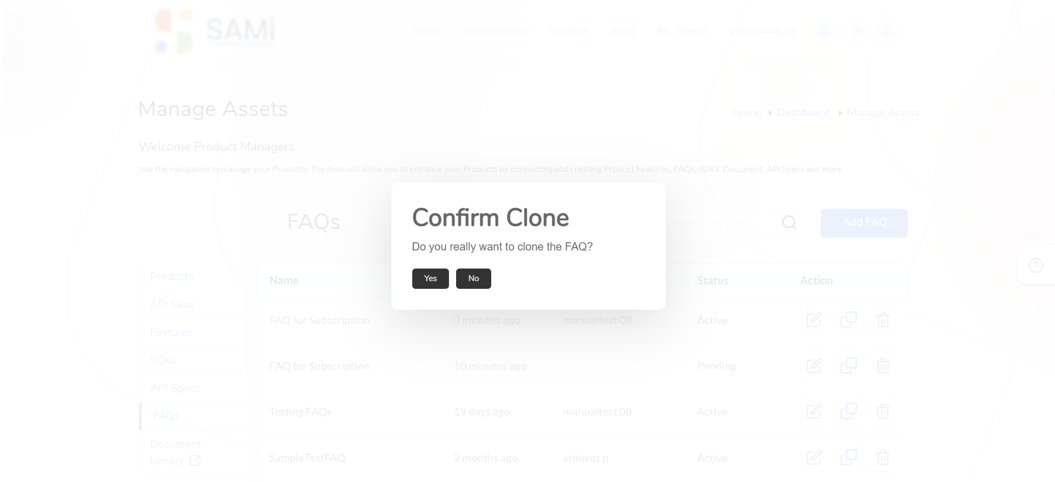
Step 4: In the Manage Assets page, select an FAQ to clone, click on Clone icon.
A Clone confirmation dialog box appears.
Step 5: Click Yes to clone.
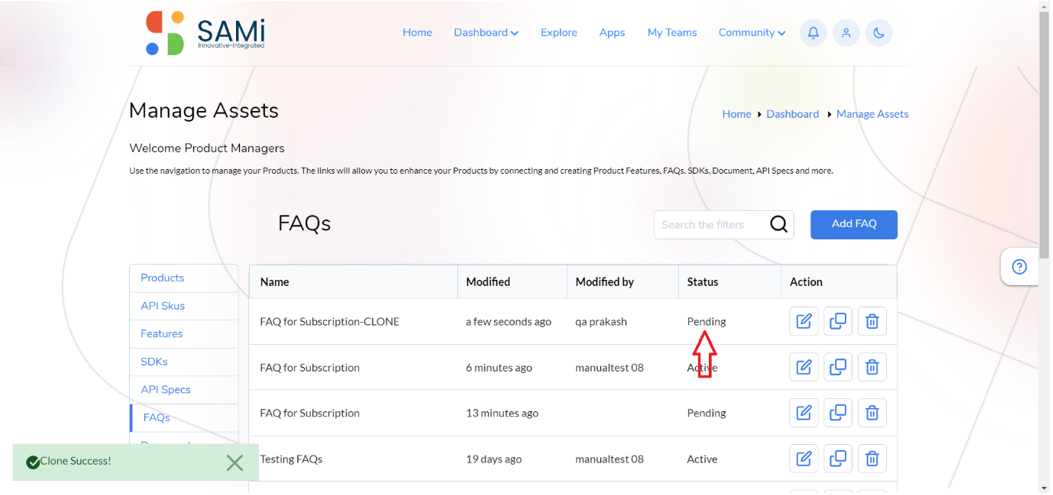
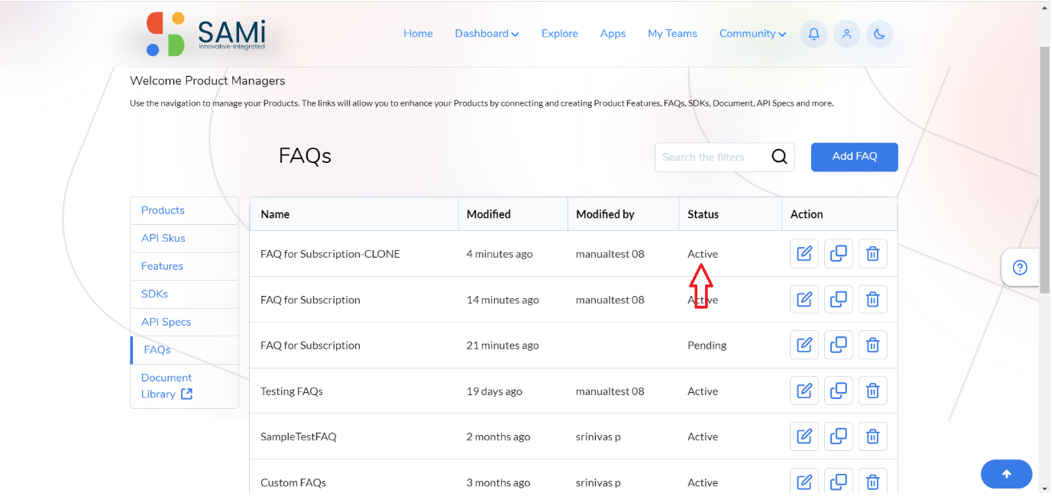
A success message appears. The FAQ is shown in the FAQs page in the ‘Active’ status.
Scenario 2 – To Manage FAQs from the PO Dashboard – Manage Assets Button (Without Approval)
As a product owner, you will be able to manage the FAQs from the Product Owner Dashboard. This involved the following operations:
- Add FAQs
- Edit FAQs
- Delete FAQs
- Clone FAQs
Add FAQs
To add an FAQ from main menu, do the following:
Step 1: Login as a Product Owner.
Step 2: Enter the SAMi Portal URL in the browser.
Step 3: Enter the Email and the Password in the respective fields and click Login.
You will land on to Product Owner Dashboard.
Step 4: As a Product Owner you will be able to Manage FAQ’s by clicking Manage Assets button, its redirects you to Manage Assets page.
The Manage Assets page is displayed.
Step 5: Product Owner will be able to manage FAQ’s by clicking on FAQ’s tab on the left navigation pane.
The Product Owner will be able to view all the FAQs in the Manage Assets page.
Step 6: The Product Owner will be able to Add FAQ by clicking Add FAQ button.
Step 7: In the FAQs page, the Product Owner is required to fill in the details:
- Title
- Question
- Answer
- Connect Assert to Products,
- Viewable By
Step 8: Click on Submit button to add an FAQ.
Step 9: Click Cancel button, to cancel adding an FAQ.
Once the Submit button is clicked. The FAQ will be listed in FAQs list in a ‘Active’ Status. An email message is sent to the SAMi Admin.
The FAQ will appear in the FAQs list in ‘Active’ Status.
Edit FAQs
To edit an existing FAQ from the Manage Assets button, do the following:
Step 1: Login as a Product Owner.
Step 2: Enter the SAMi Portal URL in the browser.
Step 3: Enter the Email and the Password in the respective fields and click Login.
You will land on to Product Owner Dashboard.
Step 4: As a Product Owner you will be able to Manage FAQ’s by clicking Manage Assets button, its redirects you to Manage Assets page.
The Manage Assets page is displayed.
Step 5: Click FAQs tab in the left navigation pane. The FAQs page will list all the FAQs.
The FAQs page appears.
Step 6: The Product Owner will be able to edit the existing FAQ upon clicking on the Edit icon in the Actions column.
The FAQs page is displayed.
Step 7: As a Product Owner, you will be able to make necessary changes to the FAQ information.
Step 8: Once all changes are done, click Submit button.
Once the Submit button is clicked. The FAQ will be listed FAQs list in a ‘Active’ Status.
Delete FAQs
To delete an existing FAQ from the Manage Assets button, do the following:
Step 1: Login as a Product Owner.
Step 2: Enter the SAMi Portal URL in the browser.
Step 3: Enter the Email and the Password in the respective fields and click Login.
You will land on to Product Owner Dashboard.
Step 4: As a Product Owner you will be able to Manage FAQ’s by clicking Manage Assets button, its redirects you to Manage Assets page.
The Manage Assets page is displayed.
Step 5: Product Owner will be able to edit FAQ’s by clicking on FAQ’s tab on the left navigation pane.
The Product Owner will be able to view all the FAQs in the Manage Assets page.
Step 5: The Product owner will be able to delete the Existing FAQ upon clicking on the Delete icon in the Action column.
A confirmation message appears.
Step 6: Click on Yes button, and then the selected FAQ will be deleted successfully.
Step 7: Click No to cancel deletion.
Upon deleting, in the FAQs page, the deleted FAQ you will no longer be viewed in the list of FAQs.
Clone FAQs
To clone an existing FAQ from the Manage Assets button, do the following:
Step 1: Login as a Product Owner.
Step 2: Enter the SAMi Portal URL in the browser.
Step 3: Enter the Email and the Password in the respective fields and click Login.
You will land on to Product Owner Dashboard.
Step 4: As a Product Owner you will be able to Manage FAQ’s by clicking Manage Assets button, its redirects you to Manage Assets page.
The Manage Assets page is displayed.
Step 4: In the Manage Assets page, select an FAQ to clone, click on Clone icon.
A Clone confirmation dialog box appears.
Step 5: Click Yes to clone.
A success message appears. The FAQ is shown in the FAQs page in the ‘Active’ status.
The Cloned FAQ will be displayed in the FAQs list with the Status as ‘Active’.
Workflow 9 – Manage Product Features
Scenario 1 – Manage Product Features from Main Menu (Without Approval)
Add Features
To add a Feature to a product, follow the procedure:
Step 1: Login as a Product Owner.
Step 2: Enter the SAMi Portal URL in the browser.
You will land on to the Product Owner Dashboard.
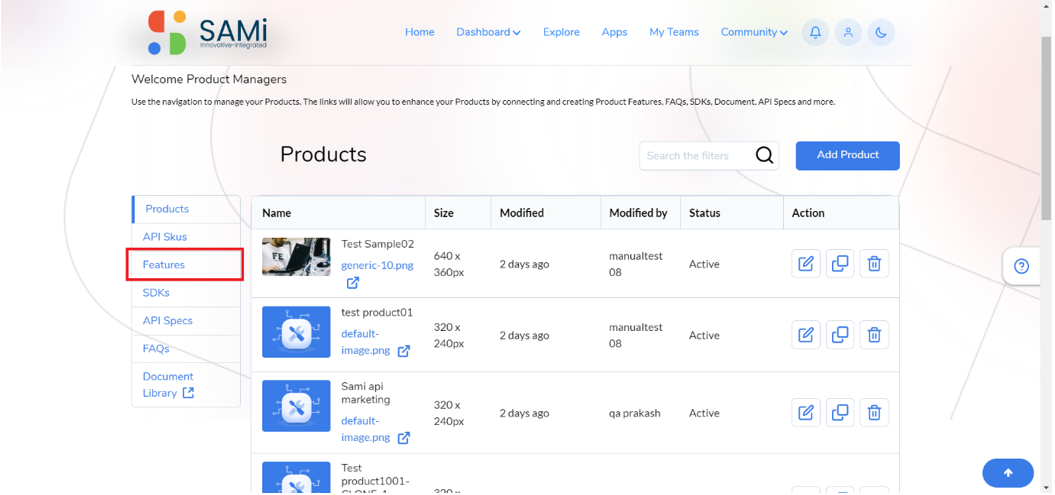
Step 3: The Product Owner will be able to Manage Assets from Main Menu by clicking on Dashboard and then Manage Assets.
The Manage Assets page appears.
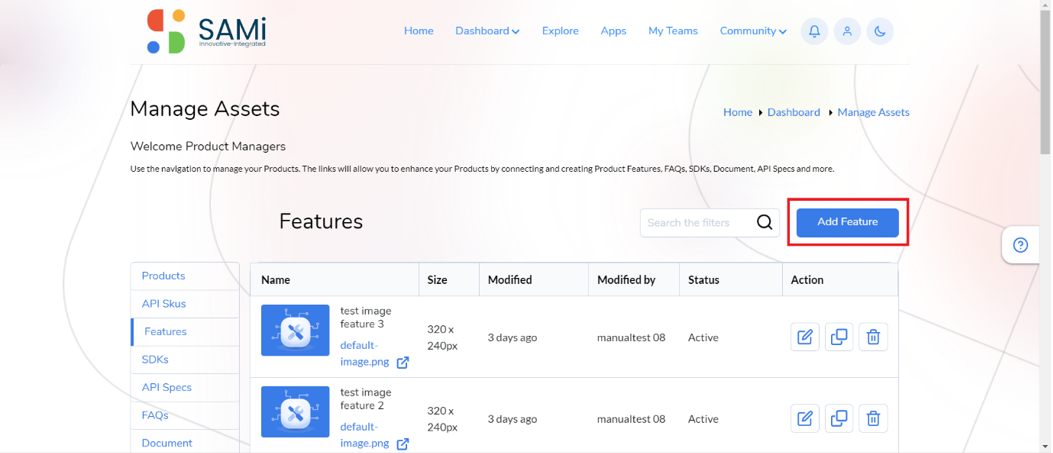
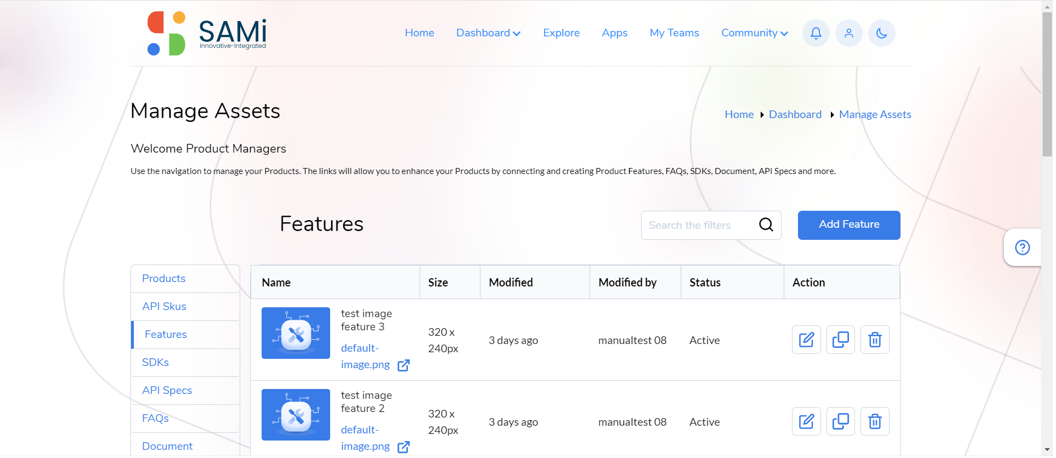
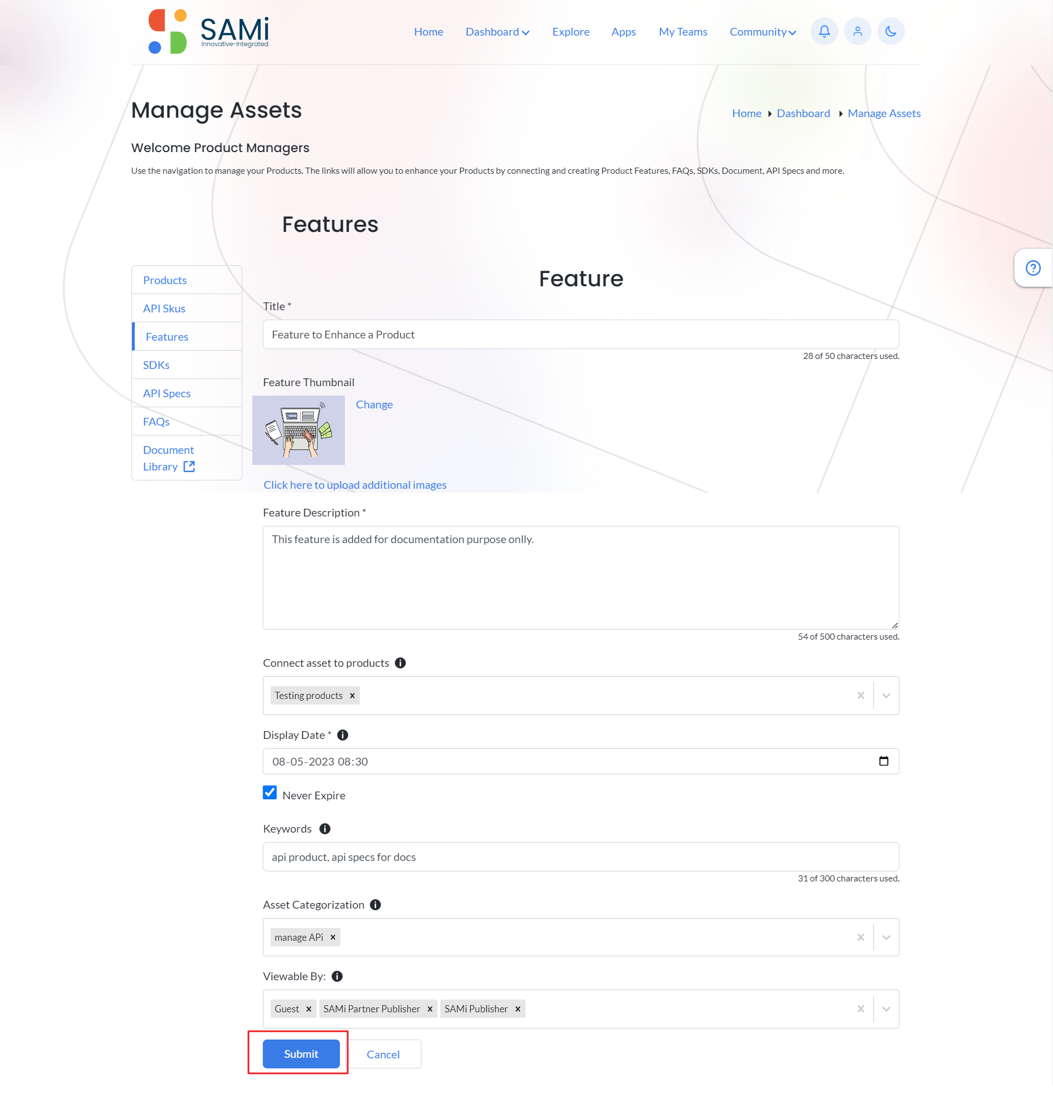
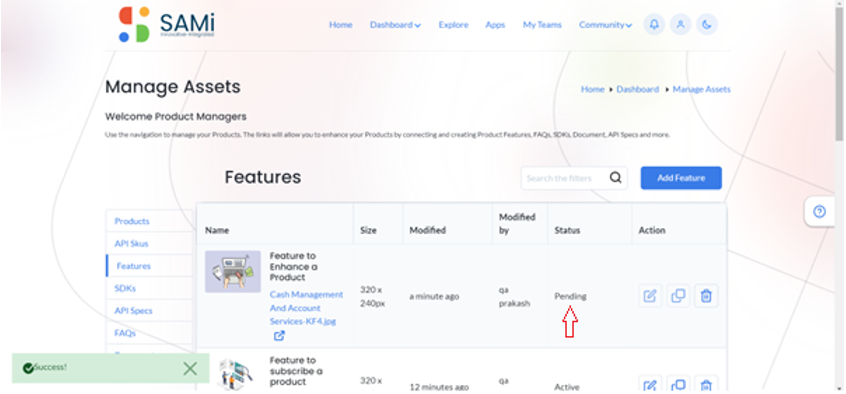
Step: 4 The Product Owner will be able to Manage Product Features by clicking on Features tab on the left navigation pane.
The Features page appears.
Step 5: The Product Owner will be able to Add Product Features by Clicking on Add Features button.
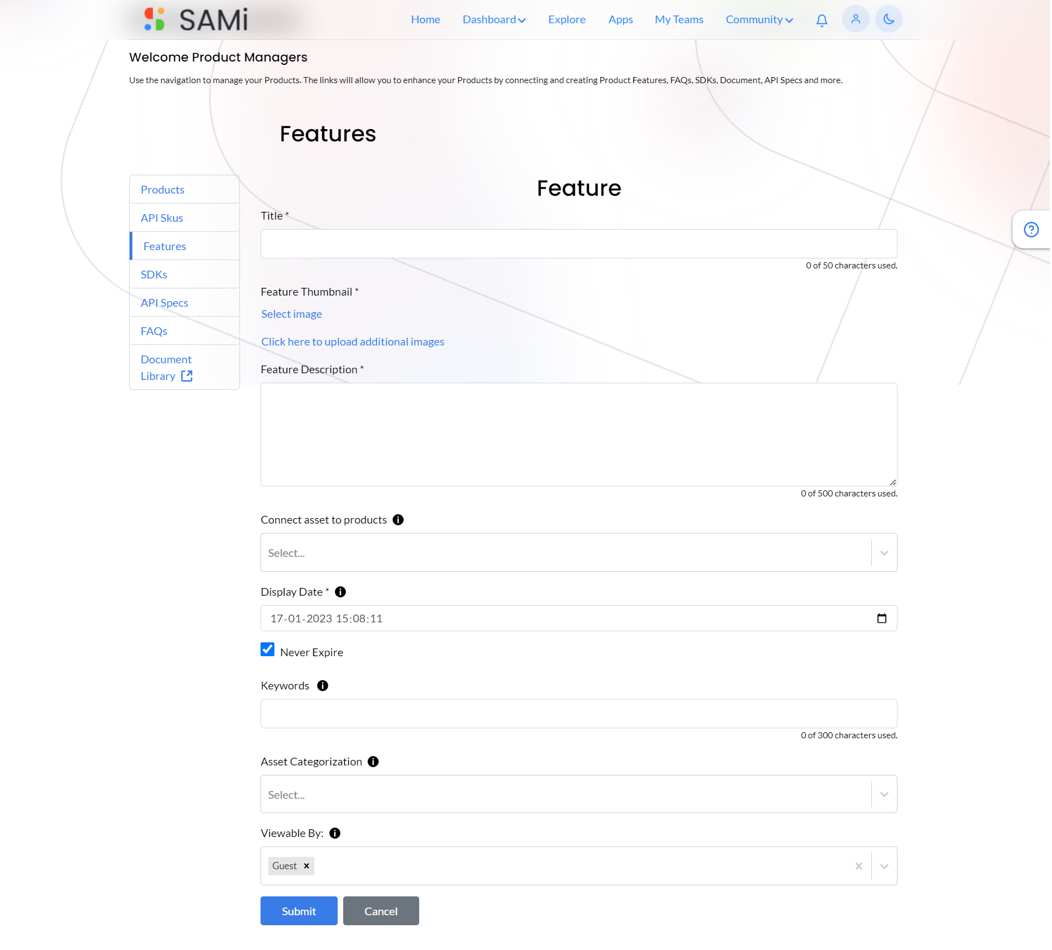
The Feature page appear to fill in all the required details.
Step 6: The Product Owner will be able to fill all the Details – Title, feature Thumbnail, Select Image, feature Description, Connect Assert to products, Viewable By.
*Note: If the Feature Image is not selected the system will by default selects a default image for that particular Feature.
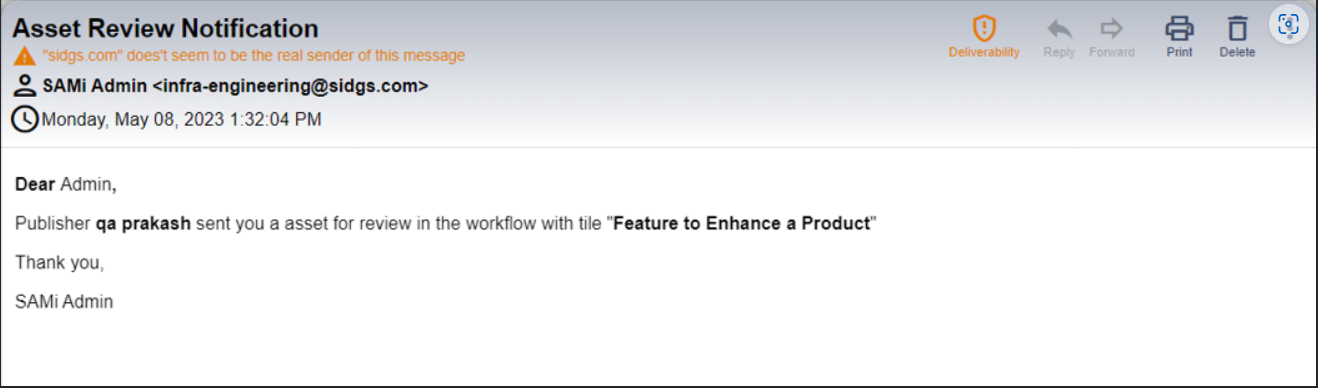
Step 7: Clicks on Submit button to Add product Feature.
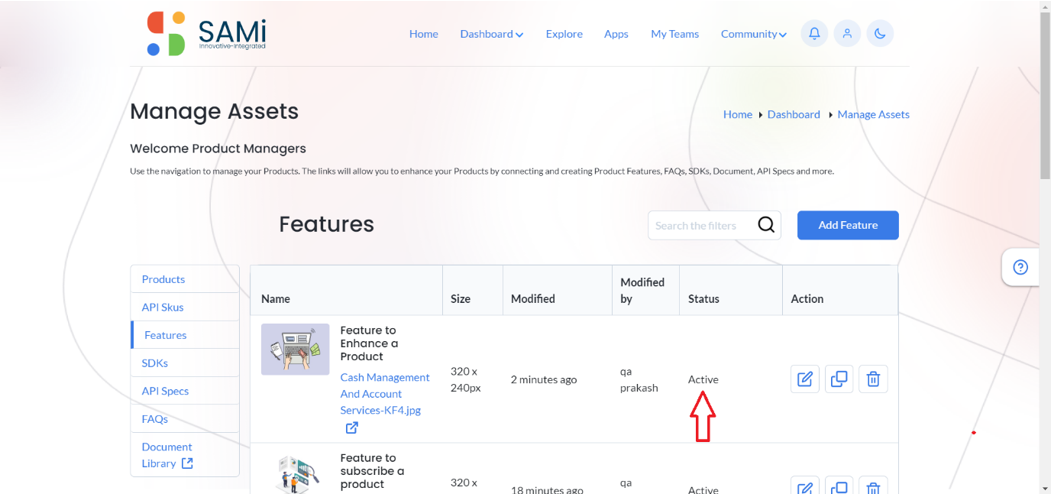
A success message appears. The Product Owner will be able to view the Added Product Features in the list in ‘Active’ Status.
Edit Product Feature
To edit the product features, do the following:
Step 1: Login as a Product Owner.
Step 2: Enter the SAMi Portal URL in the browser.
You will land on to the Product Owner Dashboard.
Step 3: The Product Owner will be able to Manage Assets from Main Menu by clicking on Dashboard and then Manage Assets.
Step 4: The Product Owner can be able to edit the existing Product Feature upon clicking on the Edit Icon.
The Features page is displayed to make necessary changes.
Step 5: Once all the changes are complete, click Submit.
The features are updated and displayed in the Features page with the ‘Active’ Status.
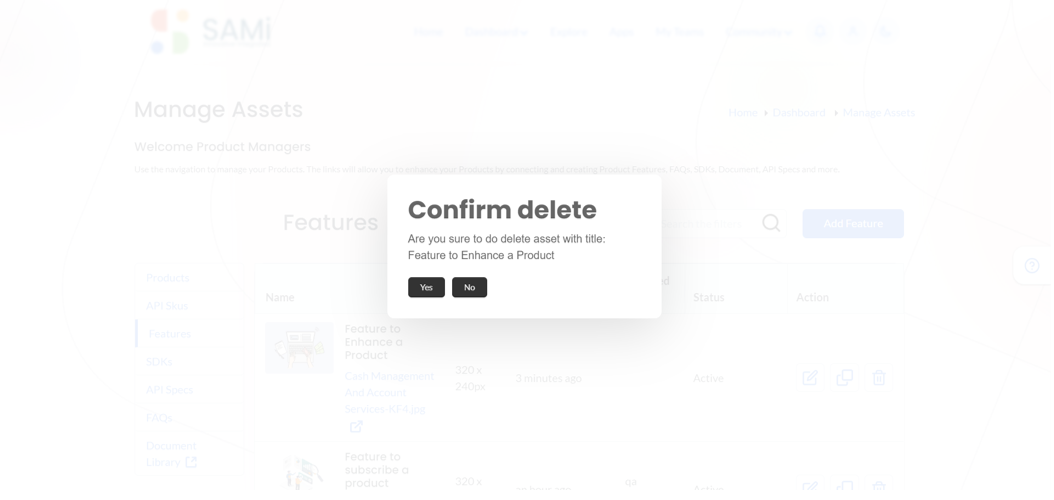
Delete a Product Feature
To delete product features, do the following:
Step 1: Login as a Product Owner.
Step 2: Enter the SAMi Portal URL in the browser.
You will land on to the Product Owner Dashboard.
Step 3: The Product Owner will be able to Manage Assets from Main Menu by clicking on Dashboard and then Manage Assets.
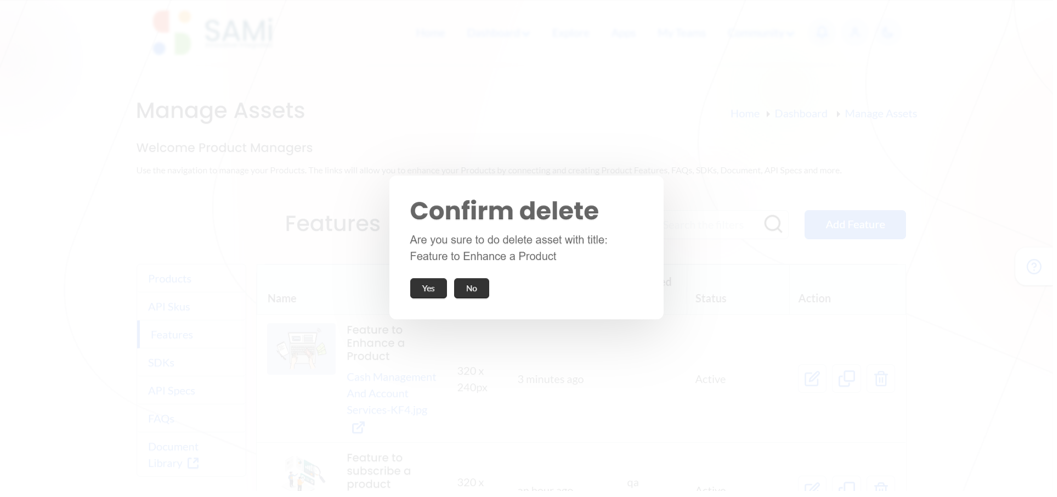
Step 4: The Product Owner will be able to delete the existing Product Feature upon clicking on the Delete Icon.
A Confirmation message appears.
Step 5: Click Yes, to delete the product feature.
Step 6: Click No, to abort deletion.
When the Yes button is clicked the Product Feature is deleted and it will no longer be available in the Features list.
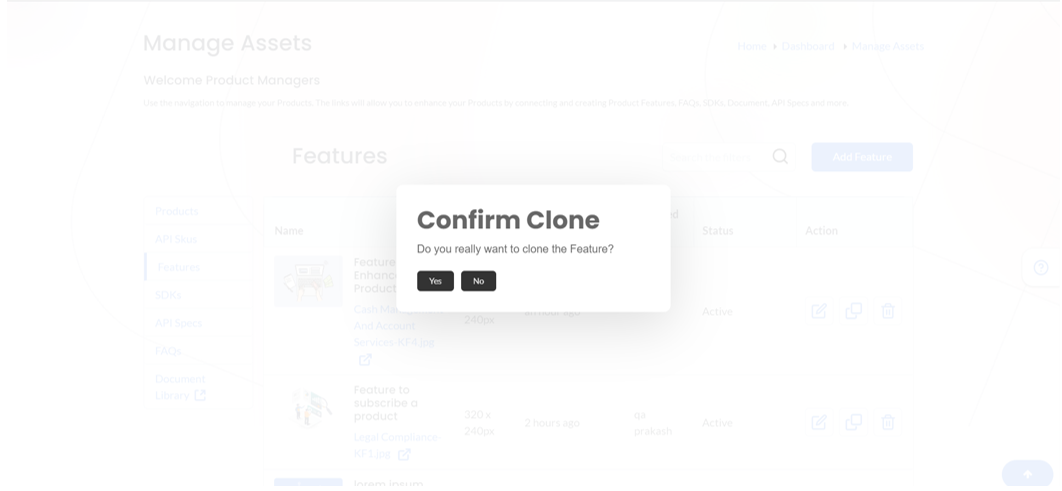
Clone Features
The Product owner will be able to clone the Features from the Main menu.
To clone a product feature, do the following:
Step 1: Login as a Product Owner.
Step 2: Enter the SAMi Portal URL in the browser.
Step 3: Enter the Email and the Password in the respective fields and click Login.
You will land on to Product Owner Dashboard.
Step 4: The Product Owner will be able to Manage Assets from Main Menu by clicking on Dashboard and then Manage Assets.
The Manage Assets page appears.
Step 5: The Product Owner will be able to Manage Product Features by clicking on Features tab on the left navigation pane.
The Features page appears.
Step 6: Click on the Clone Icon.
A Clone Confirmation dialog box appears.
Step 7: Click Yes, to confirm clone the Feature.
Step 8: Click No to cancel clone.
The Feature is listed in the Features page in ‘Active’ Status.
Scenario 2 – To Manage Products Features from the Product Owner Dashboard – Manage Assets button (Without Approval)
Add Features
To add a product Feature, follow the procedure:
Step 1: Login as a Product Owner.
Step 2: Enter the SAMi Portal URL in the browser.
You will land on to the Product Owner Dashboard.
Step 3: The Product Owner will be able to click Manage Assets button from Product Owner Dashboard.
The Manage Assets page appears.
Step 4: Product Owner will be able to Manage product Features by clicking on Features tab on the left navigation pane.
The Features page appears.
Step 5: The Product Owner will be able to Add Product Features by Clicking on Add Features button.
The Feature page appear to fill in all the required details.
Step 6: The Product Owner will be able to fill all the Details – Title, Feature Thumbnail, Select Image, Feature Description, Connect Asset to products, Viewable By.
*Note: If the Feature Image is not selected the system will by default selects a default image for that particular Feature.
Step 7: Clicks on Submit button to Add product Feature.
A success message appears. The Product Owner will be able to view the Added Product Features in the list in ‘Active’ Status.
Edit a Feature
To edit a product feature, follow the procedure:
Step 1: Login as a Product Owner.
Step 2: Enter the SAMi Portal URL in the browser.
You will land on to the Product Owner Dashboard.
Step 3: The Product Owner will be able to click Manage Assets button from Product Owner Dashboard.
The Manage Assets page appears.
Step 4: Product Owner will be able to Manage product Features by clicking on Features tab on the left navigation pane.
Step 5: The Product Owner can be able to edit the existing Product Feature upon clicking on the Edit Icon.
The Features page is displayed to make necessary changes.
Step 6: Once all the changes are complete, click Submit.
The features are updated and displayed in the Features page with the ‘Active’ Status.
Delete a Feature
To add a product feature, follow the procedure:
Step 1: Login as a Product Owner.
Step 2: Enter the SAMi Portal URL in the browser.
You will land on to the Product Owner Dashboard.
Step 3: The Product Owner will be able to click Manage Assets button from Product Owner Dashboard.
The Manage Assets page appears.
Step 4: Product Owner will be able to Manage product Features by clicking on Features tab on the left navigation pane.
Step 5: Product owner will be able to delete the Existing Product Feature upon clicking on the Delete icon.
A Confirmation message appears.
Step 6: Click Yes, to delete the product feature.
Step 7: Click No, to abort deletion.
When the Yes button is clicked the Product Feature is deleted and it will no longer be available in the Features list.
Clone Features
To clone a Feature, follow the procedure:
Step 1: Login as a Product Owner.
Step 2: Enter the SAMi Portal URL in the browser.
Step 3: Enter the Email and the Password in the respective fields and click Login.
You will land on to Product Owner Dashboard.
Once you log in with the Product Owner credentials, by default you will land on to the Product Owner Dashboard.
Step 4: The Product Owner will be able to Manage API Specs from main menu and clicking on Manage Assets button.
The Manage Assets page is displayed.
Step 5: The Product Owner will be able to Manage Product Features by clicking on Features tab on the left navigation pane.
The Features page appears.
Step 6: Click on the Clone Icon.
A Clone Confirmation dialog box appears.
Step 7: Click Yes to confirm clone the Feature.
Step 8: Click No to cancel clone.
The Feature is listed in the Features page in ‘Active’ Status.
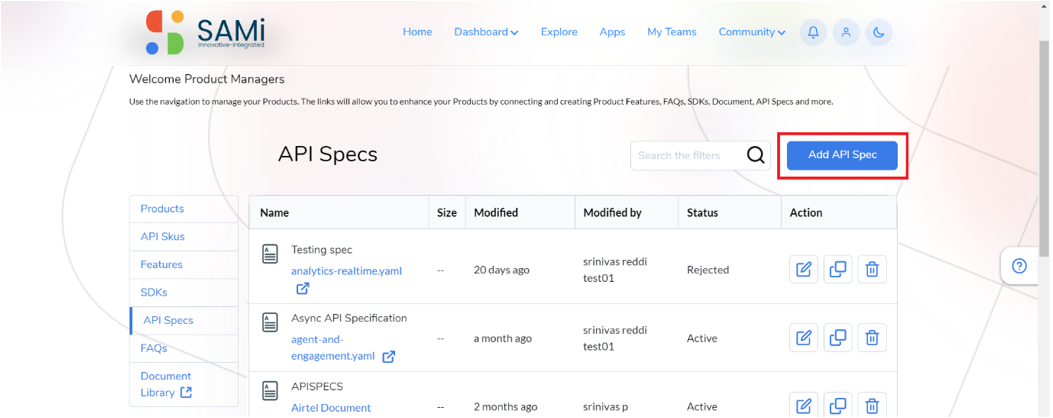
Workflow 10 – Manage API Specs from Main Menu
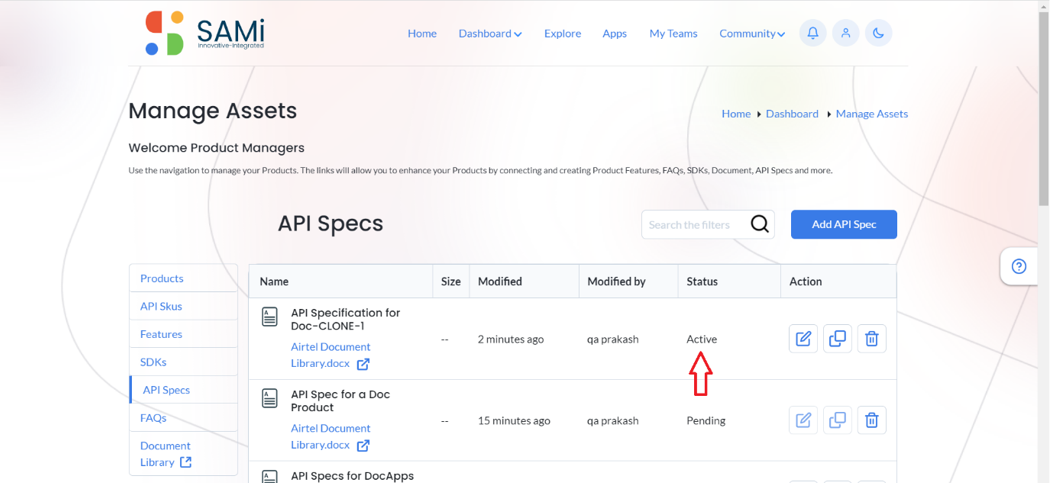
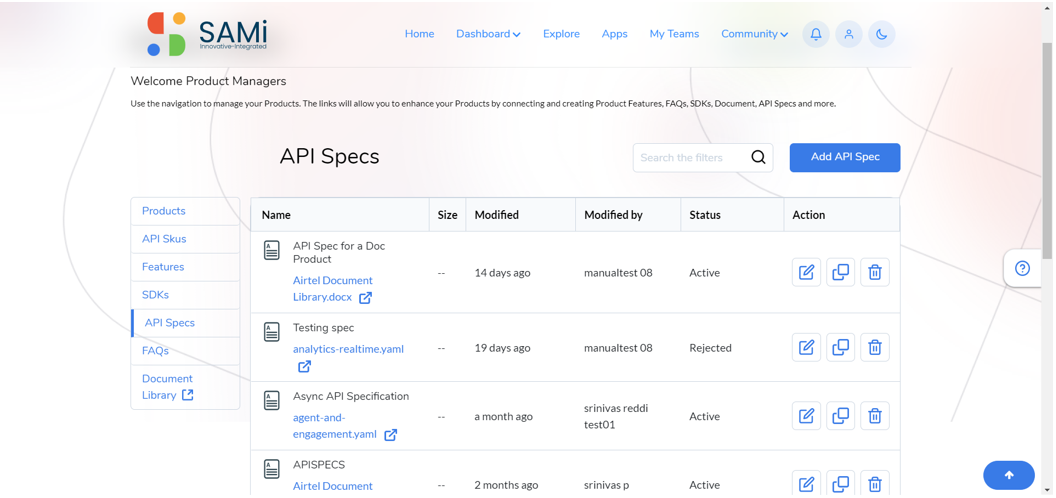
Scenario 1 – To Manage API Specs from the Main Menu – Manage Assets (Without Approval)
As a product owner, you will be able to manage the API Specs from the Product Owner Dashboard. This involved the following operations:
• Add API Specs
• Edit API Specs
• Delete API Specs
• Clone API Specs
Add API Specs
Step 1: Login as a Product Owner.
Step 2: Enter the SAMi Portal URL in the browser.
Step 3: Enter the Email and the Password in the respective fields and click Login.
You will land on to Product Owner Dashboard.
Step 4: The Product Owner will be able to Manage API Specs from main menu and clicking on Dashboard and then Manage Assets.
The Manage Assets page is displayed.
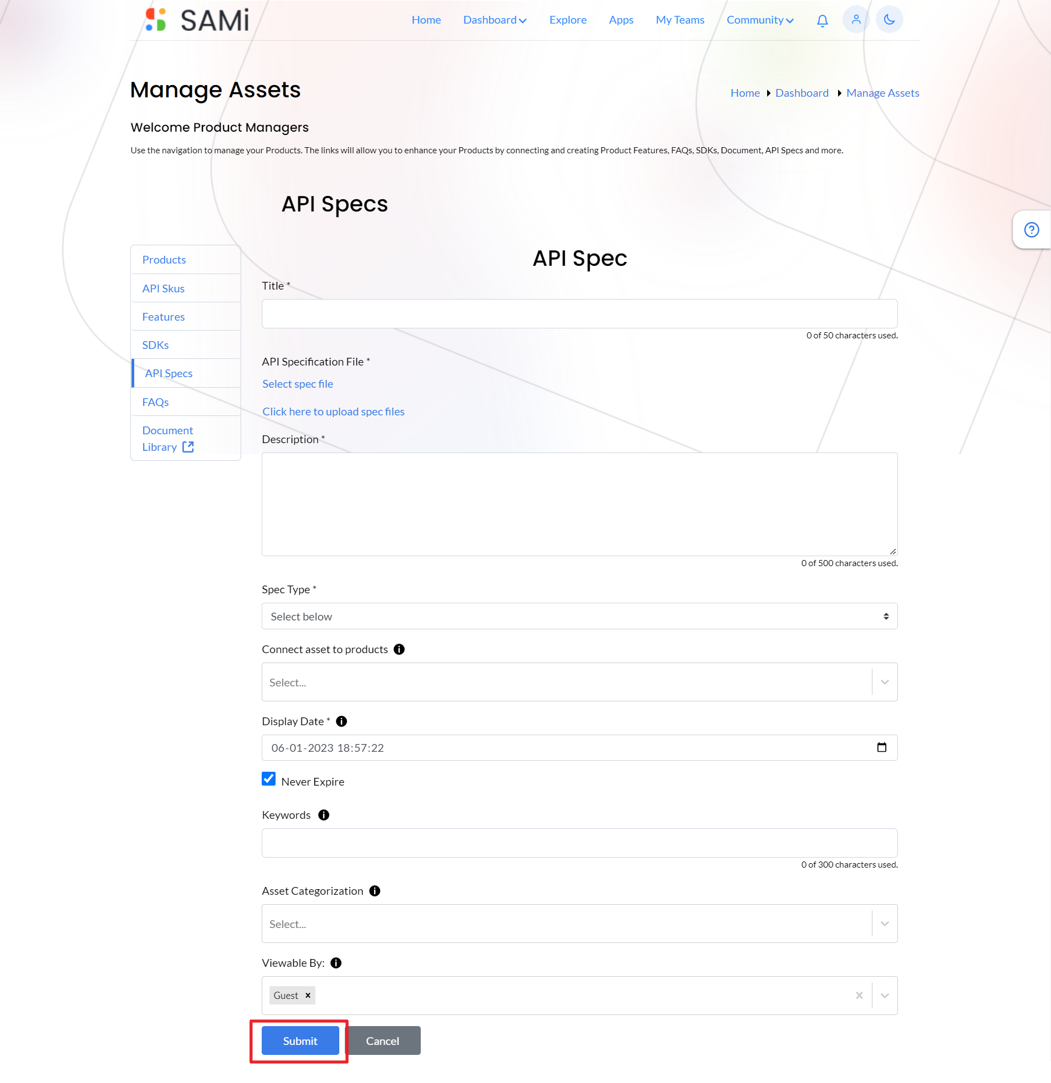
Step 5: Product Owner will be able to Manage API Specs by clicking on API Specs button on the left pane.
The API Specs page is displayed.
Step 6: The Product Owner will be able to add API Specs by clicking on Add API Spec button.
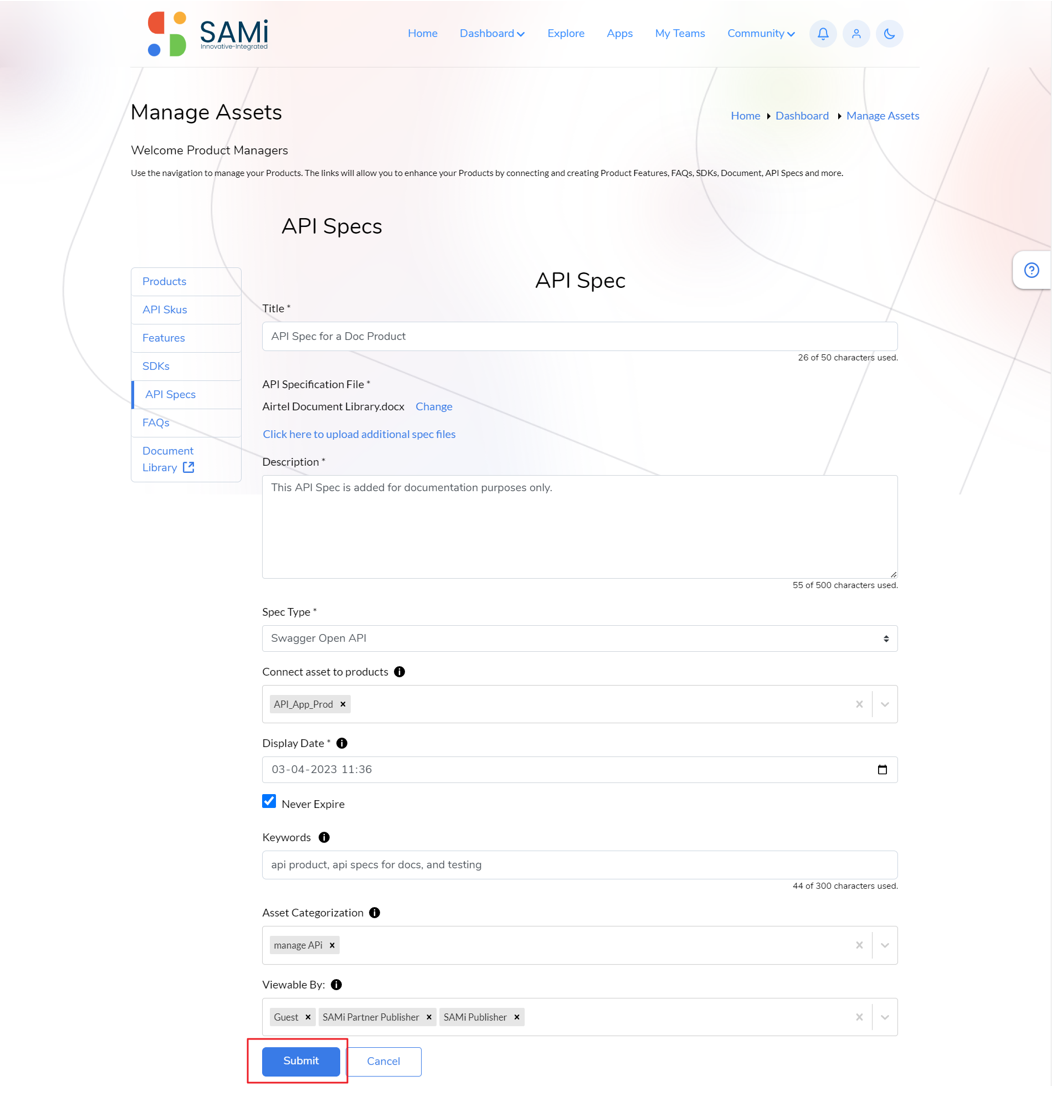
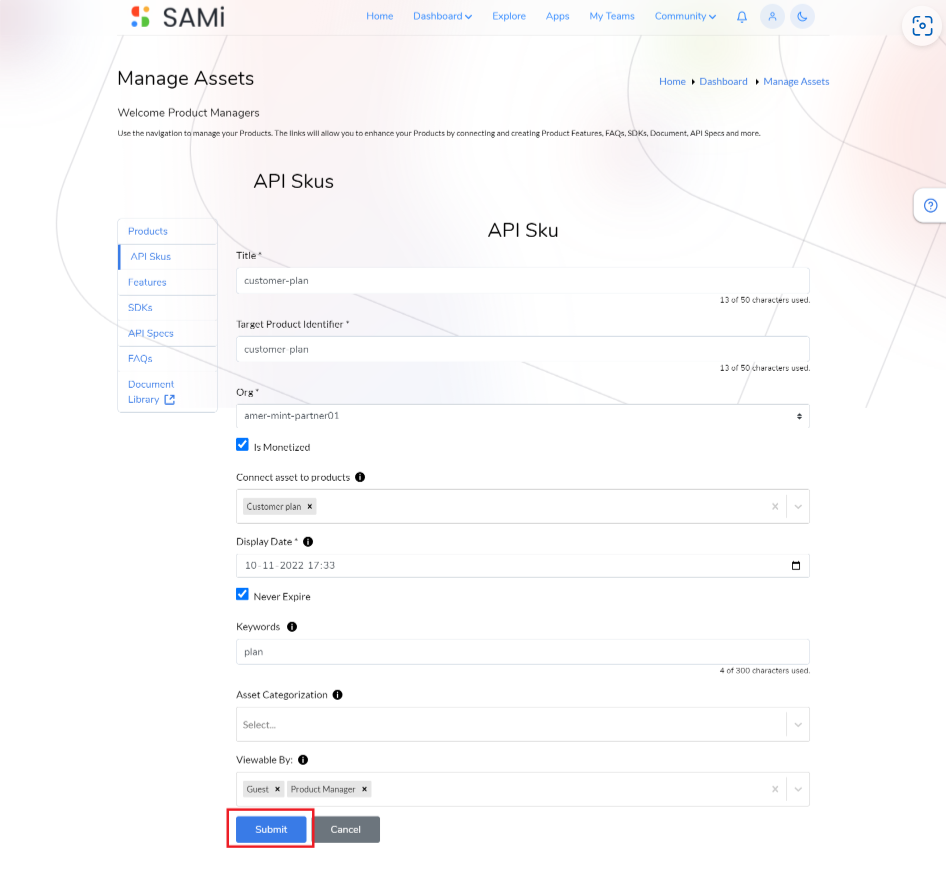
Step 7: In the API Specs page, enter the following details:
- Title
- Select Specs file, to upload it.
- Description
- Select Specs Type
- Optionally, Connect asset to products, Asset Categorization and Viewable By
Step 8: Click on Submit button to add API Spec to the Product.
Step 9: Click Cancel to cancel adding the API Spec.
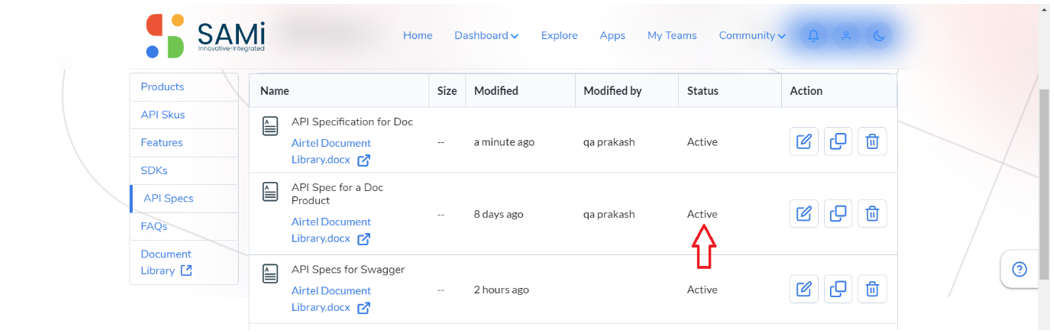
Once an API Spec is added, it will appear in the API Spec list in ‘’Active’ Status page.
The API Specs it will appear in the API Specs list in ‘Active’ Status.
Edit API Specs
The Product owner will be able to edit the API Spec from the Main menu.
To edit an API Spec, do the following:
Step 1: Login as a Product Owner.
Step 2: Enter the SAMi Portal URL in the browser.
Step 3: Enter the Email and the Password in the respective fields and click Login.
You will land on to Product Owner Dashboard.
Step 4: The Product Owner will be able to Manage API Specs from main menu and clicking on Dashboard and then Manage Assets.
The Manage Assets page is displayed.
Step 5: Product Owner will be able to Manage API Specs by clicking on API Specs button on the left pane.
The API Specs page is displayed.
Step 6: The Product Owner will be able to edit the existing API Spec upon clicking on the Edit icon.
Step 7: Click on Edit icon.
The API Spec page is displayed.
Step 8: As a Product Owner, you will be able to make necessary changes to the API Spec information.
Step 9: Once all changes are done, click Submit button.
The API Spec is updated and listed in the API Specs page with the ‘Active’ Status
Delete API Spec
The Product owner will be able to delete the API Spec from the Main menu.
To delete API Spec, do the following:
Step 1: Login as a Product Owner.
Step 2: Enter the SAMi Portal URL in the browser.
Step 3: Enter the Email and the Password in the respective fields and click Login.
You will land on to Product Owner Dashboard.
Step 4: The Product Owner will be able to Manage API Specs from main menu and clicking on Dashboard and then Manage Assets.
The Manage Assets page is displayed.
Step 5: Product Owner will be able to Manage API Specs by clicking on API Specs button on the left pane.
The API Specs page is displayed.
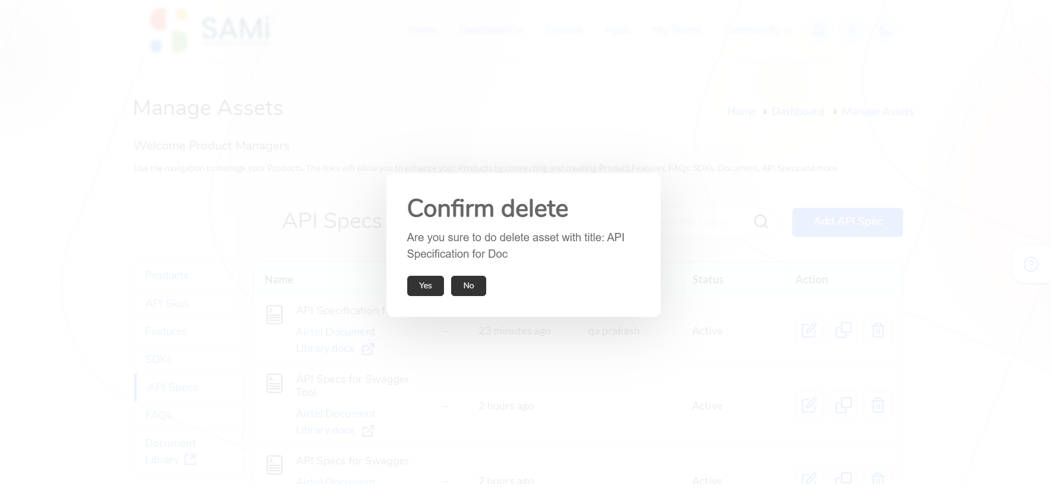
Step 6: The Product owner will be able to delete the Existing API Spec upon clicking on the Delete Icon.
A confirmation message appears.
Step 7: Click on Yes button, and then the selected API Spec will be deleted successfully.
Step 8: Click No to cancel deletion.
Upon deleting, the API Specs is deleted, and it will no longer be viewed in the list of API Specs.
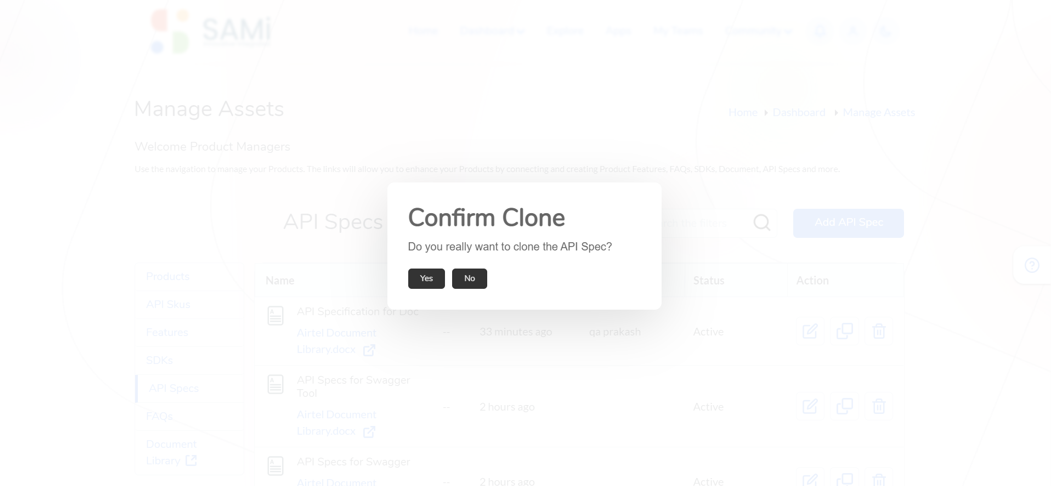
Clone API Specs
To clone an existing API Specs from the Manage Assets page, do the following:
Step 1: Login as a Product Owner.
Step 2: Enter the SAMi Portal URL in the browser.
Step 3: Enter the Email and the Password in the respective fields and click Login.
You will land on to Product Owner Dashboard.
Step 4: From Product Owner Dashboard, click Dashboard and then Manage Assets.
The Manage Assets page is displayed.
Step 5: In Manage Assets page, click on API Specs tab on the left navigation page.
The API Specs page appears.
Step 6: Click on Clone icon to clone an API Specs from the available list.
A Confirm Clone dialog box appears.
Step 7: Click Yes, to confirm clone the API Specs.
Step 8: Click No to cancel clone.
The API Spec is listed in the API Specs page in ‘Active’ Status.
The cloned API Specs will appear in the API Specs list in ‘Active’ Status.
Scenario 2 – To Manage API Specs from Manage Assets button (Without Approval)
As a product owner, you will be able to manage the API Specs from the Product Owner Dashboard > Manage Assets button. This involved the following operations:
- Add API Specs
- Edit API Specs
- Delete API Specs
- Clone API Specs
Add API Specs
Step 1: Login as a Product Owner.
Step 2: Enter the SAMi Portal URL in the browser.
Step 3: Enter the Email and the Password in the respective fields and click Login.
Once you log in with the Product Owner credentials, by default you will land on to the Product Owner Dashboard.
Step 4: The Product Owner will be able to Manage API Specs from main menu and clicking on Manage Assets button.
The Manage Assets page is displayed.

Step 5: Product Owner will be able to Manage API Specs by clicking on
API Specs button on the left pane.
The API Specs page is displayed.
Step 6: The Product Owner will be able to add API Specs by clicking on Add API Spec button.
Step 7: In the API Specs page, enter the following details:
• Title
• Select Specs file, to upload it.
• Description
• Select Specs Type
• Optionally, Connect asset to products, Asset Categorization and Viewable By
Step 8: Click on Submit button to add API Spec to the Product.
Step 9: Click Cancel to cancel adding the API Spec.
Once an API Spec is added, it will appear in the API Spec list in ‘Active’ Status.
Edit API Spec
The Product owner will be able to edit the API Spec from the Main menu.
To edit an API Spec, do the following:
Step 1: Login as a Product Owner.
Step 2: Enter the SAMi Portal URL in the browser.
Step 3: Enter the Email and the Password in the respective fields and click Login.
You will land on to Product Owner Dashboard.
Step 4: The Product Owner will be able to Manage API Specs by clicking on Manage Assets button.
The Manage Assets page is displayed.
Step 5: Product Owner will be able to Manage API Specs by clicking on API Specs button on the left pane.
The API Specs page is displayed.
Step 6: The Product Owner will be able to edit the existing API Spec upon clicking on the Edit icon.
Step 7: Click on Edit icon.
The API Spec page is displayed.
Step 8: As a Product Owner, you will be able to make necessary changes to the API Spec information.
Step 9: Once all changes are done, click Submit button.
The API Spec is updated and listed in the API Specs page with the ‘Active’ Status.
Delete API Spec
The Product owner will be able to delete the API Spec from the Main menu.
To delete API Spec, do the following:
Step 1: Login as a Product Owner.
Step 2: Enter the SAMi Portal URL in the browser.
Step 3: Enter the Email and the Password in the respective fields and click Login.
You will land on to Product Owner Dashboard.
Step 4: The Product Owner will be able to Manage API Specs by clicking on Manage Assets button.
The Manage Assets page is displayed.
Step 5: Product Owner will be able to Manage API Specs by clicking on API Specs button on the left pane.
The API Specs page is displayed.
Step 6: The Product Owner will be able to delete the existing API Spec upon clicking on the Delete icon.
Step 7: The Product owner will be able to delete the Existing API Spec upon clicking on the Delete button.
A confirmation message appears.
Step 8: Click on Yes button, and then the selected API Spec will be deleted successfully.
Step 9: Click No to cancel deletion.
Upon deleting the API Specs is deleted, and it will no longer be viewed the list of API Specs.
Clone API Specs
The Product owner will be able to clone the API Spec from the Main menu.
To clone an API Spec, do the following:
Step 1: Login as a Product Owner.
Step 2: Enter the SAMi Portal URL in the browser.
Step 3: Enter the Email and the Password in the respective fields and click Login.
You will land on to Product Owner Dashboard.
Step 4: The Product Owner will be able to Manage API Specs by clicking on Manage Assets button.
The Manage Assets page is displayed.
Step 4: In Manage Assets page, click on API Specs tab on the left navigation page.
The API Specs page appears.
Step 5: Click on Clone icon to clone an API Specs from the available list.
A Confirm Clone dialog box appears.
Step 6: Click Yes, to confirm clone the API Specs.
Step 7: Click No to cancel clone.
The API Spec is listed in the API Specs page in ‘Active’ Status.
Workflow 11 – Manage Products from PO Dashboard With Approvals
Scenario 1 – Manage Products from Product Owner Dashboard
In Manage Assets, the Product Owner will be able to a Create New Product from the Product Owner Dashboard.
In the PO Dashboard page, you will be able to perform the following operations:
- Add Product
- Edit Product
- Delete Product.
- Set Permissions.
- Clone a Product from Manage Assets Menu option
Add Product
To add a product from the Product Owner Dashboard, do the following:
Step 1: Login as a Product Owner.
Step 2: Enter the SAMI Portal URL in the browser.
Step 3: Enter the Email and the Password in the respective fields and click Login.
Step 4: You will land on to Product Owner Dashboard.
Step 5: In Product Owner Dashboard, click Create Product.
The Manage Assets page is displayed.
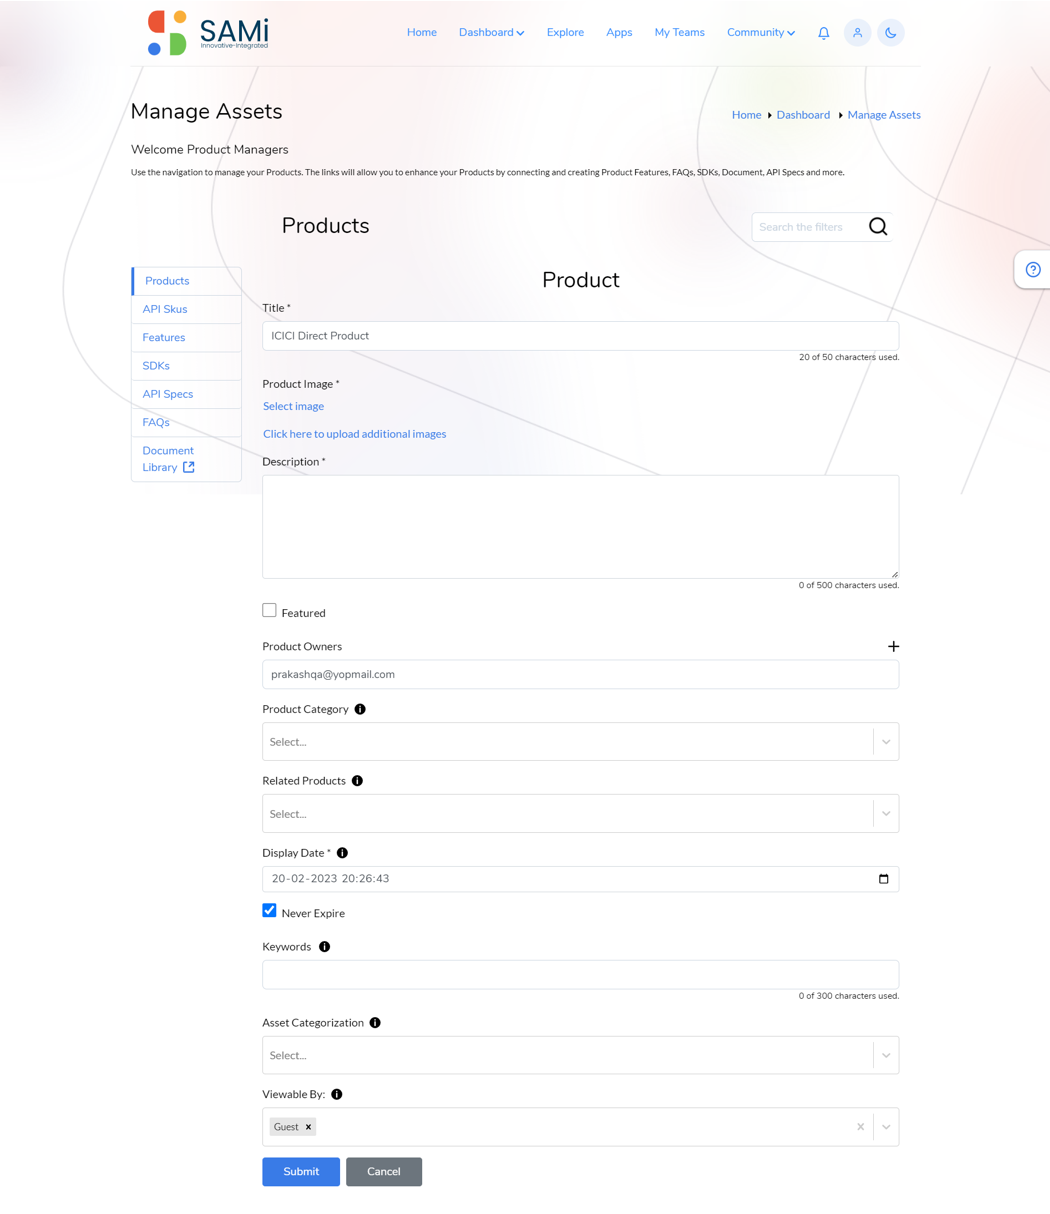
Step 6: In the Manage Assets page, enter the following:
- Enter the Title of the product.
- Select the Product Image (Select image or Click here to upload additional images),
*Note: If the Product Image is not selected the system will by default selects a default image for that product.
- Enter the Description in the text area.
- Check on Featured checkbox, if would like to create a featured product, otherwise uncheck it.
- Select the Product Category Example: SamOne/Network/MCI-APIs/SMI_APIs
- Select Related Products if the product is related to other products in the portal.
- Select the Display Date, if you wish to display the product from specific date, otherwise leave it blank as it automatically captures the current date to display.
- When you check Never Expire, the product will not expire anytime in future. Note: when you uncheck it, if you need to provide Display date and Expiry date as well.
- Enter keywords, as many as possible, this will be helpful to search the product later.
- Select Asset Categorization, to list the product in the available list of categories.
- Choose the role permissions Viewable By (External Developer/Internal Developer/Product Manager/SAMi Admin/User)
Step 7: Click Submit.
Step 8: Click Cancel, if you wish to abort the operation and close the page.
When the Submit button is clicked, a Success message appears. An email notification is sent to the Product Owner.
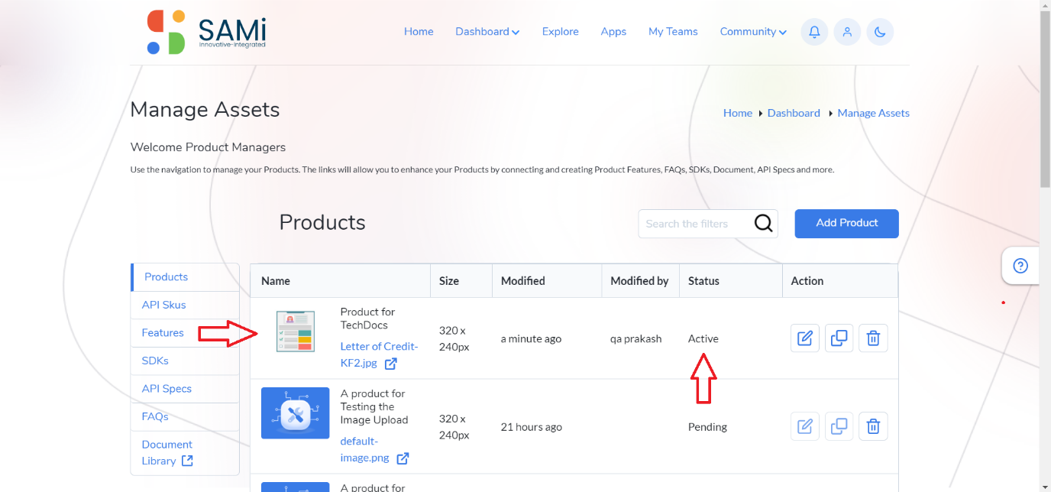
Now, the product is created and is listed in the Manage Assets – Products list.
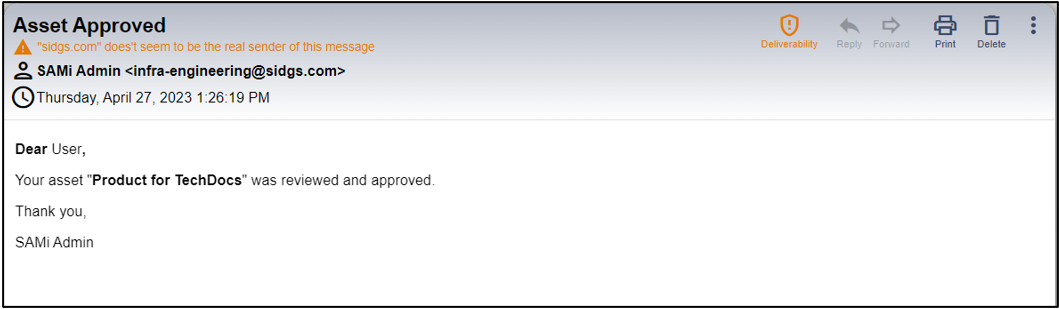
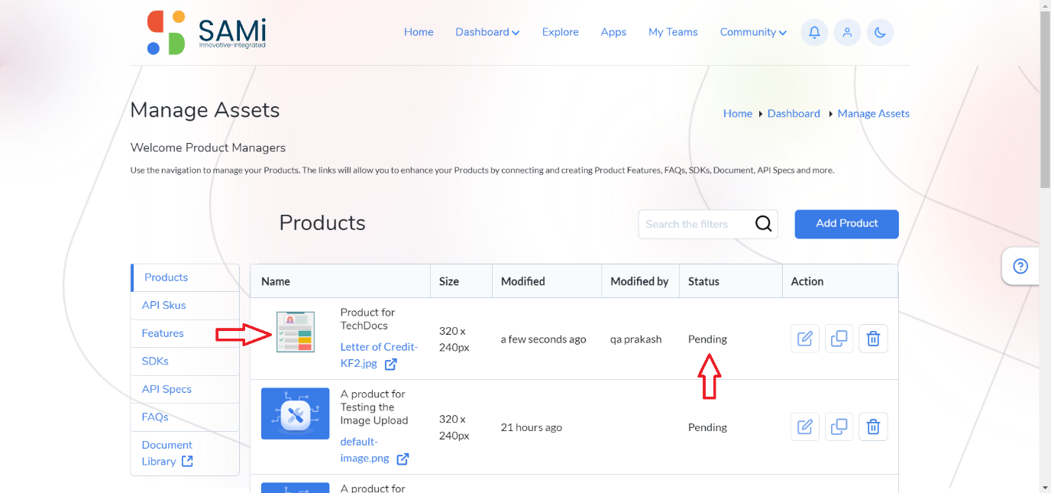
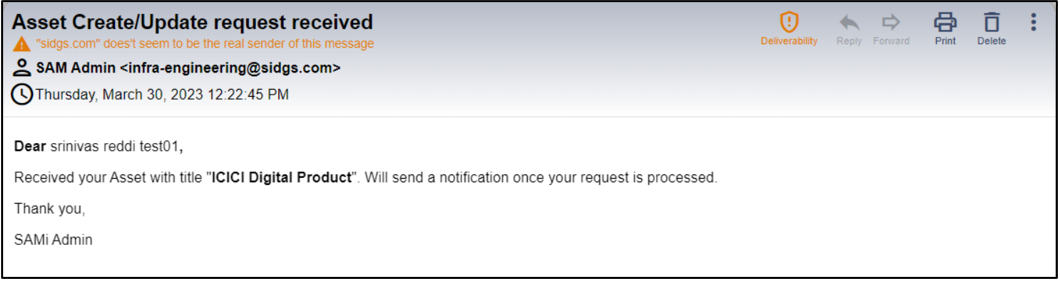
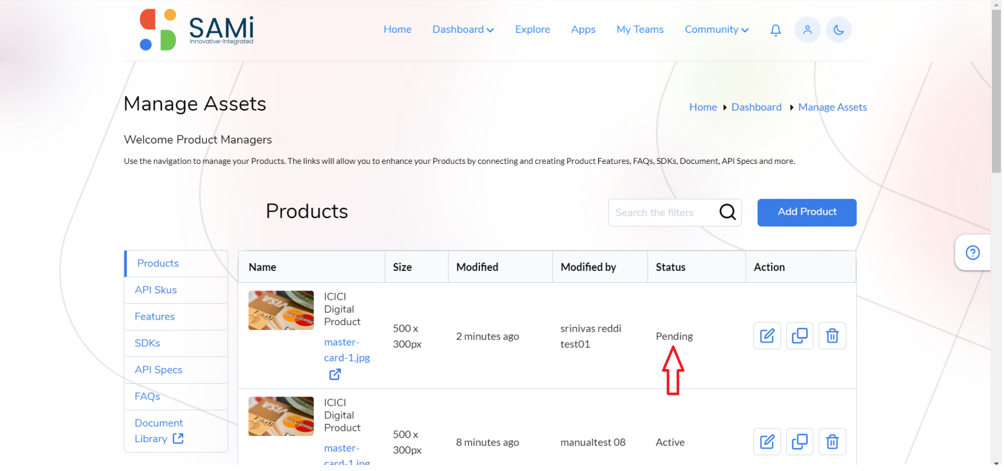
The Product is created and listed in the Products page but, the SAMi Admin needs to approve the product as it will remain in ‘Pending’ Status, till the time the SAMi Admin approves it.
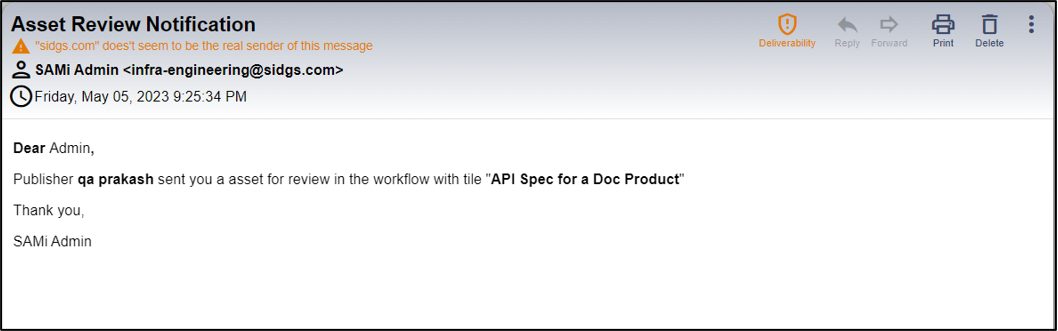
An email notification is sent to the Administrator as well to review and approve the product.
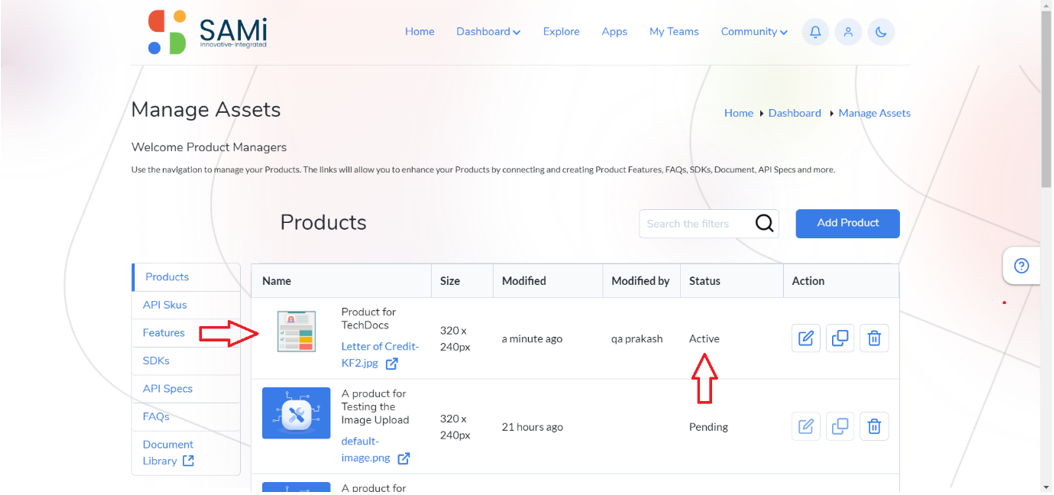
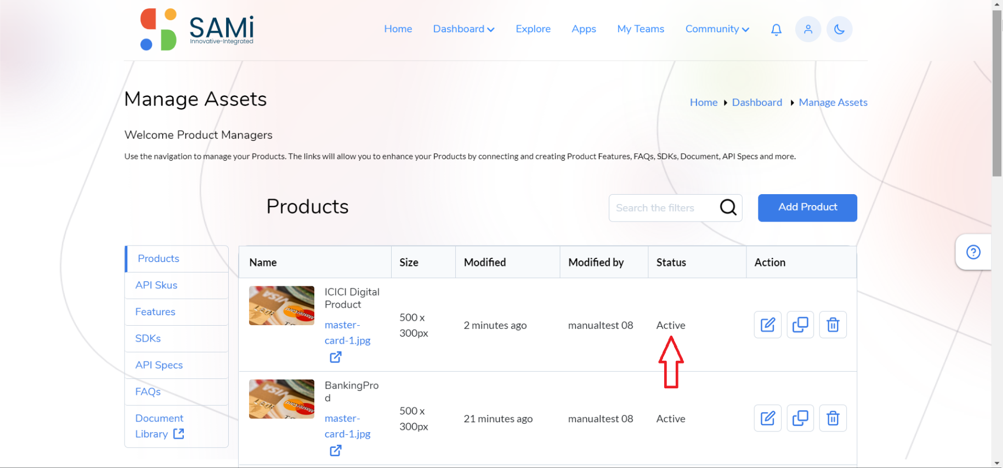
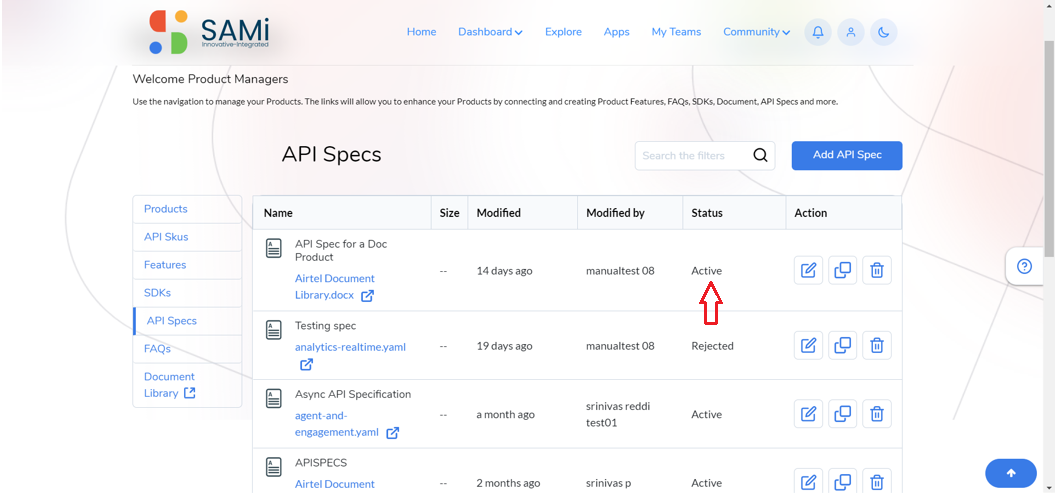
After the SAMi Administrator approves the product, the PO will be able to view the product in Manage Assets page after login in to the SAMi Portal and the product Status will be shown as, ‘Active.’
Edit Product
To edit the product from Product Owner Dashboard, do the following:
Step 1: Login as a Product Owner.
Step 2: Enter the SAMI Portal URL in the browser.
Step 3: Enter the Email and the Password in the respective fields and click Login.
You will land on to Product Owner Dashboard.
Step 4: From Product Owner Dashboard, browse the product to edit it.
Step 5: Click on Edit icon in the product card.
The Product details page appears.
In Product page, add or update any of the sections like, Title, Description, Product Category, Check or uncheck Featured checkbox, if you’d like to make it a featured product or general product, Related Products, Display Date, Asset Categorization, and Viewable By.
Step 6: Click Submit.
A success message is displayed stating, the product is successfully updated.
An email notification is sent to the PO.
A success message is displayed stating, the product is successfully updated but the product will be in ‘Pending’ Status. As shown below.
When the SAMi Administrator receives an email notification, and the admin login to the SAMi portal with his credentials and approves it. The Product Status changes to ‘Active’.
Delete Product
To delete a product from Product Owner Dashboard, do the following:
Step 1: Login as a Product Owner.
Step 2: Enter the SAMi Portal URL in the browser.
Step 3: Enter the Email and the Password in the respective fields and click Login.
You will land on to Product Owner Dashboard.
Step 4: From Product Owner Dashboard, browse the product to delete it.
Step 5: Click on Delete icon in the product card.
*Note: a product is in the Pending status, the PO will not be able to delete it. Unless the status is changed to Active.
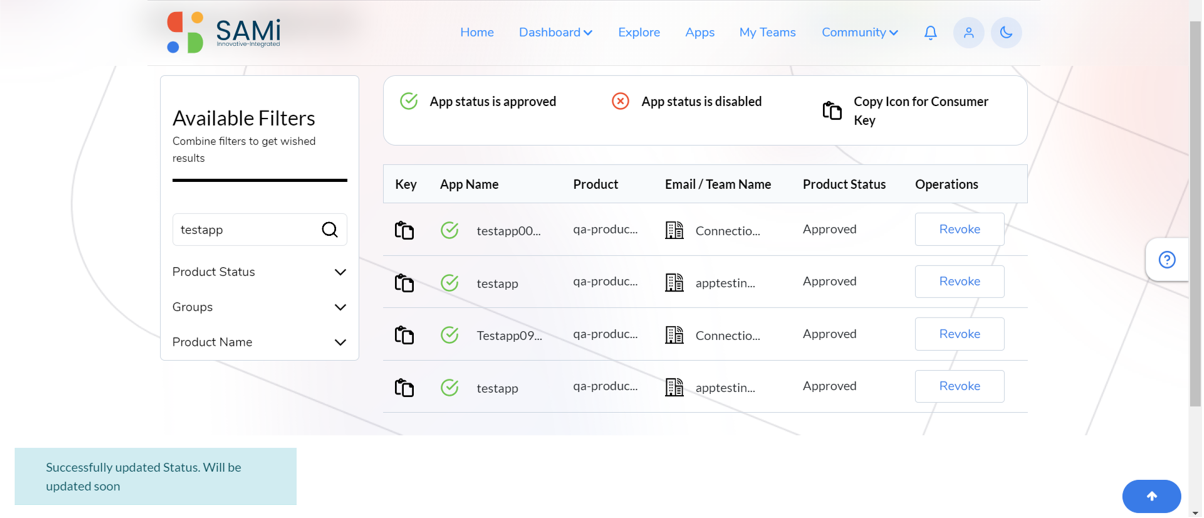
The selected product is deleted. A confirmation message appears stating, “Product Deleted Successfully.”
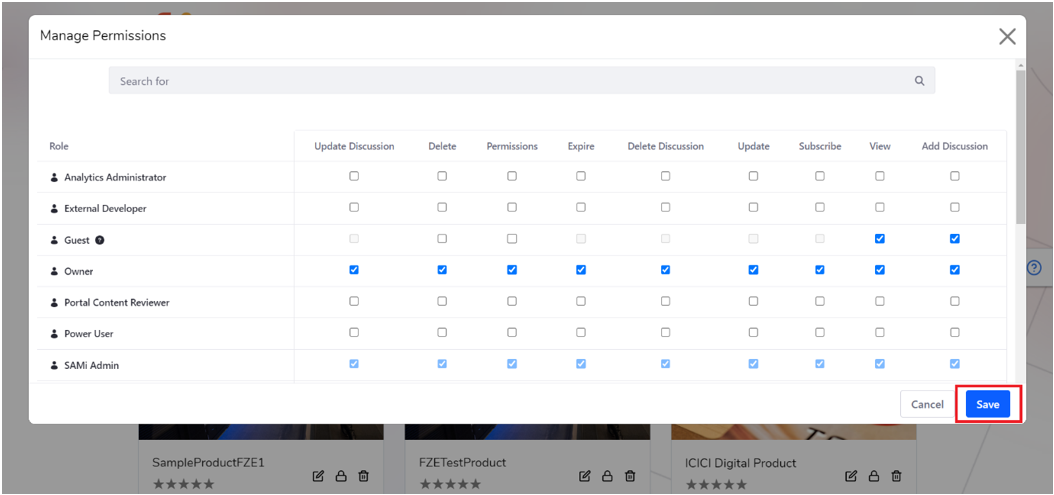
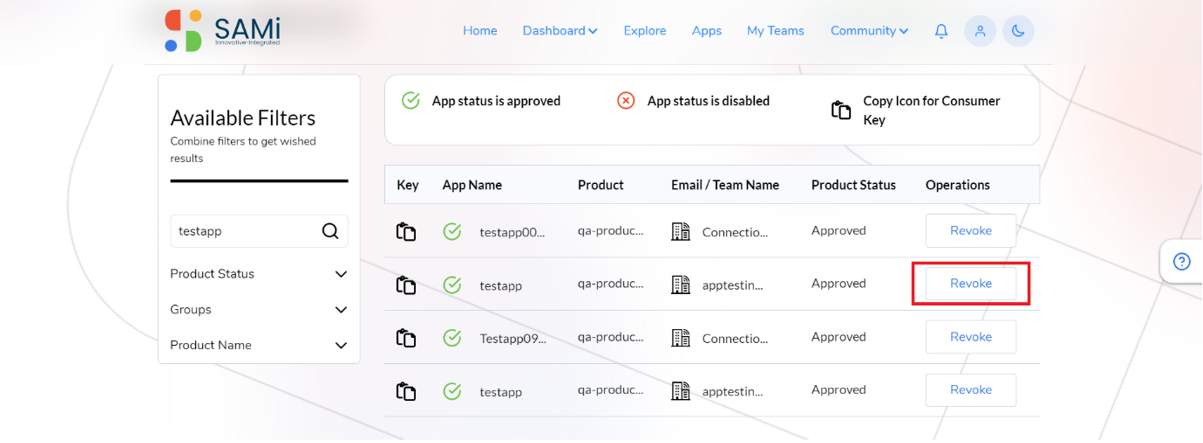
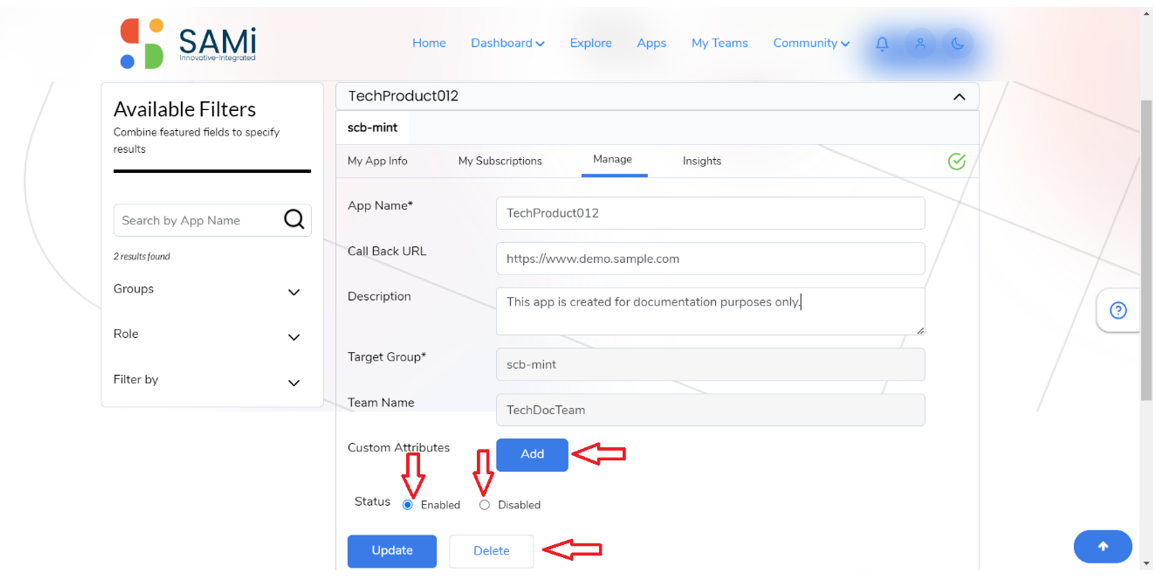
Set Permissions
To set permissions for a product from Product Owner Dashboard, do the following:
Step 1: Login as a Product Owner.
Step 2: Enter the SAMi Portal URL in the browser.
Step 3: Enter the Email and the Password in the respective fields and click Login.
You will land on to Product Owner Dashboard.
Step 4: From Product Owner Dashboard, browse the product to set its permissions.
Step 5: Click Permissions icon.
The Manage Permissions page is displayed.
Step 6: In Manage Permissions page, the product owner will be able to set product permissions based on different user roles by clicking on required checkboxes.
Note: Also, in Manage Permissions, you can search specific user roles to grant permissions by using keywords in the search field.
Step 7: Click Save.
The selected users are granted permissions based on the selections made.
Step 8: Click Cancel to abort setting permissions and close the window.
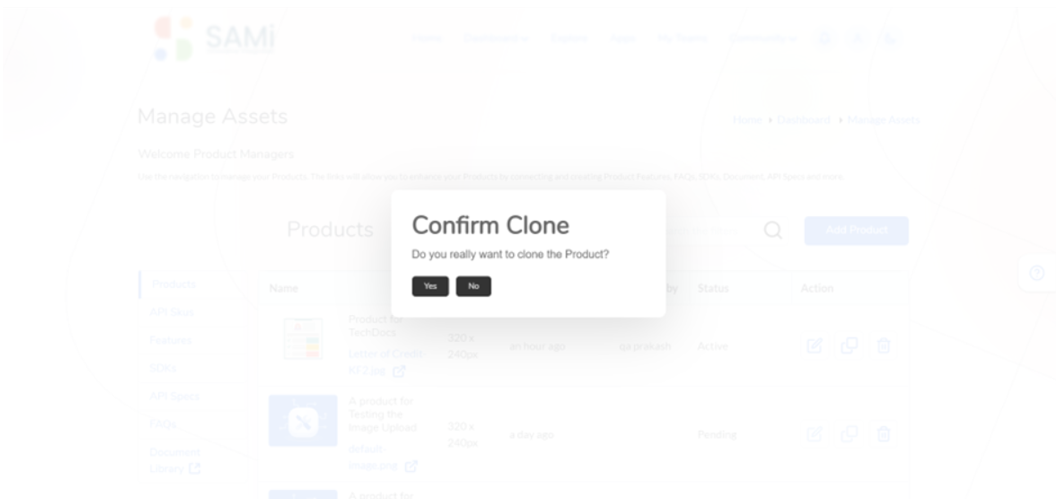
Clone a Product
Clone a Product from Manage Assets option from main menu
To clone an existing product, do the following:
Step 1: Login as a Product Owner.
Step 2: Enter the SAMi Portal URL in the browser.
Step 3: Enter the Email and Password in the respective fields and click Login.
Step 4: You will land on to Product Owner Dashboard.
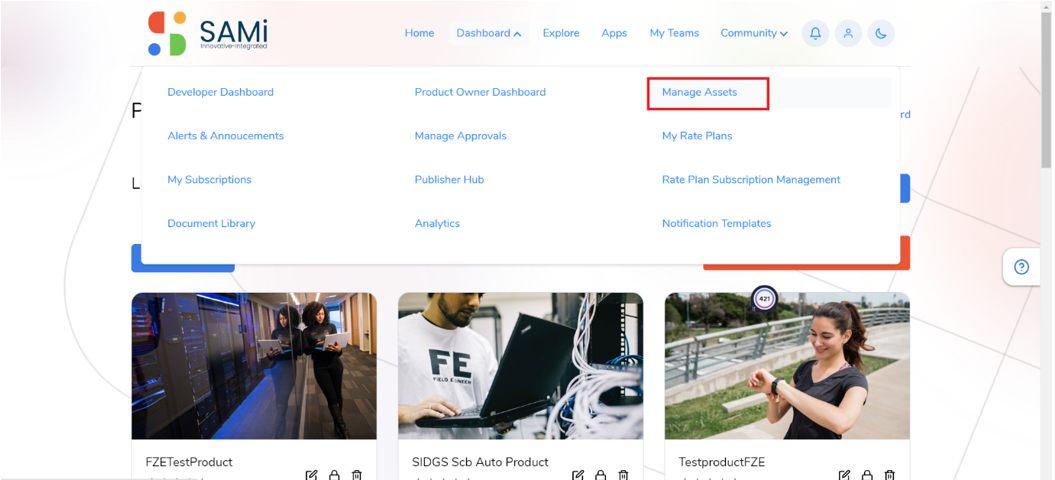
Step 5: Click on Dashboard and the Manage Assets menu option.
The Manage Assets page is displayed.
Step 5: By default, the Products are listed, select the product, and click on the Clone icon.
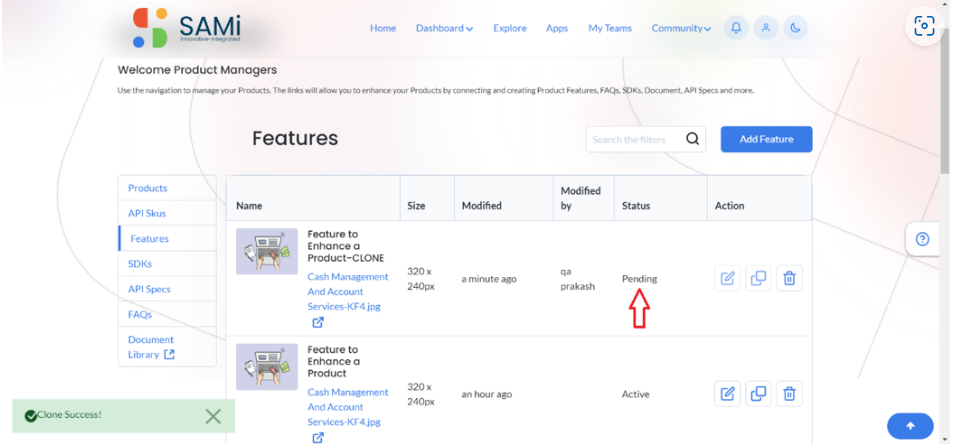
A Clone confirmation dialog box appears.
Step 6: Click Yes, to confirm.
A success message appears, the product will be in ‘Pending’ Status.
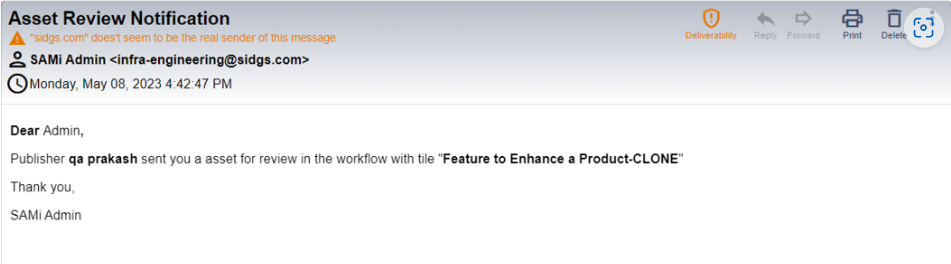
The PO will receive an email notification mentioning, the product is pending for approval.
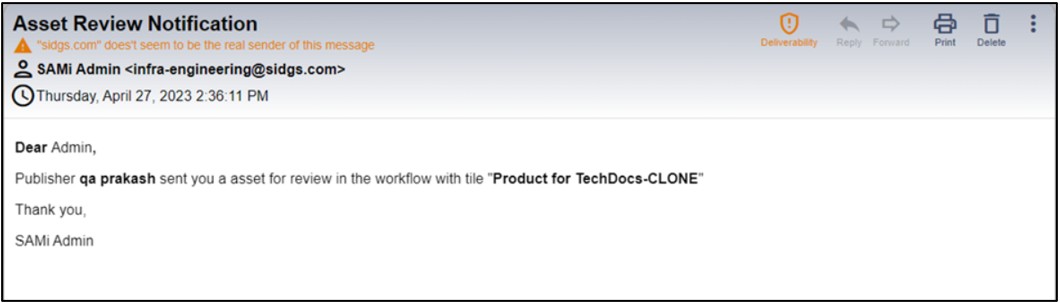
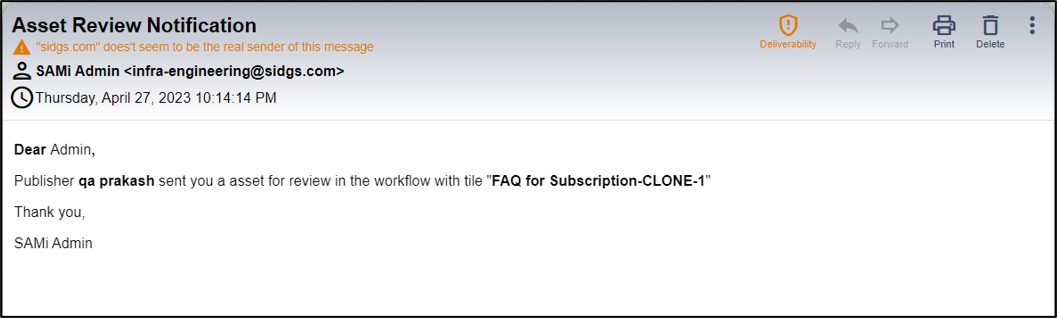
Also, the SAMi Administrator will receive an email notification mentioning, the product-clone is for review in the workflow.
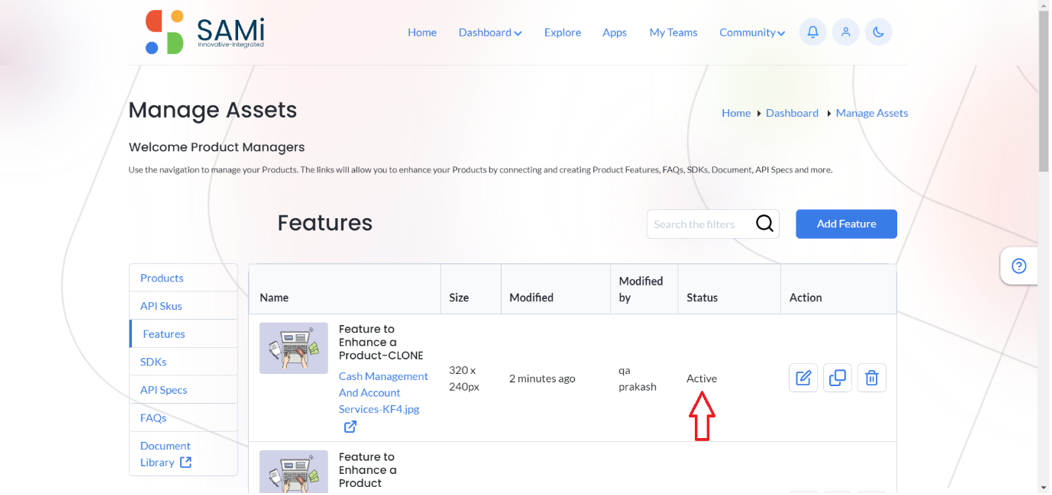
When the SAMi Admin reviews and approves the clone of the product, the product will be displayed in the product list, and it will show the status as ‘Active’.
*Note: The process of Cloning an asset is same for Products, API Specs, API SKUs, Features, SDKs, and FAQs.
Scenario 2 – Manage Products from PO Dashboard -Manage Assets Button
The Product Owner will be able to Manage Products from the Manage Assets button from the Product Owner Dashboard.
In the Manage Assets page, you will be able to do the following:
- Add Product
- Edit Product
- Delete Product.
- Clone a Product
Add Product
The add product feature helps you to create a new product by clicking on Manage Assets button on main menu.
Step 1: Login as a Product Owner.
Step 2: Enter the SAMi Portal URL in the browser.
Step 3: Enter the Email and the Password in the respective fields and click Login.
You will land on to Product Owner Dashboard.
Step 4: Click Manage Assets button.
The Manage Assets page is displayed.
Step 5: Clicks on Add Product.
Step 6: In the Manage Assets page, enter the following:
- Enter the Title of the product.
- Select the Product Image (Select image or Click here to upload additional images)
*Note: If the Product Image is not selected the system will by default selects a default image for that product.
- Enter the Description in the text area.
- Check on Featured checkbox, if would like to create a featured product, otherwise uncheck it.
- Select the Product Category Example: SamOne/Network/MCI-APIs/SMI_APIs
- Select Related Products if the product is related to other products in the portal.
- Select the Display Date, if you wish to display the product from specific date, otherwise leave it blank as it automatically captures the current date to display.
- When you check Never Expire, the product will not expire anytime in future. Note: when you uncheck it, if you need to provide Display date and Expiry date as well.
- Enter Keywords, as many as possible, this will be helpful to search the product later.
- Select Asset Categorization, to list the product in the available list of categories.
- Choose the role permissions Viewable By (External Developer/Internal Developer/Product Manager/SAMi Admin/User)
- Step 7: Click Submit.
Step 8: Click Cancel, if you wish to abort the operation and close the page.
When the Submit button is clicked, a Success message appears. An email notification is sent to the Product Owner.
Now, the product is created and is listed in the Manage Assets – Products list.
The Product is created and listed in the Products page but, the SAMi Admin needs to approve the product as it will remain in ‘Pending’ Status, till the time the SAMi Admin approves it.
An email notification is sent to the Administrator as well to review and approve the product.
After the SAMi Administrator approves the product, the PO will be able to view the product in Manage Assets page after login in to the SAMi Portal and the product Status will be shown as, ‘Active.’
Edit Product
Edit product feature allows you to edit an existing product and save it.
To edit the product from Product Owner Dashboard, do the following:
Step 1: Login as a Product Owner.
Step 2: Enter the SAMi Portal URL in the browser.
Step 3: Enter the Email and the Password in the respective fields and click Login.
You will land on to Product Owner Dashboard.
Step 4: Click Manage Assets button.
The Manage Assets page is displayed.
Step 5: From Product Owner Dashboard, browse the product to edit it.
Step 6: Click on Edit Icon to edit the product.
The Product page is displayed with all the product details.
Step 6: In Product page, add or update any of the sections like, Title, Description, Product Category, Check or uncheck Featured checkbox, if you’d like to make it a featured product or general product, Related Products, Display Date, Asset Categorization, and Viewable By.
Step 7: Click Submit.
A success message is displayed stating, the product is successfully updated with the status as ‘Pending’.
An email notification is sent to the SAMi Admin mentioning that the Product from the PO is awaiting review and approval. And the Admin will approve it after completing the review process.
*Note: Again, when the PO adds/updates the product, the approval is required from SAMi Administrator, the same process of approval is performed for updating the product as well.
The PO will view the product in the Manage Assets – Products list with the status as ‘Active’
Delete Product
Delete product feature allows you to delete an existing product.
To delete an existing product, do the following:
Step 1: In the Manage Assets page, click on Delete icon to delete a particular product.
A confirmation message appears, Confirm delete, “Are you sure to delete asset with title: API Product for doc”.
Step 2: Click Yes, to delete.
*Note: The Deleting process also requires the same approval process, when the PO clicks on Delete button, the product will be in ‘Pending’ Status, and when the SAMi Admin after review approves it will be deleted permanently.
The selected product is deleted, and it is removed from the Manage Assets list of products.
Step 3: Click No, to abort deletion and return to Manage Assets page.
Clone a Product
To clone an existing product, do the following:
Step 1: Login as a Product Owner.
Step 2: Enter the SAMi Portal URL in the browser.
Step 3: Enter the Email and Password in the respective fields and click Login.
Step 4: You will land on to Product Owner Dashboard.
Step 5: By default, the Products are listed, select the product and click on the Clone icon.
A Clone confirmation dialog box appears.
Step 6: Click Yes, to confirm.
A success message appears, the product will be in ‘Pending’ Status.
The PO will receive an email notification mentioning, the product is pending for approval.
Also, the SAMi Administrator will receive an email notification mentioning, the product-clone is for review in the workflow.
When the SAMi Admin reviews and approves the clone of the product, the product will be displayed in the product list, and it will show the status as ‘Active’.
*Important Note: The process of Cloning an asset is same for Products, API Specs, API SKUs, Features, SDKs, and FAQs. It clones only the Products, API Specs, API SKUs, Features, SDKs, and FAQs details not the Asserts, Categories attached to it.
Workflow 12 – Manage SDKs (With Approval)
Scenario 1 – To Manage SDKs from the main menu
The product owner will be able to manage the SDKs from main menu and perform the following:
- Add SDKs
- Edit SDKs
- Delete SDKs
- Clone SDKs
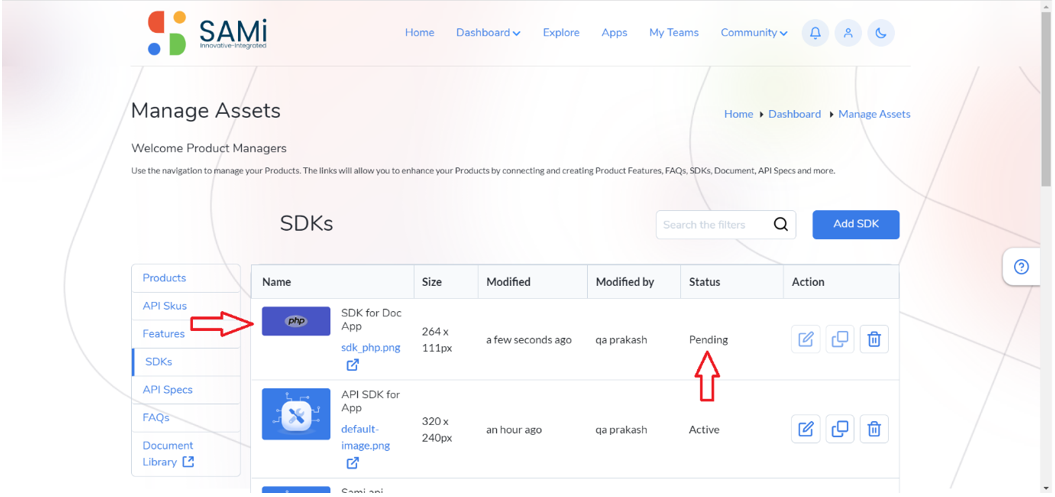
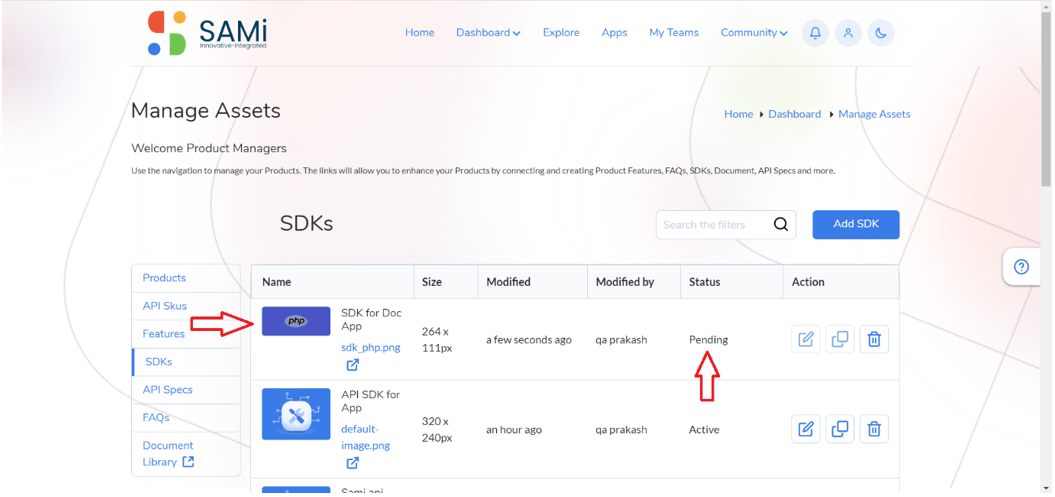
Add SDKs
The Product Owner will be able to add an SDK from the main menu, and follows the procedure:
Step 1: Login as a Product Owner.
Step 2: Enter the SAMi Portal URL in the browser.
Step 3: Enter the Email and the Password in the respective fields and click Login.
You will land on to the Product Owner Dashboard.
Step 4: Product Owner will be able to manage SDK’s by clicking on Dashboard > Manage Assets menu.
The Manage Assets page is displayed.
Step 5: To Manage SDK’s click on SDK’s tab on the left navigation.
All the available SDKs are displayed in the SDK page.
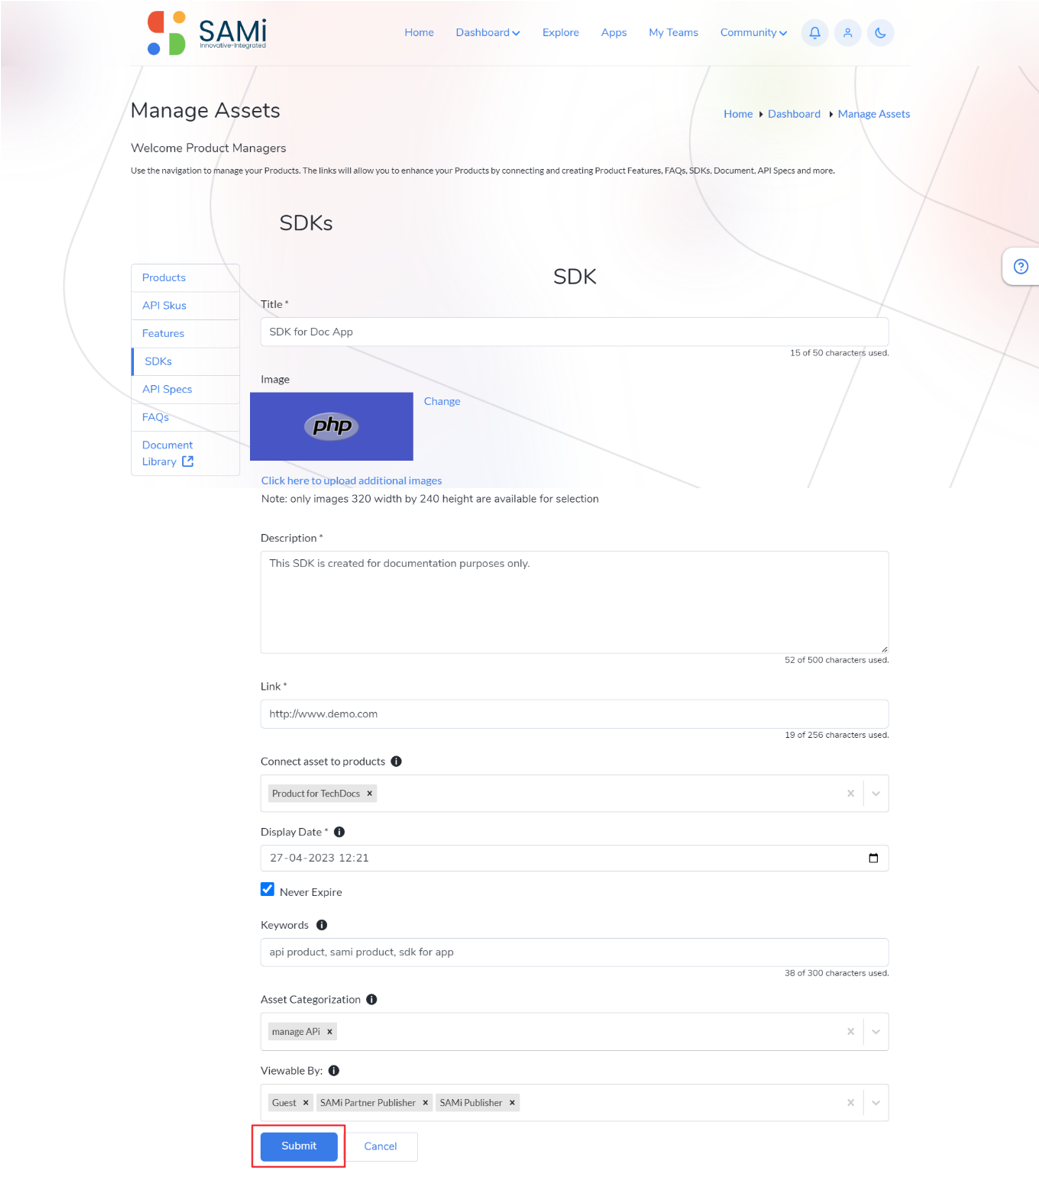
Step 6: As a Product Owner, click Add SDK button.
Step 7: You will be able to fill the details:
- Title, Image, Description, Link, Connect asset to Products, Viewable By etc.
*Note: If the SDKs Image is not selected the system will by default selects a default image for that SDK.
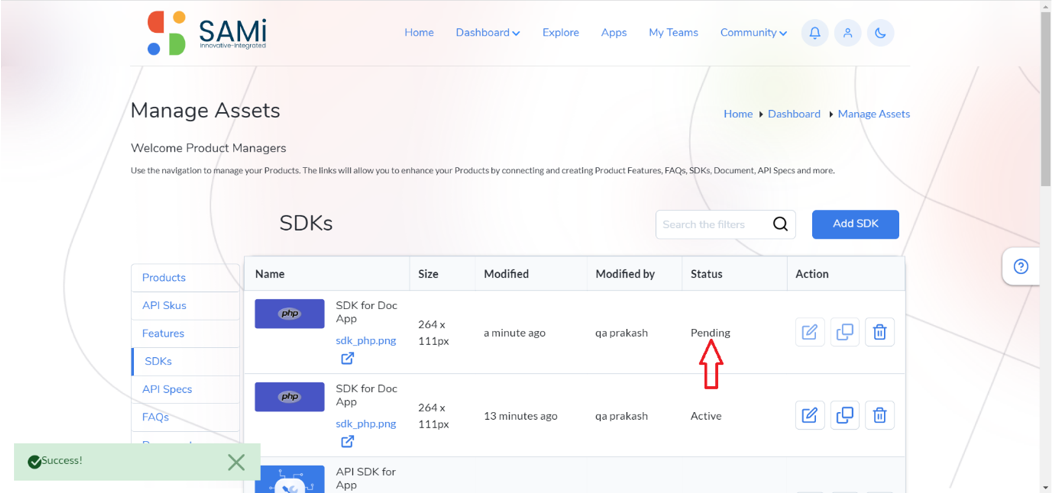
- Click on Submit button to Add SDK to the Product
- Product Owner will be able to see the Added SDK in the list with the status as ‘Pending’.
- Click Cancel, to cancel adding SDK.
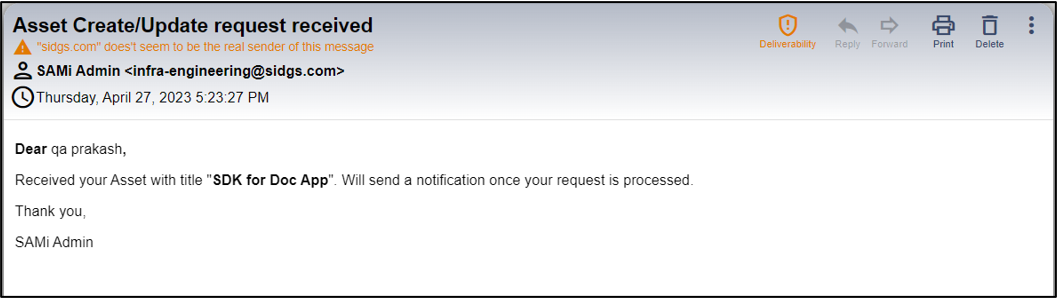
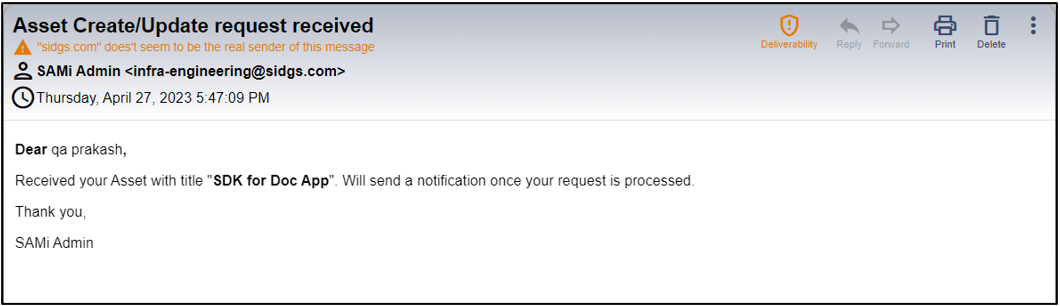
When the Submit button is clicked, a Success message appears. An email notification is sent to the Product Owner.
Now, the SDK is created and is listed in the Manage Assets – Products list.
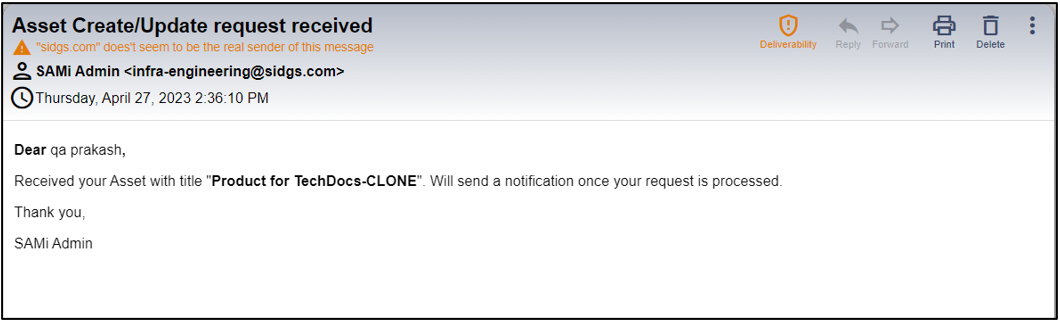
The SDK is created and listed in the Products page but, the SAMi Admin needs to approve the SDK as it will remain in ‘Pending’ Status, till the time the SAMi Admin approves it.
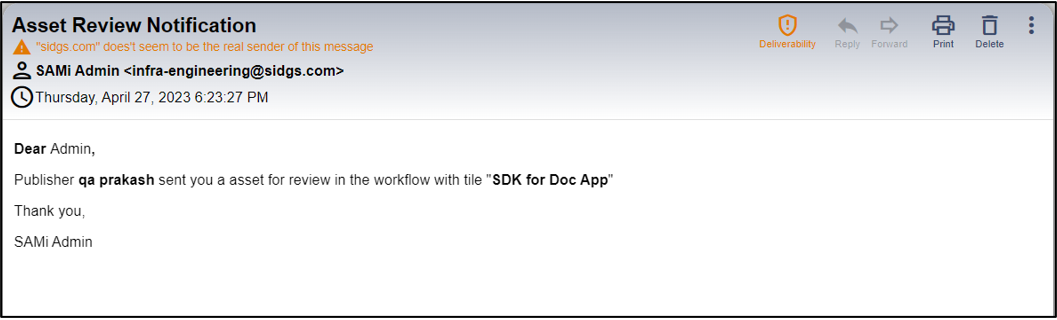
An email notification is sent to the SAMi Administrator as well to review and approve the SDK.
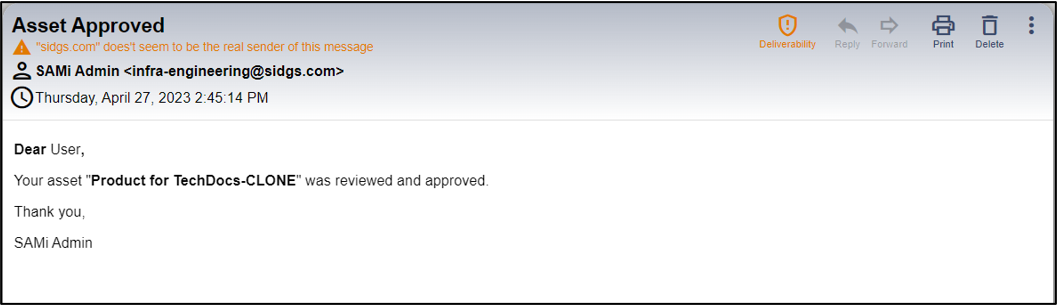
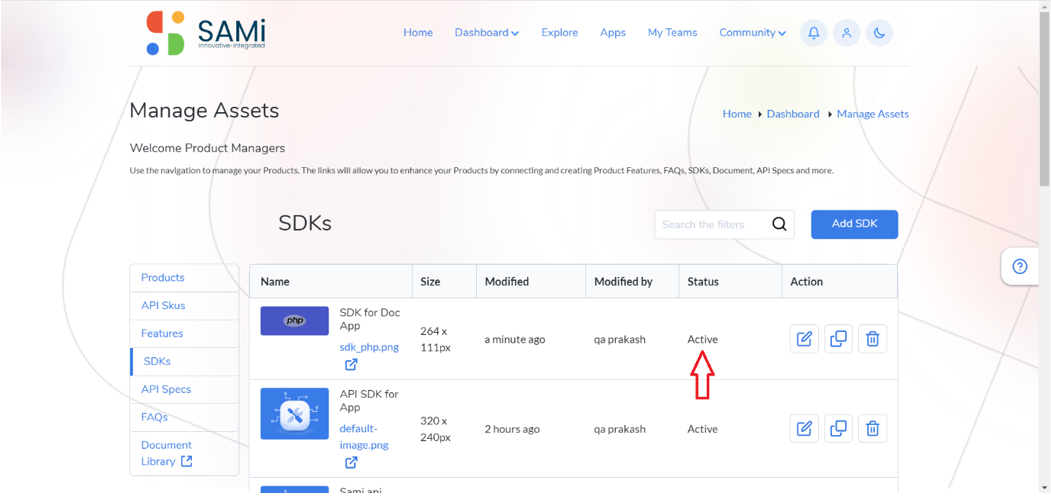
After the SAMi Administrator approves the SDK, the PO will be able to view the SDK in Manage Assets page after login in to the SAMi Portal and the SDK Status will be shown as, ‘Active.’
Edit SDK
To edit an SDK from Manage Assets menu option from PO Dashboard, do the following:
Step 1: Login as a Product Owner.
Step 2: Enter the SAMi Portal URL in the browser.
Step 3: Enter the Email and the Password in the respective fields and click Login.
Once you log in with PO credentials, by default you will land to the Product Owner Dashboard.
Step 4: Product Owner will be able to manage SDK’s by clicking on Dashboard > Manage Assets menu.
The PO will be redirected to Manage Assets page.
Step 5: Click on SDKs in the left navigation pane.
The SDKs page appears.
The SDK page is opened for the Product Owner to edit the SDK information and submit it.
Step 6: The Product Owner will be able to edit the existing SDK by clicking on the Edit icon.
Step 7: Make necessary changes to the SDK details and click Submit button.
When the Submit button is clicked, a success message appears. The selected SDK is updated and viewed in the SDK list in the ‘Pending’ Status.
An email notification is sent to the Product Owner.
An email notification is sent to the Administrator as well to review and approve the SDK.
After the SAMi Administrator approves the SDK, the PO will be able to view the SDK in Manage Assets page after login in to the SAMi Portal and the SDK Status will be shown as, ‘Active.’
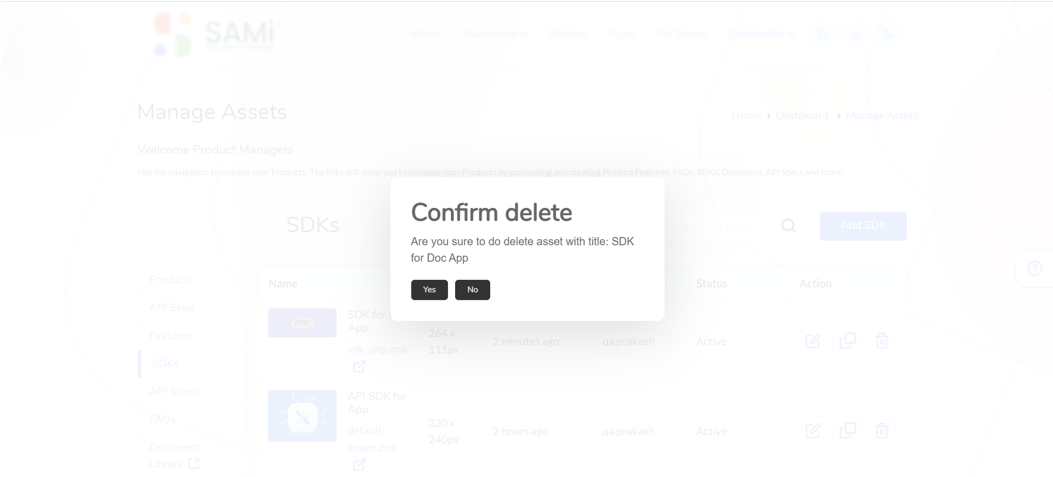
Delete SDKs
The Product owner will be able to delete any of the existing SDK from the available SDKs in the list.
To delete the SDK, do the following:
Step 1: Login as a Product Owner.
Step 2: Enter the SAMi Portal URL in the browser.
Step 3: Enter the Email and the Password in the respective fields and click Login.
You will land on to the Product Owner Dashboard.
Step 4: Product Owner will be able to manage SDK’s by clicking on Dashboard > Manage Assets menu.
The Manage Assets page appears.
Step 5: Click on SDKs in the left navigation pane.
The SDKs page appears.
Step 6: Click on Delete icon.
*Note: When the SDK is in the Pending status, the PO will not be able to delete it. Unless the status is changed to Active.
A Confirm delete message appears.
Step 7: Click on Yes button then the selected SDK is deleted successfully.
Step 8: Click No to cancel deletion.
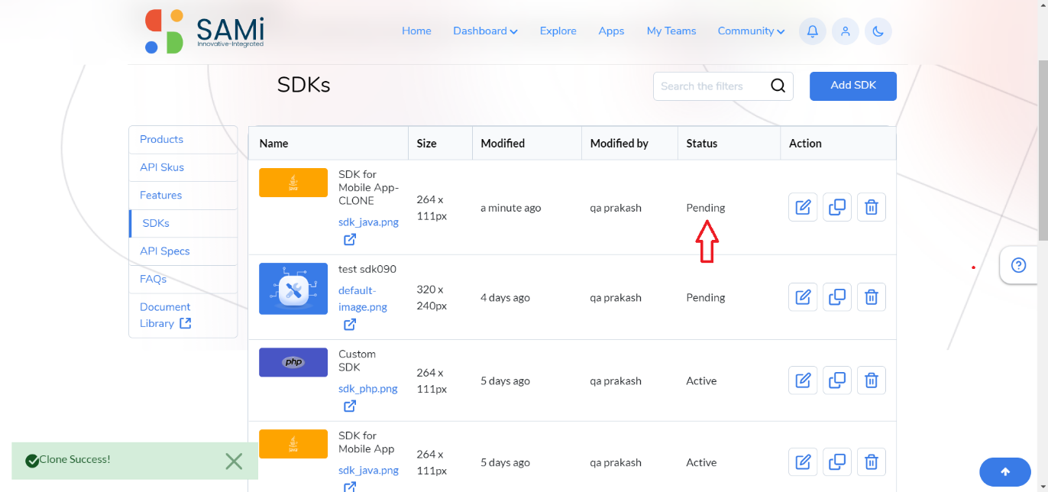
Clone SDKs
To clone the SDK, do the following:
Step 1: Login as a Product Owner.
Step 2: Enter the SAMi Portal URL in the browser.
Step 3: Enter the Email and the Password in the respective fields and click Login.
You will land on to the Product Owner Dashboard.
Step 4: Product Owner will be able to manage SDK’s by clicking on Dashboard > Manage Assets menu.
The Manage Assets page appears.
Step 5: Click on SDKs in the left navigation pane.
The SDKs page appears.
Step 6: In the SDKs page, select an SDK to clone and click on Clone icon.
A Clone confirmation page appears.
Step 7: Click Yes to Clone.
A Clone success message appears.
The Clone will be displayed in ‘Pending’ Status.
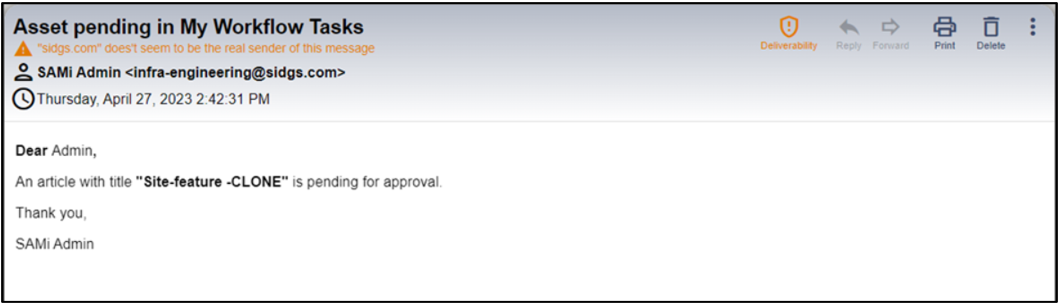
Here, the SAMi Administrator needs to approve to make it active. and the PO Admin mentioning that the Asset is under review and approval.
The SAMi admin has 24 hours to review and approve the SDK.
An email message is also sent by the SAMi Admin to the PO mentioning the asset is reviewed and clone is approved.
When the SDK Clone is approved by the SAMi Admin, it is displayed in ‘Active’ Status.
*Important Note: The process of Cloning an asset is same for Products, API Specs, API SKUs, Features, SDKs, and FAQs. It clones only the Products, API Specs, API SKUs, Features, SDKs, and FAQs details not the Assets, Categories attached to it.
Scenario 2 – To manage SDKs from Product Owner Dashboard Manage Assets button (With Approval)
Add SDK
To add an SDK from Manage button, do the following:
Step 1: Login as a Product Owner.
Step 2: Enter the SAMi Portal URL in the browser.
Step 3: Enter the Email and the Password in the respective fields and click Login.
Once you log in with PO credentials, by default you will land on to the Product Owner Dashboard.
Step 4: Product Owner will be able to manage SDK’s by clicking on Manage Assets button, it redirects you to Manage Assets page.
The Manage Assets page appears.
Step 5: To Manage SDK’s click on SDK’s tab on the left navigation.
All the available SDKs are displayed in the SDK page.
Step 6: As a Product Owner, click Add SDK button.
You will be able to fill the details:
- Title, Image, Description, Link, Connect asset to Products, Viewable By etc.
*Note: If the SDKs Image is not selected the system will by default selects a default image for that particular SDK.
- Click on Submit button to Add SDK to the Product
- Product Owner will be able to see the Added SDK in the list with the status as ‘Pending’
- Click Cancel, to cancel adding SDK
When the Submit button is clicked, a Success message appears. An email notification is sent to the Product Owner.

Now, the SDK is created and is listed in the Manage Assets – Products list.
The SDK is created and listed in the Products page but, the SAMi Admin needs to approve the SDK as it will remain in Pending Status, till the time the SAMi Admin approves it.
An email notification is sent to the Administrator as well to review and approve the SDK.
After the SAMi Administrator approves the SDK, the PO will be able to view the SDK in Manage Assets page after login in to the SAMi Portal and the SDK Status will be shown as, ‘Active.’
Edit SDK
To edit an SDK from Manage button, do the following:
Step 1: Login as a Product Owner.
Step 2: Enter the SAMi Portal URL in the browser.
Step 3: Enter the Email and the Password in the respective fields and click Login.
Once you log in with PO credentials, by default you will land to the Product Owner Dashboard.
Step 4: Product Owner will be able to manage SDK’s by clicking on Manage Assets button, it redirects you to Manage Assets page.
The Manage Assets page appears.
Step 5: To Manage SDK’s click on SDK’s tab on the left navigation.
All the available SDKs are displayed in the SDK page.
The SDK page is opened for the Product Owner to edit the SDK information and submit it.
Step 6: The Product Owner will be able to edit the existing SDK by clicking on the Edit icon.
Step 7: Make necessary changes to the SDK details and click Submit button.
When the Submit button is clicked, a success message appears. The selected SDK is updated and viewed in the SDK list in the ‘Pending’ Status.
An email notification is sent to the Product Owner.
An email notification is sent to the Administrator as well to review and approve the SDK.
After the SAMi Administrator approves the SDK, the PO will be able to view the SDK in Manage Assets page after login in to the SAMi Portal and the SDK Status will be shown as, ‘Active.’
Delete SDK
To delete an SDK from Manage button, do the following:
Step 1: Login as a Product Owner.
Step 2: Enter the SAMi Portal URL in the browser.
Step 3: Enter the Email and the Password in the respective fields and click Login.
By default, you will land on to Product Owner Dashboard.
Step 4: Product Owner will be able to manage SDK’s by clicking on Manage Assets button, it redirects you to Manage Assets page.
The Manage Assets page appears.
Step 5: To Manage SDK’s click on SDK’s tab on the left navigation.
All the available SDKs are displayed in the SDK page.
Step 6: Click on Delete icon.
*Note: When the SDK is in the Pending status, the PO will not be able to delete it. Unless the status is changed to Active.
A Confirm delete message appears.
Step 7: Click on Yes Button then the selected SDK is deleted successfully.
Step 8: Click No to cancel deletion.
Clone SDKs
To clone the SDK, do the following:
Step 1: Login as a Product Owner.
Step 2: Enter the SAMi Portal URL in the browser.
Step 3: Enter the Email and the Password in the respective fields and click Login.
You will land on to the Product Owner Dashboard.
Step 4: Product Owner will be able to manage SDK’s by clicking on Manage Assets button, it redirects you to Manage Assets page.
The Manage Assets page appears.
Step 5: To Manage SDK’s click on SDK’s tab on the left navigation.
All the available SDKs are displayed in the SDK page.
Step 6: In the SDKs page, select an SDK to clone and click on Clone icon.
A Clone confirmation page appears.
Step 7: Click Yes to Clone.
A Clone success message appears.
The Clone will be displayed in ‘Pending’ Status.
Here, the SAMi Administrator needs to approve to make it active. and the PO Admin mentioning that the Asset is under review and approval.
The SAMi admin has 24 hours to review and approve the SDK.
An email message is also sent by the SAMi Admin to the PO mentioning the asset is reviewed and clone is approved.
When the SDK Clone is approved by the SAMi Admin, it is displayed in the SDKs list with ‘Active’ Status.
*Important Note: The process of Cloning an asset is same for Products, API Specs, API SKUs, Features, SDKs, and FAQs. It clones only the Products, API Specs, API SKUs, Features, SDKs, and FAQs details not the Asserts, Categories attached to it.
Workflow 13 – Manage FAQs (With Approval)
Scenario 1 – To Manage FAQs from the main menu
As a product owner you will be able to manage FAQs from the main menu. This involves the following operations:
- Add FAQs
- Edit FAQs
- Delete FAQs
- Clone FAQs
Add FAQs
To add an FAQ from main menu, do the following:
Step 1: Login as a Product Owner.
Step 2: Enter the SAMi Portal URL in the browser.
Step 3: Enter the Email and the Password in the respective fields and click Login.
You will land on to Product Owner Dashboard.
Step 4: Product Owner will be able to manage SDK’s by clicking on Dashboard > Manage Assets menu.
The Manage Assets page appears.
Step 5: Click on FAQs in the left navigation pane.
The Product Owner will be able to view all the FAQs in the Manage Assets page.
Step 6: The Product Owner will be able to Add FAQ by clicking Add FAQ button.
Step 7: In the FAQs page, the Product Owner is required to fill in the details:
- Title
- Question
- Answer
- Connect Assert to Products,
- Viewable By
Step 8: Click on Submit button to add an FAQ.
Step 9: Click Cancel button, to cancel adding an FAQ.
Once the Submit button is clicked. The FAQ will be listed in FAQs list in a ‘Pending’ Status. An email message is sent to the SAMi Admin for approval.
An email is sent to the PO mentioning, the SAMi Admin needs to approve the FAQ.
An email message is also sent to the SAMi Admin that the FAQ is awaiting your approval.
The SAMi Admin needs to approve the FAQ and, after approval it will appear in the FAQs list in ‘Active’ Status.
Edit FAQs
To edit an existing FAQ from the Manage Assets page, do the following:
Step 1: Login as a Product Owner.
Step 2: Enter the SAMi Portal URL in the browser.
Step 3: Enter the Email and the Password in the respective fields and click Login.
You will land on to Product Owner Dashboard.
Step 4: Product Owner will be able to manage SDK’s by clicking on Dashboard > Manage Assets menu.
The Manage Assets page appears.
Step 5: Click on FAQs in the left navigation pane.
The Product Owner will be able to view all the FAQs in the Manage Assets page.
Step 6: The Product Owner will be able to edit the existing FAQ upon clicking on the Edit icon in the Actions column.
The FAQs page is displayed.
Step 7: As a Product Owner, you will be able to make necessary changes to the FAQ information.
Step 8: Once all changes are done, click Submit button.
Once the Submit button is clicked. The FAQ will be listed FAQs list in a ‘Pending’ Status. An email message is sent to the SAMi Admin for approval.
The SAMi Admin needs to approve the FAQ and, after approval it will appear in the FAQs list in ‘Active’ Status.
An email notification is sent to the PO mentioning, the FAQ is awaiting SAMi Admin approval.
An email notification is sent to the SAMi Admin mentioning, the FAQ is awaiting your approval.
When the SAMi Admin approves the FAQ, it will appear in the FAQs list with the Status as ‘Active’
Delete FAQs
To delete an existing FAQ from the Manage Assets page, do the following:
Step 1: Login as a Product Owner.
Step 2: Enter the SAMi Portal URL in the browser.
You will land on to Product Owner Dashboard.
Step 3: From Product Owner Dashboard, click Dashboard > Manage Assets.
The Manage Assets page appears.
Step 4: Click on FAQs in the left navigation pane.
The Product Owner will be able to view all the FAQs in the Manage Assets page.
Step 5: The Product owner will be able to delete the Existing FAQ upon clicking on the Delete icon in the Action column.
A confirmation message appears.
A Delete Confirmation dialog box appears.
Step 6: Click on Yes button, and then the selected FAQ will be deleted successfully.
Step 7: Click No to cancel deletion.
Upon deleting, in the FAQs page, the deleted FAQ you will no longer viewed in the list of FAQs.
Clone FAQs
To clone an existing FAQ from the Manage Assets page, do the following:
Step 1: Login as a Product Owner.
Step 2: Enter the SAMi Portal URL in the browser.
You will land on to Product Owner Dashboard.
Step 3: From Product Owner Dashboard, click Dashboard > Manage Assets.
The Manage Assets page appears.
Step 4: Click on FAQs in the left navigation pane.
The Product Owner will be able to view all the FAQs in the Manage Assets page.
Step 5: In the Manage Assets page, select an FAQ to clone, click on Clone icon.
A Clone confirmation dialog box appears.
Step 6: Click Yes to clone.
A success message appears. The FAQ is shown in the FAQs page in the ‘Pending’ status.
The SAMi Administrator needs to approve it to make it in ‘Active’ status.
An email notification is sent to PO mentioning the FAQ clone is awaiting approval.
An email notification is sent to SAMi admin mentioning the FAQ Clone is in ‘Pending’ Status awaiting your approval.
When the SAMi Admin approves it, the Cloned FAQ will be displayed in the FAQs list with the Status as ‘Active’.
Scenario 2– To Manage FAQs from the Product Owner Dashboard – Manage Assets Button
As a product owner, you will be able to manage the FAQs from the Product Owner Dashboard. This involved the following operations:
- Add FAQs
- Edit FAQs
- Delete FAQs
- Clone FAQs
Add FAQs
To add an FAQ from main menu, do the following:
Step 1: Login as a Product Owner.
Step 2: Enter the SAMi Portal URL in the browser.
Step 3: Enter the Email and the Password in the respective fields and click Login.
You will land on to Product Owner Dashboard.
Step 4: As a Product Owner you will be able to Manage FAQ’s by clicking Manage Assets button, its redirects you to Manage Assets page.
The Manage Assets page appears.
Step 5: Click on FAQs in the left navigation pane.
The Product Owner will be able to view all the FAQs in the Manage Assets page.
Step 6: The Product Owner will be able to Add FAQ by clicking Add FAQ button.
Step 7: In the FAQs page, the Product Owner is required to fill in the details:
- Title
- Question
- Answer
- Connect Assert to Products,
- Viewable By
Step 8: Click on Submit button to add an FAQ.
Step 9: Click Cancel button, to cancel adding an FAQ.
Once the Submit button is clicked. The FAQ will be listed in FAQs list in a ‘Pending’ Status. An email message is sent to the SAMi Admin for approval.
An email is sent to the PO mentioning, the SAMi Admin needs to approve the FAQ.
An email message is also sent to the SAMi Admin that the FAQ is awaiting your approval.
The SAMi Admin needs to approve the FAQ and, after approval it will appear in the FAQs list in ‘Active’ Status.
Edit FAQs
To edit an existing FAQ from the Manage Assets page, do the following:
Step 1: Login as a Product Owner.
Step 2: Enter the SAMi Portal URL in the browser.
Step 3: Enter the Email and the Password in the respective fields and click Login.
You will land on to Product Owner Dashboard.
Step 4: As a Product Owner you will be able to Manage FAQ’s by clicking Manage Assets button, its redirects you to Manage Assets page.
The Manage Assets page appears.
Step 5: Click on FAQs in the left navigation pane.
The Product Owner will be able to view all the FAQs in the Manage Assets page.
Step 6: The Product Owner will be able to edit the existing FAQ upon clicking on the Edit icon in the Actions column.
The FAQs page is displayed.
Step 7: As a Product Owner, you will be able to make necessary changes to the FAQ information.
Step 8: Once all changes are done, click Submit button.
Once the Submit button is clicked. The FAQ will be listed FAQs list in a ‘Pending’ Status. An email message is sent to the SAMi Admin for approval.
The SAMi Admin needs to approve the FAQ and, after approval it will appear in the FAQs list in ‘Active’ Status.
An email notification is sent to the PO mentioning, the FAQ is awaiting SAMi Admin approval.
An email notification is sent to the SAMi Admin mentioning, the FAQ is awaiting your approval.
When the SAMi Admin approves the FAQ, it will appear in the FAQs list with the Status as ‘Active’
Delete FAQs
To delete an existing FAQ from the Manage Assets page, do the following:
Step 1: Login as a Product Owner.
Step 2: Enter the SAMi Portal URL in the browser.
You will land on to Product Owner Dashboard.
Step 3: As a Product Owner you will be able to Manage FAQ’s by clicking Manage Assets button, its redirects you to Manage Assets page.
The Manage Assets page appears.
Step 4: Click on FAQs in the left navigation pane.
The Product Owner will be able to view all the FAQs in the Manage Assets page.
Step 5: The Product owner will be able to delete the Existing FAQ upon clicking on the Delete icon in the Action column.
A confirmation message appears.
A Delete Confirmation dialog box appears.
Step 6: Click on Yes button, and then the selected FAQ will be deleted successfully.
Step 7: Click No to cancel deletion.
Upon deleting, in the FAQs page, the deleted FAQ you will no longer viewed in the list of FAQs.
Clone FAQs
To clone an existing FAQ from the Manage Assets page, do the following:
Step 1: Login as a Product Owner.
Step 2: Enter the SAMi Portal URL in the browser.
You will land on to Product Owner Dashboard.
Step 3: As a Product Owner you will be able to Manage FAQ’s by clicking Manage Assets button, its redirects you to Manage Assets page.
The Manage Assets page appears.
Step 4: Click on FAQs in the left navigation pane.
The Product Owner will be able to view all the FAQs in the Manage Assets page.
Step 5: In the Manage Assets page, select an FAQ to clone, click on Clone icon.
A Clone confirmation dialog box appears.
Step 6: Click Yes to clone.
A success message appears. The FAQ is shown in the FAQs page in the ‘Pending’ status.
The SAMi Administrator needs to approve it to make it in ‘Active’ status.
An email notification is sent to PO mentioning the FAQ clone is awaiting approval.
An email notification is sent to SAMi admin mentioning the FAQ Clone is in ‘Pending’ Status awaiting your approval.
When the SAMi Admin approves it, the Cloned FAQ will be displayed in the FAQs list with the Status as ‘Active’.
Workflow 14 – Manage API Specs (With Approval)
Scenario 1 – To Manage API Specs from the Main Menu – Manage Assets
As a product owner, you will be able to manage the API Specs from the Product Owner Dashboard. This involved the following operations:
- Add API Specs
- Edit API Specs
- Delete API Specs
- Clone API Specs
Add API Specs
Step 1: Login as a Product Owner.
Step 2: Enter the SAMi Portal URL in the browser.
Step 3: Enter the Email and the Password in the respective fields and click Login.
You will land on to Product Owner Dashboard.
Step 4: The Product Owner will be able to Manage API Specs from main menu and clicking on Dashboard and then Manage Assets.
The Manage Assets page is displayed.
Step 5: Product Owner will be able to Manage API Specs by clicking on API Specs button on the left pane.
The API Specs page is displayed.
Step 6: The Product Owner will be able to add API Specs by clicking on Add API Spec button.
Step 7: In the API Specs page, enter the following details:
- Title
- Select Specs file, to upload it.
- Description
- Select Specs Type
- Optionally, Connect asset to products, Asset Categorization and Viewable By
Step 8: Click on Submit button to add API Spec to the Product.
Step 9: Click Cancel to cancel adding the API Spec.
Once an API Spec is added, it will appear in the API Spec list in ‘Pending’ Status page.
An email message is sent to PO mentioning, the API Specs needs review and approval from SAMi Admin, you will be notified once done.
An email message is sent to the SAMi Admin mentioning, the API Specs is awaiting approval.
When the SAMi Admin approves the API Specs it will appear in the API Specs list in ‘Active’ Status.
Edit API Specs
The Product owner will be able to edit the API Spec from the Main menu.
To edit an API Spec, do the following:
Step 1: Login as a Product Owner.
Step 2: Enter the SAMi Portal URL in the browser.
Step 3: Enter the Email and the Password in the respective fields and click Login.
You will land on to Product Owner Dashboard.
Step 4: The Product Owner will be able to Manage API Specs from main menu and clicking on Dashboard and then Manage Assets.
The Manage Assets page is displayed.
Step 5: Product Owner will be able to Manage API Specs by clicking on API Specs button on the left pane.
Step 7: Click on Edit icon.
The API Spec page is displayed.
Step 8: As a Product Owner, you will be able to make necessary changes to the API Spec information.
Step 9: Once all changes are done, click Submit button.
The API Spec is updated and listed in the API Specs page with the ‘Pending’ Status
An email message is sent to PO mentioning, the API Specs needs review and approval from SAMi Admin, you will be notified once done.
An email message is also sent to the SAMi Admin mentioning, the API Specs is awaiting approval.
When the SAMi Admin approves the API Specs will appear in the API Specs list in ‘Active’ Status.
Delete API Spec
The Product owner will be able to delete the API Spec from the Main menu.
To delete API Spec, do the following:
Step 1: Login as a Product Owner.
Step 2: Enter the SAMi Portal URL in the browser.
Step 3: Enter the Email and the Password in the respective fields and click Login.
You will land on to Product Owner Dashboard.
Step 4: The Product Owner will be able to Manage API Specs from main menu and clicking on Dashboard and then Manage Assets.
The Manage Assets page is displayed.
Step 5: Product Owner will be able to Manage API Specs by clicking on API Specs button on the left pane.
The API Specs page is displayed.
Step 6: The Product Owner will be able to delete the existing API Spec upon clicking on the Delete icon.
Step 7: The Product owner will be able to delete the Existing API Spec upon clicking on the Delete button.
A confirmation message appears.
Step 8: Click on Yes button, and then the selected API Spec will be deleted successfully.
Step 9: Click No to cancel deletion.
Upon deleting, the API Specs is deleted, and it will no longer be viewed in the list of API Specs.
Clone API Specs
To clone an existing API Specs from the Manage Assets page, do the following:
Step 1: Login as a Product Owner.
Step 2: Enter the SAMi Portal URL in the browser.
You will land on to Product Owner Dashboard.
Step 3: From Product Owner Dashboard, click Dashboard > Manage Assets.
Step 4: The Product Owner will be able to Manage API Specs from main menu and clicking on Dashboard and then Manage Assets.
The Manage Assets page is displayed.
Step 5: Product Owner will be able to Manage API Specs by clicking on API Specs button on the left pane.
The API Specs page appears.
Step 5: Click on Clone icon to clone an API Specs from the available list.
A Confirm Clone dialog box appears.
Step 6: Click Yes, to confirm clone the API Specs.
Step 7: Click No to cancel clone.
The API Spec is listed in the API Specs page in ‘Pending’ Status.
An email message is sent to PO mentioning, the API Specs needs review and approval from SAMi Admin, you will be notified once done.
An email message is also sent to the SAMi Admin mentioning, the API Specs is awaiting approval.
When the SAMi Admin approves the cloned API Specs will appear in the API Specs list in ‘Active’ Status.
Scenario 2 – To Manage API Specs from the Product Owner Dashboard – Manage button
As a product owner, you will be able to manage the API Specs from the Product Owner Dashboard > Manage button. This involved the following operations:
• Add API Specs
• Edit API Specs
• Delete API Specs
• Clone API Specs
Add API Specs
Step 1: Login as a Product Owner.
Step 2: Enter the SAMi Portal URL in the browser.
Step 3: Enter the Email and the Password in the respective fields and click Login.
You will land on to Product Owner Dashboard.
Step 4: As a Product Owner you will be able to Manage FAQ’s by clicking Manage Assets button, its redirects you to Manage Assets page.
The Manage Assets page is displayed.
Step 5: Product Owner will be able to Manage API Specs by clicking on API Specs button on the left pane.
The API Specs page is displayed.
Step 6: The Product Owner will be able to add API Specs by clicking on Add API Spec button.
Step 7: In the API Specs page, enter the following details:
- Title
- Select Specs file, to upload it.
- Description
- Select Specs Type
- Optionally, Connect asset to products, Asset Categorization and Viewable By
Step 8: Click on Submit button to add API Spec to the Product.
Step 9: Click Cancel to cancel adding the API Spec.
Once an API Spec is added, it will appear in the API Spec list in ‘Pending’ Status page.
An email message is sent to PO mentioning, the API Specs needs review and approval from SAMi Admin, you will be notified once done.
An email message is sent to the SAMi Admin mentioning, the API Specs is awaiting approval.
When the SAMi Admin approves the API Specs it will appear in the API Specs list in ‘Active’ Status.
Edit API Specs
The Product owner will be able to edit the API Spec from the Main menu.
To edit an API Spec, do the following:
Step 1: Login as a Product Owner.
Step 2: Enter the SAMi Portal URL in the browser.
Step 3: Enter the Email and the Password in the respective fields and click Login.
You will land on to Product Owner Dashboard.
Step 4: As a Product Owner you will be able to Manage FAQ’s by clicking Manage Assets button, its redirects you to Manage Assets page.
The Manage Assets page is displayed.
Step 5: Product Owner will be able to Manage API Specs by clicking on API Specs button on the left pane.
Step 6: Click on Edit icon.
The API Spec page is displayed.
Step 7: As a Product Owner, you will be able to make necessary changes to the API Spec information.
Step 8: Once all changes are done, click Submit button.
The API Spec is updated and listed in the API Specs page with the ‘Pending’ Status
An email message is sent to PO mentioning, the API Specs needs review and approval from SAMi Admin, you will be notified once done.
An email message is also sent to the SAMi Admin mentioning, the API Specs is awaiting approval.
When the SAMi Admin approves the API Specs will appear in the API Specs list in ‘Active’ Status.
Delete API Spec
The Product owner will be able to delete the API Spec from the Main menu.
To delete API Spec, do the following:
Step 1: Login as a Product Owner.
Step 2: Enter the SAMi Portal URL in the browser.
Step 3: Enter the Email and the Password in the respective fields and click Login.
You will land on to Product Owner Dashboard.
Step 4: As a Product Owner you will be able to Manage FAQ’s by clicking Manage Assets button, its redirects you to Manage Assets page.
The Manage Assets page is displayed.
Step 5: Product Owner will be able to Manage API Specs by clicking on API Specs button on the left pane.
The API Specs page is displayed.
Step 6: The Product Owner will be able to delete the existing API Spec upon clicking on the Delete icon.
Step 7: The Product owner will be able to delete the Existing API Spec upon clicking on the Delete button.
A confirmation message appears.
Step 8: Click on Yes button, and then the selected API Spec will be deleted successfully.
Step 9: Click No to cancel deletion.
Upon deleting, the API Specs is deleted, and it will no longer be viewed in the list of API Specs.
Clone API Specs
To clone an existing API Specs from the Manage Assets page, do the following:
Step 1: Login as a Product Owner.
Step 2: Enter the SAMi Portal URL in the browser.
Step 3: Enter the Email and the Password in the respective fields and click Login.
You will land on to Product Owner Dashboard.
Step 4: From Product Owner Dashboard, click Dashboard > Manage Assets.
Step 5: As a Product Owner you will be able to Manage FAQ’s by clicking Manage Assets button, its redirects you to Manage Assets page.
The Manage Assets page is displayed.
Step 6: Product Owner will be able to Manage API Specs by clicking on API Specs button on the left pane.
The API Specs page appears.
Step 7: Click on Clone icon to clone an API Specs from the available list.
A Confirm Clone dialog box appears.
Step 8: Click Yes, to confirm clone the API Specs.
Step 9: Click No to cancel clone.
The API Spec is listed in the API Specs page in ‘Pending’ Status.
An email message is sent to PO mentioning, the API Specs needs review and approval from SAMi Admin, you will be notified once done.
An email message is also sent to the SAMi Admin mentioning, the API Specs is awaiting approval.
When the SAMi Admin approves the cloned API Specs will appear in the API Specs list in ‘Active’ Status.
Workflow 15 – Manage Product Features (With Approval)
The PO will be able to manage the Product Features from the main menu and perform the following operations:
- Add Features
- Edit Features
- Delete Features
- Clone Features
Scenario 1 – To Manage Product Features from the Main Menu
Add Features
To add a feature to a product, follow the procedure:
Step 1: Login as a Product Owner.
Step 2: Enter the SAMi Portal URL in the browser.
Step 3: Enter the Email and the Password in the respective fields and click Login.
You will land on to the Product Owner Dashboard.
Step 4: From Product Owner Dashboard, click Dashboard > Manage Assets.
The Manage Assets page appears.
Step 5: The Product Owner will be able to Manage Product Features by clicking on Features tab on the left navigation pane.
The Features page appears.
Step 6: The Product Owner will be able to Add Product Features by Clicking on Add Features button.
The Feature page appear to fill in all the required details.
Step 7: The Product Owner will be able to fill all the Details – Title, feature Thumbnail, Select Image, feature Description, Connect Assert to products, Viewable By.
*Note: If the Feature Image is not selected the system will by default selects a default image for that particular Feature.
Step 8: Clicks on Submit button to Add product Feature.
A success message appears. The Product Owner will be able to view the Added Product Features in the list in ‘Pending’ Status.
The SAMi Admin needs to approve the Feature to make it in Active Status. An email message is sent to SAMi Admin mentioning, the Feature is awaiting approval.
An email notification is sent to the PO mentioning the Feature is under review by Admin and will be in active status once approved.
After approval from SAMi Admin, the Feature is displayed in Featured list in ‘Active’ Status.
Edit Product Feature
To edit the product features, do the following:
Step 1: Login as a Product Owner.
Step 2: Enter the SAMi Portal URL in the browser.
Step 3: Enter the Email and Password in the respective fields and click Login.
You will land on to the Product Owner Dashboard.
Step 4: From Product Owner Dashboard, click Dashboard > Manage Assets.
Step 5: The Product Owner will be able to edit the existing Product Feature upon clicking on the Edit Icon.
The Features page is displayed to make necessary changes.
Step 6: Once all the changes are complete, click Submit.
The features are updated and displayed in the Features page with the ‘Pending’ Status.
The SAMi Admin needs to approve the Feature to make it in Active Status. An email message is sent to SAMi Admin mentioning, the Feature is awaiting approval.
An email notification is sent to the PO mentioning the Feature is under review by Admin and will be in active status once approved.
After approval from SAMi Admin, the Feature is displayed in Featured list in ‘Active’ Status.
Delete Feature
To delete the product features, do the following:
Step 1: Login as a Product Owner.
Step 2: Enter the SAMi Portal URL in the browser.
Step 3: Enter the Email and Password in the respective fields and click Login.
You will land on to the Product Owner Dashboard.
Step 4: From Product Owner Dashboard, click Dashboard > Manage Assets.
The Manage Assets page appears.
Step 4: The Product Owner will be able to delete the existing Product Feature upon clicking on the Delete Icon.
A Confirmation message appears.
Step 5: Click Yes, to delete the product feature.
Step 6: Click No, to abort deletion.
When the Yes button is clicked the Product Feature is deleted and it will no longer be available in the Features list.
Clone Features
To clone a Feature, follow the procedure:
Step 1: Login as a Product Owner.
Step 2: Enter the SAMi Portal URL in the browser.
Step 3: Enter the Email and Password in the respective fields and click Login.
You will land on to the Product Owner Dashboard.
Step 4: From Product Owner Dashboard, click Dashboard > Manage Assets.
The Manage Assets page appears.
Step 5: Product Owner will be able to Manage product Features by clicking on Features tab on the left navigation pane.
Step 6: Click on the Clone Icon.
A Clone Confirmation dialog box appears.
Step 7: Click Yes, to confirm clone the Feature.
Step 8: Click No to cancel clone.
The Feature is listed in the Features page in ‘Pending’ Status.
An email message is also sent to the SAMi Admin mentioning, the Feature is awaiting approval.
When the SAMi Admin approves the cloned Feature, it will appear in the Features list in ‘Active’ Status.
Scenario 2 – To Manage Products Features from the Product Owner Dashboard – Manage Assets button (With Approval)
Add Features
To add a product feature, follow the procedure:
Step 1: Login as a Product Owner.
Step 2: Enter the SAMi Portal URL in the browser.
Step 3: Enter the Email and Password in the respective fields and click Login.
You will land on to the Product Owner Dashboard.
Step 4: The Product Owner will be able to click Manage Assets button from Product Owner Dashboard.
Step 4: As a Product Owner you will be able to click Manage Assets button, its redirects you to Manage Assets page.
The Manage Assets page is displayed.

Step 5: The Product Owner will be able to Manage Product Features by clicking on Features tab on the left navigation pane.
The Features page appears.
Step 6: The Product Owner will be able to Add Product Features by Clicking on Add Features button.
The Feature page appear to fill in all the required details.
Step 7: The Product Owner will be able to fill all the Details – Title, feature Thumbnail, Select Image, feature Description, Connect Assert to products, Viewable By.
*Note: If the Feature Image is not selected the system will by default selects a default image for that particular Feature.
Step 8: Clicks on Submit button to Add product Feature.
A success message appears. The Product Owner will be able to view the Added Product Features in the list in ‘Pending’ Status.
The SAMi Admin needs to approve the Feature to make it in Active Status. An email message is sent to SAMi Admin mentioning, the Feature is awaiting approval.
An email notification is sent to the PO mentioning the Feature is under review by Admin and will be in active status once approved.
After approval from SAMi Admin, the Feature is displayed in Featured list in ‘Active’ Status.
Edit Product Feature
To edit the product features, do the following:
Step 1: Login as a Product Owner.
Step 2: Enter the SAMi Portal URL in the browser.
Step 3: Enter the Email and Password in the respective fields and click Login.
You will land on to the Product Owner Dashboard.
Step 4: As a Product Owner you will be able to click Manage Assets button, its redirects you to Manage Assets page.
The Manage Assets page is displayed.
Step 5: The Product Owner will be able to Manage Product Features by clicking on Features tab on the left navigation pane.
The Features page appears.
Step 5: The Product Owner will be able to edit the existing Product Feature upon clicking on the Edit Icon.
The Features page is displayed to make necessary changes.
Step 6: Once all the changes are complete, click Submit.
The features are updated and displayed in the Features page with the ‘Pending’ Status.
The SAMi Admin needs to approve the Feature to make it in Active Status. An email message is sent to SAMi Admin mentioning, the Feature is awaiting approval.
An email notification is sent to the PO mentioning the Feature is under review by Admin and will be in active status once approved.
After approval from SAMi Admin, the Feature is displayed in Featured list in ‘Active’ Status.
Delete Feature
To delete the product features, do the following:
Step 1: Login as a Product Owner.
Step 2: Enter the SAMi Portal URL in the browser.
Step 3: Enter the Email and Password in the respective fields and click Login.
Step 4: As a Product Owner you will be able to click Manage Assets button, its redirects you to Manage Assets page.
The Manage Assets page is displayed.
Step 5: The Product Owner will be able to Manage Product Features by clicking on Features tab on the left navigation pane.
The Features page appears.
The Manage Assets page appears.
Step 4: The Product Owner will be able to delete the existing Product Feature upon clicking on the Delete Icon.
A Confirmation message appears.
Step 5: Click Yes, to delete the product feature.
Step 6: Click No, to abort deletion.
When the Yes button is clicked the Product Feature is deleted and it will no longer be available in the Features list.
Clone Features
To clone a Feature, follow the procedure:
Step 1: Login as a Product Owner.
Step 2: Enter the SAMi Portal URL in the browser.
Step 3: Enter the Email and Password in the respective fields and click Login.
You will land on to the Product Owner Dashboard.
Step 4: As a Product Owner you will be able to click Manage Assets button, its redirects you to Manage Assets page.
The Manage Assets page is displayed.
Step 5: The Product Owner will be able to Manage Product Features by clicking on Features tab on the left navigation pane.
The Features page appears.
Step 5: Product Owner will be able to Manage product Features by clicking on Features tab on the left navigation pane.
Step 6: Click on the Clone Icon.
A Clone Confirmation dialog box appears.
Step 7: Click Yes, to confirm clone the Feature.
Step 8: Click No to cancel clone.
The Feature is listed in the Features page in ‘Pending’ Status.
An email message is also sent to the SAMi Admin mentioning, the Feature is awaiting approval.
When the SAMi Admin approves the cloned Feature, it will appear in the Features list in ‘Active’ Status.
Workflow 16 – Manage API SKUs
Scenario 1 – To Manage API SKU’s from the Main Menu (Without Approval)
Add API SKUs
To add API SKUs from the main menu, follow the procedure:
Step 1: Login as a Product Owner.
Step 2: Enter the SAMi Portal URL in the browser.
Step 3: Enter the Email and Password in the respective fields and click Login.
You will land on to the Product Owner Dashboard.
Step 3: The Product Owner will be able to Manage Assets from Main Menu by clicking on Dashboard and then Manage Assets.
The Manage Assets page appears.
Step: 4 Product Owner can be able to Manage API SKU’s by clicking on API SKU’s tab on the left navigation pane.
The API SKU’s page appears.
Step 5: Clicks on Add API Sku button.
The API Skus Form appears.
Step 6: The Product Owner is required to fill these details: Title, Target Product Identifier, Org, Is Monetized (if Product is Monetized), Connect Assets to Product, Viewable by
*Note: To add an API Skus, the target identifier to be available in the ‘API Management Gateway’, such as APIGEE Edge/X/Hybrid/Saas. Otherwise, the PO will not be able to add an API Skus.
Step 7: Click on Submit button to Add API SKU to the Product.
A success message appears. The API SKU is successfully added with the ‘Pending’ Status. An email message is received by the PO.
When the SAMi Administrator approves the API SKU, the status changes to ‘Active’.
The Product Owner will be able to view the API SKU listed in the API SKUs list as ‘Active’ Status.
Edit the API SKU’s
The Product Owner will be allowed to edit the API SKUs from Manage Assets in main menu.
Step 1: Login as a Product Owner.
Step 2: Enter the SAMi Portal URL in the browser.
Step 3: Enter the Email and Password in the respective fields and click Login.
You will land on to the Product Owner Dashboard.
Step 4: The Product Owner will be able to Manage Assets from Main Menu by clicking on Dashboard and then Manage Assets.
The Manage Assets page appears.
Step: 5 Product Owner can be able to Manage API SKU’s by clicking on API SKU’s tab on the left navigation pane.
The API Skus page is opened. All the API Skus are listed in the page.
Step 6: To edit a Skus, the Product Owner to click the edit the existing API SKU upon clicking on the Edit button.
The specific API Skus page is opened for you to edit it.
Step 6: Make necessary changes to the Skus.
Step 7: Click Submit.
A success message appears. The SKU is successfully updated with the ‘Pending’ Status.
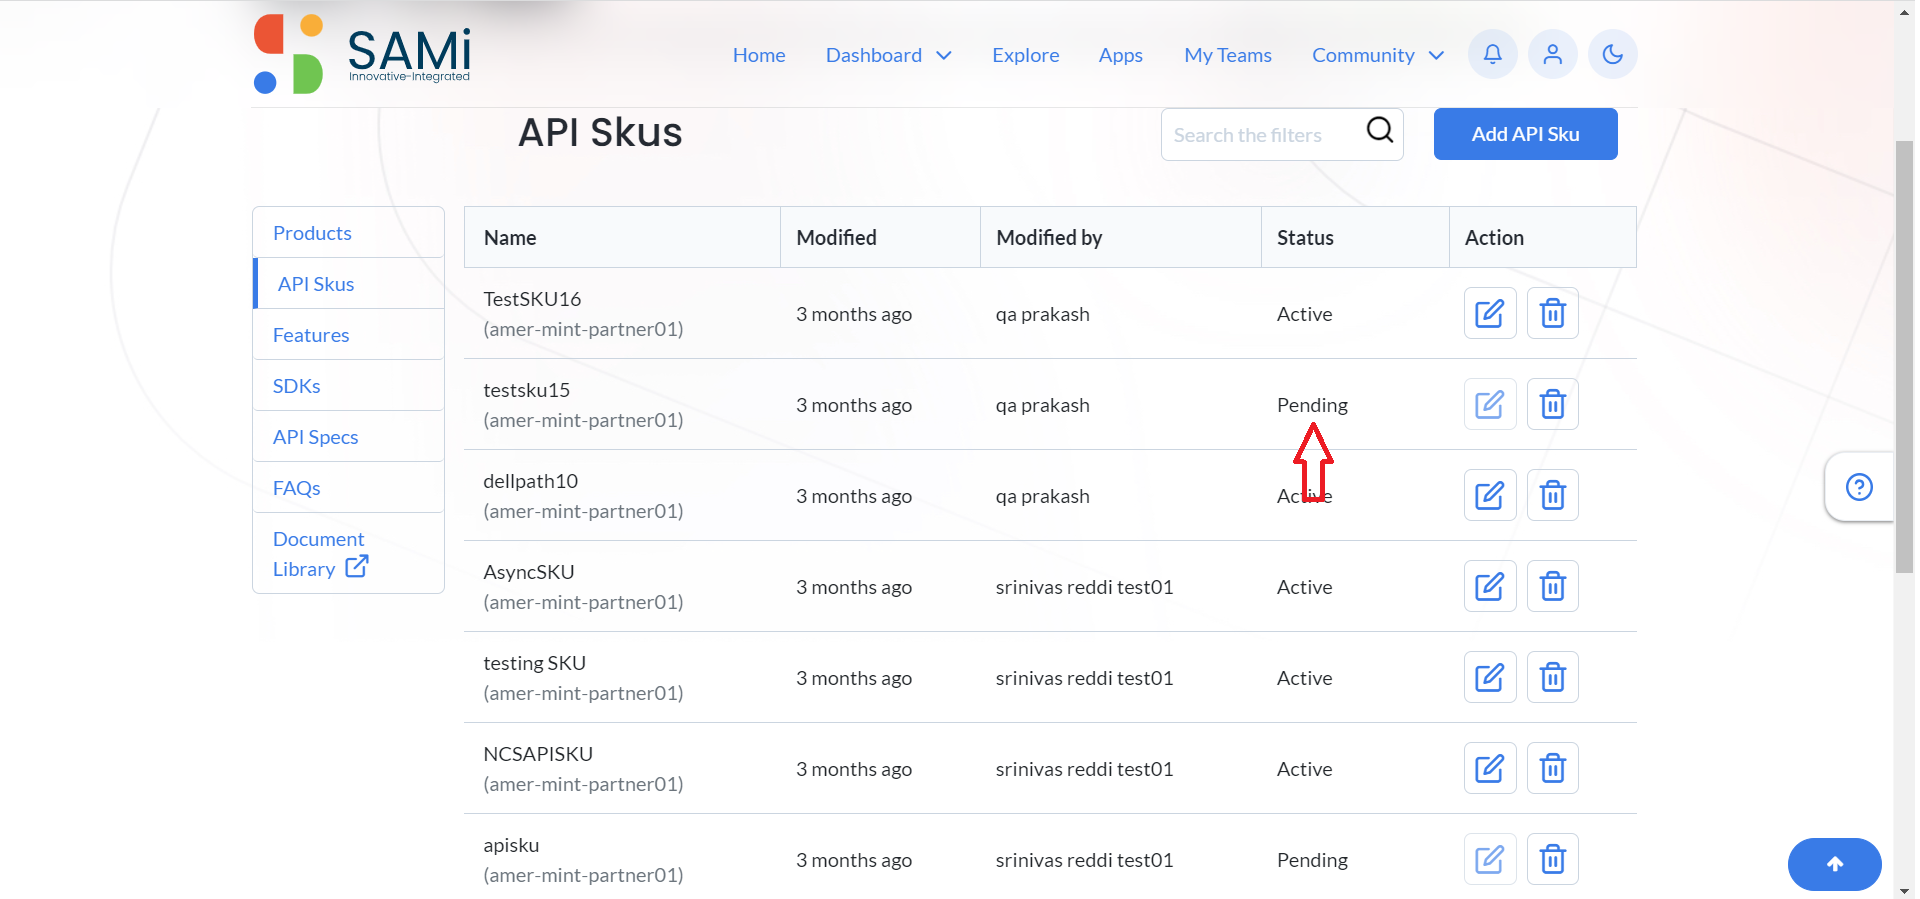
An email message is received by the PO and to the Admin.
When the SAMi Administrator approves the SKU, the status changes to ‘Active’.
The Product Owner will be able to view the updated SKU in the Features list.
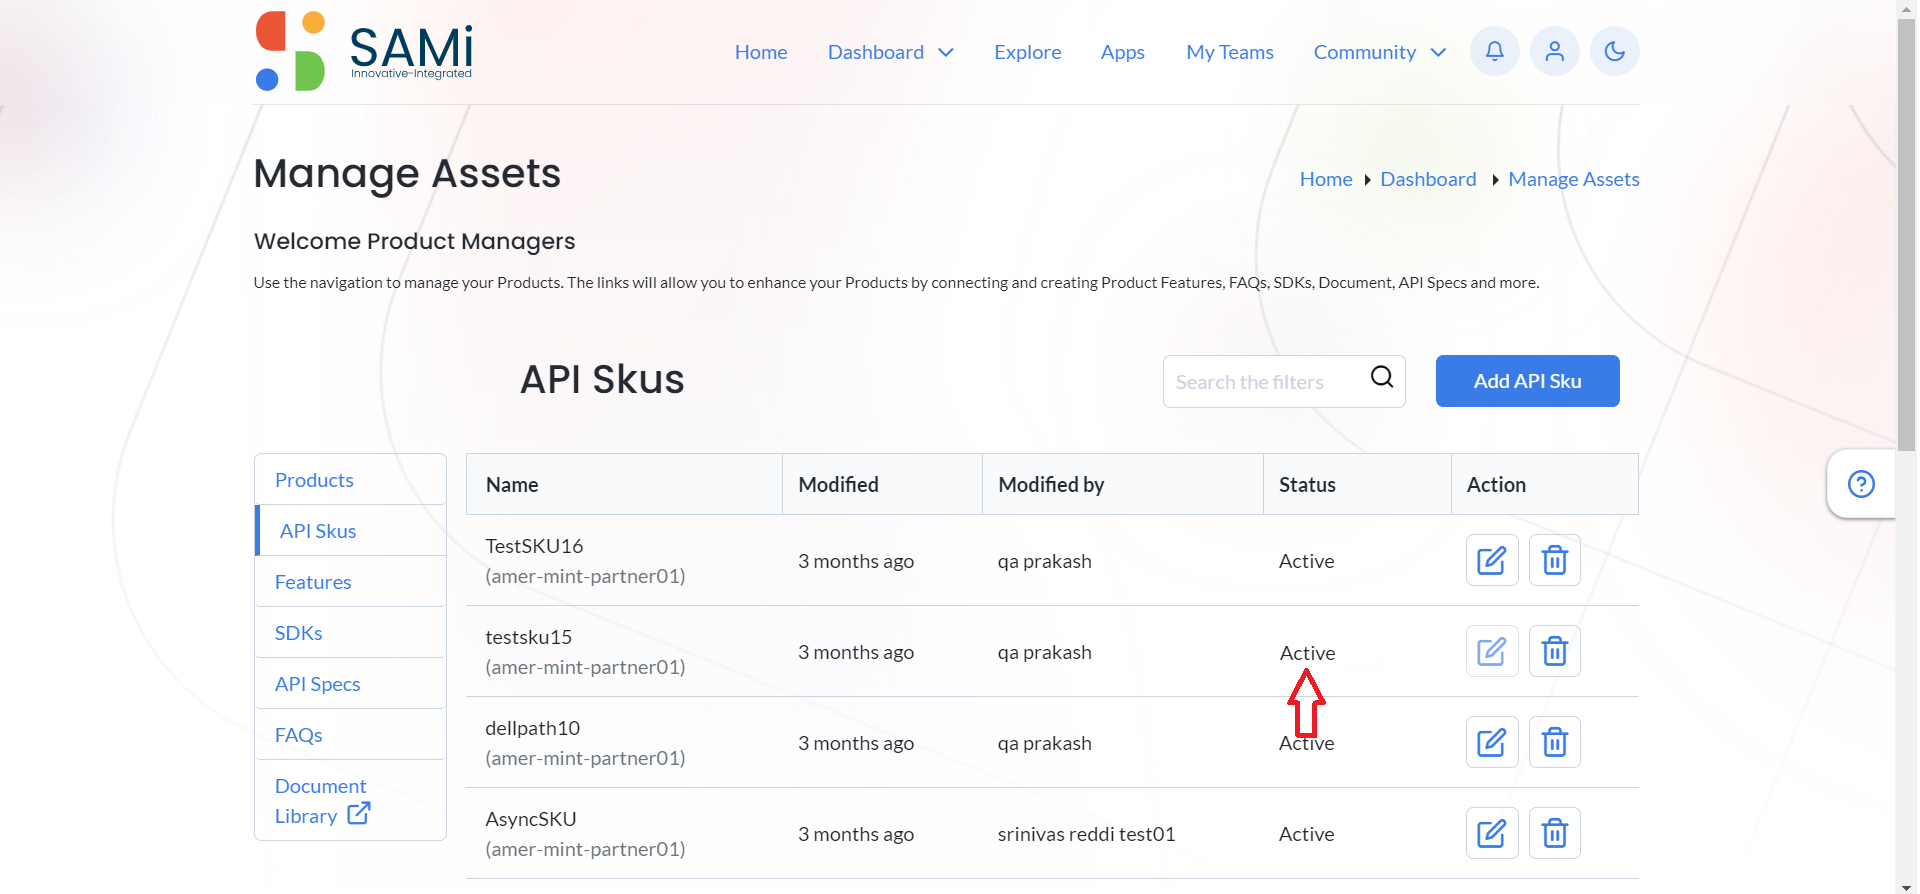
Step 9: Click Cancel, if you do not wish to make any changes to the API Skus, and the window is closed.
Delete an API Skus
The Product Owner will be allowed to delete an API Skus from Manage Assets in main menu.
Step 1: Login as a Product Owner.
Step 2: Enter the SAMi Portal URL in the browser.
Step 3: Enter the Email and Password in the respective fields and click Login.
You will land on to the Product Owner Dashboard.
Step 4: The Product Owner will be able to Manage Assets from Main Menu by clicking on Dashboard and then Manage Assets.
The Manage Assets page appears.
Step: 5 Product Owner can Manage API SKU’s by clicking on API SKU’s tab on the left navigation pane.
The API Skus page is opened. All the API Skus are listed in the page.
Step 6: To delete an API Skus, the Product Owner to click delete the existing API SKU upon clicking on the Delete button.
A confirmation delete message appears.
Step 7: Click Yes, to confirm delete.
The selected API Skus is deleted from the list.
Scenario 2 – To Manage API SKU’s from the PO Dashboard – Manage button (Without Approval)
Add API SKU’s
To add API SKUs from the main menu, follow the procedure:
Step 1: Login as a Product Owner.
Step 2: Enter the SAMi Portal URL in the browser.
Step 3: Enter the Email and Password in the respective fields and click Login.
You will land on to the Product Owner Dashboard.
Step 3: The Product Owner will be able to Manage Assets from Main Menu by clicking on Dashboard and then Manage Assets button.
The Manage Assets page appears.
Step: 4 Product Owner can be able to Manage API SKU’s by clicking on API SKU’s tab on the left navigation pane.
The API SKU’s page appears.
Step 5: Clicks on Add API Sku button.
The API Skus Form appears.
Step 6: The Product Owner is required to fill these details: Title, Target Product Identifier, Org, Is Monetized (if Product is Monetized), Connect Assets to Product, Viewable by
*Note: To add an API Skus, the target identifier to be available in the ‘API Management Gateway’, such as APIGEE Edge/X/Hybrid/Saas. Otherwise, the PO will not be able to add an API Skus.
Step 7: Click on Submit button to Add API SKU to the Product.
A success message appears. The API SKU is successfully added with the ‘Pending’ Status. An email message is received by the PO.
When the SAMi Administrator approves the API SKU, the status changes to ‘Active’.
The Product Owner will be able to view the API SKU listed in the API SKUs list as ‘Active’ Status.
Edit the API SKU’s
The Product Owner will be allowed to edit the API SKUs from Manage Assets in main menu.
Step 1: Login as a Product Owner.
Step 2: Enter the SAMi Portal URL in the browser.
Step 3: Enter the Email and Password in the respective fields and click Login.
You will land on to the Product Owner Dashboard.
Step 4: The Product Owner will be able to Manage Assets from Main Menu by clicking on Dashboard and then Manage Assets button.
The Manage Assets page appears.
Step: 5 Product Owner can be able to Manage API SKU’s by clicking on API SKU’s tab on the left navigation pane.
The API Skus page is opened. All the API Skus are listed in the page.
Step 6: To edit a Skus, the Product Owner to click the edit the existing API SKU upon clicking on the Edit button.
The specific API Skus page is opened for you to edit it.
Step 6: Make necessary changes to the Skus.
Step 7: Click Submit.
A success message appears. The SKU is successfully updated with the ‘Pending’ Status.
An email message is received by the PO and to the Admin.
When the SAMi Administrator approves the SKU, the status changes to ‘Active’.
The Product Owner will be able to view the updated SKU in the Features list.
Step 9: Click Cancel, if you do not wish to make any changes to the API Skus, and the window is closed.
Delete an API Skus
The Product Owner will be allowed to delete an API Skus from Manage Assets in main menu.
Step 1: Login as a Product Owner.
Step 2: Enter the SAMi Portal URL in the browser.
Step 3: Enter the Email and Password in the respective fields and click Login.
You will land on to the Product Owner Dashboard.
Step 4: The Product Owner will be able to Manage Assets from Main Menu by clicking on Dashboard and then Manage Assets button.
The Manage Assets page appears.
Step: 5 Product Owner can Manage API SKU’s by clicking on API SKU’s tab on the left navigation pane.
The API Skus page is opened. All the API Skus are listed in the page.
Step 6: To delete an API Skus, the Product Owner to click delete the existing API SKU upon clicking on the Delete button.
A confirmation delete message appears.
Step 7: Click Yes, to confirm delete.
The selected API Skus is deleted from the list.
Workflow 18 – Manage Assets – Manage Product Document Libraries
Scenario 1 – To Manage Document Library from the Main Menu
Step 1: Login as a Product Owner.
Step 2: Enter the SAMi Portal URL in the browser.
Step 3: Enter the Email and the Password in the respective fields and click Login.
You will land on to Product Owner Dashboard.
Step 4: The Product Owner will be able to Manage Document Library from Main Menu by clicking on Dashboard and the Document Library.
The Document Library page appears.
Step 5: By selecting the Document Library, Product Owner will be able to edit the document by clicking on the 3 dots, a dropdown menu appears, select the Edit option.
Note: Similarly, the Product Owner is allowed to edit the Folder by clicking on 3 dots and selecting the Edit option, the folder information is opened to update and save it.
The selected document is opened.
Step 6: In the document, the Product Owner can edit the details and click on Save button.
Step 7: Click Cancel to cancel the updates.
A success message appears stating, “Success, your request completed successfully”.
Step 8: As a Product Owner you will be able to see the Information of the Document Library by Clicking on any document to open it.
The document is opened. Click on Info button.
The document info is displayed on the right side.
Download File
Product Owner will be able to Download the Document Library by clicking on the Download Icon on the Top Menu displayed or by clicking 3 dots Action option and click on Download option.
Step 1: Login as a Product Owner
Step 2: Enter the SAMi Portal URL in the browser.
Step 3: Enter the Email and the Password in the respective fields and click Login.
You will land on to Product Owner Dashboard.
Step 4: The Product Owner will be able to Manage Document Library from Main Menu by clicking on Dashboard and the Document Library.
The Document Library page appears.
Step 5: By selecting the Document Library, Product Owner will be able to download the document by clicking on the 3 dots, a dropdown menu appears, select the download option.
Step 6: As a Product Owner, to download a file, click on 3 dots of any document.
The document’s options dropdown is opened.
Step 7: Click on Download button.
The file starts downloading. And, saved in the Downloads folder of your local drive.
Move Document
To move a document, do the following:
Step 1: Login as a Product Owner.
Step 2: Enter the SAMi Portal URL in the browser.
Step 3: Enter the Email and the Password in the respective fields and click Login.
You will land on to Product Owner Dashboard.
Step 4: The Product Owner will be able to Manage Document Library from Main Menu by clicking on Dashboard and the Document Library.
The Document Library page appears.
Step 5: Scroll down the Document Library page, you will be able to move the document by selecting a document and clicking on the 3 dots, a dropdown menu appears.
Step 6: Click on Move button.
The Select Destination Folder window is opened.
Step 7: Browse the destination folder where you’d like to move the file, click on Select button.
The file is moved to the desired folder.
Note: If you wish to add a new folder, where you want to move a particular document, click Add Folder button and provide folder information and save it.
Delete File
To delete a file from main menu, do the following:
Step 1: Login as a Product Owner
Step 2: Enter the SAMi Portal URL in the browser.
Step 3: Enter the Email and the Password in the respective fields and click Login.
You will land on to Product Owner Dashboard.
Step 4: The Product Owner will be able to Manage Document Library from Main Menu by clicking on Dashboard and the Document Library.
The Document Library page appears.
Step 5: Select the document by clicking on the checkbox.
Once the document checkbox is selected a top formatting menu appears.
Step 6: Click on Delete icon.
Once the Delete icon is clicked, the document is deleted successfully, and it is sent to the Recycle Bin.
Move the Document
To move a document from main menu, do the following:
Step 1: Login as a Product Owner.
Step 2: Enter the SAMi Portal URL in the browser.
Step 3: Enter the Email and the Password in the respective fields and click Login.
You will land on to Product Owner Dashboard.
Step 4: The Product Owner will be able to Manage Document Library from Main Menu by clicking on Dashboard and the Document Library.
The Document Library page appears.
Step 5: Product Owner will be able to Manage Document Library by clicking on Document Library button on the left navigation pane.
The Document Library page is displayed.
Step 6: Select the document by clicking on the checkbox.
Once the document checkbox is selected a top formatting menu appears.
Step 7: Click the Move icon.
The Select Destination Folder dialog box appears.
Step 8: Choose the selected folder to move. Otherwise, you can also create a folder by clicking on Add Folder option.
If you click Add Folder, the dialog box to add a new folder appears.
Step 9: In this dialog box, enter the Name, Description and select the permission by clicking on Permissions tab.
Step 10: Click Save.
The folder is created, a success message appears stating, “Folder created successfully”.
Step 11: Click Cancel, if you wish to cancel creating a folder and close the dialog box.
The folder by name ‘Bank’ is displayed in the dialog box.
Step 12: Click Select button to move the document to Bank folder.
A success message appears stating, “Your request is successful”.
Edit Tag of a Document
To edit the tag of a document from main menu, do the following:
Step 1: Login as a Product Owner.
Step 2: Enter the SAMi Portal URL in the browser.
Step 3: Enter the Email and the Password in the respective fields and click Login.
You will land on to Product Owner Dashboard.
Step 4: The Product Owner will be able to Manage Document Library from Main Menu by clicking on Dashboard and the Document Library.
The Document Library page appears.
Step 5: Click on Document Library button on the left navigation pane.
The Document Library page appears.
Step 6: Scroll down, select the document by clicking on the checkbox.
Once the document checkbox is selected a top formatting menu appears.
Step 7: Product Owner can be able to edit Tags of a Document by clicking on the Edit Tags Icon on the Top Menu displayed, alternatively by clicking 3 dots Action option and clicking on Edit Tags option.
Delete a Document from 3 dots menu option
To delete a document from main menu, do the following:
Step 1: Login as a Product Owner.
Step 2: Enter the SAMi Portal URL in the browser.
Step 3: Enter the Email and the Password in the respective fields and click Login.
You will land on to Product Owner Dashboard.
Step 4: The Product Owner will be able to Manage Document Library from Main Menu by clicking on Dashboard and the Document Library.
The Document Library page appears.
Step 5: Click on Document Library button on the left navigation pane.
The Document Library page appears.
Step 6: Scroll down, select the document by clicking on the checkbox.
Once the document checkbox is selected a top formatting menu appears.
Step 7: Product Owner can be able to Delete Document by clicking on the Delete Icon on the Top Menu displayed. Alternatively, by clicking 3 dots Action option and click on Move to Recycle Bin option.
The selected document is moved to the Recycle Bin.
Filter and Order a Document
The Product Owner will be able to filter and Order Document by clicking on the Filter and Order checkbox. And, providing the search parameters in the search field.
To Filter and Order a document, do the following:
Step 1: Login as a Product Owner.
Step 2: Enter the SAMi Portal URL in the browser.
Step 3: Enter the Email and the Password in the respective fields and click Login.
You will land on to Product Owner Dashboard.
Step 4: The Product Owner will be able to Manage Document Library from Main Menu by clicking on Dashboard and the Document Library.
The Document Library page appears.
Step 5: Product Owner will be able to Search a Document by entering the Document Name in the search field and clicking on Search icon.
The relevant document is searched and displayed.
Uploading Documents
The Product Owner will be able to upload the documents by visiting the Document Library page.
To Upload a document, do the following:
Step 1: Login as a Product Owner.
Step 2: Enter the SAMi Portal URL in the browser.
Step 3: Enter the Email and the Password in the respective fields and click Login.
You will land on to Product Owner Dashboard.
Step 4: The Product Owner will be able to Manage Document Library from Main Menu by clicking on Dashboard and the Document Library.
The Document Library page appears.
Step 5: In Document Library page, click on the Plus Icon.
The File Upload menu appears.
Step 6: Click on File Upload option.
Step 7: Click on Choose File button.
The Browser Dialog box appears.
Step 8: Select a File to upload and click Open. The File name appears in the Name field.
Add Description, in the text area and Asset Categorization fields.
Step 9: Click Publish.
The File is uploaded successfully.
Step 10: Click Cancel to cancel the file upload process and close the window.
*Notes:
- Similarly, you can upload multiple files as well by clicking the Plus Icon and following the same process as described above for single file upload.
- In the same way, you can upload folders as well by clicking the Plus Icon and following the same process as described above for single file upload.
Display Files and Folders in different Views
To display the files and folders in different views, do the following:
Step 1: In the Document Library page, click on the Display icon.
The Display option appear.
Step 2: Click on Cards option to view the Documents in card view.
Step 3: Similarly, click on List option to view the documents in list view.
Step 4: Click on Table option to view the documents in Table view.
Scenario 2 – To Manage Document Library from the PO Dashboard – Manage Assets button.
Step 1: Login as a Product Owner.
Step 2: Enter the SAMi Portal URL in the browser.
Step 3: Enter the Email and the Password in the respective fields and click Login.
You will land on to Product Owner Dashboard.
Step 4: The Product Owner will be able to Manage Document Library from Main Menu by clicking on Dashboard and the Manage Assets button.
Step 5: In Manage Assets page, click on Document Library button on the Left navigation.
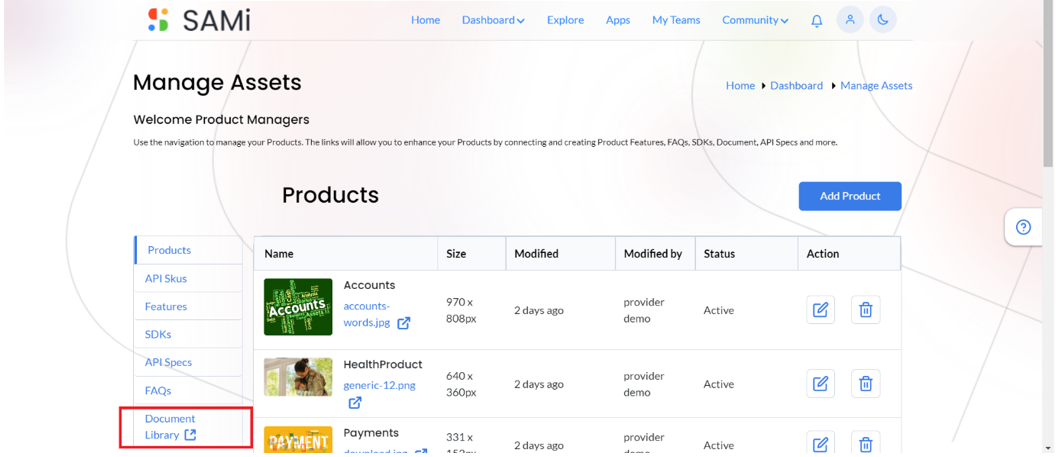
The Document Library page appears.
Step 6: By selecting the Document Library, Product Owner will be able to edit the document by clicking on the 3 dots, a dropdown menu appears, select the Edit option.
Note: Similarly, the Product Owner is allowed to edit the Folder by clicking on 3 dots and selecting the Edit option, the folder information is opened to update and save it.
The selected document is opened.
Step 7: In the document, the Product Owner can edit the details and click on Save button.
Step 8: Click Cancel to cancel the updates.
A success message appears stating, “Success, your request completed successfully”.
Step 9: As a Product Owner you will be able to see the Information of the Document Library by Clicking on any document to open it.
The document is opened. Click on Info button.
The document info is displayed on the right side.
Download File
Product Owner will be able to Download the Document Library by clicking on the Download Icon on the Top Menu displayed or by clicking 3 dots Action option and click on Download option.
Step 1: Login as a Product Owner
Step 2: Enter the SAMi Portal URL in the browser.
Step 3: Enter the Email and the Password in the respective fields and click Login.
You will land on to Product Owner Dashboard.
Step 4: The Product Owner will be able to Manage Document Library from Main Menu by clicking on Dashboard and the Manage Assets button.
Step 5: In Manage Assets page, click on Document Library button on the Left navigation.
The Document Library page appears.
Step 5: By selecting the Document Library, Product Owner will be able to download the document by clicking on the 3 dots, a dropdown menu appears, select the download option.
Step 6: As a Product Owner, to download a file, click on 3 dots of any document.
The document’s options dropdown is opened.
Step 7: Click on Download button.
The file starts downloading. And, saved in the Downloads folder of your local drive.
Move Document
To move a document, do the following:
Step 1: Login as a Product Owner.
Step 2: Enter the SAMi Portal URL in the browser.
Step 3: Enter the Email and the Password in the respective fields and click Login.
You will land on to Product Owner Dashboard.
Step 4: The Product Owner will be able to Manage Document Library from Main Menu by clicking on Dashboard and the Manage Assets button.
Step 5: In Manage Assets page, click on Document Library button on the Left navigation.
The Document Library page appears.
Step 6: Scroll down the Document Library page, you will be able to move the document by selecting a document and clicking on the 3 dots, a dropdown menu appears.
Step 7: Click on Move button.
The Select Destination Folder window is opened.
Step 8: Browse the destination folder where you’d like to move the file, click on Select button.
The file is moved to the desired folder.
Note: If you wish to add a new folder, where you want to move a particular document, click Add Folder button and provide folder information and save it.
Delete File
To delete a file from main menu, do the following:
Step 1: Login as a Product Owner
Step 2: Enter the SAMi Portal URL in the browser.
Step 3: Enter the Email and the Password in the respective fields and click Login.
You will land on to Product Owner Dashboard.
Step 4: The Product Owner will be able to Manage Document Library from Main Menu by clicking on Dashboard and the Manage Assets button.
Step 5: In Manage Assets page, click on Document Library button on the Left navigation.
The Document Library page appears.
Step 6: Select the document by clicking on the checkbox.
Once the document checkbox is selected a top formatting menu appears.
Step 7: Click on Delete icon.
Once the Delete icon is clicked, the document is deleted successfully, and it is sent to the Recycle Bin.
Move the Document
To move a document from main menu, do the following:
Step 1: Login as a Product Owner.
Step 2: Enter the SAMi Portal URL in the browser.
Step 3: Enter the Email and the Password in the respective fields and click Login.
You will land on to Product Owner Dashboard.
Step 4: The Product Owner will be able to Manage Document Library from Main Menu by clicking on Dashboard and the Manage Assets button.
Step 5: In Manage Assets page, click on Document Library button on the Left navigation.
The Document Library page appears.
Step 6: Product Owner will be able to Manage Document Library by clicking on Document Library button on the left navigation pane.
The Document Library page is displayed.
Step 7: Select the document by clicking on the checkbox.
Once the document checkbox is selected a top formatting menu appears.
Step 8: Click the Move icon.
The Select Destination Folder dialog box appears.
Step 9: Choose the selected folder to move. Otherwise, you can also create a folder by clicking on Add Folder option.
If you click Add Folder, the dialog box to add a new folder appears.
Step 10: In this dialog box, enter the Name, Description and select the permission by clicking on Permissions tab.
Step 11: Click Save.
The folder is created, a success message appears stating, “Folder created successfully”.
Step 12: Click Cancel, if you wish to cancel creating a folder and close the dialog box.
The folder by name ‘Bank’ is displayed in the dialog box.
Step 13: Click Select button to move the document to Bank folder.
A success message appears stating, “Your request is successful”.
Edit Tag of a Document
To edit the tag of a document from main menu, do the following:
Step 1: Login as a Product Owner.
Step 2: Enter the SAMi Portal URL in the browser.
Step 3: Enter the Email and the Password in the respective fields and click Login.
You will land on to Product Owner Dashboard.
Step 4: The Product Owner will be able to Manage Document Library from Main Menu by clicking on Dashboard and the Manage Assets button.
Step 5: In Manage Assets page, click on Document Library button on the Left navigation.
The Document Library page appears.
Step 6: Scroll down, select the document by clicking on the checkbox.
Once the document checkbox is selected a top formatting menu appears.
Step 7: Product Owner can be able to edit Tags of a Document by clicking on the Edit Tags Icon on the Top Menu displayed, alternatively by clicking 3 dots Action option and clicking on Edit Tags option.
Delete a Document from 3 dots menu option
To delete a document from main menu, do the following:
Step 1: Login as a Product Owner.
Step 2: Enter the SAMi Portal URL in the browser.
Step 3: Enter the Email and the Password in the respective fields and click Login.
You will land on to Product Owner Dashboard.
Step 4: The Product Owner will be able to Manage Document Library from Main Menu by clicking on Dashboard and the Manage Assets button.
Step 5: In Manage Assets page, click on Document Library button on the Left navigation.
The Document Library page appears.
Step 6: Scroll down, select the document by clicking on the checkbox.
Once the document checkbox is selected a top formatting menu appears.
Step 7: Product Owner can be able to Delete Document by clicking on the Delete Icon on the Top Menu displayed. Alternatively, by clicking 3 dots Action option and click on Move to Recycle Bin option.
The selected document is moved to the Recycle Bin.
Filter and Order a Document
The Product Owner will be able to filter and Order Document by clicking on the Filter and Order checkbox. And, providing the search parameters in the search field.
To Filter and Order a document, do the following:
Step 1: Login as a Product Owner.
Step 2: Enter the SAMi Portal URL in the browser.
Step 3: Enter the Email and the Password in the respective fields and click Login.
You will land on to Product Owner Dashboard.
Step 4: The Product Owner will be able to Manage Document Library from Main Menu by clicking on Dashboard and the Manage Assets button.
Step 5: In Manage Assets page, click on Document Library button on the Left navigation.
The Document Library page appears.
Step 6: Product Owner will be able to Search a Document by entering the Document Name in the search field and clicking on Search icon.
The relevant document is searched and displayed.
Uploading Documents
The Product Owner will be able to upload the documents by visiting the Document Library page.
To Upload a document, do the following:
Step 1: Login as a Product Owner.
Step 2: Enter the SAMi Portal URL in the browser.
Step 3: Enter the Email and the Password in the respective fields and click Login.
You will land on to Product Owner Dashboard.
Step 4: The Product Owner will be able to Manage Document Library from Main Menu by clicking on Dashboard and the Manage Assets button.
Step 5: In Manage Assets page, click on Document Library button on the Left navigation.
The Document Library page appears.
Step 6: In Document Library page, click on the Plus Icon.
The File Upload menu appears.
Step 7: Click on File Upload option.
Step 8: Click on Choose File button.
The Browser Dialog box appears.
Step 9: Select a File to upload and click Open. The File name appears in the Name field.
Add Description, in the text area and Asset Categorization fields.
Step 10: Click Publish.
The File is uploaded successfully.
Step 11: Click Cancel to cancel the file upload process and close the window.
*Notes:
- Similarly, you can upload multiple files as well by clicking the Plus Icon and following the same process as described above for single file upload.
- In the same way, you can upload folders as well by clicking the Plus Icon and following the same process as described above for single file upload.
Display Files and Folders in different Views
To display the files and folders in different views, do the following:
Step 1: In the Document Library page, click on the Display icon.
The Display option appear.
Step 2: Click on Cards option to view the Documents in card view.
Step 3: Similarly, click on List option to view the documents in list view.
Step 4: Click on Table option to view the documents in Table view.
Scenario 3 – To Manage Document Library from Manage Assets – Document Library
Step 1: Login as a Product Owner.
Step 2: Enter the SAMi Portal URL in the browser.
Step 3: Enter the Email and the Password in the respective fields and click Login.
You will land on to Product Owner Dashboard.
Step 4: The Product Owner will be able to Manage Document Library from Main Menu by clicking on Dashboard and the Manage Assets menu.
Step 5: In Manage Assets page, click on Document Library button on the Left navigation.
The Document Library page appears.
Step 6: By selecting the Document Library, Product Owner will be able to edit the document by clicking on the 3 dots, a dropdown menu appears, select the Edit option.
Note: Similarly, the Product Owner is allowed to edit the Folder by clicking on 3 dots and selecting the Edit option, the folder information is opened to update and save it.
The selected document is opened.
Step 7: In the document, the Product Owner can edit the details and click on Save button.
Step 8: Click Cancel to cancel the updates.
A success message appears stating, “Success, your request completed successfully”.
Step 9: As a Product Owner you will be able to see the Information of the Document Library by Clicking on any document to open it.
The document is opened. Click on Info button.
The document info is displayed on the right side.
Download File
Product Owner will be able to Download the Document Library by clicking on the Download Icon on the Top Menu displayed or by clicking 3 dots Action option and click on Download option.
Step 1: Login as a Product Owner
Step 2: Enter the SAMi Portal URL in the browser.
Step 3: Enter the Email and the Password in the respective fields and click Login.
You will land on to Product Owner Dashboard.
Step 4: The Product Owner will be able to Manage Document Library from Main Menu by clicking on Dashboard and the Manage Assets menu.
Step 5: In Manage Assets page, click on Document Library button on the Left navigation.
The Document Library page appears.
Step 6: By selecting the Document Library, Product Owner will be able to download the document by clicking on the 3 dots, a dropdown menu appears, select the download option.
Step 7: As a Product Owner, to download a file, click on 3 dots of any document.
The document’s options dropdown is opened.
Step 8: Click on Download button.
The file starts downloading. And, saved in the Downloads folder of your local drive.
Move Document
To move a document, do the following:
Step 1: Login as a Product Owner.
Step 2: Enter the SAMi Portal URL in the browser.
Step 3: Enter the Email and the Password in the respective fields and click Login.
You will land on to Product Owner Dashboard.
Step 4: The Product Owner will be able to Manage Document Library from Main Menu by clicking on Dashboard and the Manage Assets menu.
Step 5: In Manage Assets page, click on Document Library button on the Left navigation.
The Document Library page appears.
Step 6: Scroll down the Document Library page, you will be able to move the document by selecting a document and clicking on the 3 dots, a dropdown menu appears.
Step 7: Click on Move button.
The Select Destination Folder window is opened.
Step 8: Browse the destination folder where you’d like to move the file, click on Select button.
The file is moved to the desired folder.
Note: If you wish to add a new folder, where you want to move a particular document, click Add Folder button and provide folder information and save it.
Delete File
To delete a file from main menu, do the following:
Step 1: Login as a Product Owner
Step 2: Enter the SAMi Portal URL in the browser.
Step 3: Enter the Email and the Password in the respective fields and click Login.
You will land on to Product Owner Dashboard.
Step 4: The Product Owner will be able to Manage Document Library from Main Menu by clicking on Dashboard and the Manage Assets menu.
Step 5: In Manage Assets page, click on Document Library button on the Left navigation.
The Document Library page appears.
Step 6: Select the document by clicking on the checkbox.
Once the document checkbox is selected a top formatting menu appears.
Step 7: Click on Delete icon.
Once the Delete icon is clicked, the document is deleted successfully, and it is sent to the Recycle Bin.
Move the Document
To move a document from main menu, do the following:
Step 1: Login as a Product Owner.
Step 2: Enter the SAMi Portal URL in the browser.
Step 3: Enter the Email and the Password in the respective fields and click Login.
You will land on to Product Owner Dashboard.
Step 4: The Product Owner will be able to Manage Document Library from Main Menu by clicking on Dashboard and the Manage Assets menu.
Step 5: In Manage Assets page, click on Document Library button on the Left navigation.
The Document Library page appears.
Step 6: Product Owner will be able to Manage Document Library by clicking on Document Library button on the left navigation pane.
The Document Library page is displayed.
Step 7: Select the document by clicking on the checkbox.
Once the document checkbox is selected a top formatting menu appears.
Step 8: Click the Move icon.
The Select Destination Folder dialog box appears.
Step 9: Choose the selected folder to move. Otherwise, you can also create a folder by clicking on Add Folder option.
If you click Add Folder, the dialog box to add a new folder appears.
Step 10: In this dialog box, enter the Name, Description and select the permission by clicking on Permissions tab.
Step 11: Click Save.
The folder is created, a success message appears stating, “Folder created successfully”.
Step 12: Click Cancel, if you wish to cancel creating a folder and close the dialog box.
The folder by name ‘Bank’ is displayed in the dialog box.
Step 13: Click Select button to move the document to Bank folder.
A success message appears stating, “Your request is successful”.
Edit Tag of a Document
To edit the tag of a document from main menu, do the following:
Step 1: Login as a Product Owner.
Step 2: Enter the SAMi Portal URL in the browser.
Step 3: Enter the Email and the Password in the respective fields and click Login.
You will land on to Product Owner Dashboard.
Step 4: The Product Owner will be able to Manage Document Library from Main Menu by clicking on Dashboard and the Manage Assets menu.
Step 5: In Manage Assets page, click on Document Library button on the Left navigation.
The Document Library page appears.
Step 6: Scroll down, select the document by clicking on the checkbox.
Once the document checkbox is selected a top formatting menu appears.
Step 7: Product Owner can be able to edit Tags of a Document by clicking on the Edit Tags Icon on the Top Menu displayed, alternatively by clicking 3 dots Action option and clicking on Edit Tags option.
Delete a Document from 3 dots menu option
To delete a document from main menu, do the following:
Step 1: Login as a Product Owner.
Step 2: Enter the SAMi Portal URL in the browser.
Step 3: Enter the Email and the Password in the respective fields and click Login.
You will land on to Product Owner Dashboard.
Step 4: The Product Owner will be able to Manage Document Library from Main Menu by clicking on Dashboard and the Manage Assets menu.
Step 5: In Manage Assets page, click on Document Library button on the Left navigation.
The Document Library page appears.
Step 6: Scroll down, select the document by clicking on the checkbox.
Once the document checkbox is selected a top formatting menu appears.
Step 7: Product Owner can be able to Delete Document by clicking on the Delete Icon on the Top Menu displayed. Alternatively, by clicking 3 dots Action option and click on Move to Recycle Bin option.
The selected document is moved to the Recycle Bin.
Filter and Order a Document
The Product Owner will be able to filter and Order Document by clicking on the Filter and Order checkbox. And, providing the search parameters in the search field.
To Filter and Order a document, do the following:
Step 1: Login as a Product Owner.
Step 2: Enter the SAMi Portal URL in the browser.
Step 3: Enter the Email and the Password in the respective fields and click Login.
You will land on to Product Owner Dashboard.
Step 4: The Product Owner will be able to Manage Document Library from Main Menu by clicking on Dashboard and the Manage Assets menu.
Step 5: In Manage Assets page, click on Document Library button on the Left navigation.
The Document Library page appears.
Step 6: Product Owner will be able to Search a Document by entering the Document Name in the search field and clicking on Search icon.
The relevant document is searched and displayed.
Uploading Documents
The Product Owner will be able to upload the documents by visiting the Document Library page.
To Upload a document, do the following:
Step 1: Login as a Product Owner.
Step 2: Enter the SAMi Portal URL in the browser.
Step 3: Enter the Email and the Password in the respective fields and click Login.
You will land on to Product Owner Dashboard.
Step 4: The Product Owner will be able to Manage Document Library from Main Menu by clicking on Dashboard and the Manage Assets menu.
Step 5: In Manage Assets page, click on Document Library button on the Left navigation.
The Document Library page appears.
Step 6: In Document Library page, click on the Plus Icon.
The File Upload menu appears.
Step 7: Click on File Upload option.
Step 8: Click on Choose File button.
The Browser Dialog box appears.
Step 9: Select a File to upload and click Open. The File name appears in the Name field.
Add Description, in the text area and Asset Categorization fields.
Step 10: Click Publish.
The File is uploaded successfully.
Step 11: Click Cancel to cancel the file upload process and close the window.
*Notes:
- Similarly, you can upload multiple files as well by clicking the Plus Icon and following the same process as described above for single file upload.
- In the same way, you can upload folders as well by clicking the Plus Icon and following the same process as described above for single file upload.
Display Files and Folders in different Views
To display the files and folders in different views, do the following:
Step 1: In the Document Library page, click on the Display icon.
The Display option appear.
Step 2: Click on Cards option to view the Documents in card view.
Step 3: Similarly, click on List option to view the documents in list view.
Step 4: Click on Table option to view the documents in Table view.
Workflow 19 – Alerts and Announcement
Scenario 1 – To Manage Alerts & Announcements from Main Menu
The Product Owner will be allowed to Manage Alerts & Announcement in main menu.
Step 1: Login as a Product Owner.
Step 2: Enter the SAMi Portal URL in the browser.
Step 3: Enter the Email and the Password in the respective fields and click Login.
You will land on to the Product Owner Dashboard.
Step 4: The Product Owner will be able to Manage Alerts and Announcements by navigating and clicking Dashboard and then Alerts & Announcements option.
The Alerts & Announcements page appears.
In the Alerts & Announcements page, you will be able to see the list of Unread and Read Alerts and Announcements.
Add Alerts & Announcements
Step 1: The Product Owner will be able to Add Alerts by clicking Alerts option on the left navigation pane.
The Alerts message appears.
Step 2: To add Alert & Announcements, In the Alerts & Announcements page, click Add Alert button.
Step 3: You can fill the respective details all the fields in Entry page: Type, Product, Title, and Content.
Step 4: Click on Save to add an Alert.
The Product Owner will be able to see the successfully added Alert message.
Also, an email message is triggered to the Product Owner. As shown below.
Mark as Read
To mark an alert or announcement, navigate to an alter and click on 3 dots and then Mark as Read. When you click mark as read, the alert or announcement will go to Read.
Edit an Alert
Step 1: Product Owner able to edit an existing the Alert by clicking on 3 dots menu option and selecting Edit button.
Step 2: The Edit Alert & Announcements page appears.
Step 3: Make necessary changes to the Alert message.
Step 4: Click Save.
The Alert message is updated successfully. A success message appears stating, “Your request completed successfully”
Delete Alert
Step 1: Product Owner will be able to delete an existing the Alert by clicking on 3 dots option and selecting Delete button.
The Alert & Notifications page appears with an Alert Message.
The Alert Message prompt stating, “Are you sure you want to delete this? It will be deleted immediately.
Step 2: Click on OK button to confirm deletion. The Alert message is deleted successfully.
View Announcements
To view the announcements, the Product Owner will be able to select the Announcements tab on left navigation to view all the announcements listed on this page.
Step 1: Click on Announcements tab on left navigation pane.
The Announcements page appears with all the announcements listed.
Add Announcements
To add a new announcement on the Announcement page, select the Add Announcements button.
Step 1: Click Add Announcement
The Add Announcement page appears.
Step 2: In the Add Announcement the Product Owner is required to fill all the details – Type, Product, Title, Content
Step 3: Optionally, Click on Configuration to set user role specific alerts.
Step 4: Click Save to add the Announcement.
An Email Announcement Message is send to the Product Owner. As shown below.
Step 5: Click on Announcements tab on the left navigation pane to view the added announcements.
Edit Announcements
To edit the Product Owner will be able to edit Announcement by selecting the 3 dot menu and clicking Edit option.
Step 1: Select the 3 dot menu and click Edit option.
The Alerts & Announcements page opens.
Step 3: Make necessary changes to the Announcement message.
Step 4: Click Save.
The Announcement message is updated successfully. A success message appears stating, “Your request completed successfully.”
Delete Announcements
Step 1: Product Owner will be able to delete an existing the Alert by selecting the 3 dots menu option and clicking on Delete option.
The Alert & Notifications page appears with an Alert Message.
The Confirmation Message prompts stating, “Are you sure you want to delete this? It will be deleted immediately.
Step 2: Click on OK button to confirm deletion. The Alert message is deleted successfully.
Step 3: If you wish to abort deletion, click Cancel button.
Scenario 2 – To Manage Alerts & Announcements from Bell Icon
The Product Owner will be allowed to Manage Alerts & Announcement in main menu.
Step 1: Login as a Product Owner.
Step 2: Enter the SAMi Portal URL in the browser.
Step 4: Enter the Email and Password in the respective fields and click Login.
You will land on to the Product Owner Dashboard.
Step 3: The Product Owner will be able to view the most recent Alerts and Announcements by navigating and hovering on the Bell Icon.
Step 4: Hover on to the Bell icon, click on the First Announcement to go to the Announcements page and view the recent announcement.
The most recent announcement is displayed and followed by the next announcements.
Workflow 20 – Manage Rate Plans from PO Dashboard
The Product Owner will be allowed to Manage Rate Plan using the main menu.
Create A Rate Plan
Step 1: Login as a Product Owner.
Step 2: Enter the SAMi Portal URL in the browser.
Step 3: Enter the Email and Password in the respective fields and click Login.
You will land on to the Product Owner Dashboard.
Step 4: The Product Owner will be able to Manage Rate Plans click Manage Plan button on any card to create a rate plan for that product.
The Product Owner Dashboard with the list of Current Plans appears.
Step 5: Click on Create New.
The Overview – Configure Your Rate Plan page appears.
Step 6: In this page, to configure the rate plan, fill in the following:
- Enter the Rate Plan Name in the textbox provided.
- Select the Rate Plan Type from the dropdown as, Fees Only or Rate Card.
- Audience dropdown is by default set to Everyone, if any other applicable you may select it.
- The Start Date is by default set to the current date.
- Scroll down and toggle the “Has end date” button to right, this will enable the end date field.
- Enter the End Date in the textbox provided.
- The Currency field is by default set to $ USD, if any other currency available may change it.
- Set the Setup Fees by using the dropdown or entering manually, by default the fees is set to $ USD 30.
- The Early Termination Fees is 10 (If the subscriber wishes to terminate the subscription prior to the set date, $ 10 is applicable)
- The Contract Duration is set to 1 month, you can change it accordingly and also, allowed to change the duration from Day to Month to Year anytime.
- Set the Payment due within, by default it is set to 30 days.
- Set the Visible to Portals toggle button to right to enable it, if you wish to set the visibility of this rate plan for Portals.
Freemium – Optionally, if you select any Freemium, you need to provide the details like, Freemium Unit, Freemium Duration, Freemium Type in respective entry boxes.
Step 7: Click Publish.
A success message appears stating, “Plan created successfully”.
Navigate to Product Owner Dashboard, in Current Rate Plan page, you will view the newly created rate plan saved as Draft.
Note: If the Rate Plan is created first time, the Plan will be activated automatically.
Edit Rate Plan
To edit an existing rate plan, do the following:
Step 1: In Product Owner Dashboard, Click on Manage Plan button on any rate plan card.
The Current Plans page appear.
Step 2: In Current Plans, select a Rate Plan and click on Edit Icon.
The Configure your Rate Plan page is displayed.
Step 2: Make Necessary changes to the Rate Plan.
Step 3: Click on Edit Plan.
The existing rate plan is updated.
Delete a Rate Plan
To delete an existing rate plan, do the following:
Step 1: In Product Owner Dashboard, Click on Manage Plan button on any rate plan card.
The Current Plans page appear.
Step 2: In Current Plans, select a Rate Plan and click on Delete Icon.
A Delete confirmation dialog box appears stating, Are you sure to Delete the Plan?
Step 3: Click Ok to delete the plan.
The selected plan is deleted, and it will no longer be available in current plan page.
Step 4: Click Cancel, if you wish to abort the cancel operation.
Filter Rate Plans from Current Plan page
The Product Owner will be allowed to Filter Rate Plan in main menu.
Create A Rate Plan
Step 1: Login as a Product Owner.
Step 2: Enter the SAMi Portal URL in the browser.
Step 3: Enter the Email and Password in the respective fields and click Login.
You will land on to the Product Owner Dashboard.
Step 4: The Product Owner will be able to Manage Rate Plans by navigating and clicking Dashboard and then Product Owner Dashboard option.
Step 5: In the Product Owner Dashboard, click Manage Plan button on any card to filter the rate plans.
The Product Owner Dashboard with the list of Current Plans appears.
Filter by Plan: In this filter option the PO will be able to filter the plans based on Plan selection as Rate Cards or Fees Only option.
Filter by Status: In this filter option the PO will be able to filter the plans based on Status selection as Active, Expired or Draft option.
Filter by Provider: In this filter option the PO will be able to filter the plans based on Provider selection as Select All or a current provider.
Publishing a Rate Plan
Step 1: Login as a Product Owner.
Step 2: Enter the SAMi Portal URL in the browser.
Step 3: Enter the Email and Password in the respective fields and click Login.
You will land on to the Product Owner Dashboard.
Step 4: In the Product Owner Dashboard, click Manage Plan button on any card to filter the rate plans.
The Product Owner Dashboard with the list of Current Plans appears.
Step 5: In Current Plans page, click on the Publish Icon.
A confirmation message appears, “Are you sure to Publish the Plan.”
Step 6: Click Ok to publish the rate plan.
Note: If No Rate Plans are Active (Current Rate plan is Expired) it will be published. Otherwise, a message is displayed stating, “Active Rate Plan exists already. No more than one active rate plan at a time. Either expire active rate plan or wait until it expires on given end date”.
Expiring a Rate Plan
To expire a rate plan, the rate plan has to be active, the Product Owner can search a particular rate plan using the filter option and expire the selected rate plan.
Step 1: To expire an active rate plan navigate to Current Plan page.
Step 2: Search for an active rate plan as a PO, if you would like to expire it. Use the Filter By Status option to filter the rate plan as per Active status. Click Apply Filter button.
The Active rate plans appear in the Current Plan page.
Step 3: Click on Expire Plan Icon.
A confirmation message appears stating, “Are you sure to expire the Plan”.
Step 4: Click Ok to expire the plan.
Step 5: Click Cancel to abort expiring a plan.
Note: After Clicking the Expiring Plan, it will take 24Hours to Expire the Current Plan.
View User Metrics
The Product Owner can view the product related metrics from the Product Owner Dashboard. To view the metrics follow the procedure:
Step 1: Login as a Product Owner.
Step 2: Enter the SAMi Portal URL in the browser.
Step 3: Enter the Email and Password in the respective fields and click Login.
You will land on to the Product Owner Dashboard.
The Product owner will also be able to view the product Metrics from PO Dashboard.
Step 4: Clicks View Metrics.
The Product metrics page appears.
The Product metrics includes: No of Apps for the Product, Teams Subscribed, Developers Subscribed, and Product Rating.
Workflow 21 – My Rate Plans (Metrics)
To Manage Metrics from the Main Menu
The Product Owner will be allowed to Manage Rate Plan in main menu.
Step 1: Login as a Product Owner.
Step 2: Enter the SAMi Portal URL in the browser.
Step 3: Enter the Email and Password in the respective fields and click Login.
You will land on to the Product Owner Dashboard.
Step 4: The Product Owner will be able to View the Metrics (Billing Reports) by navigating and clicking Dashboard and then My Rate Plans option.
The Product Owner views the My Rate Plan page.
Step 5: The Product Owner will be able to view the list of My Rate Plans with Rate Plan Name, Rate Plan Start Date, Rate Plan End Date, Rate Org and Billing Reports.
Step 6: The Product Owner will be able to see the Billing Report of Rate Plans by clicking the Billing Reports button. The PO will be able to view the Plan Purchased details, Revenue Earned, Volume Bands, How many people purchased, and Rate Plan details.
Step 7: The Product Owner will be able to generate and view the Revenue Earned based on Year and Month by Clicking the Double arrow icon of Revenue Earned. A dropdown is displayed, the PO will also be able to select the Year and Month to see the Revenue Earned in that specific date range.
Step 8: The PO can be able to search a Rate Plan by entering a Valid Rate Plan in Search field and click on Search Icon.
The PO will be able to view the Search My Rate Plan details.
Step 9: The Product Owner will be able to see the Billing Report of Rate Plans by Clicking the Billing Reports button. PO can be able to see the Plan Purchased details, Revenue Earned, Volume Bands, how many Purchased, Rate Plan Details.
Step 10: The Product Owner will be able to generate and view the Metrics in the form of Revenue Earned by Year and Month by Clicking the Double arrow icon of Revenue Earned. The PO will be able to select the year and Month to see the Revenue Earned.
This report is not available as there is no data available.
Workflow 22 – My Subscription
Scenario 1 – To Manage My Subscription from Main Menu
The Product Owner will be allowed to manage My Subscription in main menu.
Step 1: Login as a Product Owner.
Step 2: Enter the SAMi Portal URL in the browser.
Step 3: Enter the Email and Password in the respective fields and click Login.
You will land on to the Product Owner Dashboard.
Step 4: The Product Owner will be able to Manage Rate Plans by navigating and clicking Dashboard and then My Subscriptions option.
Step 5: The PO will be able to view the list of My Subscribed Rate Plans with Active, Expired, Rate Plan Details, Cancel Subscription button and Add to Apps.
Step 6: The Product Owner will be able to Cancel the Subscription by Clicking on Cancel Subscription button.
The Product Owner will be able to view the Cancel Subscription as the Cancelled Subscription button is greyed out and the Add to App button is Not Visible.
Once the Rate Plan is Cancelled, the PO can be able to view the Cancel Subscription for the same Rate Plan in the Rate Plan Subscription Management Page.
Step 7: Go to the Main Menu and click on Rate Plan Subscription Manage Page. In the Rate Plan Subscription Manage Page, use the search option to search the Cancelled Rate Plan. You will receive the required searched Rate plan.
The Cancelled Subscription Rate plans appear.
Step 8: Pagination: Also, you will be able to search the Rate Plans, click on the pagination tabs to navigate and search all the rate plans.
The

icon denotes that the status of the Rate Plan as EXPIRED.
The

icon denotes that the status of the Rate Plan as ACTIVE.
Step 9: From My Subscription page, subscribe a Rate Plan by clicking on Add To App button (Subscribing a Product).
Step 10: Click on Add to App button to subscribe a Rate Plan. The Product Owner will be able to add all the details in the Apps page to Subscribe the Rate Plan – App Name, Team Name, Call Back URL, Description, and Custom Attributes.
Step 11: Clicks on Create An App.
A success message appears stating, you have successfully subscribed a rate plan to an App.
Step 12: The Product Owner will be able to view the Successfully Subscribed Rate Plan App in App Page – Click on App page > Select Team > Displays the App Created.
The App provides Consumer Key and Consumer Secret to access the app the first time.
Workflow 23 – Rate Plan Subscription Management
Scenario 1 – To Manage Rate Plan from the Main Menu
The Product Owner will be allowed to Manage Rate Plan Subscription in main menu.
Step 1: Login as a Product Owner.
Step 2: Enter the SAMi Portal URL in the browser.
Step 3: Enter the Email and Password in the respective fields and click Login.
You will land on to the Product Owner Dashboard.
Step 4: The Product Owner will be able to Cancel the Rate Plans by navigating and clicking the Dashboard and then Rate Plan Subscription Management option.
The Rate Plan Subscription Management page appears.
The Product Owner will be able to see the list of Rate Plan Subscriptions with App name with $ Symbol (Monetized), Rate Plan Name, Email, Active rate Plans, Expired rate Plans, Rate Plan Status, Operations (Cancel Subscription)
Step 5: PO can be able to Search an App by entering a Valid App Name in the Search field and clicking the Search icon.
The Product Owner will be able to see the relevant Searched App displayed.
Step 6: The Product Owner will be able to Filter by Rate Plan Status and Rate Plan Name by selecting the Filter option on the left pane.
Step 7: The Product Owner will be able to see Expired Rate Plans Filtered by Clicking the Filter Option Rate Plan Status as ‘Expired’.
Step 8: The Product Owner will be able to see Active Rate Plans Filtered by Clicking the Filter Option Rate Plan Status as ‘Active’.
Step 9: The Product Owner will be able to Filter Active rate Plan with Rate Plan Name.
Step 10: The Product Owner will be able to filter the Rate Plans with Multiple Filter Options provided in the left pane.
Step 11: Pagination: The Product Owner will be able to navigate to different pages using the pagination option at the bottom of the page.
Step 12: The Product Owner will be able to Cancel the Subscription by clicking the Cancel Subscription button on the Operations Option.
Step 13: The Product Owner will be able to see the Successful Cancelled Subscription Message and Disabled Cancelled Subscription button with Grey Color.
The Product Owner will be able to see the Cancelled Subscription in My Subscription Rate Plan Page also.
Workflow 24 – Manage Approvals
The manage approvals process requires the PO to approve his/her apps and those apps request that are initiated by the subscriber needs PO approval. When the approval is complete, the PO or the subscriber will be able to view the approved app on the Apps page.
Scenario 1 – To Manage Approvals from the Main Menu
The Product Owner will be allowed to Manage Approvals in main menu.
Step 1: Login as a Product Owner.
Step 2: Enter the SAMi Portal URL in the browser.
Step 3: Enter the Email and Password in the respective fields and click Login.
You will land on to the Product Owner Dashboard.
Step 4: The Product Owner will be able to Manage Rate Plans by navigating and clicking the Dashboard and then Manage Approvals option.
Step 5: The Product Owner will be able to see the list of Apps with App name, Product, Email/Team Name, Product Status, Operations.
*Note: These approval requests are received by PO from developers and other user roles.
In Manage Approvals page, the Product Owner will be able to Filter Apps by Product Status, Groups and Product Name using the respective checkboxes in the left pane.
Filter by Pending Status: In Manage Approvals page, the Product Owner will be able to Filter Apps by Product Status as, ‘Pending’ by selecting Product Status checkbox.
Filter by Approved Status: In Manage Approvals page, the Product Owner will be able to Filter Apps by Product Status as, ‘Approved’ by selecting the Product Status checkbox.
Filter by Groups: In Manage Approvals page, the Product Owner will be able to Filter Apps by Product Status as, ‘Groups’ by selecting the Groups checkbox.
Filter by Product Name: In Manage Approvals page, the Product Owner will be able to Filter Apps by Product Status as, ‘Product Name’ by selecting any Product Name checkbox.
Search App by Available Filters: The Product Owner will be able to Search an App by entering the App name in the search field and clicking on Search option.
The Product Owner will be able to See the Searched Apps with the relevant names are displayed.
Approval of App by Product Owner
The product owner will be able to approve an app, when a request has been raised through email by a Subscriber or PO when subscribing a Manual Product.
Step 1: To approve an app, the PO will search for the App by using the App name in the search filter and searching it. Once the App is found, the PO can approve or revoke it.
Step 2: The Product Owner will be able to Approve the Subscription by clicking the Approve button in Operation Option.
The Product owner will be able to see the “Successfully Updated Status. Will be Updated Soon” message, and Subscriber/PO to get an Email notification for Subscription Approval.
Approval Email is sent to the Product Owner.
After approval the app will be displayed with the Product Status as ‘Approved’.
Step 3: The Product Owner will be able to revoke the subscription by clicking the Revoke button in Operation Option.
The Product Owner will be able to see the Successful Revoke Message and Developer/PO to get an Email notification for Subscription revoked.
In Manage Approvals page, The Product Owner will be able to view the App as ‘Revoked’ in the Product Status.
Step 4: The Product Owner will be able to Copy the Consumer Key by clicking the Copy Icon on the Key option.
Workflow 25 – Manage Apps
Scenario 1 – To Manage Apps from the main menu.
The Product Owner will be allowed to manage the subscription of non-monetized products from Explore page by searching the product.
Step 1: Login as a Product Owner.
Step 2: Enter the SAMi Portal URL in the browser.
Step 3: Enter the Email and Password in the respective fields and click Login.
You will land on to the Product Owner Dashboard.
Step 3: The PO will be able to navigate to Product Owner Dashboard page and clicks on Apps in Main menu.
The Product Owner will land on to the Apps page.
Step 4: In the Apps page, select any one of the Team using the Select Team dropdown list.
Step 5: Click on My Subscription tab to manage the app.
Step 6: The PO will be able to manage subscription of the app.
Step 7: In My Subscriptions:
- The Product Owner can remove the subscription of an app from my subscription tab by clicking on Delete icon.
- Also, the Product Owner will be able to redirect to the product page by clicking on the product title here it is, “ICICI Digital Product”.
Step 8: Click on Manage tab to update the App.
In Manage tab, the app details appear. Here the PO is allowed to update the app details.
If the PO wishes to update the App, may do necessary changes to the app details.
Step 9: Clicks Update button.
The App is updated successfully, and a success message appears.
Note: Please wait while the app details will take 3-4 minutes to get reflected.
Step 10: In Manage tab, the PO will be able to perform these operations:
- Product Owner will be able to update the App Call-back URL, Description, and status of an App.
- Update the existing App name, URL, description, status of an app from the Manage app.
- Add Custom Attributes to the app by clicking the Add button.
- Delete the App by clicking on Delete button.
Search the App by Filtering
The Product Owner will be able to search an app by navigating to Apps page from the Product Owner Dashboard.
Step 1: Navigate to Apps page by clicking on Apps menu from Product Owner Dashboard.
Step 2: To search for an app, use the Filtering options by entering the App name in the field and clicking on Search icon.
The relevant App is displayed with App info.
Scenario 2 – To manage apps from the Explore page.
The Product Owner will be allowed to manage the subscription of non-monetized products from Explore page by searching the product.
Step 1: Login as a Product Owner.
Step 2: Enter the SAMi Portal URL in the browser.
Step 3: Enter the Email and Password in the respective fields and click Login.
You will land on to the Product Owner Dashboard.
Step 4: The PO clicks on Explore in the main menu.
The PO will land on to Explore page.
Step 5: Searches the product by entering product name in the search field and clicks Search Icon.
The searched results appear.
Step 6: Click on Read More.
Step 7: The PO will land on to product details, selects the SKU to subscribe radio buttons. Once the Select the SKU radio buttons are clicked then the Subscribe button is viewed as Active.
Step 8: Click on Subscribe button.
The PO will be redirected to Apps page.
Step 9: Clicks on Create App button.
Step 10: The PO will be able to fill the mandatory fields and click on Create An App button.
A success message appears. The App is created successfully,
Step 11: Selects the Team name from the drop down, to view the apps.
Step 12: In Search field selects related app team and then the PO will be able to view created app.
Step 13: View My Subscriptions to manage the app.
Remove Subscription: The Product Owner will be able to remove the subscription of an app from My Subscription tab by clicking on Delete icon.
Also, the Product Owner will be able to redirect to the product page by clicking on the product title, here it is, “Manual Product”.
Step 14: Clicks on Manage tab to update the App.
Step 15: In the Manage tab, the PO will be able to perform these operations:
- The Product Owner will be able to update the App Call-back URL, Description, and status of an App
- Allowed to Manage the existing App name, URL, description, status of an app from the Manage tab.
- Also, able to delete the App from the Manage tab by clicking on Delete button. Note: Deleting the app will also remove the app subscription.
Workflow 26 – Manage My Teams
The Manage My Teams helps the Product Owner to create a team, search teams, invite a developer, or non-developer to the team in the SAMi API portal, and at the same time also has the capability to delete any existing team from the portal.
Scenario 1 – To Manage My Teams from the Main Menu.
The Product Owner will be allowed to manage the Teams from My Teams menu.
The Product Owner will be allowed to manage the subscription of non-monetized products from Explore page by searching the product.
Step 1: Login as a Product Owner.
Step 2: Enter the SAMi Portal URL in the browser.
Step 3: Enter the Email and Password in the respective fields and click Login.
You will land on to the Product Owner Dashboard.
Step 4: In the Product Owner Dashboard, the PO clicks on My Teams on main menu to visit the My Teams page.
Step 5: The PO will land on to My Teams page, select the Team from the available list of Teams.
These are the operations the PO will be able to perform on My Teams Page:
- Invite a Developer to the Team
- Developer List
- Owner List
Invite an Existing Developer or PO to the Team
Step 1: To invite a developer to Explore the Product, the PO will select a team from the available list of teams by clicking on a Team.
The TechDocTeam is expands for the PO to invite developers by providing some details.
Step 2: The invite tab is enabled, enter Email address and select the Role form the dropdown.
Step 3: Click Invite.
Note: Only the Team Developer, Team Owner of the company is invited by the Product Owner to access his/her team.
A success message appears and in email invitation is sent to the invitee.
Step 4: The PO when selects the Members tab, under Members tab, the Team Developer will be able to view the team members email addresses and role.
Invite a Non-Existing Developer or PO to the Team
To invite a non-existing developer or PO to the team, follow the procedure:
Step 1: To invite a developer to Explore the Product, the PO will select a team from the available list of teams by clicking on a Team.
Note: Before going ahead and inviting a non-developer in the Teams page, create a team by name ‘NonDeveloper’.
The Cloud Team is opened.
Step 2: Under the Invite tab, enter the Email address of a non-existing developer.
Step 3: Click Invite.
A confirmation message appears. An invitation email is sent successfully to a non-existing developer.
The email invitation will be received by the Non-Developer.
Navigate to My Teams page to view the approval status.
Note: You have to wait for 3-4 minutes before it to appears in My Teams page.
The invited Developer now can Register to SAMi Portal to Sign up and Explore the Products.
Create Team
Step 1: In My Teams page, the PO clicks on Create Team to create a new team.
*Note: If the PO wishes, can delete the team member who’ve been just invited by clicking on Delete button.
Step 2: Enter a Team name and click on the Create Team button to create a new team.
A success message appears. The Team is created successfully.
Search a Team
To search a Team from Home page, do the following:
1. From Home page, click on My Teams in the main menu.
The My Teams page appears.
In My Teams page, search a Team name by entering the Team name in the search field and press Enter.
All the relevant Team names appears in My Teams page.
Filter Teams by Roles
As a PO, you will be able to search the Teams using the Roles by checking Roles checkboxes.
1. In Home page, click on My Teams menu.
The My Teams page appears listing all the available teams.
2. Enter the Team name in the Search field and click to select the Roles checkboxes to filter the teams.
All the relevant teams will be displayed in My Teams page.
Workflow 27 – Manage Developer Dashboard
Scenario 1 – To Manage Developer Dashboard from Main menu
The Product Owner will be allowed to manage the Developer Dashboard from the SAMi Portal’s main menu. The Developer Dashboard helps the PO to view the product categories by selecting the monetized, non-monetized, and All options.
Step 1: Login as a Product Owner.
Step 2: Enter the SAMi Portal URL in the browser.
Step 3: Enter the Email and Password in the respective fields and click Login.
You will land on to the Product Owner Dashboard.
Step 3: The Product Owner will navigate from Dashboard to Developer Dashboard in menu.
The Product Owner will land on to the Developer Dashboard. And the PO will be able to view all the Subscribed products for Monetized and Non-Monetized.
Step 4: In Developer Dashboard, the Product Owner will be able to view the Search bar and can search the products.
The Product Owner will be able to view the searched product result.
Step 5: In My Subscribed Products, the Product Owner will be able View products using the drop-down options:
- All (by default, it will be set to All, will be able to view all products)
- Monetized
- Non-Monetized products
Step 6: Product Owner will be able to view the Monetized products by selecting Monetized option using the View dropdown.
Step 7: Product Owner will be able to view the Non-Monetized products by selecting Non-Monetized option using the View dropdown.
Workflow 28 – Publisher Hub
Scenario 1 – To Publisher Hub from the main menu
The Product Owner will be allowed to manage the Publisher Hub from main menu.
Step 1: Login as a Product Owner.
Step 2: Enter the SAMi Portal URL in the browser.
Step 3: Enter the Email and Password in the respective fields and click Login.
You will land on to the Product Owner Dashboard.
Step 4: The Product Owner will navigate from Dashboard to Publisher Hub in menu.
Step 5: Product Owner will land on to the Publisher Hub page.
Step 6: The Product Owner will be able to search the existing provider groups using the search field. Upon search all the relevant provider groups are listed.
Add Provider Group
To add a provider group, do the following:
Step 1: Search a provider group using the search field. The Add Provider Group button appears.
Step 2: Click Add Provider Group.
The Onboard API Provider Group page appears.
Step 3: In the Onboard API Provider Group, select and fill in the required information:
- Name – enter the name in the textbox.
- Group Owner – enter the Group Owner Email address in the textbox.
- Gateway – Select the Gateway from the list of available options.
- Environment – Select the Environment from the available list options. If you wish to add a new Environment, click on the + icon and enter the details to add.
- Alias/Deployment target – enter the Alias or Deployment target in the textbox.
Step 4: Click Submit.
A success message appears, the API Provider Group is successfully onboarded.
Edit Provider Group
To edit the provider group, follow the process:
Step 1: Product Owner will be able to Update the API Provider Groups and click on Edit icon.
The Provider Group Update page appears.
Step 2: Make necessary changes to the selected Provider Group.
Step 3: Click Update, to update the provider group.
A success message appears. The Provider group is updated successfully.
Onboard a SKUs/Service
The Product Owner will be able to onboard SKUs/Services after searching a product or service group using the search operation.
Step 1: Search a group by entering the keywords/service name in the search field.
Step 2: The Product Owner will be able to search a group. Clicks on Group Name.
The View API provider group page appears.
Step 3: In the View API Provider Group, click on View SKUs/Services button.
Step 4: The PO clicks on Onboard SKU/Services button.
Step 5: Product Owner will be able to Onboard an SKUs or service by entering the required details:
- Enters the Display Name in the textbox provided.
- Selects the Alias/Deployment target from the available list of deployment types like dev, production etc.
- Selects the Options like, Security, Quota, and any other optional button selections are enabled.
Step 6: Clicks on Add Resource button.
Step 7: Clicks on Resource 1:
The Resource 1 screen expands for the PO to enter the required details.
Step 8: Product Owner enters the Path in the textbox provided.
Step 9: Selects the Method from the available list of like, Get, Post, Put, Delete etc. based on the requirement.
Step 10: Enters the Destination URL in the respective field.
Step 11: Selects the Security Type from the available list like, OAUTH2, API-KEY etc.
Note: When you choose the OAUTH2, you need to provide the API Key, API Secret, Token Endpoint. Similarly, when you select API-KEY, you need to provide information like API Key.
Step 12: Click Submit.
The SKU/Service is onboarded, and a success message appears.
Inviting a Group Owner
To invite a Group Owner, you need to navigate to Publisher Hub from main menu and update the existing group owner and add a new group owner.
1. Click on Dashboard and the Publisher Hub option on main menu.
The Publisher Hub page appears with the list of Group Owners.
2. Click on Edit icon, by selecting a Group Owner from the list.
The Provider Group page opens.
3. Click on the + icon besides the Group Owner to expand.
The Group Owner field appears for you to invite a new Group Owner.
*Note: A Group Owner is allowed to invite an API Provider, but the API provider cannot invite a Group Owner.
4. Enter the Email of the Group Owner to invite.
5. Click on Update button.
A success message appears stating, “Provider Group has been updated successfully…”
Once you’ve invited Group Owner you will be diverted to Publisher Hub and there the new Group Owner is displayed.
Note: The Group Owner can Invite other Group Owners and API Provider. He cannot create a New Group.
Inviting API Provider
To invite an API Provider, you need to navigate to Publisher Hub from main menu and update the existing API Provider and add a new API Provider.
1. Click on Dashboard and the Publisher Hub option on main menu.
The Publisher Hub page appears with the list of Group Owners.
2. Click on Edit icon, by selecting a Group Owner from the list.
The Provider Group page opens.
3. Click on the + icon besides the API Publisher to expand.
The Provider Group page opens.
4. Enter the Email of the API Publisher to invite.
5. Click on Update button.
A success message appears stating, “Provider Group has been updated successfully…”
Once you’ve invited API Provider you will be diverted to Publisher Hub and there the new API Provider is displayed.
*Note: The API Provider cannot invite the other API Provider or Group Owner. He can be able to Use the SKU.
Workflow 29 – SAMi Support
The SAMi Support topics are the important help documents that can be accessed from SAMi API Marketplace Portal. The PO can access these documents as self-help guides to follow and perform specific functions at the SAMi Portal.
The Product Owner will be allowed to get support from All pages of SAMi Portal. By navigating to the Help icon on Home page and any other SAMi Portal page, the PO will be able to view the SAMi support pages.
Access SAMi Support
To access SAMi Support follow the process:
Step 1: Login as a Product Owner.
Step 2: Enter the SAMi Portal URL in the browser.
Step 3: Enter the Email and Password in the respective fields and click Login.
You will land on to the Product Owner Dashboard.
Step 4: Clicks on Home page icon on the main menu.
The PO will land onto the Home page.
Step 5: In Home page, the PO clicks on the (?) Support Icon.
The PO will be able to view a window expanding with a list of support documents (Learn More/ How to:). The PO will be able to open and view any of these specific documents for understanding specific features of SAMi and perform relevant operations.
Search Help Topics
The PO will be able to search specific topics by using the Support Search field and accessing a specific help topic.
Step 1: Enters the Help Topic in the search field.
Step 2: Clicks on Search icon.
The relevant help topics appear in the Support Window to open and view.
PO can be able to Navigate quickly the links provided in Learn more/How to:
- Create a Product
- Community Help Topics
- Manage Rate Plans
- Update a Product
For instance, if the PO clicks on Create a Product Help link. The PO will be redirected to the https://www.mysami.io/documentation/create-a-product/ website page with the Create a Product Document opened.
Note: Similarly, click on any of the SAMi Support Help topics from any of the main pages of SAMi API Marketplace portal to open and view the documents in https://www.mysami.io
Workflow 30 – Inviting Friends
Scenario 1 – To Manage Inviting Friends from Home Page
To Invite a friend to SAMi API Marketplace Portal, the PO needs to perform the following:
Step 1: The PO Create the friend’s account by going to Sign Up page and provide all the required information. When the friend’s account is created the PO will be able to invite the friend (Developer) to SAMi Portal.
An email message is sent to the Friend, to create a password for sign-in to SAMi portal.
Step 2: Login as a Product Owner.
Step 3: Enter the SAMi Portal URL in the browser.
Step 4: Enter the Email and Password in the respective fields and click Login.
You will land on to the Product Owner Dashboard.
Step 5: Clicks on Home page icon on the main menu.
The PO will land on to the Home page.
Step 6: In Home page, the PO needs to scroll down to navigate to Invite Friends option.
Step 7: In the Invite Friends section, the PO needs to enter the Email address of the friend, whom he would like to invite to SAMi API Marketplace portal.
Step 8: Clicks Invite Users.
A success message appears. The Invitation is sent to the friend successfully.
In the Your Current Invites section, the PO needs to scroll down to view the Invitee status as ‘Accepted’.
*Note: If the Invitee (Friend’s) account is not created earlier in SAMi portal, the status of invitee will remain as ‘Pending’. Once the approval gets from Admin the status shown as Accepted and an Email has sent to the Invited Friend with Set password Link.
After, successfully creating the password for SAMi, the Friend will be able to access SAMi Portal and join as a Developer.
Workflow 31: Publisher Quick Links
The PO will be able to access the major features using the quick links. The quick links will serve as a Publisher Toolbox to perform specific operations.
Scenario 1: SAMi Publisher Quick links from Explore Page
The PO will be able to access the major features using the quick links from Explore page.
To access the Publisher Quick Links, follow the procedure:
Step 1: Login as a Product Owner.
Step 2: Enter the SAMi Portal URL in the browser.
Step 3: Enter the Email and Password in the respective fields and click Login.
You will land on to the Product Owner Dashboard.
Step 4: Clicks on Explore option on the main menu.
The PO will land onto the Explore page.
- In Explore page, click on Manage Assets link to navigate to the Manage Assets page.
- In Explore page, click on Manage Product Approvals link to navigate to the Manage Approvals page.
- In Explore page, click on Manage Rate Plans link to navigate to the Manage Rate Plans page.
Similarly, in Explore page, click on Show All Services > link to navigate to all the other Publisher Services.